Installation Manual
Page 2
PAM-200 Table of Contents Parts List ...- 3 Installation Tools ...- 3 Features ...- 4 Selecting the Proper Mounting Hardware...- 4 Attaching the Mount ...- 5 Optional Hardware...- 5 Ceiling Installation...- 6 Height Adjustment ...- 6 Safety Warning ...- 7 Concrete Mounting ...- 7 Technical Specifications ...- 7 Warranty ...- 8 Contact Sony Electronics...- 8 Warning Statements ...- 8 - Installation Manual Page - 2 -
PAM-200 Table of Contents Parts List ...- 3 Installation Tools ...- 3 Features ...- 4 Selecting the Proper Mounting Hardware...- 4 Attaching the Mount ...- 5 Optional Hardware...- 5 Ceiling Installation...- 6 Height Adjustment ...- 6 Safety Warning ...- 7 Concrete Mounting ...- 7 Technical Specifications ...- 7 Warranty ...- 8 Contact Sony Electronics...- 8 Warning Statements ...- 8 - Installation Manual Page - 2 -
Installation Manual
Page 3
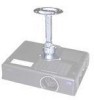
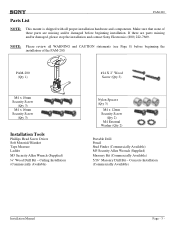
... (Commercially Available) Installation Manual Page - 3 - NOTE: Please review all proper installation hardware and components. PAM-200 Parts List NOTE: This mount is shipped with all WARNING and CAUTION statements (see Page 8) before beginning the installation of these parts are... and contact Sony Electronics (800) 222-7669. PAM-200 (Qty 1) M4 x 10mm Security Screw (Qty 3) M4 x 16mm Security Screw (Qty 3) Installation Tools Phillips Head Screw Driver Soft Material/ Blanket Tape Measure Ladder M3 Security Allen Wrench (Supplied) ¼" Wood Drill Bit - Ceiling Installation (Commercially...
... (Commercially Available) Installation Manual Page - 3 - NOTE: Please review all proper installation hardware and components. PAM-200 Parts List NOTE: This mount is shipped with all WARNING and CAUTION statements (see Page 8) before beginning the installation of these parts are... and contact Sony Electronics (800) 222-7669. PAM-200 (Qty 1) M4 x 10mm Security Screw (Qty 3) M4 x 16mm Security Screw (Qty 3) Installation Tools Phillips Head Screw Driver Soft Material/ Blanket Tape Measure Ladder M3 Security Allen Wrench (Supplied) ¼" Wood Drill Bit - Ceiling Installation (Commercially...
Installation Manual
Page 4
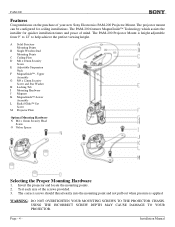
... MagnaGuide™ Technology which assists the installer for ceiling installations. Test each size of your new Sony Electronics PAM-200 Projector Mount. Installation Manual Upper Assembly G M4 x 12mm Security Screw and Star Washer H Locking Tab I Mounting Hardware J Magnets K MagnaGuide™-Lower Assembly L Radial Glide™ Set Screw M Projector Plate Optional Mounting Hardware N M4 x 12mm Security Head Screw O Nylon Spacer...
... MagnaGuide™ Technology which assists the installer for ceiling installations. Test each size of your new Sony Electronics PAM-200 Projector Mount. Installation Manual Upper Assembly G M4 x 12mm Security Screw and Star Washer H Locking Tab I Mounting Hardware J Magnets K MagnaGuide™-Lower Assembly L Radial Glide™ Set Screw M Projector Plate Optional Mounting Hardware N M4 x 12mm Security Head Screw O Nylon Spacer...
Installation Manual
Page 6
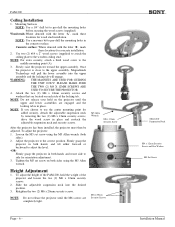
...ceiling plate to use the center mounting point for wood stud installation. NOTE: If you choose to the wooden ceiling stud. Loosen the M5 set screw on the projector until the M6 screws are located on each side of the projector and loosen the two (2) M6 x 12mm security screws. 2. To adjust the height of the PAM-200..., hold on both sides). 2. NOTE: Do not release the projector until the upper and lower assemblies are engaged and the locking tab is close to the correct position. PAM-200 Ceiling Installation 1. Wood studs: Where denoted with...
...ceiling plate to use the center mounting point for wood stud installation. NOTE: If you choose to the wooden ceiling stud. Loosen the M5 set screw on the projector until the M6 screws are located on each side of the projector and loosen the two (2) M6 x 12mm security screws. 2. To adjust the height of the PAM-200..., hold on both sides). 2. NOTE: Do not release the projector until the upper and lower assemblies are engaged and the locking tab is close to the correct position. PAM-200 Ceiling Installation 1. Wood studs: Where denoted with...
Installation Manual
Page 7
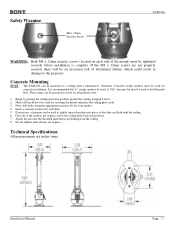
...used for your local hardware store. 1. Once all nuts are in place, move the ceiling plate back into place so that they are flush with a minimum 6" thickness. Concrete Mounting NOTE: The PAM-200 can be purchased at your anchor. 4. These items can be used to drill the...to the projector. If the M4 x 12mm screws are not properly secured, there will be tightened securely before installation is complete. Next, drill holes using the appropriate masonry bit for securing the mount and place the ceiling plate aside. 3. Safety Warning M4 x 12mm Security Screw PAM-200 WARNING: ...
...used for your local hardware store. 1. Once all nuts are in place, move the ceiling plate back into place so that they are flush with a minimum 6" thickness. Concrete Mounting NOTE: The PAM-200 can be purchased at your anchor. 4. These items can be used to drill the...to the projector. If the M4 x 12mm screws are not properly secured, there will be tightened securely before installation is complete. Next, drill holes using the appropriate masonry bit for securing the mount and place the ceiling plate aside. 3. Safety Warning M4 x 12mm Security Screw PAM-200 WARNING: ...

Installation Manual
Page 8
...THE INSTALLATION OF THIS PRODUCT, THE INSTALLATION INSTRUCTIONS SHOULD BE READ AND COMPLETELY UNDERSTOOD. IF NOT, THE CEILING STRUCTURE MUST BE REINFORCED. PROPER INSTALLATION PROCEDURE BY A QUALIFIED SERVICE TECHNICIAN, AS OUTLINED IN THE INSTALLATION INSTRUCTIONS...projector and/or damage to the mounting surface. WARNING: SAFETY MEASURES MUST BE PRACTICED AT ALL TIMES DURING THE INSTALLATION OF THIS PRODUCT. Sony is not liable for improper installation that is to be taken at all times. Do not install on a structure that results in materials and workmanship. PAM-200...
...THE INSTALLATION OF THIS PRODUCT, THE INSTALLATION INSTRUCTIONS SHOULD BE READ AND COMPLETELY UNDERSTOOD. IF NOT, THE CEILING STRUCTURE MUST BE REINFORCED. PROPER INSTALLATION PROCEDURE BY A QUALIFIED SERVICE TECHNICIAN, AS OUTLINED IN THE INSTALLATION INSTRUCTIONS...projector and/or damage to the mounting surface. WARNING: SAFETY MEASURES MUST BE PRACTICED AT ALL TIMES DURING THE INSTALLATION OF THIS PRODUCT. Sony is not liable for improper installation that is to be taken at all times. Do not install on a structure that results in materials and workmanship. PAM-200...

