Handbook
Page 1
4-423-275-11(1) Interchangeable Lens Digital Camera α Handbook Table of contents Sample photo Menu Index NEX-F3 GB © 2012 Sony Corporation
4-423-275-11(1) Interchangeable Lens Digital Camera α Handbook Table of contents Sample photo Menu Index NEX-F3 GB © 2012 Sony Corporation

Handbook
Page 12
... A Flash B ON/OFF (Power) switch C Shutter button (27) D AF illuminator/Self-timer lamp/Smile Shutter lamp E Lens release button F Image sensor position mark (66) G Smart Accessory Terminal 2 1) H Microphone 2) 12GB Continued r Table of contents Sample photo ...Identifying parts When the lens is removed I Lens J Mount K Image sensor 3) L Lens contacts 3) M (flash pop-up) button (65) N (Playback) button (29) O MOVIE button (27) P Soft key A (20) Q Soft ...
... A Flash B ON/OFF (Power) switch C Shutter button (27) D AF illuminator/Self-timer lamp/Smile Shutter lamp E Lens release button F Image sensor position mark (66) G Smart Accessory Terminal 2 1) H Microphone 2) 12GB Continued r Table of contents Sample photo ...Identifying parts When the lens is removed I Lens J Mount K Image sensor 3) L Lens contacts 3) M (flash pop-up) button (65) N (Playback) button (29) O MOVIE button (27) P Soft key A (20) Q Soft ...

Handbook
Page 14
Table of contents Sample photo Menu Index Lens E18 - 55 mm F3.5-5.6 OSS (supplied with NEX-F3D) A Converter index* B Focusing ring C Lens contacts** D Mounting index * A converter is sold separately. ** Do not touch this part directly. E16 mm F2.8 (supplied with NEX-F3D/F3K/F3Y) A Hood index B Focusing ring C Zoom ring D Focal-length scale E Focal-length index F Lens contacts* G Mounting index * Do not touch this part directly. 14GB Continued r
Table of contents Sample photo Menu Index Lens E18 - 55 mm F3.5-5.6 OSS (supplied with NEX-F3D) A Converter index* B Focusing ring C Lens contacts** D Mounting index * A converter is sold separately. ** Do not touch this part directly. E16 mm F2.8 (supplied with NEX-F3D/F3K/F3Y) A Hood index B Focusing ring C Zoom ring D Focal-length scale E Focal-length index F Lens contacts* G Mounting index * Do not touch this part directly. 14GB Continued r

Handbook
Page 15
E55 - 210 mm F4.5-6.3 OSS (supplied with NEX-F3Y) Table of contents Sample photo Menu Index A Focusing ring B Zoom ring C Focal-length scale D Focal-length index E Lens contacts* F Mounting index * Do not touch this part directly. 15GB
E55 - 210 mm F4.5-6.3 OSS (supplied with NEX-F3Y) Table of contents Sample photo Menu Index A Focusing ring B Zoom ring C Focal-length scale D Focal-length index E Lens contacts* F Mounting index * Do not touch this part directly. 15GB
Handbook
Page 25
...use autofocus when you look through an Electronic Viewfinder (sold separately). Sets the level of contents Selects the color of color reproduction. Lens Comp.: Distortion Face Priority Tracking Movie Audio Rec Wind Noise Reduct. Displays an enlarged image when focusing manually. Sets camera shake ...shot continuously in an expanded form. MF Assist MF Assist Time Color Space SteadyShot Release w/o Lens Eye-Start AF Front Curtain Shutter Long Exposure NR High ISO NR Lens Comp.: Shading Lens Comp.: Chro. Sets whether to the power save all the images that face during movie...
...use autofocus when you look through an Electronic Viewfinder (sold separately). Sets the level of contents Selects the color of color reproduction. Lens Comp.: Distortion Face Priority Tracking Movie Audio Rec Wind Noise Reduct. Displays an enlarged image when focusing manually. Sets camera shake ...shot continuously in an expanded form. MF Assist MF Assist Time Color Space SteadyShot Release w/o Lens Eye-Start AF Front Curtain Shutter Long Exposure NR High ISO NR Lens Comp.: Shading Lens Comp.: Chro. Sets whether to the power save all the images that face during movie...
Handbook
Page 26
Table of the camera and the lens/mount adaptor. CTRL FOR HDMI Sets whether or not to display the demonstration with a "BRAVIA" Sync compatible TV's Remote Control. Demo Mode Sets whether or ...
Table of the camera and the lens/mount adaptor. CTRL FOR HDMI Sets whether or not to display the demonstration with a "BRAVIA" Sync compatible TV's Remote Control. Demo Mode Sets whether or ...

Handbook
Page 32
... [Intelligent Auto] or [Superior Auto], select . Selects the desired effect filter for shooting. Notes • The Photo Creativity function is only available when an E-mount lens is mounted. • The Photo Creativity function is only available when [Shoot Mode] is set to [Intelligent Auto] or [Superior Auto], or is activated, the...
... [Intelligent Auto] or [Superior Auto], select . Selects the desired effect filter for shooting. Notes • The Photo Creativity function is only available when an E-mount lens is mounted. • The Photo Creativity function is only available when [Shoot Mode] is set to [Intelligent Auto] or [Superior Auto], or is activated, the...

Handbook
Page 33
... closer to make the subject stand out, while checking the defocusing effect on the distance from the subject or the lens used. Notes • The defocusing range available depends on the lens used. • The defocusing effect may not be noticeable, depending on the LCD screen. You can record a movie with a value...
... closer to make the subject stand out, while checking the defocusing effect on the distance from the subject or the lens used. Notes • The defocusing range available depends on the lens used. • The defocusing effect may not be noticeable, depending on the LCD screen. You can record a movie with a value...

Handbook
Page 45
... speed of continuous shooting may be slower, depending on the control wheel t [Spd Priority Cont.]. Menu Index 45GB Shooting] (at a rate faster than that of [Lens Comp.: Distortion]). You can continuously shoot at a maximum of about 5.5 images per second). 1 (Drive Mode) on shooting conditions (Image size, ISO setting, High ISO NR...
... speed of continuous shooting may be slower, depending on the control wheel t [Spd Priority Cont.]. Menu Index 45GB Shooting] (at a rate faster than that of [Lens Comp.: Distortion]). You can continuously shoot at a maximum of about 5.5 images per second). 1 (Drive Mode) on shooting conditions (Image size, ISO setting, High ISO NR...

Handbook
Page 54
...-held Twilight] when shooting: - Subjects that are taken, and image processing is less effective even in -focus range, refer to the minimum distance of the lens attached to the camera. - Menu Index 54GB Subjects with a repeating pattern such as waves or water falls. • In the case of shots are too...
...-held Twilight] when shooting: - Subjects that are taken, and image processing is less effective even in -focus range, refer to the minimum distance of the lens attached to the camera. - Menu Index 54GB Subjects with a repeating pattern such as waves or water falls. • In the case of shots are too...

Handbook
Page 57
.... • Determine the scene and press the shutter button halfway, so that the section is in the same direction as possible • When using a zoom lens, it is recommended that you can select the image size by selecting MENU t [Image Size] t [Panorama Direction].
.... • Determine the scene and press the shutter button halfway, so that the section is in the same direction as possible • When using a zoom lens, it is recommended that you can select the image size by selecting MENU t [Image Size] t [Panorama Direction].
Handbook
Page 58
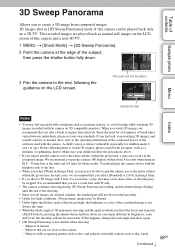
...the precautions above. • If you cannot pan the camera across the entire subject within about 8 seconds when using an E18 - 55 mm lens at the edge of the subject, then press the shutter button fully down are stitched together, the stitched part will not be successful. Sample ...photo 3 Pan the camera to watch 3D images, we recommend that you use a zoom lens with W side. • The camera continues shooting during [3D Sweep Panorama] recording, and the shutter keeps clicking until the end of the shooting. ...
...the precautions above. • If you cannot pan the camera across the entire subject within about 8 seconds when using an E18 - 55 mm lens at the edge of the subject, then press the shutter button fully down are stitched together, the stitched part will not be successful. Sample ...photo 3 Pan the camera to watch 3D images, we recommend that you use a zoom lens with W side. • The camera continues shooting during [3D Sweep Panorama] recording, and the shutter keeps clicking until the end of the shooting. ...
Handbook
Page 59
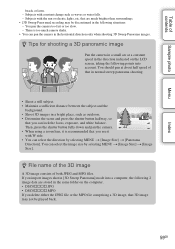
... Size]. You pan the camera too fast or too slow. - Then, press the shutter button fully down and pan the camera. • When using a zoom lens, it is too much brighter than surroundings. • [3D Sweep Panorama] recording may not be discontinued in the following points into account. You should pan...
... Size]. You pan the camera too fast or too slow. - Then, press the shutter button fully down and pan the camera. • When using a zoom lens, it is too much brighter than surroundings. • [3D Sweep Panorama] recording may not be discontinued in the following points into account. You should pan...
Handbook
Page 60
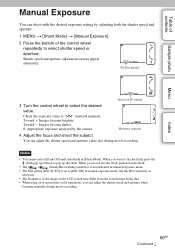
... as necessary. • The brightness of the image on the LCD screen may differ from the actual image being shot. • When using an A-mount lens (sold separately), you can adjust the shutter speed and aperture when focusing manually during movie recording. Shutter speed and aperture adjustment screens appear alternately. Check...
... as necessary. • The brightness of the image on the LCD screen may differ from the actual image being shot. • When using an A-mount lens (sold separately), you can adjust the shutter speed and aperture when focusing manually during movie recording. Shutter speed and aperture adjustment screens appear alternately. Check...

Handbook
Page 62
... is recommended. • The brightness of the image on the LCD screen may differ from the actual image being shot. • When using an A-mount lens (sold separately), you want to fire the flash, press the (flash pop-up) button to pop up the flash. You can adjust the shutter speed...
... is recommended. • The brightness of the image on the LCD screen may differ from the actual image being shot. • When using an A-mount lens (sold separately), you want to fire the flash, press the (flash pop-up) button to pop up the flash. You can adjust the shutter speed...

Handbook
Page 63
... or sharpens things in front of the image on the LCD screen may differ from the actual image being shot. • When using an A-mount lens (sold separately), you can adjust the aperture when focusing manually during movie recording. 1 MENU t [Shoot Mode] t [Aperture Priority]. 2 Select the desired value with the control...
... or sharpens things in front of the image on the LCD screen may differ from the actual image being shot. • When using an A-mount lens (sold separately), you can adjust the aperture when focusing manually during movie recording. 1 MENU t [Shoot Mode] t [Aperture Priority]. 2 Select the desired value with the control...

Handbook
Page 65
...press the (flash pop-up) button to pop up to shoot a clear image of both the subject and the background by the lens attached. Sample photo Menu Index (flash pop-up) button 1 MENU t [Camera] t [Flash Mode] t desired mode. 2...and it is attached to shoot a bright image of the backlit subject. Remove the lens hood when using the flash. • When using the flash allows you to [Fill-flash] with the flash... • The lens hood may be blocked by slowing the shutter speed. Table of contents Flash Mode In a dark ...
...press the (flash pop-up) button to pop up to shoot a clear image of both the subject and the background by the lens attached. Sample photo Menu Index (flash pop-up) button 1 MENU t [Camera] t [Flash Mode] t desired mode. 2...and it is attached to shoot a bright image of the backlit subject. Remove the lens hood when using the flash. • When using the flash allows you to [Fill-flash] with the flash... • The lens hood may be blocked by slowing the shutter speed. Table of contents Flash Mode In a dark ...
Handbook
Page 66
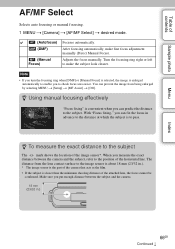
...t [MF Assist] t [Off]. After focusing automatically, make the subject look clearer. With "Focus fixing," you can prevent the image from the lens contact surface to check focus area easier. When you put enough distance between the camera and the subject, refer to pass. z Using manual focusing ...effectively "Focus fixing" is to the position of the attached lens, the focus cannot be confirmed. Table of the image sensor*. Turn the focusing ring right or left to the subject. Make sure...
...t [MF Assist] t [Off]. After focusing automatically, make the subject look clearer. With "Focus fixing," you can prevent the image from the lens contact surface to check focus area easier. When you put enough distance between the camera and the subject, refer to pass. z Using manual focusing ...effectively "Focus fixing" is to the position of the attached lens, the focus cannot be confirmed. Table of the image sensor*. Turn the focusing ring right or left to the subject. Make sure...
Handbook
Page 67
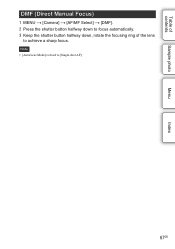
Table of contents Sample photo Menu Index DMF (Direct Manual Focus) 1 MENU t [Camera] t [AF/MF Select] t [DMF]. 2 Press the shutter button halfway down to focus automatically. 3 Keep the shutter button halfway down, rotate the focusing ring of the lens to [Single-shot AF]. 67GB Note • [Autofocus Mode] is fixed to achieve a sharp focus.
Table of contents Sample photo Menu Index DMF (Direct Manual Focus) 1 MENU t [Camera] t [AF/MF Select] t [DMF]. 2 Press the shutter button halfway down to focus automatically. 3 Keep the shutter button halfway down, rotate the focusing ring of the lens to [Single-shot AF]. 67GB Note • [Autofocus Mode] is fixed to achieve a sharp focus.

Handbook
Page 68
... Spot) Moves the focusing area to focus on faces. Table of the control wheel. Use this function is set before you cannot use an E-mount lens and press the shutter button half way down in auto focus mode. 1 MENU t [Camera] t [Autofocus Area] t desired mode. (Multi) (Center) The camera determines which of...
... Spot) Moves the focusing area to focus on faces. Table of the control wheel. Use this function is set before you cannot use an E-mount lens and press the shutter button half way down in auto focus mode. 1 MENU t [Camera] t [Autofocus Area] t desired mode. (Multi) (Center) The camera determines which of...


