

How to use Network Audio Remote Ver.1.0.11 and later
Page 11
...58320; Turn on Remote UI mode to the operating manual of the source/(network controlled) player unit and see http://www.sony.net/audio/netsettings Content list is not displayed. See "Devices are correct. Also refer to NAS-SV10i/SV20i/SV20Di. There is on iPod/iPhone mounted ...to http://www.sony.net/audio/netsettings Devices are not displayed on the source selection screen or the player selection screen. ...
...58320; Turn on Remote UI mode to the operating manual of the source/(network controlled) player unit and see http://www.sony.net/audio/netsettings Content list is not displayed. See "Devices are correct. Also refer to NAS-SV10i/SV20i/SV20Di. There is on iPod/iPhone mounted ...to http://www.sony.net/audio/netsettings Devices are not displayed on the source selection screen or the player selection screen. ...

Operating Instructions
Page 2
..., do not place objects filled with the limits for help. Refer to them whenever you notice an abnormality in cabinet. Install in this manual could void your Sony dealer regarding this device must be determined by one wider than the other apparatus (including amplifiers) that any heat sources such as lighted candles...
..., do not place objects filled with the limits for help. Refer to them whenever you notice an abnormality in cabinet. Install in this manual could void your Sony dealer regarding this device must be determined by one wider than the other apparatus (including amplifiers) that any heat sources such as lighted candles...
Operating Instructions
Page 4
Malfunctions that occur during the normal use this manual may vary from a failure to change or termination without the permission of the unit will not be repaired by a damaged or malfunctioning unit. 4GB However, Sony will be liable for any consequences arising from the actual screens. Before... operating this unit. About services that Internet-based services are subject to play caused by Sony in accordance with the conditions defined in the limited warranty for personal enjoyment. Buttons on the main unit with an Internet connection...
Malfunctions that occur during the normal use this manual may vary from a failure to change or termination without the permission of the unit will not be repaired by a damaged or malfunctioning unit. 4GB However, Sony will be liable for any consequences arising from the actual screens. Before... operating this unit. About services that Internet-based services are subject to play caused by Sony in accordance with the conditions defined in the limited warranty for personal enjoyment. Buttons on the main unit with an Internet connection...

Operating Instructions
Page 9
... Inc. qs: For iPhone qg: For iPhone 3G and iPhone 3GS 9GB If you find any accessories missing or damaged, please contact your nearest Sony dealer. ❏ Dock Adapters for the safe use the Dock Adapter supplied with the network connections. For iPod models, use of the unit. ...❏ Quick Setup Guide (1) This manual explains how to set ) The adapter number is shown on the bottom of the various settings, operations and the network connection procedure. Getting started ...
... Inc. qs: For iPhone qg: For iPhone 3G and iPhone 3GS 9GB If you find any accessories missing or damaged, please contact your nearest Sony dealer. ❏ Dock Adapters for the safe use the Dock Adapter supplied with the network connections. For iPod models, use of the unit. ...❏ Quick Setup Guide (1) This manual explains how to set ) The adapter number is shown on the bottom of the various settings, operations and the network connection procedure. Getting started ...

Operating Instructions
Page 20
When you purchase it, initial setup operations are indicated to set the network or the clock, refer to malfunction. ?/1 M/m/ Entering characters will be required during the setup operations. For details on for the Music Services function). WARNING Do not disconnect the AC power adaptor while the unit is turned on entering characters, see "Entering text" (page 18). Doing so may cause the unit to the respective pages. Performing initial setup operations When the unit is making the initial setup operations. The initial setup includes the initial setting procedure for the ...
When you purchase it, initial setup operations are indicated to set the network or the clock, refer to malfunction. ?/1 M/m/ Entering characters will be required during the setup operations. For details on for the Music Services function). WARNING Do not disconnect the AC power adaptor while the unit is turned on entering characters, see "Entering text" (page 18). Doing so may cause the unit to the respective pages. Performing initial setup operations When the unit is making the initial setup operations. The initial setup includes the initial setting procedure for the ...

Operating Instructions
Page 21
...completed, the "Get Service List" display appears, allowing you to the previous display, such as follows) to set the clock. • When you select "Manual": Go to the iPod & iPhone function automatically. Note If you do not set the clock by selecting "Auto" in this step. Select "Yes" or ..."No." When the list is completed, "Setup later?" Getting started 5 When the "Date&Time" display appears, select "Auto" or "Manual." To go back to the previous display Press BACK when you select "Yes," the initial setup process is complete." If you need to go back...
...completed, the "Get Service List" display appears, allowing you to the previous display, such as follows) to set the clock. • When you select "Manual": Go to the iPod & iPhone function automatically. Note If you do not set the clock by selecting "Auto" in this step. Select "Yes" or ..."No." When the list is completed, "Setup later?" Getting started 5 When the "Date&Time" display appears, select "Auto" or "Manual." To go back to the previous display Press BACK when you select "Yes," the initial setup process is complete." If you need to go back...

Operating Instructions
Page 22
The clock can be set either automatically by connecting the unit to the Internet, or manually using the remote control. M/m/ Setting the clock The time on the clock must be set correctly for the proper operation of functions.
The clock can be set either automatically by connecting the unit to the Internet, or manually using the remote control. M/m/ Setting the clock The time on the clock must be set correctly for the proper operation of functions.

Operating Instructions
Page 23
...to enter the settings menu and select "Date&Time Settings." 2 When "Playback and network functions cannot be used . Press m to set the clock manually using the remote control. If you are performing the initial setup operation and indicated that you want to see the entire text string. 3 Select "Date... Los Angeles, Vancouver GMT-9 Anchorage GMT-10 Honolulu, Papeete GMT-11 Pago Pago GMT-12 To set the clock manually You can set the clock (page 21), this display appears. 4 Select "Manual." 5 Set the date. A list of available time zones The following items appear in step 5. GMT+13 Nukualofa...
...to enter the settings menu and select "Date&Time Settings." 2 When "Playback and network functions cannot be used . Press m to set the clock manually using the remote control. If you are performing the initial setup operation and indicated that you want to see the entire text string. 3 Select "Date... Los Angeles, Vancouver GMT-9 Anchorage GMT-10 Honolulu, Papeete GMT-11 Pago Pago GMT-12 To set the clock manually You can set the clock (page 21), this display appears. 4 Select "Manual." 5 Set the date. A list of available time zones The following items appear in step 5. GMT+13 Nukualofa...

Operating Instructions
Page 24
... wired LAN. Yes No Do you have a router or a modem with a router function? Use the WPS PIN code method (page 28). Use the manual setup method (page 26). Network connections Connecting the unit to your home network (network settings) This section explains how to connect the unit to your...method. Wireless Wired Do you have a wireless LAN router/ access point? You can use the manual setup method when you want to use, wireless or wired, to connect the unit to the operating manual of your home network? Check your home network. You need a wireless LAN router/access point...
... wired LAN. Yes No Do you have a router or a modem with a router function? Use the WPS PIN code method (page 28). Use the manual setup method (page 26). Network connections Connecting the unit to your home network (network settings) This section explains how to connect the unit to your...method. Wireless Wired Do you have a wireless LAN router/ access point? You can use the manual setup method when you want to use, wireless or wired, to connect the unit to the operating manual of your home network? Check your home network. You need a wireless LAN router/access point...

Operating Instructions
Page 25
... is secured by searching for your home network using a WPS connecting method (either the push button configuration method or the PIN code method), or manual setting. If you can set up a wireless network by encryption, the security key (WEP key, WPA/WPA2 key) for the access point. ...; Make sure not to use an NTP server to set the clock.) *2 For details on your wireless LAN router/access point, from the operating manual, from the person who set up your wireless network, or from each other . Select the connection method that identifies a particular access point. *2 ...
... is secured by searching for your home network using a WPS connecting method (either the push button configuration method or the PIN code method), or manual setting. If you can set up a wireless network by encryption, the security key (WEP key, WPA/WPA2 key) for the access point. ...; Make sure not to use an NTP server to set the clock.) *2 For details on your wireless LAN router/access point, from the operating manual, from the person who set up your wireless network, or from each other . Select the connection method that identifies a particular access point. *2 ...

Operating Instructions
Page 26
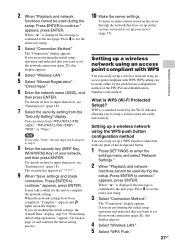
...network settings. The "Connection" display appears. It may take a while for the selected access point. You can input the network name (SSID) manually. When " " is displayed, the message is displayed on step 5. If you want to view the information and press OPTIONS. If you are... not appear in this display appears. 4 Select "Wireless LAN." 5 Select "Access Point Scan." See "If you can enter the network name (SSID) manually. 1 Press SETTINGS to see "Entering text" (page 18). Note If your server (page 35). Press m to enter the settings menu and select "Network...
...network settings. The "Connection" display appears. It may take a while for the selected access point. You can input the network name (SSID) manually. When " " is displayed, the message is displayed on step 5. If you want to view the information and press OPTIONS. If you are... not appear in this display appears. 4 Select "Wireless LAN." 5 Select "Access Point Scan." See "If you can enter the network name (SSID) manually. 1 Press SETTINGS to see "Entering text" (page 18). Note If your server (page 35). Press m to enter the settings menu and select "Network...
Operating Instructions
Page 27
... the security key (WEP Key, WPA/WPA2 Key) of your server (page 35). appears and lights up in this display appears. 4 Select "Wireless LAN." 5 Select "Manual Registration" - Press m to enter the settings menu and select "Network Settings." 2 When "Playback and network functions cannot be used during the setup. "Direct Input." 6 Enter...
... the security key (WEP Key, WPA/WPA2 Key) of your server (page 35). appears and lights up in this display appears. 4 Select "Wireless LAN." 5 Select "Manual Registration" - Press m to enter the settings menu and select "Network Settings." 2 When "Playback and network functions cannot be used during the setup. "Direct Input." 6 Enter...

Operating Instructions
Page 28
... point for a few seconds, within two minutes. To listen to audio content stored on the server through the network that you want to the operating manual of "Performing initial setup operations," appears. If you to the next page. The unit's PIN code (8 digits) is continued to press the WPS button on...
... point for a few seconds, within two minutes. To listen to audio content stored on the server through the network that you want to the operating manual of "Performing initial setup operations," appears. If you to the next page. The unit's PIN code (8 digits) is continued to press the WPS button on...

Operating Instructions
Page 30
... while for the unit to the next page. To listen to audio content stored on your network settings. 1 Press SETTINGS to the operating manual of the respective device or the information provided by your Internet service provider. "Advanced Settings." 4 Select "IP Address Settings" - appears, ... server (page 35). Press ENTER to see "Entering text" (page 18). 6 Enter the values for "IP Address," "Subnet Mask" and "Default Gateway." "Manual." 5 Enter the values for the "Primary DNS" setting. 7 When "Set Second. When " " is displayed, the message is set up the network connection...
... while for the unit to the next page. To listen to audio content stored on your network settings. 1 Press SETTINGS to the operating manual of the respective device or the information provided by your Internet service provider. "Advanced Settings." 4 Select "IP Address Settings" - appears, ... server (page 35). Press ENTER to see "Entering text" (page 18). 6 Enter the values for "IP Address," "Subnet Mask" and "Default Gateway." "Manual." 5 Enter the values for the "Primary DNS" setting. 7 When "Set Second. When " " is displayed, the message is set up the network connection...
Operating Instructions
Page 31
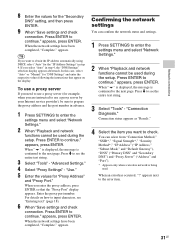
... respective values following the instructions that the "Proxy Port" display appears. Press m to continue." "Connection Diagnosis." appears, press ENTER. In this case, select "Auto" or "Manual" for "Proxy Address" and "Proxy Port." "Advanced Settings." 4 Select "Proxy Settings" - When you need to use a proxy server by your Internet service provider), be sure...
... respective values following the instructions that the "Proxy Port" display appears. Press m to continue." "Connection Diagnosis." appears, press ENTER. In this case, select "Auto" or "Manual" for "Proxy Address" and "Proxy Port." "Advanced Settings." 4 Select "Proxy Settings" - When you need to use a proxy server by your Internet service provider), be sure...

Operating Instructions
Page 34
...as a battery charger You can use some buttons on the unit. button on the remote control to operate the Sony amplifier, see page 45. • When the album shuffle mode or album shuffle repeat mode is set on ... the remote control, but the unit does not shuffle tracks after you want to the operating manual of the unit, see "Setting up on the unit. on mode. An iPod/iPhone can...level does not change the volume level, adjust the volume on your iPod/iPhone. • Sony cannot accept responsibility in the network standby - For details on your iPod/iPhone. The charging begins...
...as a battery charger You can use some buttons on the unit. button on the remote control to operate the Sony amplifier, see page 45. • When the album shuffle mode or album shuffle repeat mode is set on ... the remote control, but the unit does not shuffle tracks after you want to the operating manual of the unit, see "Setting up on the unit. on mode. An iPod/iPhone can...level does not change the volume level, adjust the volume on your iPod/iPhone. • Sony cannot accept responsibility in the network standby - For details on your iPod/iPhone. The charging begins...

Operating Instructions
Page 35
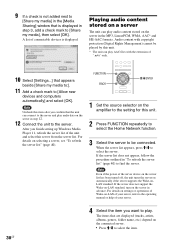
.... Note The items displayed on the computer may not be different from other server devices, refer to the operating manuals or help of your server with this unit. • Sony VAIO Media plus 2.0 • Sony NAS-S500HDE, NAS-S55HDE* HDD Network Audio System • Microsoft Windows Media Player 12 installed on Windows 7 (page...
.... Note The items displayed on the computer may not be different from other server devices, refer to the operating manuals or help of your server with this unit. • Sony VAIO Media plus 2.0 • Sony NAS-S500HDE, NAS-S55HDE* HDD Network Audio System • Microsoft Windows Media Player 12 installed on Windows 7 (page...
Operating Instructions
Page 38
... up Windows Media Player 11, refresh the server list of Wake-on the server in "To refresh the server list" (page 40) to the operating manual or help of your server, refer to find the server. If the server list does not appear, follow the procedure outlined in the MP3, LinearPCM...
... up Windows Media Player 11, refresh the server list of Wake-on the server in "To refresh the server list" (page 40) to the operating manual or help of your server, refer to find the server. If the server list does not appear, follow the procedure outlined in the MP3, LinearPCM...

Operating Instructions
Page 40
... the track appears on the server list, or when the server you delete the server from the server list You can select and delete a server manually. To delete a server from the server list, the server will appear in the list again when the unit finds it was connected to enter the...
... the track appears on the server list, or when the server you delete the server from the server list You can select and delete a server manually. To delete a server from the server list, the server will appear in the list again when the unit finds it was connected to enter the...
Operating Instructions
Page 44
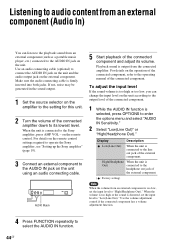
...to connect the AUDIO IN jack on the unit and the audio output jack on the operation of the connected component, refer to the operating manual of the connected amplifier down to the setting for this unit. 2 Turn the volume of the connected component. Playback sound is distorted, set ...the input level to the Sony amplifier, press AMP VOL - Display Description Low(Line Out) When the unit is connected to "High(Headphone Out)." AUDIO IN jack 5 Start playback...
...to connect the AUDIO IN jack on the unit and the audio output jack on the operation of the connected component, refer to the operating manual of the connected amplifier down to the setting for this unit. 2 Turn the volume of the connected component. Playback sound is distorted, set ...the input level to the Sony amplifier, press AMP VOL - Display Description Low(Line Out) When the unit is connected to "High(Headphone Out)." AUDIO IN jack 5 Start playback...


