Operating Instructions (SLVN750)
Page 3
.... Information For customers in the USA CAUTION You are cautioned that interference will not occur in a particular installation. Record these numbers in this manual could void your Sony dealer regarding this equipment does cause harmful interference to radio or television reception, which can radiate radio frequency energy and, if not installed and...
.... Information For customers in the USA CAUTION You are cautioned that interference will not occur in a particular installation. Record these numbers in this manual could void your Sony dealer regarding this equipment does cause harmful interference to radio or television reception, which can radiate radio frequency energy and, if not installed and...

Operating Instructions (SLVN750)
Page 4
... set is not likely to have a suitable outlet installed. Overloading Do not overload wall outlets, extension cords or convenience receptacles beyond their capacity, since this manual for future reference. Quick stops, excessive force, and uneven surfaces may fall, causing serious injury to a child or an adult, and serious damage to the...
... set is not likely to have a suitable outlet installed. Overloading Do not overload wall outlets, extension cords or convenience receptacles beyond their capacity, since this manual for future reference. Quick stops, excessive force, and uneven surfaces may fall, causing serious injury to a child or an adult, and serious damage to the...

Operating Instructions (SLVN750)
Page 7
SLV-N750 is for the exclusive use of your model name The instructions in this VCR. Check your VCR. Unpacking 7 Check your model name by looking at the rear panel of this manual are for the 2 models: SLV-N750 and SLV-N650. Getting Started Getting Started Step 1 : Unpacking Check that you have received the following items with the VCR: • Remote commander • Size AA (R6) batteries • 75-ohm coaxial cable with F-type connectors Note • The supplied remote commander is the model used for illustration purposes.
SLV-N750 is for the exclusive use of your model name The instructions in this VCR. Check your VCR. Unpacking 7 Check your model name by looking at the rear panel of this manual are for the 2 models: SLV-N750 and SLV-N650. Getting Started Getting Started Step 1 : Unpacking Check that you have received the following items with the VCR: • Remote commander • Size AA (R6) batteries • 75-ohm coaxial cable with F-type connectors Note • The supplied remote commander is the model used for illustration purposes.

Operating Instructions (SLVN750)
Page 14
... happens, see "Using Manual Clock Set" on page 26. The clock is plugged into the AC outlet. You have now completed VCR setup. Hookup 1 : VCR setup Plug the VCR into the AC outlet. The VCR automatically presets the VCR's clock and TV channels when the VCR is set . AC power... cord to French or Spanish, see "Presetting/disabling channels manually" on page 22. To change ...
... happens, see "Using Manual Clock Set" on page 26. The clock is plugged into the AC outlet. You have now completed VCR setup. Hookup 1 : VCR setup Plug the VCR into the AC outlet. The VCR automatically presets the VCR's clock and TV channels when the VCR is set . AC power... cord to French or Spanish, see "Presetting/disabling channels manually" on page 22. To change ...

Operating Instructions (SLVN750)
Page 16
...and channels. To change the on page 18. You have now completed VCR setup. AC power cord to French or Spanish, see "Presetting/disabling channels manually" on the VCR continuously for the first time after you purchase the VCR. • Auto preset can be incorrectly set. When Auto preset is... STOP on page 26. The clock is completed, the current time appears in the display window. If this happens, see "Using Manual Clock Set" on the VCR or remote commander during Auto preset. • Auto preset starts automatically only when you connect the AC power cord before the antenna...
...and channels. To change the on page 18. You have now completed VCR setup. AC power cord to French or Spanish, see "Presetting/disabling channels manually" on the VCR continuously for the first time after you purchase the VCR. • Auto preset can be incorrectly set. When Auto preset is... STOP on page 26. The clock is completed, the current time appears in the display window. If this happens, see "Using Manual Clock Set" on the VCR or remote commander during Auto preset. • Auto preset starts automatically only when you connect the AC power cord before the antenna...
Operating Instructions (SLVN750)
Page 19
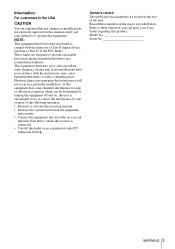
... CH" to either channel. If both are not yet sending time signals, set the "VCR Output CH" to "3CH" or "4CH" in your area are used, set the time manually (page 22). Getting Started Step 5 : Setting the clock Using the Auto Clock Set feature Some TV and cable channels transmit time signals... only if a channel in ADVANCED OPTIONS menu (page 47). When using A/V connections, set the TV to video input. • Press TV/VIDEO to display the VCR indicator in your area is connected to automatically set ," then press OK. If your TV is broadcasting a time signal. Your...
... CH" to either channel. If both are not yet sending time signals, set the "VCR Output CH" to "3CH" or "4CH" in your area are used, set the time manually (page 22). Getting Started Step 5 : Setting the clock Using the Auto Clock Set feature Some TV and cable channels transmit time signals... only if a channel in ADVANCED OPTIONS menu (page 47). When using A/V connections, set the TV to video input. • Press TV/VIDEO to display the VCR indicator in your area is connected to automatically set ," then press OK. If your TV is broadcasting a time signal. Your...

Operating Instructions (SLVN750)
Page 21
continued Setting the clock 21 If nothing happens even after you wait about 20 minutes, set the clock manually (page 22). • If you made Hookup 3, make sure you do not receive a channel that carry time signals, setting the clock automatically may take up to about 20 minutes. Getting Started Notes • The clock cannot be set automatically if you leave the cable box on. If so, set the clock manually (page 22). • If there are only a few channels in your area that carries a time signal in your area.
continued Setting the clock 21 If nothing happens even after you wait about 20 minutes, set the clock manually (page 22). • If you made Hookup 3, make sure you do not receive a channel that carry time signals, setting the clock automatically may take up to about 20 minutes. Getting Started Notes • The clock cannot be set automatically if you leave the cable box on. If so, set the clock manually (page 22). • If there are only a few channels in your area that carries a time signal in your area.
Operating Instructions (SLVN750)
Page 22
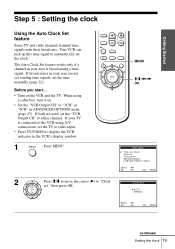
...MENU 3 Press M/m to select MANUAL, then press OK. MENU M/m/, OK 1 MENU Press MENU. MAIN MENU Timer set / check Clock set Tuner preset Advanced options Language / Idioma / Langue Select : Vv Set : OK Quit : MENU 2 Press M/m to move the cursor (B) to "Clock set the "VCR Output CH" to either channel....is connected to the VCR using A/V connections, set the TV to video input. • Press TV/VIDEO to display the VCR indicator in ADVANCED OPTIONS menu (page 47). Using Manual Clock Set Before you start... • Turn on the VCR and the TV. • Set the "VCR Output CH" to ...
...MENU 3 Press M/m to select MANUAL, then press OK. MENU M/m/, OK 1 MENU Press MENU. MAIN MENU Timer set / check Clock set Tuner preset Advanced options Language / Idioma / Langue Select : Vv Set : OK Quit : MENU 2 Press M/m to move the cursor (B) to "Clock set the "VCR Output CH" to either channel....is connected to the VCR using A/V connections, set the TV to video input. • Press TV/VIDEO to display the VCR indicator in ADVANCED OPTIONS menu (page 47). Using Manual Clock Set Before you start... • Turn on the VCR and the TV. • Set the "VCR Output CH" to ...
Operating Instructions (SLVN750)
Page 24
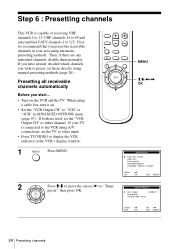
... have already decided which channels you wish to preset, set them manually. If your area using automatic presetting methods. When using manual presetting methods (page 26). First, we recommend that you start... • Turn on . • Set the "VCR Output CH" to "3CH" or "4CH" in ADVANCED OPTIONS ... 125. OK MENU M/m/ If both are any unwanted channels, disable them directly using a cable box, turn it on the VCR and the TV. Step 6 : Presetting channels This VCR is connected to the VCR using A/V connections, set the TV to video input. • Press TV/VIDEO to display the...
... have already decided which channels you wish to preset, set them manually. If your area using automatic presetting methods. When using manual presetting methods (page 26). First, we recommend that you start... • Turn on . • Set the "VCR Output CH" to "3CH" or "4CH" in ADVANCED OPTIONS ... 125. OK MENU M/m/ If both are any unwanted channels, disable them directly using a cable box, turn it on the VCR and the TV. Step 6 : Presetting channels This VCR is connected to the VCR using A/V connections, set the TV to video input. • Press TV/VIDEO to display the...
Operating Instructions (SLVN750)
Page 26
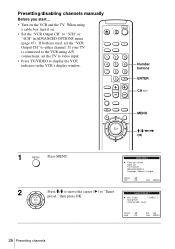
MENU M/m/ If both are used, set the TV to video input. • Press TV/VIDEO to either channel. Presetting/disabling channels manually Before you start... • Turn on . • Set the "VCR Output CH" to "3CH" or "4CH" in the VCR's display window. 123 456 789 0 Number buttons ENTER CH +/- If your TV is connected to the VCR using a cable box, turn it on the VCR and the TV. When using A/V connections, set the "VCR Output CH" to display the VCR indicator in ADVANCED OPTIONS menu (page 47).
MENU M/m/ If both are used, set the TV to video input. • Press TV/VIDEO to either channel. Presetting/disabling channels manually Before you start... • Turn on . • Set the "VCR Output CH" to "3CH" or "4CH" in the VCR's display window. 123 456 789 0 Number buttons ENTER CH +/- If your TV is connected to the VCR using a cable box, turn it on the VCR and the TV. When using A/V connections, set the "VCR Output CH" to display the VCR indicator in ADVANCED OPTIONS menu (page 47).

Operating Instructions (SLVN750)
Page 46
In this case, manually adjust the tracking. Adjusting the picture (tracking) Although the VCR automatically adjusts the tracking when playing a tape, distortion may occur if the recording is in the LP mode on the VCR to work with tapes recorded in poor condition. The distortion should disappear as you ... buttons. TRACKING Tracking meter Note • The auto tracking adjustment cannot be guaranteed to display the tracking meter. on other VCRs. 46 Adjusting the picture (tracking) To resume automatic tracking adjustment, eject the tape and reinsert it. Press TRACKING +/-
In this case, manually adjust the tracking. Adjusting the picture (tracking) Although the VCR automatically adjusts the tracking when playing a tape, distortion may occur if the recording is in the LP mode on the VCR to work with tapes recorded in poor condition. The distortion should disappear as you ... buttons. TRACKING Tracking meter Note • The auto tracking adjustment cannot be guaranteed to display the tracking meter. on other VCRs. 46 Adjusting the picture (tracking) To resume automatic tracking adjustment, eject the tape and reinsert it. Press TRACKING +/-