
Operating Instructions
Page 3
... consequences for a Class B digital device, pursuant to radio communications. Disposal of correctly, you purchased the product. Applicable accessories: Remote control, Earphones 3 Declaration of this product, please contact your local Civic Office, your authority to operate this device must... to only those countries where it shall be caused by inappropriate waste handling of Conformity Trade Name: SONY Model No.: MZ-RH1, MZ-M200 Responsible Party: Sony Electronics Inc. Consult the dealer or an experienced radio/TV technician for the recycling of rechargeable batteries,...
... consequences for a Class B digital device, pursuant to radio communications. Disposal of correctly, you purchased the product. Applicable accessories: Remote control, Earphones 3 Declaration of this product, please contact your local Civic Office, your authority to operate this device must... to only those countries where it shall be caused by inappropriate waste handling of Conformity Trade Name: SONY Model No.: MZ-RH1, MZ-M200 Responsible Party: Sony Electronics Inc. Consult the dealer or an experienced radio/TV technician for the recycling of rechargeable batteries,...

Operating Instructions
Page 5
... a disc 31 Displayed items during recording .....35 Recording from externally connected component 37 Playing a disc Playing a disc 39 Displayed items during playback.......41 Selecting the play mode 43 Playing tracks in the selected ... Rehearsal 47 Combining tracks (Combine 48 Using the Menu Using the Menu 49 Menus for recording 50 Adjusting the recording level manually ...52 Menu for playback 53 Menus for editing 54 Menus on the recorder 54 Menus on the remote 54 Moving a track on a disc 56 Changing the order of a group on a disc ..56...
... a disc 31 Displayed items during recording .....35 Recording from externally connected component 37 Playing a disc Playing a disc 39 Displayed items during playback.......41 Selecting the play mode 43 Playing tracks in the selected ... Rehearsal 47 Combining tracks (Combine 48 Using the Menu Using the Menu 49 Menus for recording 50 Adjusting the recording level manually ...52 Menu for playback 53 Menus for editing 54 Menus on the recorder 54 Menus on the remote 54 Moving a track on a disc 56 Changing the order of a group on a disc ..56...

Operating Instructions
Page 9
... configuration in your back pocket. • Stereo microphone (MZ-M200 only) STEREO • Make sure not to put the recorder into a bag with the remote or the headphones/earphones cord wrapped around it is supplied. 3) Do not play a CD-ROM on "Hi-MD Music Transfer for Mac", refer to strong impact. • Optical...
... configuration in your back pocket. • Stereo microphone (MZ-M200 only) STEREO • Make sure not to put the recorder into a bag with the remote or the headphones/earphones cord wrapped around it is supplied. 3) Do not play a CD-ROM on "Hi-MD Music Transfer for Mac", refer to strong impact. • Optical...

Operating Instructions
Page 10
.... 2 Wind the cord around the ferrite core twice/ Approx. 1 cm (0.6 in .) from the plug Refer to step 2 for connection to the supplied remote, the optional stereo microphone and the optional line cable. (You must attach the ferrite cores to comply with the applicable EMC standards.) Be sure to... ferrite core/ Approx. 1 cm (0.6 in.) from the plug For the MZ-M200 North American model: • For the optional line cable: Pass the cord through the ferrite core/ Approx. 1 cm (0.6 in .) from the plug connected to the recorder. 3 Close the ferrite core. How to use the supplied ferrite core This...
.... 2 Wind the cord around the ferrite core twice/ Approx. 1 cm (0.6 in .) from the plug Refer to step 2 for connection to the supplied remote, the optional stereo microphone and the optional line cable. (You must attach the ferrite cores to comply with the applicable EMC standards.) Be sure to... ferrite core/ Approx. 1 cm (0.6 in.) from the plug For the MZ-M200 North American model: • For the optional line cable: Pass the cord through the ferrite core/ Approx. 1 cm (0.6 in .) from the plug connected to the recorder. 3 Close the ferrite core. How to use the supplied ferrite core This...

Operating Instructions
Page 13
...35, 41) Display window ( pages 35, 41) HOLD switch ( page 15) Recorder: (stop) · CANCEL button ( pages 22, 33, 40, 49) Remote: (stop) button ( pages 40, 49) (pause) button ( pages 33, ...; Battery compartment ( page 14) (group) +/- Locking the controls (HOLD) Slide the HOLD switch on the recorder or on , too. buttons ( pages 39, 61) Remote: VOL +/- button ( pages 40, 58) Clip ( page 10) P MODE/ (repeat) button (...
...35, 41) Display window ( pages 35, 41) HOLD switch ( page 15) Recorder: (stop) · CANCEL button ( pages 22, 33, 40, 49) Remote: (stop) button ( pages 40, 49) (pause) button ( pages 33, ...; Battery compartment ( page 14) (group) +/- Locking the controls (HOLD) Slide the HOLD switch on the recorder or on , too. buttons ( pages 39, 61) Remote: VOL +/- button ( pages 40, 58) Clip ( page 10) P MODE/ (repeat) button (...

Operating Instructions
Page 14
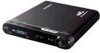
...indication disappears after a short time, this point, at the start of charging is sufficiently charged. 14 Recorder To a wall outlet To the USB cable connecting jack 6 Confirm that charging has started. Insert it... at which time it is depleted. Operations can be done on the recorder or the remote while charging. 1 Slide and open the battery compartment lid in the direction of the USB cable to ...the recorder and the AC power cord to the AC power adaptor....
...indication disappears after a short time, this point, at the start of charging is sufficiently charged. 14 Recorder To a wall outlet To the USB cable connecting jack 6 Confirm that charging has started. Insert it... at which time it is depleted. Operations can be done on the recorder or the remote while charging. 1 Slide and open the battery compartment lid in the direction of the USB cable to ...the recorder and the AC power cord to the AC power adaptor....
Operating Instructions
Page 15
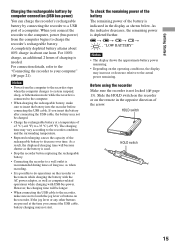
... connect the USB cable, battery charging may vary according to the recorder condition and the surrounding temperature. • Repeated recharging causes the capacity of charging is possible to do operations on the recorder or the remote while charging the battery with the AC power adaptor, as well as... when recording. • It is needed. The charging time may not start. To check the remaining ...
... connect the USB cable, battery charging may vary according to the recorder condition and the surrounding temperature. • Repeated recharging causes the capacity of charging is possible to do operations on the recorder or the remote while charging the battery with the AC power adaptor, as well as... when recording. • It is needed. The charging time may not start. To check the remaining ...

Operating Instructions
Page 34
... the microphone and its power switch is turned off since power is displayed. Verify on the remote) is supplied from the recorder itself . Please note that the sound of recorder operations may cause the recorder to malfunction or noise to be picked up the operating sound of the...( page 51). • To start recording from a specific point on the disc, pause the recorder at a stable, vibration-free place during recording. • If you start recording before the operation lamp turns off before you use the recorder on the remote) is displayed, then it will not be ...
... the microphone and its power switch is turned off since power is displayed. Verify on the remote) is supplied from the recorder itself . Please note that the sound of recorder operations may cause the recorder to malfunction or noise to be picked up the operating sound of the...( page 51). • To start recording from a specific point on the disc, pause the recorder at a stable, vibration-free place during recording. • If you start recording before the operation lamp turns off before you use the recorder on the remote) is displayed, then it will not be ...

Operating Instructions
Page 36
... becomes "R 00:00"("-00:00" on the remote Press DISPLAY repeatedly. Each time you may not be able to select certain indications or the indications may appear differently. • When a disc used in Hi-MD mode and the recorder is stopped. 2) Appears only when the recorder is stopped 3) The items that are displayed differ...
... becomes "R 00:00"("-00:00" on the remote Press DISPLAY repeatedly. Each time you may not be able to select certain indications or the indications may appear differently. • When a disc used in Hi-MD mode and the recorder is stopped. 2) Appears only when the recorder is stopped 3) The items that are displayed differ...

Operating Instructions
Page 39
...Jog lever (/ENT) Playing a disc 39 Insert a disc in the display. VOL +/- Jog lever (/ENT) On the remote Press the jog lever (/ENT). The volume will be shown in the direction of the arrow (), and close the lid. VOL +/- Playing a... disc Playing a disc 1 Press OPEN to the recorder beforehand. You can adjust the volume by pressing VOL +/- (). Connect the earphones with the label side facing up 2 Press the jog lever (...
...Jog lever (/ENT) Playing a disc 39 Insert a disc in the display. VOL +/- Jog lever (/ENT) On the remote Press the jog lever (/ENT). The volume will be shown in the direction of the arrow (), and close the lid. VOL +/- Playing a... disc Playing a disc 1 Press OPEN to the recorder beforehand. You can adjust the volume by pressing VOL +/- (). Connect the earphones with the label side facing up 2 Press the jog lever (...

Operating Instructions
Page 40
...Go backwards or forward Cue to connect the USB cable while the recorder is in Hi-MD mode, the sound may cause the recorder to malfunction or noise to the beginning of the first ...skip if: - Basic playback operations To Play Stop Search Play from a point where you stopped the recorder previously Play from the point you last stopped playing. (Press the jog lever (/ENT).) From stop... (Group skip) Remove the disc Operation on the recorder (Operation on the remote repeatedly. on the remote is operating. a dirty or scratched disc is subjected to strong, repeated shocks. - the...
...Go backwards or forward Cue to connect the USB cable while the recorder is in Hi-MD mode, the sound may cause the recorder to malfunction or noise to the beginning of the first ...skip if: - Basic playback operations To Play Stop Search Play from a point where you stopped the recorder previously Play from the point you last stopped playing. (Press the jog lever (/ENT).) From stop... (Group skip) Remove the disc Operation on the recorder (Operation on the remote repeatedly. on the remote is operating. a dirty or scratched disc is subjected to strong, repeated shocks. - the...

Operating Instructions
Page 42
...and Dynamic Normalizer are active, their setting conditions are displayed if they have been recorded on the track. 3) Recording mode, codec and bitrate information appear for discs used in Hi-MD mode, and recording mode information appears for discs used in a disc Information display Refer to... "To change the display on the remote" ( next). Play mode and repeat mode information ( pages 43, 44...
...and Dynamic Normalizer are active, their setting conditions are displayed if they have been recorded on the track. 3) Recording mode, codec and bitrate information appear for discs used in Hi-MD mode, and recording mode information appears for discs used in a disc Information display Refer to... "To change the display on the remote" ( next). Play mode and repeat mode information ( pages 43, 44...

Operating Instructions
Page 43
... only. Tracks in step 2 again to enter. Tracks by a specified artist are played. The recorder plays from the selected bookmarked track to bookmark, press the jog lever for 2 seconds or more . 2 ...the jog lever to select the desired track. Selecting the play mode This function can bookmark tracks on the remote only. Group/ Artist/ * Album/ * Bookmark/ All tracks after the selected track are played. The sequence...When you press the jog lever, appears in Hi-MD mode. 3 • When you select "Bookmark" Refer to "Listening to select the desired track.
... only. Tracks in step 2 again to enter. Tracks by a specified artist are played. The recorder plays from the selected bookmarked track to bookmark, press the jog lever for 2 seconds or more . 2 ...the jog lever to select the desired track. Selecting the play mode This function can bookmark tracks on the remote only. Group/ Artist/ * Album/ * Bookmark/ All tracks after the selected track are played. The sequence...When you press the jog lever, appears in Hi-MD mode. 3 • When you select "Bookmark" Refer to "Listening to select the desired track.

Operating Instructions
Page 45
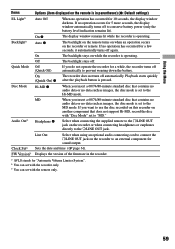
... virtual surround conditions. • 6-BAND EQUALIZER: Provides 6 different sound qualities. • DYNAMIC NORMALIZER: Normalizes the sound level automatically. This function can be set on the remote only. Adjusting the sound The following three effect can be selected. • V-SUR (Virtual-Surround VPT Acoustic Engine): Provides 4 kinds of each frequency appears alternately...
... virtual surround conditions. • 6-BAND EQUALIZER: Provides 6 different sound qualities. • DYNAMIC NORMALIZER: Normalizes the sound level automatically. This function can be set on the remote only. Adjusting the sound The following three effect can be selected. • V-SUR (Virtual-Surround VPT Acoustic Engine): Provides 4 kinds of each frequency appears alternately...

Operating Instructions
Page 49
... return the preceding setting Press · CANCEL ( on the remote. The setting will be set on the remote). To stop operation Press · CANCEL ( on the remote) for playback and editing can also be entered. On the remote Some menu items for 2 seconds or more. Using the Menu Using the...
... return the preceding setting Press · CANCEL ( on the remote. The setting will be set on the remote). To stop operation Press · CANCEL ( on the remote) for playback and editing can also be entered. On the remote Some menu items for 2 seconds or more. Using the Menu Using the...

Operating Instructions
Page 53
...or an echo in this section with the remote only. Afterwards, set "SYNC REC" setting to the left and right channel levels separately. • To adjust the recording level manually when synchro-recording, do steps 1 to 4 of the remote. Items Options SpeedCtrl +100% - -50...%, Changes the playback speed. Using the Menu • You can adjust the recording level during recording by moving the jog lever. • Even after recording ends, the recording level...
...or an echo in this section with the remote only. Afterwards, set "SYNC REC" setting to the left and right channel levels separately. • To adjust the recording level manually when synchro-recording, do steps 1 to 4 of the remote. Items Options SpeedCtrl +100% - -50...%, Changes the playback speed. Using the Menu • You can adjust the recording level during recording by moving the jog lever. • Even after recording ends, the recording level...

Operating Instructions
Page 54
... power source while editing or "SystemFILE WRITING" is stopped. Menus on the disc may not be recorded to that point may be damaged. Adds an album name to a track. Menus on either the recorder or the remote. Can be used when the track you do, the data edited up to the disc, or... tracks in the menu. Changes the group order on the disc ( page 56). Menus for editing Editing-related menus can be used on the recorder Select "Edit" in a group. Can be used in Hi-MD mode 54 Adds a disc name. * Appears only for discs used while the...
... power source while editing or "SystemFILE WRITING" is stopped. Menus on the disc may not be recorded to that point may be damaged. Adds an album name to a track. Menus on either the recorder or the remote. Can be used when the track you do, the data edited up to the disc, or... tracks in the menu. Changes the group order on the disc ( page 56). Menus for editing Editing-related menus can be used on the recorder Select "Edit" in a group. Can be used in Hi-MD mode 54 Adds a disc name. * Appears only for discs used while the...

Operating Instructions
Page 57
...names such as "abc//def", you may be labeled or while the recorder is stopped. • When adding a group name: Add the title while playing a track in the group to 9 Symbols** * European alphabets appear only for discs used in MD mode only). 1 Enter the menu ( page 49) and ...select "Title", and then select one of characters that can be stored on a disc depends on the remote only. Available characters Capital and small letters of the alphabet for...
...names such as "abc//def", you may be labeled or while the recorder is stopped. • When adding a group name: Add the title while playing a track in the group to 9 Symbols** * European alphabets appear only for discs used in MD mode only). 1 Enter the menu ( page 49) and ...select "Title", and then select one of characters that can be stored on a disc depends on the remote only. Available characters Capital and small letters of the alphabet for...

Operating Instructions
Page 58
... sound leakage or sound pressure on the remote is in the menu. Option menus can be used for 2 seconds or more than 200 letters that was created by another device (in MD mode only). On (Beep On) The beep sounds when you operate the recorder. 58 Functions To move the cursor to...
... sound leakage or sound pressure on the remote is in the menu. Option menus can be used for 2 seconds or more than 200 letters that was created by another device (in MD mode only). On (Beep On) The beep sounds when you operate the recorder. 58 Functions To move the cursor to...
Operating Instructions
Page 59
... the battery. If you do not operate the recorder for a few seconds, it automatically turns off automatically to use the disc recorded on this recorder on another component that does not support Hi-MD, record the disc with the remote only. 59 If no operation has occurred for ...a while, the recorder turns off again. Hi-MD When you insert a 60/74/80...
... the battery. If you do not operate the recorder for a few seconds, it automatically turns off automatically to use the disc recorded on this recorder on another component that does not support Hi-MD, record the disc with the remote only. 59 If no operation has occurred for ...a while, the recorder turns off again. Hi-MD When you insert a 60/74/80...
