Operating Instructions
Page 2
.... As ENERGY STAR® Partner, Sony Corporation has determined that may cause harmful interference to which can radiate radio frequency energy and, if not installed and used in accordance with the limits for a Class B digital device, pursuant to correct the interference by one or more of important operating and maintenance (servicing) instructions in a residential installation. WARNING To prevent fire or...
.... As ENERGY STAR® Partner, Sony Corporation has determined that may cause harmful interference to which can radiate radio frequency energy and, if not installed and used in accordance with the limits for a Class B digital device, pursuant to correct the interference by one or more of important operating and maintenance (servicing) instructions in a residential installation. WARNING To prevent fire or...

Operating Instructions
Page 3
... 1: Hooking up the system 4 Step 2: Setting the time 6 Step 3: Presetting radio stations 8 Saving the power in standby mode ......... 10 Basic Operations Playing a CD 11 Recording a CD 13 Listening to the radio 14 Recording from the radio 16 Playing a tape 17 Recording from a tape 20 Sound Adjustment Adjusting the sound 31 Selecting the preset audio effect file ....... 32 Changing the spectrum analyzer display 34 Selecting surround effects 35 Controlling the graphic equalizer 36 Creating a personal audio effect file ....... 37 Other Features Using the Radio...
... 1: Hooking up the system 4 Step 2: Setting the time 6 Step 3: Presetting radio stations 8 Saving the power in standby mode ......... 10 Basic Operations Playing a CD 11 Recording a CD 13 Listening to the radio 14 Recording from the radio 16 Playing a tape 17 Recording from a tape 20 Sound Adjustment Adjusting the sound 31 Selecting the preset audio effect file ....... 32 Changing the spectrum analyzer display 34 Selecting surround effects 35 Controlling the graphic equalizer 36 Creating a personal audio effect file ....... 37 Other Features Using the Radio...

Operating Instructions
Page 6
... MODE SELECT when the system is in the display. 2 Hold down V-GROOVE and press ?/1 so that all discs are removed from slipping. When the remote no longer operates the system, replace both batteries with new ones. Note If you do not use , the batteries should last for other models. appears. When carrying this system Do the following page ("To change the time") after turning the power...
... MODE SELECT when the system is in the display. 2 Hold down V-GROOVE and press ?/1 so that all discs are removed from slipping. When the remote no longer operates the system, replace both batteries with new ones. Note If you do not use , the batteries should last for other models. appears. When carrying this system Do the following page ("To change the time") after turning the power...

Operating Instructions
Page 8
... store other stations. To cancel the menu operation Press MODE SELECT. 8 "TUNED" and "STEREO" (for AM). ?/1 (Power) 1 3 Multi stick PUSH ENTER 3 Press MODE SELECT repeatedly to select "Set Up Mode", then press PUSH ENTER. 4 Move the multi stick toward b or B repeatedly to select "TUNER Set Up ?", then press PUSH ENTER. 5 Move the multi stick toward b or B repeatedly to select "TUNER Memory ?", then press PUSH ENTER. A preset number and the frequency appear in . TUNED STEREO 6 Press PUSH...
... store other stations. To cancel the menu operation Press MODE SELECT. 8 "TUNED" and "STEREO" (for AM). ?/1 (Power) 1 3 Multi stick PUSH ENTER 3 Press MODE SELECT repeatedly to select "Set Up Mode", then press PUSH ENTER. 4 Move the multi stick toward b or B repeatedly to select "TUNER Set Up ?", then press PUSH ENTER. 5 Move the multi stick toward b or B repeatedly to select "TUNER Memory ?", then press PUSH ENTER. A preset number and the frequency appear in . TUNED STEREO 6 Press PUSH...

Operating Instructions
Page 9
... European model) The AM tuning interval is factory-preset to 9 kHz (10 kHz in the station manually. Select "TUNER Ers FM ALL" (or "TUNER Ers AM ALL") when you unplug the power cord or a power failure occurs. Tip The preset stations are renumbered. While holding down MODE SELECT, turn off the power. To switch the AM tuning interval, tune in the selected preset number. You can preset a new station in any AM station first, then turn the power back...
... European model) The AM tuning interval is factory-preset to 9 kHz (10 kHz in the station manually. Select "TUNER Ers FM ALL" (or "TUNER Ers AM ALL") when you unplug the power cord or a power failure occurs. Tip The preset stations are renumbered. While holding down MODE SELECT, turn off the power. To switch the AM tuning interval, tune in the selected preset number. You can preset a new station in any AM station first, then turn the power back...
Operating Instructions
Page 14
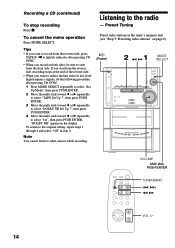
.... • When you record on page 8). To return to the radio To stop recording Press x. Recording a CD (continued) Listening to the original setting, repeat steps 1 through 4 and select "Off" in step 4. Note You cannot listen to other sources while recording. ?/1 (Power) 2 1 m M MODE SELECT VOLUME Multi stick PUSH ENTER TUNER/BAND . > m M V B b v VOL +/- 14 To cancel the menu operation Press MODE SELECT. - "DOLBY NR" appears in the...
.... • When you record on page 8). To return to the radio To stop recording Press x. Recording a CD (continued) Listening to the original setting, repeat steps 1 through 4 and select "Off" in step 4. Note You cannot listen to other sources while recording. ?/1 (Power) 2 1 m M MODE SELECT VOLUME Multi stick PUSH ENTER TUNER/BAND . > m M V B b v VOL +/- 14 To cancel the menu operation Press MODE SELECT. - "DOLBY NR" appears in the...

Operating Instructions
Page 15
.... Preset number* STEREO Frequency * When only one station is preset, "ONE PRESET" appears in the Power Saving Mode, the One Touch Play function does not work. • You can switch from another source to the radio just by pressing TUNER/BAND (Automatic Source Selection). • When an FM program is in the display. To Do this Turn off automatically turns the power on the remote). To listen to the last received station (One Touch Play). For manual tuning, press...
.... Preset number* STEREO Frequency * When only one station is preset, "ONE PRESET" appears in the Power Saving Mode, the One Touch Play function does not work. • You can switch from another source to the radio just by pressing TUNER/BAND (Automatic Source Selection). • When an FM program is in the display. To Do this Turn off automatically turns the power on the remote). To listen to the last received station (One Touch Play). For manual tuning, press...

Operating Instructions
Page 16
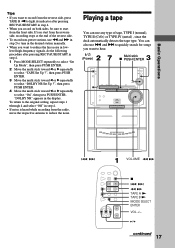
... up a preset station. Preset number STEREO Frequency 16 Recording from the radio You can use TYPE I (normal) or TYPE II (CrO2) tapes. You can record the radio program on a tape by for recording. 5 Press MODE SELECT repeatedly to select "Set Up Mode", then press PUSH ENTER. 6 Move the multi stick toward b or B repeatedly to select "TAPE Set Up ?", then press PUSH ENTER. 7 Move the multi stick toward b or B repeatedly to select "Direction Set Up ?", then...
... up a preset station. Preset number STEREO Frequency 16 Recording from the radio You can use TYPE I (normal) or TYPE II (CrO2) tapes. You can record the radio program on a tape by for recording. 5 Press MODE SELECT repeatedly to select "Set Up Mode", then press PUSH ENTER. 6 Move the multi stick toward b or B repeatedly to select "TAPE Set Up ?", then press PUSH ENTER. 7 Move the multi stick toward b or B repeatedly to select "Direction Set Up ?", then...
Operating Instructions
Page 17
... return to the original setting, repeat steps 1 tthrough 4 and select "Off" in the display. Basic Operations Tips • If you want to hear. ?/1 2 (Power) 7 3 Multi stick x PUSH ENTER . > 1 VOLUME m M V B b v x . > m M TAPE A N TAPE B N MODE SELECT ENTER VOL +/- If you start from the reverse side, recording stops at the end of the reverse side. • To record non-preset stations, use any type of tape, TYPE I (normal), TYPE...
... return to the original setting, repeat steps 1 tthrough 4 and select "Off" in the display. Basic Operations Tips • If you want to hear. ?/1 2 (Power) 7 3 Multi stick x PUSH ENTER . > 1 VOLUME m M V B b v x . > m M TAPE A N TAPE B N MODE SELECT ENTER VOL +/- If you start from the reverse side, recording stops at the end of the reverse side. • To record non-preset stations, use any type of tape, TYPE I (normal), TYPE...

Operating Instructions
Page 19
... in the opposite direction to the original setting, repeat steps 1 through 4 and select "Off" in the display. To return to go forward in the deck (One Touch Play). Press . When the unit is less than 4 seconds long. - "DOLBY NR" appears in low-level high-frequency signals, do the following circumstances: - Basic Operations Tips • Pressing TAPE A (or TAPE B) N or n when the power is off the...
... in the opposite direction to the original setting, repeat steps 1 through 4 and select "Off" in the display. To return to go forward in the deck (One Touch Play). Press . When the unit is less than 4 seconds long. - "DOLBY NR" appears in low-level high-frequency signals, do the following circumstances: - Basic Operations Tips • Pressing TAPE A (or TAPE B) N or n when the power is off the...

Operating Instructions
Page 20
... "Cycle" (or "Relay") to set DOLBY NR, since the tape in deck A. 20 Tips • When you select "Cycle" in deck B. To cancel the menu operation Press MODE SELECT. Dubbing starts. 71 1 Press A A and A B and insert a recorded tape in deck A and a recordable tape in the "Direction Set Up ?" To stop dubbing Press x. Recording from the front side. menu when the tapes you use TYPE I (normal) or TYPE II...
... "Cycle" (or "Relay") to set DOLBY NR, since the tape in deck A. 20 Tips • When you select "Cycle" in deck B. To cancel the menu operation Press MODE SELECT. Dubbing starts. 71 1 Press A A and A B and insert a recorded tape in deck A and a recordable tape in the "Direction Set Up ?" To stop dubbing Press x. Recording from the front side. menu when the tapes you use TYPE I (normal) or TYPE II...

Operating Instructions
Page 25
... ?" appears. Press PUSH ENTER again. Select "Play Mode Set Up ?" Press CD NX to select "PGM Check Clear ?", then press PUSH ENTER. 5 Move the multi stick toward b or B. you made remains in the display. 7 Press PUSH ENTER again. To cancel the menu operation Press MODE SELECT. The disc number and the track number appears. 6 After checking the program, press MODE SELECT. Entire program is cleared automatically. Add the...
... ?" appears. Press PUSH ENTER again. Select "Play Mode Set Up ?" Press CD NX to select "PGM Check Clear ?", then press PUSH ENTER. 5 Move the multi stick toward b or B. you made remains in the display. 7 Press PUSH ENTER again. To cancel the menu operation Press MODE SELECT. The disc number and the track number appears. 6 After checking the program, press MODE SELECT. Entire program is cleared automatically. Add the...

Operating Instructions
Page 47
Connecting surround speakers Connect the speaker cords of each component. Refer to the instructions of the surround speakers to the appropriate SURROUND SPEAKER jacks. FM antenna Connect the optional FM external antenna. Connect the solid cords to the red jacks and connect the striped cords to connect both left and right surround speakers. You can also use the TV antenna instead. Jack type A To the surround speaker (Right) To the surround speaker (Left) Note Be sure to the black jacks. Connecting external antennas Connect the external antenna to...
Connecting surround speakers Connect the speaker cords of each component. Refer to the instructions of the surround speakers to the appropriate SURROUND SPEAKER jacks. FM antenna Connect the optional FM external antenna. Connect the solid cords to the red jacks and connect the striped cords to connect both left and right surround speakers. You can also use the TV antenna instead. Jack type A To the surround speaker (Right) To the surround speaker (Left) Note Be sure to the black jacks. Connecting external antennas Connect the external antenna to...
Operating Instructions
Page 50
... and the metal parts that the power cord is connected firmly and the speakers are connected. • Insert only the stripped portion of the speaker cord into any problem using a tape longer than half a day. Should any slack in the tape. General The display starts flashing as soon as play, stop, and fast-winding, etc. "Step 3: Presetting radio stations" on page 6. - When the tape heads become damaged. Use separately sold...
... and the metal parts that the power cord is connected firmly and the speakers are connected. • Insert only the stripped portion of the speaker cord into any problem using a tape longer than half a day. Should any slack in the tape. General The display starts flashing as soon as play, stop, and fast-winding, etc. "Step 3: Presetting radio stations" on page 6. - When the tape heads become damaged. Use separately sold...

Operating Instructions
Page 51
... you select "Timer Select ?" The color irregularity on a TV screen persists. • Turn off the power and check the speaker cord. The remote does not function. • There is an obstacle between the remote and the system. • The remote is not pointing in program or shuffle mode. There is acoustic feedback. • Decrease the volume level. • Move the microphone away form the speakers or change the direction of...
... you select "Timer Select ?" The color irregularity on a TV screen persists. • Turn off the power and check the speaker cord. The remote does not function. • There is an obstacle between the remote and the system. • The remote is not pointing in program or shuffle mode. There is acoustic feedback. • Decrease the volume level. • Move the microphone away form the speakers or change the direction of...
Operating Instructions
Page 52
... antenna. Clean them (see "Cleaning the tape heads" on page 50). If other troubles not described above occur, reset the system as the preset stations, clock, and timer are cleared. Noise increases or the high frequencies are erased. • The record/playback heads are magnetized. menu. All the settings you made, such as follows: 1 Unplug the power cord. 2 Plug the power cord back in the "Stereo...
... antenna. Clean them (see "Cleaning the tape heads" on page 50). If other troubles not described above occur, reset the system as the preset stations, clock, and timer are cleared. Noise increases or the high frequencies are erased. • The record/playback heads are magnetized. menu. All the settings you made, such as follows: 1 Unplug the power cord. 2 Plug the power cord back in the "Stereo...
Operating Instructions
Page 53
... watts per channel minimum RMS power, with the interval set at a distance of 200 mm from the objective lens surface on the Optical Pick-up Block with 8 ohm loads both channels driven, from 250 milliwatts to rated output. Wavelength 780 - 790 nm Frequency response 2 Hz - 20 kHz (±0.5 dB) Signal-to 16 ohms SURROUND SPEAKER: accepts impedance of 16 ohms SUPER WOOFER: Voltage 1 V, impedance 1 kilohms CD player section System Compact disc...
... watts per channel minimum RMS power, with the interval set at a distance of 200 mm from the objective lens surface on the Optical Pick-up Block with 8 ohm loads both channels driven, from 250 milliwatts to rated output. Wavelength 780 - 790 nm Frequency response 2 Hz - 20 kHz (±0.5 dB) Signal-to 16 ohms SURROUND SPEAKER: accepts impedance of 16 ohms SUPER WOOFER: Voltage 1 V, impedance 1 kilohms CD player section System Compact disc...

Operating Instructions
Page 55
... preset audio effect file. CD Remote Button(s) CD N x X ./> m/M DISC SKIP* LOOP* FLASH* Function Starts play back. Stops playback. Searches for a station or selects a preset station. MODE SELECT Enters the menu mode. Parts Identification for the remote You can also operate the system with the supplied remote. *: You can operate with the remote only. Activates Flash function. TUNER Remote Button(s) Function TUNER/BAND Selects FM or AM. ./> (+, -) Selects a preset number. B/b/V/v ENTER Use to select menu and adjust the settings. Activates Loop function. TAPE Remote Button...
... preset audio effect file. CD Remote Button(s) CD N x X ./> m/M DISC SKIP* LOOP* FLASH* Function Starts play back. Stops playback. Searches for a station or selects a preset station. MODE SELECT Enters the menu mode. Parts Identification for the remote You can also operate the system with the supplied remote. *: You can operate with the remote only. Activates Flash function. TUNER Remote Button(s) Function TUNER/BAND Selects FM or AM. ./> (+, -) Selects a preset number. B/b/V/v ENTER Use to select menu and adjust the settings. Activates Loop function. TAPE Remote Button...
Operating Instructions
Page 56
... 27 Program Play 24 Protecting recordings 49 PTY 38 R Radio Data System 38 Radio stations presetting 8 tuning in 14 Recording a CD 13 a radio program 16 timer recording 43 Repeat Play 22 Resetting the system 52 S Saving recordings 49 Selecting the audio effect file 32 Setting the time 6 Shuffle Play 23 Sleep Timer 40 Sound adjustment 31 GROOVE 31 GROOVE-EX 32 V-GROOVE 32 Station name 38 T, U, V, W, X, Y, Z Tape Select Edit 30 Timer falling asleep to music...
... 27 Program Play 24 Protecting recordings 49 PTY 38 R Radio Data System 38 Radio stations presetting 8 tuning in 14 Recording a CD 13 a radio program 16 timer recording 43 Repeat Play 22 Resetting the system 52 S Saving recordings 49 Selecting the audio effect file 32 Setting the time 6 Shuffle Play 23 Sleep Timer 40 Sound adjustment 31 GROOVE 31 GROOVE-EX 32 V-GROOVE 32 Station name 38 T, U, V, W, X, Y, Z Tape Select Edit 30 Timer falling asleep to music...
Operating Instructions
Page 60
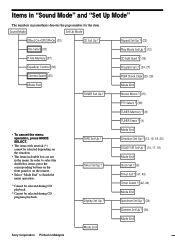
TAPE Set Up ? Timer Set Up ? Sound Mode Set Up Mode Effect OnpOff/OffpOn (33) CD Set Up ? * File Select (33) P File Memory (37) Equalizer Control (36) * Cinema Space (35) Repeat Set Up ? (22) Play Mode Set Up ? *(12) 1) CD Edit Start ? (30) 2) Program Set ? (24, 27) PGM Check Clear (25, 29) Mode End TUNER Set Up ? * Mode End Stereo Mono ? *(15) PTY Select ? *(38) TUNER Memory ? (8) TUNER Erase ? *(9) • To cancel the menu operation, press MODE SELECT. • The items...
TAPE Set Up ? Timer Set Up ? Sound Mode Set Up Mode Effect OnpOff/OffpOn (33) CD Set Up ? * File Select (33) P File Memory (37) Equalizer Control (36) * Cinema Space (35) Repeat Set Up ? (22) Play Mode Set Up ? *(12) 1) CD Edit Start ? (30) 2) Program Set ? (24, 27) PGM Check Clear (25, 29) Mode End TUNER Set Up ? * Mode End Stereo Mono ? *(15) PTY Select ? *(38) TUNER Memory ? (8) TUNER Erase ? *(9) • To cancel the menu operation, press MODE SELECT. • The items...


