Operating Instructions
Page 5
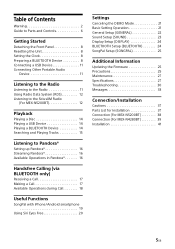
...Started Detaching the Front Panel 8 Resetting the Unit 8 Setting the Clock 8 Preparing a BLUETOOTH Device 8 Connecting a USB Device 11 Connecting Other Portable Audio Device 11 Listening to the Radio Listening to the Radio 11 Using Radio Data System (RDS 12 Listening to the SiriusXM Radio (For MEX-N5200BT 12 Playback Playing a Disc 14... Firmware 25 Precautions 25 Maintenance 27 Specifications 27 Troubleshooting 30 Messages 33 Connection/Installation Cautions 37 Parts List for Installation 37 Connection (For MEX-N5200BT 38 Connection (For MEX-N4280BT 39 Installation 41 5GB
...Started Detaching the Front Panel 8 Resetting the Unit 8 Setting the Clock 8 Preparing a BLUETOOTH Device 8 Connecting a USB Device 11 Connecting Other Portable Audio Device 11 Listening to the Radio Listening to the Radio 11 Using Radio Data System (RDS 12 Listening to the SiriusXM Radio (For MEX-N5200BT 12 Playback Playing a Disc 14... Firmware 25 Precautions 25 Maintenance 27 Specifications 27 Troubleshooting 30 Messages 33 Connection/Installation Cautions 37 Parts List for Installation 37 Connection (For MEX-N5200BT 38 Connection (For MEX-N4280BT 39 Installation 41 5GB

Operating Instructions
Page 8
... to the operating instructions supplied with a Smartphone by NFC. Caution alarm If you must reset the unit. 8GB 1 Press DSPL and (back)/MODE for a few seconds. Attaching the front panel Resetting the Unit Before operating the unit for the first time, or after replacing the car...and audio device (hereafter "BLUETOOTH device" if not otherwise specified). The alarm will erase the clock setting and some stored contents. Note Resetting the unit will only sound if the built-in amplifier is complete and the clock starts. Getting Started Detaching the Front Panel You can ...
... to the operating instructions supplied with a Smartphone by NFC. Caution alarm If you must reset the unit. 8GB 1 Press DSPL and (back)/MODE for a few seconds. Attaching the front panel Resetting the Unit Before operating the unit for the first time, or after replacing the car...and audio device (hereafter "BLUETOOTH device" if not otherwise specified). The alarm will erase the clock setting and some stored contents. Note Resetting the unit will only sound if the built-in amplifier is complete and the clock starts. Getting Started Detaching the Front Panel You can ...
Operating Instructions
Page 22
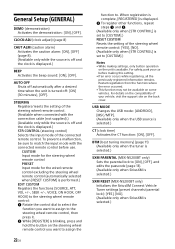
...remote control PRESET Input mode for the wired remote control excluding the steering wheel remote control (automatically selected when [RESET CUSTOM] is performed.) EDIT CUSTOM Registers the functions (SOURCE, ATT, VOL +/-, SEEK +/-, VOICE, ON HOOK...to [ON], [OFF], and edits the passcode (page 13). (Available only when SiriusXM is selected.) SXM RESET (MEX-N5200BT only) Initializes the SiriusXM Connect Vehicle Tuner settings (preset channels/parental lock): [YES], [NO]. (Available only ...after a desired time when the unit is selected.) SXM PARENTAL (MEX-N5200BT only) Sets the parental lock to .
...remote control PRESET Input mode for the wired remote control excluding the steering wheel remote control (automatically selected when [RESET CUSTOM] is performed.) EDIT CUSTOM Registers the functions (SOURCE, ATT, VOL +/-, SEEK +/-, VOICE, ON HOOK...to [ON], [OFF], and edits the passcode (page 13). (Available only when SiriusXM is selected.) SXM RESET (MEX-N5200BT only) Initializes the SiriusXM Connect Vehicle Tuner settings (preset channels/parental lock): [YES], [NO]. (Available only ...after a desired time when the unit is selected.) SXM PARENTAL (MEX-N5200BT only) Sets the parental lock to .

Operating Instructions
Page 30
... starts. If no operation is performed for more than 2 seconds to the unit. (The power requirement is 12 V DC.) The operation buttons do not reset the unit while you press and hold OFF. - The display disappears from the dashboard, see "Connection/Installation" (page 37). Press OFF on using the built... ignition is not solved, visit the support site on the unit. Set [DEMO-OFF] (page 22). Check that the car battery supplies enough power to reset the unit.
... starts. If no operation is performed for more than 2 seconds to the unit. (The power requirement is 12 V DC.) The operation buttons do not reset the unit while you press and hold OFF. - The display disappears from the dashboard, see "Connection/Installation" (page 37). Press OFF on using the built... ignition is not solved, visit the support site on the unit. Set [DEMO-OFF] (page 22). Check that the car battery supplies enough power to reset the unit.

Operating Instructions
Page 42
... Make sure the 4 catches on the original fuse. In such a case, consult your Sony dealer. Fuse replacement When replacing the fuse, Fuse (10 A) be sure to dashboard/center console Bracket Bracket Resetting the unit For details, see "Detaching the Front Panel" (page 8). Existing parts supplied &#... prevent malfunction, install only with the supplied screws . Detaching and attaching the front panel For details, see "Resetting the Unit" (page 8). Notes • If the catches are straight or bent outwards, the unit will not be installed securely and may...
... Make sure the 4 catches on the original fuse. In such a case, consult your Sony dealer. Fuse replacement When replacing the fuse, Fuse (10 A) be sure to dashboard/center console Bracket Bracket Resetting the unit For details, see "Detaching the Front Panel" (page 8). Existing parts supplied &#... prevent malfunction, install only with the supplied screws . Detaching and attaching the front panel For details, see "Resetting the Unit" (page 8). Notes • If the catches are straight or bent outwards, the unit will not be installed securely and may...

