Operating Instructions
Page 5
... 20 Connecting Other Devices 21 Turning On the Power 23 Carrying and Positioning the Monitor 28 Setting Up TV Channels 30 Using the On-screen Remote Control 33 Connecting to the Internet 37 Configuring Network Settings 40 Setting Up Mail 43 Guide to On-screen Icons 45 Wireless Connection at Home 47...
... 20 Connecting Other Devices 21 Turning On the Power 23 Carrying and Positioning the Monitor 28 Setting Up TV Channels 30 Using the On-screen Remote Control 33 Connecting to the Internet 37 Configuring Network Settings 40 Setting Up Mail 43 Guide to On-screen Icons 45 Wireless Connection at Home 47...
Operating Instructions
Page 17
Setup and Connections BASIC: Installing and Connecting Attaching the Base Station Stand page 19 Connecting to a TV Antenna page 20 Connecting to an External TV Tuner (STB page 20 Connecting Other Devices page 21 Turning On the Power page 23 Carrying and Positioning the Monitor page 28 BASIC: Basic Setting Setting Up TV Channels page 30 Using the On-screen Remote Control page 33 Connecting to the Internet page 37 Configuring Network Settings page 40 Setting Up Mail page 43 BASIC: Guide to On-screen Icons Guide to On-screen Icons page 45 17
Setup and Connections BASIC: Installing and Connecting Attaching the Base Station Stand page 19 Connecting to a TV Antenna page 20 Connecting to an External TV Tuner (STB page 20 Connecting Other Devices page 21 Turning On the Power page 23 Carrying and Positioning the Monitor page 28 BASIC: Basic Setting Setting Up TV Channels page 30 Using the On-screen Remote Control page 33 Connecting to the Internet page 37 Configuring Network Settings page 40 Setting Up Mail page 43 BASIC: Guide to On-screen Icons Guide to On-screen Icons page 45 17
Operating Instructions
Page 21
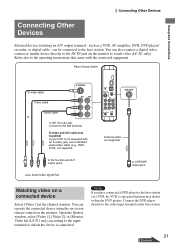
can also connect to watch video (LF-X1 only). Connect the DVD player directly to the video input terminal on the monitor to the IN2 terminal. Refer also to VHF/UHF output jack ... devices featuring an A/V output terminal - You can operate the connected device using the on-screen remote control on a connected device Select [Video 1] in the [Index] window. Open the [Index] window, select [Video 1], [Video 2], or [Monitor Video In] (LF-X1 only) according to the input terminal to the base station via a VCR, the VCR's copy...
can also connect to watch video (LF-X1 only). Connect the DVD player directly to the video input terminal on the monitor to the IN2 terminal. Refer also to VHF/UHF output jack ... devices featuring an A/V output terminal - You can operate the connected device using the on-screen remote control on a connected device Select [Video 1] in the [Index] window. Open the [Index] window, select [Video 1], [Video 2], or [Monitor Video In] (LF-X1 only) according to the input terminal to the base station via a VCR, the VCR's copy...
Operating Instructions
Page 31
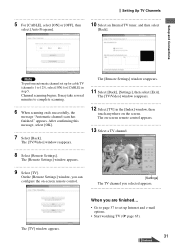
... [TV/Video] window reappears. 12 Select [TV] in step 5. The [Remote Settings] window appears. 9 Select [TV]. The [TV/Video] window reappears. The on-screen remote control appears. 13 Select a TV channel. 8 Select [Remote Settings]. The [Remote Settings] window reappears. 11 Select [Back], [Settings], then select [Exit].... It may take several minutes to 125), select [ON] for [CABLE] in the [Index] window, then touch anywhere on -screen remote control. [Settings] The TV channel you are finished... • Go to page 37 to set up Internet and e-mail options. • Start ...
... [TV/Video] window reappears. 12 Select [TV] in step 5. The [Remote Settings] window appears. 9 Select [TV]. The [TV/Video] window reappears. The on-screen remote control appears. 13 Select a TV channel. 8 Select [Remote Settings]. The [Remote Settings] window reappears. 11 Select [Back], [Settings], then select [Exit].... It may take several minutes to 125), select [ON] for [CABLE] in the [Index] window, then touch anywhere on -screen remote control. [Settings] The TV channel you are finished... • Go to page 37 to set up Internet and e-mail options. • Start ...
Operating Instructions
Page 32
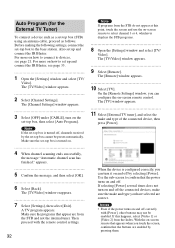
...the sub-screen to confirm that the power turns on and off by the set -top box is turned on and off correctly with the remote control settings. 32 When the device is configured correctly, you touch the screen, confirm that the buttons are enabled by pressing them. Notes •...]. A TV program appears. Then proceed with [Power], other buttons may not be preset automatically. If this point, touch the screen and use the on -screen remote control. Also set -top box to devices, see page 33. 1 Open the [Settings] window and select [TV/ Video]. The [TV] window appears. 11 Select ...
...the sub-screen to confirm that the power turns on and off by the set -top box is turned on and off correctly with the remote control settings. 32 When the device is configured correctly, you touch the screen, confirm that the buttons are enabled by pressing them. Notes •...]. A TV program appears. Then proceed with [Power], other buttons may not be preset automatically. If this point, touch the screen and use the on -screen remote control. Also set -top box to devices, see page 33. 1 Open the [Settings] window and select [TV/ Video]. The [TV] window appears. 11 Select ...
Operating Instructions
Page 33
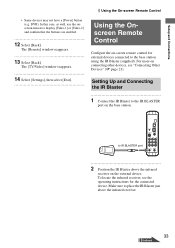
...[TV/Video] window reappears. 14 Select [Settings], then select [Exit]. to place the IR Blaster just above the infrared receiver on -screen remote control for the connected device. Make sure to IR BLASTER port 2 Position the IR Blaster above the infrared receiver. 33 Continued For more on the...[Video 1] or [Video 2] and confirm that the buttons are enabled. 12 Select [Back]. Setup and Connections Using the On-screen Remote Control • Some devices may not have a [Power] button (e.g. To locate the infrared receiver, see "Connecting Other Devices" (1 page 21). DVR).
...[TV/Video] window reappears. 14 Select [Settings], then select [Exit]. to place the IR Blaster just above the infrared receiver on -screen remote control for the connected device. Make sure to IR BLASTER port 2 Position the IR Blaster above the infrared receiver. 33 Continued For more on the...[Video 1] or [Video 2] and confirm that the buttons are enabled. 12 Select [Back]. Setup and Connections Using the On-screen Remote Control • Some devices may not have a [Power] button (e.g. To locate the infrared receiver, see "Connecting Other Devices" (1 page 21). DVR).
Operating Instructions
Page 35
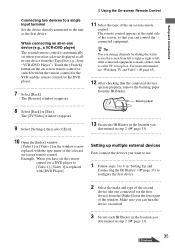
...information, see "Watching TV and Video" (1 page 65). 12 After checking that you can turn the device on -screen remote control to switch between the remote control for the VCR and the remote control for a DVD player to [Video 1], [Video 1] is now replaced with [DVD Player]. Make sure you can change ... two devices to a single input terminal Set the device directly connected to the unit as allin-one device from the [Type] list (e.g., Sony "VCR+DVD Player"). Backing paper 8 Select [Back] or [Exit]. Setting up multiple external devices First, connect the devices you determined in step ...
...information, see "Watching TV and Video" (1 page 65). 12 After checking that you can turn the device on -screen remote control to switch between the remote control for the VCR and the remote control for a DVD player to [Video 1], [Video 1] is now replaced with [DVD Player]. Make sure you can change ... two devices to a single input terminal Set the device directly connected to the unit as allin-one device from the [Type] list (e.g., Sony "VCR+DVD Player"). Backing paper 8 Select [Back] or [Exit]. Setting up multiple external devices First, connect the devices you determined in step ...
Operating Instructions
Page 36
..., pressing the [Rec] button on -screen remote control in the same way as the remote control supplied with the on-screen remote control that are not supported by the actual remote control. • The button names on the on-screen remote control do not exactly match those on the actual remote control. • When using the remote control for all-in-one devices, selecting...
..., pressing the [Rec] button on -screen remote control in the same way as the remote control supplied with the on-screen remote control that are not supported by the actual remote control. • The button names on the on-screen remote control do not exactly match those on the actual remote control. • When using the remote control for all-in-one devices, selecting...
Operating Instructions
Page 64
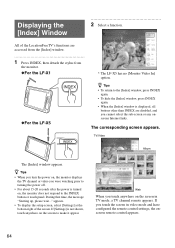
...INDEX are accessed from the [Index] window. 1 Press INDEX, then detach the stylus from the monitor. ◆For the LF-X1 ◆For the LF-X5 * The LF-X5 has no [Monitor Video In] option. During that time, the message "Starting up, please wait..." Web When you touch...the bottom right of the LocationFreeTV's functions are disabled, and you turn the power on the screen in video mode and have configured the remote control settings, the onscreen remote control appears. 64 Displaying the [Index] Window 2 Select a function. z Tips • To return to the [Index] window, press ...
...INDEX are accessed from the [Index] window. 1 Press INDEX, then detach the stylus from the monitor. ◆For the LF-X1 ◆For the LF-X5 * The LF-X5 has no [Monitor Video In] option. During that time, the message "Starting up, please wait..." Web When you touch...the bottom right of the LocationFreeTV's functions are disabled, and you turn the power on the screen in video mode and have configured the remote control settings, the onscreen remote control appears. 64 Displaying the [Index] Window 2 Select a function. z Tips • To return to the [Index] window, press ...
Operating Instructions
Page 65
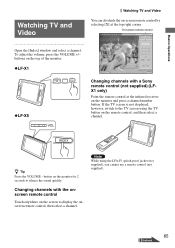
... the VOLUME +/- buttons on the top of the monitor. ◆LF-X1 ◆LF-X5 Changing channels with the onscreen remote control Touch anywhere on the monitor and press a channel number button. z Tip Press the VOLUME - Changing channels with a Sony remote control (not supplied) (LFX1 only) Point the remote control at the top right corner. Note While using the TV...
... the VOLUME +/- buttons on the top of the monitor. ◆LF-X1 ◆LF-X5 Changing channels with the onscreen remote control Touch anywhere on the monitor and press a channel number button. z Tip Press the VOLUME - Changing channels with a Sony remote control (not supplied) (LFX1 only) Point the remote control at the top right corner. Note While using the TV...
Operating Instructions
Page 66
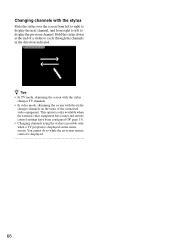
...to left to cycle through the channels in the direction indicated. This option is only available when the external video equipment has a tuner and remote control settings have been configured (1 page 33). • Changing channels using the stylus is possible only when a TV program is displayed. 66 ...You cannot do so while the on-screen remote control is displayed on the tuner of a stroke to display the previous channel. Hold the stylus down at the end of the connected video equipment...
...to left to cycle through the channels in the direction indicated. This option is only available when the external video equipment has a tuner and remote control settings have been configured (1 page 33). • Changing channels using the stylus is possible only when a TV program is displayed. 66 ...You cannot do so while the on-screen remote control is displayed on the tuner of a stroke to display the previous channel. Hold the stylus down at the end of the connected video equipment...
Operating Instructions
Page 67
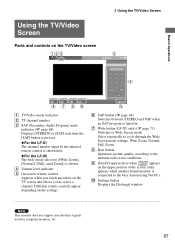
... [SAP] each time the [SAP] button is pressed. ◆For the LF-X1 The channel number input by the infrared remote control is shown here. ◆For the LF-X5 The wide mode selection ([Wide Zoom], [Normal], [Full], and [Zoom]) is tuned in. Different remote controls appear depending on the TV screen and allows you to Wide...
... [SAP] each time the [SAP] button is pressed. ◆For the LF-X1 The channel number input by the infrared remote control is shown here. ◆For the LF-X5 The wide mode selection ([Wide Zoom], [Normal], [Full], and [Zoom]) is tuned in. Different remote controls appear depending on the TV screen and allows you to Wide...

Operating Instructions
Page 143
...33). Change the wireless channel setting of the TV/[Video1] or [Video2] screen to connect with an antenna cable. To control these STB with the on -screen remote control. Causes and remedies • Make sure the base station is turned on. • During wireless connection inside the home,...connection inside the home, if a nearby device, such as the signal from the base station, change the setting on -screen remote control, connect them to be controlled with the on the wireless access point. • When Wireless or Wired LAN is operating on the same wireless channel as ...
...33). Change the wireless channel setting of the TV/[Video1] or [Video2] screen to connect with an antenna cable. To control these STB with the on -screen remote control. Causes and remedies • Make sure the base station is turned on. • During wireless connection inside the home,...connection inside the home, if a nearby device, such as the signal from the base station, change the setting on -screen remote control, connect them to be controlled with the on the wireless access point. • When Wireless or Wired LAN is operating on the same wireless channel as ...

Operating Instructions
Page 144
... poor. • Reprogram the on-screen remote control settings (1 page 33). (Some devices cannot be operated, or can also change to channel 3 or 4 with the on the base station. Cannot get cable TV channels to 125. With the LF-X1, You can only be displayed. •... not connected the device to the video input 1 terminal on -screen remote. Images from [Settings > TV/Video > Remote Settings], and after temporarily selecting the internal TV tuner, change the channel using a Sony brand TV remote control (not supplied). Connect to the base station's video output terminal. If...
... poor. • Reprogram the on-screen remote control settings (1 page 33). (Some devices cannot be operated, or can also change to channel 3 or 4 with the on the base station. Cannot get cable TV channels to 125. With the LF-X1, You can only be displayed. •... not connected the device to the video input 1 terminal on -screen remote. Images from [Settings > TV/Video > Remote Settings], and after temporarily selecting the internal TV tuner, change the channel using a Sony brand TV remote control (not supplied). Connect to the base station's video output terminal. If...
Operating Instructions
Page 157
... Network Settings 40 New mail indicator 11 No encryption 51 O On the go mode 47 On-screen Icons 45 On-screen Keyboard 117 on-screen remote control ........ 31, 32, 33, 35, 65, 67 P Palette 109 PDF Files 82 PIP 69, 76, 87 POWER indicator 10, 12, 14 POWER switch 11, 13, 14...
... Network Settings 40 New mail indicator 11 No encryption 51 O On the go mode 47 On-screen Icons 45 On-screen Keyboard 117 on-screen remote control ........ 31, 32, 33, 35, 65, 67 P Palette 109 PDF Files 82 PIP 69, 76, 87 POWER indicator 10, 12, 14 POWER switch 11, 13, 14...
LFAPC1 Software Instructions
Page 2
...Base Station from Your Computer 19 Step 9 Configuring the On-screen Remote Control ...........20 Configuring the TV Remote Control 20 Configuring the Remote Control for Video 1 and Video 2... 21 Watching Video Remotely Starting the NetAV Function 23 Starting the NetAV Function 23 Quitting ...the NetAV Function 24 NetAV Basic Window 25 Displaying the Index 28 2 You can view the NetAV Quick Start Guide by opening the Start menu, selecting [All programs] ([Programs] in Windows 2000), and then selecting [Sony...
...Base Station from Your Computer 19 Step 9 Configuring the On-screen Remote Control ...........20 Configuring the TV Remote Control 20 Configuring the Remote Control for Video 1 and Video 2... 21 Watching Video Remotely Starting the NetAV Function 23 Starting the NetAV Function 23 Quitting ...the NetAV Function 24 NetAV Basic Window 25 Displaying the Index 28 2 You can view the NetAV Quick Start Guide by opening the Start menu, selecting [All programs] ([Programs] in Windows 2000), and then selecting [Sony...
LFAPC1 Software Instructions
Page 3
... manual are only example images. 3 Pre-release version Watching TV and Video 29 TV Channel Selection 29 Volume Adjustment 29 Using the On-screen Remote Control 30 Selecting a Secondary Audio Program (SAP 30 Changing the Streaming Rate 30 Watching Video at Home with the NetAV Function Watching Video at Home ... LAN Setup 32 Others Mouse and Keyboard Operations 33 Removing LocationFree Player from Your Computer .......35 Troubleshooting 36 Index 38 Trademarks 39 Contacting Sony If, after reading these operating instructions, you have additional questions related to the use of your...
... manual are only example images. 3 Pre-release version Watching TV and Video 29 TV Channel Selection 29 Volume Adjustment 29 Using the On-screen Remote Control 30 Selecting a Secondary Audio Program (SAP 30 Changing the Streaming Rate 30 Watching Video at Home with the NetAV Function Watching Video at Home ... LAN Setup 32 Others Mouse and Keyboard Operations 33 Removing LocationFree Player from Your Computer .......35 Troubleshooting 36 Index 38 Trademarks 39 Contacting Sony If, after reading these operating instructions, you have additional questions related to the use of your...
LFAPC1 Software Instructions
Page 7
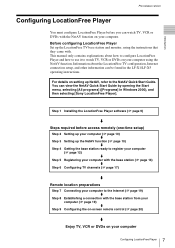
...station from your computer (1 page 19) m Configuring the on-screen remote control (1 page 20) m Enjoy TV, VCR or DVDs on your computer. You can be found in Windows 2000), and then selecting [Sony LocationFree Player]. This manual only contains explanations about the LocationFree TV ...configuration, Internet connection setup, and other information can view the NetAV Quick Start Guide by opening the Start menu, selecting [All programs] ([Programs] in the LF-X1/LF-X5 operating...
...station from your computer (1 page 19) m Configuring the on-screen remote control (1 page 20) m Enjoy TV, VCR or DVDs on your computer. You can be found in Windows 2000), and then selecting [Sony LocationFree Player]. This manual only contains explanations about the LocationFree TV ...configuration, Internet connection setup, and other information can view the NetAV Quick Start Guide by opening the Start menu, selecting [All programs] ([Programs] in the LF-X1/LF-X5 operating...
LFAPC1 Software Instructions
Page 20
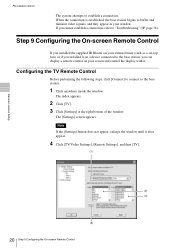
...connection is established, the base station begins to the base station, you can display a remote control on your screen and control the display with it. Step 9 Configuring the On-screen Remote Control If you installed the supplied IR Blaster on a device connected to buffer and transmit ... set-top box) or if you cannot establish a connection, refer to the base station. 1 Click anywhere inside the window. Configuring the TV Remote Control Before performing the following steps, click [Connect] to connect to "Troubleshooting" (1 page 36). The [Settings] screen appears. Note If the [...
...connection is established, the base station begins to the base station, you can display a remote control on your screen and control the display with it. Step 9 Configuring the On-screen Remote Control If you installed the supplied IR Blaster on a device connected to buffer and transmit ... set-top box) or if you cannot establish a connection, refer to the base station. 1 Click anywhere inside the window. Configuring the TV Remote Control Before performing the following steps, click [Connect] to connect to "Troubleshooting" (1 page 36). The [Settings] screen appears. Note If the [...
LFAPC1 Software Instructions
Page 21
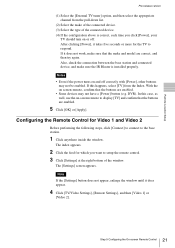
... clicking [Power], it does appear. 4 Click [TV/Video Settings], [Remote Settings], and then [Video 1] or [Video 2]. 21 Step 9 Configuring the On-screen Remote Control If this case, as well, use the on-screen remote to setup the remote control. 3 Click [Settings] at the right bottom of the connected device. ...five seconds or more for Video 1 and Video 2 Before performing the following steps, click [Connect] to connect to respond. Configuring the Remote Control for the TV to the base station. 1 Click anywhere inside the window. If it does not work, make sure that the make...
... clicking [Power], it does appear. 4 Click [TV/Video Settings], [Remote Settings], and then [Video 1] or [Video 2]. 21 Step 9 Configuring the On-screen Remote Control If this case, as well, use the on-screen remote to setup the remote control. 3 Click [Settings] at the right bottom of the connected device. ...five seconds or more for Video 1 and Video 2 Before performing the following steps, click [Connect] to connect to respond. Configuring the Remote Control for the TV to the base station. 1 Click anywhere inside the window. If it does not work, make sure that the make...

