
Operating Instructions
Page 2
Contents For detailed information on the Base Station 18 The Features of the Base Station 20 Automatic NetAV check 20 Receiving remote signals 20 What is the LocationFree® Base Station 4 Identifying Parts and Controls 7 Checking the Package Contents 9 Dynamic DNS Terms of Use Agreement 10 Setup and Cable Connections 11 Attaching the Base Station stand 11 Connect the power cord...
Contents For detailed information on the Base Station 18 The Features of the Base Station 20 Automatic NetAV check 20 Receiving remote signals 20 What is the LocationFree® Base Station 4 Identifying Parts and Controls 7 Checking the Package Contents 9 Dynamic DNS Terms of Use Agreement 10 Setup and Cable Connections 11 Attaching the Base Station stand 11 Connect the power cord...
Operating Instructions
Page 7
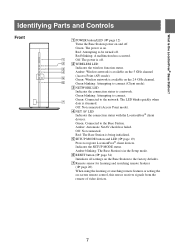
... status to the network. Off: Not connected. Red: The Base Station is the LocationFree® Base Station? Green: Connected to connect. Amber blinking: The Base Station is streamed. The LED blinks quickly when data is in the Setup mode. 6 RESET button (1 page 34) Initializes all settings on the Base Station to be turned off . Identifying Parts and Controls Front WIRELESS...
... status to the network. Off: Not connected. Red: The Base Station is the LocationFree® Base Station? Green: Connected to connect. Amber blinking: The Base Station is streamed. The LED blinks quickly when data is in the Setup mode. 6 RESET button (1 page 34) Initializes all settings on the Base Station to be turned off . Identifying Parts and Controls Front WIRELESS...
Operating Instructions
Page 11
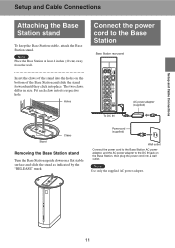
... the power cord to the DC IN jack on a flat stable surface and slide the stand as indicated by the "RELEASE" mark. Setup and Cable Connections Setup and Cable Connections Attaching the Base Station stand To keep the Base Station stable, attach the Base Station stand. Note Place the Base Station at least 4 inches (10 cm) away from the wall.
... the power cord to the DC IN jack on a flat stable surface and slide the stand as indicated by the "RELEASE" mark. Setup and Cable Connections Setup and Cable Connections Attaching the Base Station stand To keep the Base Station stable, attach the Base Station stand. Note Place the Base Station at least 4 inches (10 cm) away from the wall.
Operating Instructions
Page 12
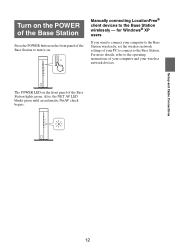
The POWER LED on . WIRELESS NETWORK NET AV SETUP MODE RESET Setup and Cable Connections 12 For more details, refer to the Base Station. for Windows® XP users If you want to connect your computer to the Base Station wirelessly, set the wireless network settings of your PC to ...until an automatic NetAV check begins. Turn on the POWER of the Base Station Press the POWER button on the front panel of the Base Station to the Base Station wirelessly - WIRELESS NETWORK NET AV SETUP MODE RESET Manually connecting LocationFree® client devices to turn it on the front panel of ...
The POWER LED on . WIRELESS NETWORK NET AV SETUP MODE RESET Setup and Cable Connections 12 For more details, refer to the Base Station. for Windows® XP users If you want to connect your computer to the Base Station wirelessly, set the wireless network settings of your PC to ...until an automatic NetAV check begins. Turn on the POWER of the Base Station Press the POWER button on the front panel of the Base Station to the Base Station wirelessly - WIRELESS NETWORK NET AV SETUP MODE RESET Manually connecting LocationFree® client devices to turn it on the front panel of ...
Operating Instructions
Page 13
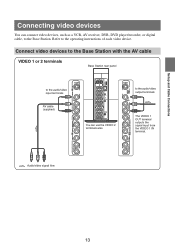
... L AUDIO R Y The VIDEO 1 OUT terminal PB outputs the signal input from PR the VIDEO 1 IN terminal. S VIDEO to the operating instructions of each video device. Setup and Cable Connections Connecting video devices You can connect video devices, such as a VCR, AV receiver, DVR, DVD player/recorder, or digital cable, to the... R VIDEO DC IN 12V L AUDIO R VIDEO 2 IN (VIDEO/COMPONENT) VIDEO 2 OUT (VIDEO/COMPONENT) You can use the VIDEO 2 terminals also. Connect video devices to the Base Station with the AV cable VIDEO 1 or 2 terminals Base Station rear panel S VIDEO to the...
... L AUDIO R Y The VIDEO 1 OUT terminal PB outputs the signal input from PR the VIDEO 1 IN terminal. S VIDEO to the operating instructions of each video device. Setup and Cable Connections Connecting video devices You can connect video devices, such as a VCR, AV receiver, DVR, DVD player/recorder, or digital cable, to the... R VIDEO DC IN 12V L AUDIO R VIDEO 2 IN (VIDEO/COMPONENT) VIDEO 2 OUT (VIDEO/COMPONENT) You can use the VIDEO 2 terminals also. Connect video devices to the Base Station with the AV cable VIDEO 1 or 2 terminals Base Station rear panel S VIDEO to the...

Operating Instructions
Page 14
Setup and Cable Connections Connect video devices to the Base Station with an S-Video and audio cables VIDEO 1 terminals to the audio/S-Video input terminals S VIDEO S-Video cable (not supplied) VIDEO 1 IN VIDEO Audio cable (not supplied) L AUDIO R Y PB PR Base Station rear panel VIDEO 1 IN OUT VIDEO 1 WLAN S VIDEO S VIDEO CLIENT AP VIDEO L AUDIO R Y PB...
Setup and Cable Connections Connect video devices to the Base Station with an S-Video and audio cables VIDEO 1 terminals to the audio/S-Video input terminals S VIDEO S-Video cable (not supplied) VIDEO 1 IN VIDEO Audio cable (not supplied) L AUDIO R Y PB PR Base Station rear panel VIDEO 1 IN OUT VIDEO 1 WLAN S VIDEO S VIDEO CLIENT AP VIDEO L AUDIO R Y PB...
Operating Instructions
Page 15
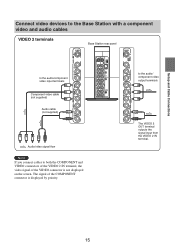
The signal of the VIDEO connector is displayed by priority. 15 Setup and Cable Connections Connect video devices to the Base Station with a component video and audio cables VIDEO 2 terminals S VIDEO Base Station rear panel S VIDEO OUT VIDEO 1 VIDEO 1 IN VIDEO L AUDIO to the audio/component R video input terminals Y PB Component video cable (not supplied) PR...
The signal of the VIDEO connector is displayed by priority. 15 Setup and Cable Connections Connect video devices to the Base Station with a component video and audio cables VIDEO 2 terminals S VIDEO Base Station rear panel S VIDEO OUT VIDEO 1 VIDEO 1 IN VIDEO L AUDIO to the audio/component R video input terminals Y PB Component video cable (not supplied) PR...

Operating Instructions
Page 16
...IR Blaster Attach the supplied IR Blaster to the video devices connected to the video input terminal on the Base Station. z Tip To operate video devices from the LocationFree® client devices, you connect a DVD player to the operating instructions of the page. VIDEO L AUDIO... (supplied) Infrared transmitter Remote sensor With reference to the Base Station via the IR Blaster. Note If you must connect the supplied IR Blaster. Setup and Cable Connections Watching video with the LocationFree® client devices on Sony Recorders and other products are identified by the symbol.
...IR Blaster Attach the supplied IR Blaster to the video devices connected to the video input terminal on the Base Station. z Tip To operate video devices from the LocationFree® client devices, you connect a DVD player to the operating instructions of the page. VIDEO L AUDIO... (supplied) Infrared transmitter Remote sensor With reference to the Base Station via the IR Blaster. Note If you must connect the supplied IR Blaster. Setup and Cable Connections Watching video with the LocationFree® client devices on Sony Recorders and other products are identified by the symbol.

Operating Instructions
Page 17
... it. z Tips • If the IR Blaster cable is too short, use the 3.5 mm jack extension cable (not supplied). • Remote sensors on Sony Recorders and other products are identified by the symbol. • You can set the video devices and the IR Blaster as shown. IR Blaster Remote..., you need to the LocationFree® Player's Help. 17 Setup and Cable Connections When operating two video devices with the IR Blaster, set up two on-screen remote controls for each video input connector, except if you to operate two video devices connected directly to the Base Station, and to the operating...
... it. z Tips • If the IR Blaster cable is too short, use the 3.5 mm jack extension cable (not supplied). • Remote sensors on Sony Recorders and other products are identified by the symbol. • You can set the video devices and the IR Blaster as shown. IR Blaster Remote..., you need to the LocationFree® Player's Help. 17 Setup and Cable Connections When operating two video devices with the IR Blaster, set up two on-screen remote controls for each video input connector, except if you to operate two video devices connected directly to the Base Station, and to the operating...

Operating Instructions
Page 19
...Base Station without your registration password (1 page 31). The SETUP MODE LED starts blinking amber. Registering a device via the Internet When you register a device via the Internet] in the [Setting Status] screen (1 page 24). 2 Register the device by using the LF-V30 in Access Point mode, the Base Station... LocationFree® Client Devices on the Base Station Registering a device by entering the information you obtained. When you are using the SETUP MODE button When you register a device near the Base Station, you are registering a computer installed with the LocationFree&#...
...Base Station without your registration password (1 page 31). The SETUP MODE LED starts blinking amber. Registering a device via the Internet When you register a device via the Internet] in the [Setting Status] screen (1 page 24). 2 Register the device by using the LF-V30 in Access Point mode, the Base Station... LocationFree® Client Devices on the Base Station Registering a device by entering the information you obtained. When you are using the SETUP MODE button When you register a device near the Base Station, you are registering a computer installed with the LocationFree&#...
Operating Instructions
Page 28
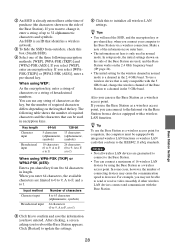
...-PSK (TKIP)] and [WPA2-PSK (AES)]. Click [Restart] to the IEEE802.11a/b/g standards. In setup mode, the initial settings shown on the side of the Base Station are used, and the Base Station works on the 2.4 GHz frequency band (1 page 24). • The initial setting for computers, the...all wireless LAN devices are limited to 0 to 9, A to F, and a to the Base Station via the Base Station from 8 to decrease. z Tip To use the Base Station as a wireless access point. Base Station Settings 28 An SSID is an ID that is only compatible with integrated wireless LAN functions ...
...-PSK (TKIP)] and [WPA2-PSK (AES)]. Click [Restart] to the IEEE802.11a/b/g standards. In setup mode, the initial settings shown on the side of the Base Station are used, and the Base Station works on the 2.4 GHz frequency band (1 page 24). • The initial setting for computers, the...all wireless LAN devices are limited to 0 to 9, A to F, and a to the Base Station via the Base Station from 8 to decrease. z Tip To use the Base Station as a wireless access point. Base Station Settings 28 An SSID is an ID that is only compatible with integrated wireless LAN functions ...

Operating Instructions
Page 33
... may be a hardware malfunction or a settings file error. Others 33 Self-diagnostics LED Base Station front panel WIRELESS NETWORK NET AV SETUP MODE RESET POWER LED POWER LED on again. 2 Initialize the Base Station (1 page 34). 3 If the problem persists, contact Sony LocationFree® Customer Support (1 the back cover). Refer to the following table for descriptions of...
... may be a hardware malfunction or a settings file error. Others 33 Self-diagnostics LED Base Station front panel WIRELESS NETWORK NET AV SETUP MODE RESET POWER LED POWER LED on again. 2 Initialize the Base Station (1 page 34). 3 If the problem persists, contact Sony LocationFree® Customer Support (1 the back cover). Refer to the following table for descriptions of...
Operating Instructions
Page 34
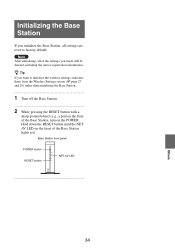
Hold down the RESET button until the NET AV LED on the POWER. Initializing the Base Station If you initialize the Base Station, all of the Base Station lights red. Base Station front panel POWER button RESET button WIRELESS NETWORK NET AV SETUP MODE RESET NET AV LED Others 34 Note After initializing, all settings are reset to initialize the...
Hold down the RESET button until the NET AV LED on the POWER. Initializing the Base Station If you initialize the Base Station, all of the Base Station lights red. Base Station front panel POWER button RESET button WIRELESS NETWORK NET AV SETUP MODE RESET NET AV LED Others 34 Note After initializing, all settings are reset to initialize the...

Operating Instructions
Page 35
...reach to the install location of the Base Station LF-V30 to check the settings. • Check whether the modem power and...SETUP MODE LED is securely connected. • Make sure you set the Base Station to check the cause of LocationFree® Base Station. Cannot connect a computer to the Base Station. Start the LocationFree® Player, click of the Base Station you connect the Base Station... contact Sony LocationFree® Customer Support (1 the back cover). Cannot switch to the information provided in this section. Configure the same information on the Base Station keeps ...
...reach to the install location of the Base Station LF-V30 to check the settings. • Check whether the modem power and...SETUP MODE LED is securely connected. • Make sure you set the Base Station to check the cause of LocationFree® Base Station. Cannot connect a computer to the Base Station. Start the LocationFree® Player, click of the Base Station you connect the Base Station... contact Sony LocationFree® Customer Support (1 the back cover). Cannot switch to the information provided in this section. Configure the same information on the Base Station keeps ...

Operating Instructions
Page 36
...setup screen fails. Base Station Settings Problem Cannot open the [Base Station Settings] page right after setting. Authentication of the "Quick Start Guide." • If you enter the correct user name? Cannot delete the registered information of LocationFree® Player again to open the [Base Station... Settings] page with a wired LAN, you enter uppercase letters instead of the Base Station. Click [Base Station Settings] of a PC which is assigned to a ...
...setup screen fails. Base Station Settings Problem Cannot open the [Base Station Settings] page right after setting. Authentication of the "Quick Start Guide." • If you enter the correct user name? Cannot delete the registered information of LocationFree® Player again to open the [Base Station... Settings] page with a wired LAN, you enter uppercase letters instead of the Base Station. Click [Base Station Settings] of a PC which is assigned to a ...

Operating Instructions
Page 38
...-T/100BASE-TX Ethernet with RJ-45 interface (1) IR BLASTER Minijack (2) Wireless Wireless LAN Standard Frequency range Modulation Access Point Mode IEEE802.11a/b/g (IEEE802.11b/g in Setup mode) Client Mode IEEE802.11b/g Access Point mode 2.4 GHz band: Channels 1, 6, and 11 5 GHz band: Channels 36, 40, 44, and 48 Client mode 2.4 GHz band...
...-T/100BASE-TX Ethernet with RJ-45 interface (1) IR BLASTER Minijack (2) Wireless Wireless LAN Standard Frequency range Modulation Access Point Mode IEEE802.11a/b/g (IEEE802.11b/g in Setup mode) Client Mode IEEE802.11b/g Access Point mode 2.4 GHz band: Channels 1, 6, and 11 5 GHz band: Channels 36, 40, 44, and 48 Client mode 2.4 GHz band...
