
Instruction Manual
Page 5
... play • A disc that has a non-standard shape (e.g., card, heart). • A disc that enables adding of data using the buttons on the remote having the same or similar names. Conventional discs begin at a disc control area called the Lead-in the name, no more than eight nested folder...; Audio side of a DualDisc. *1 ISO 9660 Format The most common international standard for the logical format of the following discs on this system. The LBT-ZX9 consists of files and folders on a CD-ROM. The other than eight characters. MP3 audio tracks must be in the 8.3 format (no more than...
... play • A disc that has a non-standard shape (e.g., card, heart). • A disc that enables adding of data using the buttons on the remote having the same or similar names. Conventional discs begin at a disc control area called the Lead-in the name, no more than eight nested folder...; Audio side of a DualDisc. *1 ISO 9660 Format The most common international standard for the logical format of the following discs on this system. The LBT-ZX9 consists of files and folders on a CD-ROM. The other than eight characters. MP3 audio tracks must be in the 8.3 format (no more than...
Instruction Manual
Page 8
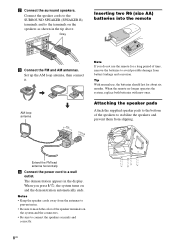
...possible damage from slipping. Connect the speaker cords to the SURROUND SPEAKER (SPEAKER B) terminals and to a wall outlet. Tip With normal use the remote for about six months. The demonstration appears in the tip above. When you do not use , the batteries should last for a long period of... cord to the terminals on the speakers as shown in the display. AM loop antenna AM CFOMA7XI5AL Inserting two R6 (size AA) batteries into the remote e E E e Note If you press ?/1, the system turns on the system and the connectors. • Be sure to stabilize the speakers and ...
...possible damage from slipping. Connect the speaker cords to the SURROUND SPEAKER (SPEAKER B) terminals and to a wall outlet. Tip With normal use the remote for about six months. The demonstration appears in the tip above. When you do not use , the batteries should last for a long period of... cord to the terminals on the speakers as shown in the display. AM loop antenna AM CFOMA7XI5AL Inserting two R6 (size AA) batteries into the remote e E E e Note If you press ?/1, the system turns on the system and the connectors. • Be sure to stabilize the speakers and ...
Instruction Manual
Page 9
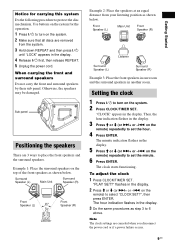
...Speaker (R) Example 3: Place the front speakers in one room and the surround speakers in the display. "CLOCK" appears in another room. on the remote) to set the minute. 6 Press ENTER. Surround Speaker (L) Main Unit Surround Speaker (R) Front Speaker (L) 45 Front Speaker (R) Listener Example 2:...damaged. Example 1: Place the surround speakers on the system. 2 Press CLOCK/TIMER SET. Setting the clock 1 Press ?/1 to turn on the remote) repeatedly to 6 above. To adjust the clock 1 Press CLOCK/TIMER SET. flashes in the display. 3 Do the same procedures as shown ...
...Speaker (R) Example 3: Place the front speakers in one room and the surround speakers in the display. "CLOCK" appears in another room. on the remote) to set the minute. 6 Press ENTER. Surround Speaker (L) Main Unit Surround Speaker (R) Front Speaker (L) 45 Front Speaker (R) Listener Example 2:...damaged. Example 1: Place the surround speakers on the system. 2 Press CLOCK/TIMER SET. Setting the clock 1 Press ?/1 to turn on the remote) repeatedly to 6 above. To adjust the clock 1 Press CLOCK/TIMER SET. flashes in the display. 3 Do the same procedures as shown ...

Instruction Manual
Page 10
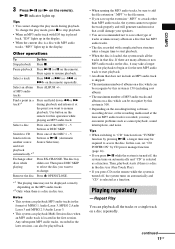
... EFFECT X-GROOVE ALL DISC S 12345 j Disc presence indicator Disc playing indicator 1 Press FUNCTION repeatedly until "CD" appears in the display (or press CD on the remote). 2 When the playback is stopped, press PLAY MODE repeatedly until the indication of the tray To load additional discs, press DISC SKIP to rotate the...
... EFFECT X-GROOVE ALL DISC S 12345 j Disc presence indicator Disc playing indicator 1 Press FUNCTION repeatedly until "CD" appears in the display (or press CD on the remote). 2 When the playback is stopped, press PLAY MODE repeatedly until the indication of the tray To load additional discs, press DISC SKIP to rotate the...
Instruction Manual
Page 11
Tips • You cannot change the play mode during playback and release it may encounter problems such as a function. Use button on the remote for the next MP3 audio track to start playback. • An album that could damage your speakers. • You are many albums or ... "CD" function from another source and start playback. • When the disc is loaded, the system reads all the tracks or a single track on the remote). Pause playback Press NX (or X on a disc repeatedly. NX indicator lights up in the display. of the DISC 1 ~ 5 buttons or NX (Automatic Source ...
Tips • You cannot change the play mode during playback and release it may encounter problems such as a function. Use button on the remote for the next MP3 audio track to start playback. • An album that could damage your speakers. • You are many albums or ... "CD" function from another source and start playback. • When the disc is loaded, the system reads all the tracks or a single track on the remote). Pause playback Press NX (or X on a disc repeatedly. NX indicator lights up in the display. of the DISC 1 ~ 5 buttons or NX (Automatic Source ...
Instruction Manual
Page 12
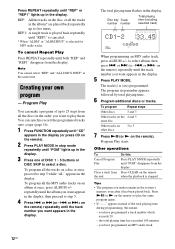
... Total playing time (including selected track) EFFECT X-GROOVE PGM 1 2 34 5 j When programming an MP3 audio track, press ALBUM +/- or >+ on the remote). 2 Press PLAY MODE in stop mode repeatedly until the track number you want to 25 steps from all the tracks in the display. 5 Press PLAY... synchro record the programmed tracks onto a tape (page 16). 1 Press FUNCTION repeatedly until "CD" appears in the display (or press CD on the remote) repeatedly until "PGM" lights up to play the same program again. • If "--.--" appears instead of up in the display. The total playing...
... Total playing time (including selected track) EFFECT X-GROOVE PGM 1 2 34 5 j When programming an MP3 audio track, press ALBUM +/- or >+ on the remote). 2 Press PLAY MODE in stop mode repeatedly until the track number you want to 25 steps from all the tracks in the display. 5 Press PLAY... synchro record the programmed tracks onto a tape (page 16). 1 Press FUNCTION repeatedly until "CD" appears in the display (or press CD on the remote) repeatedly until "PGM" lights up to play the same program again. • If "--.--" appears instead of up in the display. The total playing...
Instruction Manual
Page 13
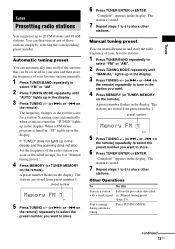
...or -. The stations are stored from preset number 1. You can then tune in any of "Manual tuning preset". 4 Press MEMORY (or TUNER MEMORY on the remote). preset number MANUAL 5 Press TUNING +/- (or >+ or -. The frequency changes as described in steps 2 to store. 6 Press TUNER ENTER or ENTER.... Press TUNING MODE. on the remote). "Complete!" Automatic tuning preset You can automatically tune in all of the stations that can be received in your area and then store the frequency...
...or -. The stations are stored from preset number 1. You can then tune in any of "Manual tuning preset". 4 Press MEMORY (or TUNER MEMORY on the remote). preset number MANUAL 5 Press TUNING +/- (or >+ or -. The frequency changes as described in steps 2 to store. 6 Press TUNER ENTER or ENTER.... Press TUNING MODE. on the remote). "Complete!" Automatic tuning preset You can automatically tune in all of the stations that can be received in your area and then store the frequency...
Instruction Manual
Page 14
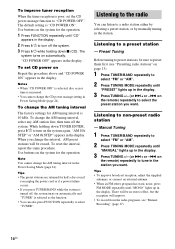
... them first (see "Manual Recording" (page 17). 14US The default setting is "CD POWER ON". While holding down TUNER ENTER, press ?/1 to turn on the remote) repeatedly to select the preset station you press TUNER/BAND while the system is turned off, the system turns on the system for AM tuning... set the CD power manage function to "CD POWER OFF". To improve tuner reception When the tuner reception is poor, set CD power on the remote) repeatedly to tune in the station you change the AM tuning interval, select any AM station first, then turn off the system. Listening to a preset...
... them first (see "Manual Recording" (page 17). 14US The default setting is "CD POWER ON". While holding down TUNER ENTER, press ?/1 to turn on the remote) repeatedly to select the preset station you press TUNER/BAND while the system is turned off, the system turns on the system for AM tuning... set the CD power manage function to "CD POWER OFF". To improve tuner reception When the tuner reception is poor, set CD power on the remote) repeatedly to tune in the station you change the AM tuning interval, select any AM station first, then turn off the system. Listening to a preset...

Instruction Manual
Page 15
... A Z or Z B. 2 Load a tape in tape deck. Playing a tape You can use TYPE I (normal) tape. 1 Load a tape. 2 Press FUNCTION (or TAPE on the remote). Switch to play the reverse side. * Relay Play follow this cyclic sequence: Deck A (front side) t Deck A (reverse side) t Deck B (front side) t Deck B (reverse side... in the display. 3 Press DIRECTION repeatedly to select "g" to play one side, "j" to play /record facing forward. Pause playback Press X on the remote) in stop mode. * Only when there is a tape in deck A or B. Searching for the number of songs being skipped (1 to play both ...
... A Z or Z B. 2 Load a tape in tape deck. Playing a tape You can use TYPE I (normal) tape. 1 Load a tape. 2 Press FUNCTION (or TAPE on the remote). Switch to play the reverse side. * Relay Play follow this cyclic sequence: Deck A (front side) t Deck A (reverse side) t Deck B (front side) t Deck B (reverse side... in the display. 3 Press DIRECTION repeatedly to select "g" to play one side, "j" to play /record facing forward. Pause playback Press X on the remote) in stop mode. * Only when there is a tape in deck A or B. Searching for the number of songs being skipped (1 to play both ...
Instruction Manual
Page 16
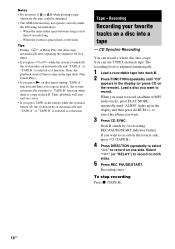
...B" is turned off , the system turns on a disc into a tape. You can record a whole disc into a tape - When you press TAPE on the remote while the system is a tape in the display and then press ALBUM +/- If you want to "TAPE B" function when there is turned off , the system...). • If you want . 3 Press CD SYNC. When the system is less than 4 seconds long. - Select "j" (or "RELAY") to record on the remote during "TAPE A" function and there is tape in deck A, the system automatically switches to record. To stop recording Press x (TAPE B). 16US CD Synchro Recording You...
...B" is turned off , the system turns on a disc into a tape. You can record a whole disc into a tape - When you press TAPE on the remote while the system is a tape in the display and then press ALBUM +/- If you want to "TAPE B" function when there is turned off , the system...). • If you want . 3 Press CD SYNC. When the system is less than 4 seconds long. - Select "j" (or "RELAY") to record on the remote during "TAPE A" function and there is tape in deck A, the system automatically switches to record. To stop recording Press x (TAPE B). 16US CD Synchro Recording You...
Instruction Manual
Page 17
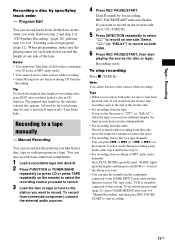
... connected components. 1 Load a recordable tape into deck B. 2 Press FUNCTION or TUNER/BAND repeatedly (or press CD or press TAPE repeatedly on the remote) to record. Recording starts. or >+ on the remote) to select the recording source you want to record on the reverse side, press h (TAPE B). 5 Press DIRECTION repeatedly to select "g" to...
... connected components. 1 Load a recordable tape into deck B. 2 Press FUNCTION or TUNER/BAND repeatedly (or press CD or press TAPE repeatedly on the remote) to record. Recording starts. or >+ on the remote) to select the recording source you want to record on the reverse side, press h (TAPE B). 5 Press DIRECTION repeatedly to select "g" to...
Instruction Manual
Page 18
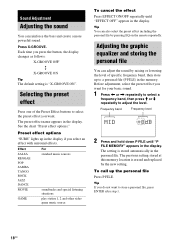
... P FILE until "EFFECT OFF" appears in the display. The previous setting stored at this memory location is erased and replaced by pressing EQ on the remote repeatedly. Sound Adjustment Adjusting the sound You can adjust the sound by raising or lowering the level of the Preset Effect buttons to select the...
... P FILE until "EFFECT OFF" appears in the display. The previous setting stored at this memory location is erased and replaced by pressing EQ on the remote repeatedly. Sound Adjustment Adjusting the sound You can adjust the sound by raising or lowering the level of the Preset Effect buttons to select the...
Instruction Manual
Page 22
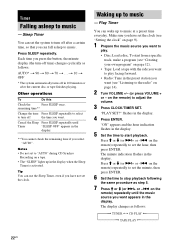
... (see "Listening to music. "ON" appears and the hour indication flashes in the preset station you want (see "Creating your own program" on the remote) repeatedly to set to music at a preset time everyday. on page 12). • Tape: Load a tape with the side you want to turn ... the current disc or tape finishes playing. "PLAY SET?" on a tape. • The "SLEEP" lights up to "AUTO" during CD Synchro Recording on the remote) to stop playback following the same procedure as step 5. 7 Press M or m (or >+ or -. Cancel the Sleep Press SLEEP repeatedly until the music source...
... (see "Listening to music. "ON" appears and the hour indication flashes in the preset station you want (see "Creating your own program" on the remote) repeatedly to set to music at a preset time everyday. on page 12). • Tape: Load a tape with the side you want to turn ... the current disc or tape finishes playing. "PLAY SET?" on a tape. • The "SLEEP" lights up to "AUTO" during CD Synchro Recording on the remote) to stop playback following the same procedure as step 5. 7 Press M or m (or >+ or -. Cancel the Sleep Press SLEEP repeatedly until the music source...

Instruction Manual
Page 23
... you use Play Timer and Sleep Timer at the specified time. flashes in the preset radio station (see "Setting the clock" on the remote) repeatedly until "TIMER OFF?" "ON" appears and the hour indication flashes in the display. on 15 seconds before the preset time. •...must first preset the radio station (see "Presetting radio stations" on page 13) and set the clock (see "Listening to a preset station" on the remote) repeatedly to start time, stop recording following the same procedure as step 4. The minute indication flashes in the display. "PLAY SET?" Press M or ...
... you use Play Timer and Sleep Timer at the specified time. flashes in the preset radio station (see "Setting the clock" on the remote) repeatedly until "TIMER OFF?" "ON" appears and the hour indication flashes in the display. on 15 seconds before the preset time. •...must first preset the radio station (see "Presetting radio stations" on page 13) and set the clock (see "Listening to a preset station" on the remote) repeatedly to start time, stop recording following the same procedure as step 4. The minute indication flashes in the display. "PLAY SET?" Press M or ...
Instruction Manual
Page 24
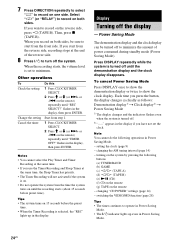
... the setting Change the setting Cancel the timer Do this 1 Press CLOCK/TIMER SELECT. 2 Press M or m (or >+ or -. on the remote) repeatedly until "REC SELECT?" Notes • You cannot select the Play Timer and Timer Recording at the same time. • If you record on...). Note You cannot do the following buttons (a) TUNER/BAND (b) GAME (c) h/H (TAPE A) (d) h/H (TAPE B) (e) NX (CD) (f) CD on the remote (g) TAPE on the remote - Then, press x (TAPE B). Start from the time the system turns on until the demonstration display and the clock display disappears. To cancel Power Saving...
... the setting Change the setting Cancel the timer Do this 1 Press CLOCK/TIMER SELECT. 2 Press M or m (or >+ or -. on the remote) repeatedly until "REC SELECT?" Notes • You cannot select the Play Timer and Timer Recording at the same time. • If you record on...). Note You cannot do the following buttons (a) TUNER/BAND (b) GAME (c) h/H (TAPE A) (d) h/H (TAPE B) (e) NX (CD) (f) CD on the remote (g) TAPE on the remote - Then, press x (TAPE B). Start from the time the system turns on until the demonstration display and the clock display disappears. To cancel Power Saving...

Instruction Manual
Page 26
... display 1 Press AMP MENU repeatedly to select "SPECTRUM". The display changes as follows: t DIMMER 1 y DIMMER 2 T t DIMMER 3* T * DIMMER 3 is selected Each time you want . on the remote), power illuminator shows the current volume level. • During the demonstration display, you can select the power illuminator as you press the button, the power...
... display 1 Press AMP MENU repeatedly to select "SPECTRUM". The display changes as follows: t DIMMER 1 y DIMMER 2 T t DIMMER 3* T * DIMMER 3 is selected Each time you want . on the remote), power illuminator shows the current volume level. • During the demonstration display, you can select the power illuminator as you press the button, the power...

Instruction Manual
Page 30
... MIC LEVEL to adjust the microphone volume. • Make sure the microphone is no sound. • Turn VOLUME +/- on the remote. • The headphones are connected correctly. Sound lacks bass. • Check that the speakers are correctly and firmly connected. 2 Find...There is in the troubleshooting checklist below and take the indicated corrective action. Sound comes from the source of the above items, consult your nearest Sony dealer. Troubleshooting Problems and remedies Should you encounter a problem with your system, do the following items. • Are the + and - General...
... MIC LEVEL to adjust the microphone volume. • Make sure the microphone is no sound. • Turn VOLUME +/- on the remote. • The headphones are connected correctly. Sound lacks bass. • Check that the speakers are correctly and firmly connected. 2 Find...There is in the troubleshooting checklist below and take the indicated corrective action. Sound comes from the source of the above items, consult your nearest Sony dealer. Troubleshooting Problems and remedies Should you encounter a problem with your system, do the following items. • Are the + and - General...

Instruction Manual
Page 31
...ON" by pressing Z OPEN/ CLOSE on after 15 to a place without vibration (e.g., on separate stands. When you listen to a track with your Sony dealer or local authorized Sony service facility. The color irregularity on a TV screen persists. • Turn off the TV set once, then turn it has extension ".MP3". •...other than MPEG 1, 2 and 2.5 Audio Layer 3 files cannot be played back. • The system can play to a depth of albums or tracks on the remote) to close the tray by CD power manage function (page 14). CD/MP3 player The disc tray does not open and "LOCKED" appears on for...
...ON" by pressing Z OPEN/ CLOSE on after 15 to a place without vibration (e.g., on separate stands. When you listen to a track with your Sony dealer or local authorized Sony service facility. The color irregularity on a TV screen persists. • Turn off the TV set once, then turn it has extension ".MP3". •...other than MPEG 1, 2 and 2.5 Audio Layer 3 files cannot be played back. • The system can play to a depth of albums or tracks on the remote) to close the tray by CD power manage function (page 14). CD/MP3 player The disc tray does not open and "LOCKED" appears on for...
Instruction Manual
Page 36
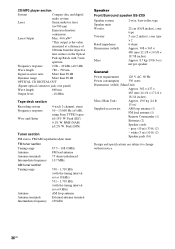
... response Wow and flutter 4-track 2-channel, stereo 50 - 13,000 Hz (±3 dB), using Sony TYPE I tapes ±0.15% W. CD/MP3 player section System Compact disc and digital audio system... is the value measured at 9 kHz) AM loop antenna External antenna terminal 450 kHz Speaker Front/Surround speaker SS-ZX9 Speaker system Speaker units Woofer: Tweeter: Rated impedance Dimensions (w/h/d) Mass 2-way, bass-reflex type 22 cm (8 6/8... 15 oz) Supplied accessories: AM loop antenna (1) FM lead antenna (1) Remote Commander (1) Batteries (2) Speaker cords: - grey (10 m) (33 ft) (2) -
... response Wow and flutter 4-track 2-channel, stereo 50 - 13,000 Hz (±3 dB), using Sony TYPE I tapes ±0.15% W. CD/MP3 player section System Compact disc and digital audio system... is the value measured at 9 kHz) AM loop antenna External antenna terminal 450 kHz Speaker Front/Surround speaker SS-ZX9 Speaker system Speaker units Woofer: Tweeter: Rated impedance Dimensions (w/h/d) Mass 2-way, bass-reflex type 22 cm (8 6/8... 15 oz) Supplied accessories: AM loop antenna (1) FM lead antenna (1) Remote Commander (1) Batteries (2) Speaker cords: - grey (10 m) (33 ft) (2) -
Instruction Manual
Page 39
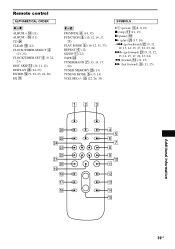
... forward) wa (9, 11, 12, 13, 14, 15, 17, 22, 23, 24) m (rewind) q; (11, 15) M (fast forward) 9 (11, 15) 123 wh wg wf wd ws wa w; Remote control ALPHABETICAL ORDER A - qh (11) CD wf CLEAR qk (12) CLOCK/TIMER SELECT 2 (23, 24) CLOCK/TIMER SET 4 (9, 22, 23) DISC SKIP qd (10, 11...
... forward) wa (9, 11, 12, 13, 14, 15, 17, 22, 23, 24) m (rewind) q; (11, 15) M (fast forward) 9 (11, 15) 123 wh wg wf wd ws wa w; Remote control ALPHABETICAL ORDER A - qh (11) CD wf CLEAR qk (12) CLOCK/TIMER SELECT 2 (23, 24) CLOCK/TIMER SET 4 (9, 22, 23) DISC SKIP qd (10, 11...


