Operating Instructions
Page 1
FST-ZX8 FST-ZX6 LBT-ZX8 LBT-ZX6 ©2004 Sony Corporation Serial No. Refer to them whenever you call upon your Sony dealer regarding this product. Record the serial number in the space provided below. Model No. 4-253-172-15(1) Compact Hi-Fi Stereo System Operating Instructions Owner's Record The model and serial numbers are located on the rear of the unit.
FST-ZX8 FST-ZX6 LBT-ZX8 LBT-ZX6 ©2004 Sony Corporation Serial No. Refer to them whenever you call upon your Sony dealer regarding this product. Record the serial number in the space provided below. Model No. 4-253-172-15(1) Compact Hi-Fi Stereo System Operating Instructions Owner's Record The model and serial numbers are located on the rear of the unit.
Operating Instructions
Page 2
... Note to rain or moisture. Don't throw away the battery with newspapers, table-cloths, curtains, etc. As an ENERGY STAR® partner, Sony Corporation has determined that this apparatus to CATV system installer: This reminder is classified as close to the presence of uninsulated "dangerous voltage" within the...of the NEC that the cable ground shall be connected to the grounding system of the building, as a CLASS 1 LASER product. FST-ZX8/LBT-ZX84-253-172-15(1) WARNING To reduce the risk of fire or electric shock, do not expose this product meets the ENERGY STAR®...
... Note to rain or moisture. Don't throw away the battery with newspapers, table-cloths, curtains, etc. As an ENERGY STAR® partner, Sony Corporation has determined that this apparatus to CATV system installer: This reminder is classified as close to the presence of uninsulated "dangerous voltage" within the...of the NEC that the cable ground shall be connected to the grounding system of the building, as a CLASS 1 LASER product. FST-ZX8/LBT-ZX84-253-172-15(1) WARNING To reduce the risk of fire or electric shock, do not expose this product meets the ENERGY STAR®...
Operating Instructions
Page 3
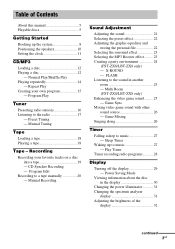
...Turning off the display 29 - Repeat Play Creating your favorite tracks on a disc into a tape 19 - X-ROUND - Multi Room (FST-ZX8/LBT-ZX8 only) Enhancing the video game sound ......... 25 - Game Sync Mixing video game sound with other sound source 26 - Recording Recording your own program... and storing the personal file 22 Selecting the surround effect 23 Selecting the MP3 Booster effect ......... 23 Creating a party environment 24 (FST-ZX8/LBT-ZX8 only) - Sleep Timer Waking up the system 8 Positioning the speakers 10 Setting the clock 11 CD/MP3 Loading a disc 12 Playing ...
...Turning off the display 29 - Repeat Play Creating your favorite tracks on a disc into a tape 19 - X-ROUND - Multi Room (FST-ZX8/LBT-ZX8 only) Enhancing the video game sound ......... 25 - Game Sync Mixing video game sound with other sound source 26 - Recording Recording your own program... and storing the personal file 22 Selecting the surround effect 23 Selecting the MP3 Booster effect ......... 23 Creating a party environment 24 (FST-ZX8/LBT-ZX8 only) - Sleep Timer Waking up the system 8 Positioning the speakers 10 Setting the clock 11 CD/MP3 Loading a disc 12 Playing ...
Operating Instructions
Page 4
Optional Components Hooking up optional components ......... 33 Listening to audio from a connected component 34 Recording on a connected component 35 Connecting external antennas 35 Troubleshooting Problems and remedies 36 Messages 39 Additional Information Precautions 40 Specifications 41 List of button locations and reference pages 44 4GB
Optional Components Hooking up optional components ......... 33 Listening to audio from a connected component 34 Recording on a connected component 35 Connecting external antennas 35 Troubleshooting Problems and remedies 36 Messages 39 Additional Information Precautions 40 Specifications 41 List of button locations and reference pages 44 4GB
Operating Instructions
Page 5
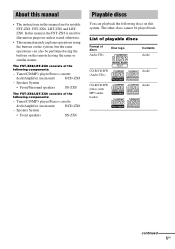
... discs You can also be played back. Tuner/CD/MP3 player/Stereo cassette deck/Amplifier (main unit) HCD-ZX6 - The FST-ZX8/LBT-ZX8 consists of the following components: - List of playable discs Format of the following components: - The other discs cannot be performed using ...the buttons on this manual are for models FST-ZX8, FST-ZX6, LBT-ZX8 and LBTZX6. Speaker System • Front/Surround speakers SS-ZX8 The FST-ZX6/LBT-ZX6 consists of discs Audio CDs Disc logo Contents Audio CD-R/CD-RW (Audio CDs) CD-R/CD-RW (Discs...
... discs You can also be played back. Tuner/CD/MP3 player/Stereo cassette deck/Amplifier (main unit) HCD-ZX6 - The FST-ZX8/LBT-ZX8 consists of the following components: - List of playable discs Format of the following components: - The other discs cannot be performed using ...the buttons on this manual are for models FST-ZX8, FST-ZX6, LBT-ZX8 and LBTZX6. Speaker System • Front/Surround speakers SS-ZX8 The FST-ZX6/LBT-ZX6 consists of discs Audio CDs Disc logo Contents Audio CD-R/CD-RW (Audio CDs) CD-R/CD-RW (Discs...
Operating Instructions
Page 6
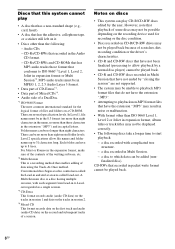
CD-Rs/CD-RWs that recorded in expansion format or Multi Session*2. Level 2 specifications allow playback by a normal disc player) cannot be played back. 6GB Notes on it. • Discs other than eight nested folder levels. a disc to which data can be displayed correctly. • The following : - There are not supported. • The system may be unable to playback MP3 format files that do not have up to Leadout regarded as a single session. *3 CD-Extra This format records audio (audio CD data) on the tracks in session 1 and data on the tracks in session 2. *4 Mixed CD ...
CD-Rs/CD-RWs that recorded in expansion format or Multi Session*2. Level 2 specifications allow playback by a normal disc player) cannot be played back. 6GB Notes on it. • Discs other than eight nested folder levels. a disc to which data can be displayed correctly. • The following : - There are not supported. • The system may be unable to playback MP3 format files that do not have up to Leadout regarded as a single session. *3 CD-Extra This format records audio (audio CD data) on the tracks in session 1 and data on the tracks in session 2. *4 Mixed CD ...
Operating Instructions
Page 7
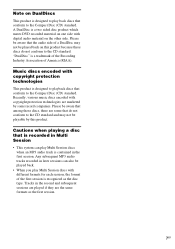
A DualDisc is designed to playback discs that conform to play Multi Session discs with copyright protection technologies are marketed by some that the audio side of a DualDisc may not be played back on this product. Tracks in later sessions can play Multi Session discs when an MP3 audio track is recognized as the first session. 7GB Music discs encoded with copyright protection technologies This product is a two sided disc product which mates DVD recorded material on one side with digital audio material on the other side. Recently, various music discs encoded with ...
A DualDisc is designed to playback discs that conform to play Multi Session discs with copyright protection technologies are marketed by some that the audio side of a DualDisc may not be played back on this product. Tracks in later sessions can play Multi Session discs when an MP3 audio track is recognized as the first session. 7GB Music discs encoded with copyright protection technologies This product is a two sided disc product which mates DVD recorded material on one side with digital audio material on the other side. Recently, various music discs encoded with ...
Operating Instructions
Page 8
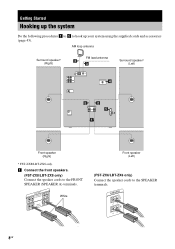
... speaker* (Left) 4 2 2 5 1 Front speaker (Right) * FST-ZX8/LBT-ZX8 only. 1 Connect the front speakers. (FST-ZX8/LBT-ZX8 only) Connect the speaker cords to hook up your system using the supplied cords and accessories (page 43). SRPS(SUEPREARAKOKEURENBRD) L L R (SPFERAOKNERT A) White Front speaker (Left) (FST-ZX6/LBT-ZX6 only) Connect the speaker cords to the SPEAKER...
... speaker* (Left) 4 2 2 5 1 Front speaker (Right) * FST-ZX8/LBT-ZX8 only. 1 Connect the front speakers. (FST-ZX8/LBT-ZX8 only) Connect the speaker cords to hook up your system using the supplied cords and accessories (page 43). SRPS(SUEPREARAKOKEURENBRD) L L R (SPFERAOKNERT A) White Front speaker (Left) (FST-ZX6/LBT-ZX6 only) Connect the speaker cords to the SPEAKER...
Operating Instructions
Page 9
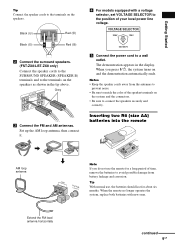
... 230-240V 5 Connect the power cord to the terminals on and the demonstration automatically ends. Black (#) Black (#) Red (3) Red (3) 2 Connect the surround speakers. (FST-ZX8/LBT-ZX8 only) Connect the speaker cords to the SURROUND SPEAKER (SPEAKER B) terminals and to a wall outlet. When you do not use , the batteries should last...
... 230-240V 5 Connect the power cord to the terminals on and the demonstration automatically ends. Black (#) Black (#) Red (3) Red (3) 2 Connect the surround speakers. (FST-ZX8/LBT-ZX8 only) Connect the speaker cords to the SURROUND SPEAKER (SPEAKER B) terminals and to a wall outlet. When you do not use , the batteries should last...
Operating Instructions
Page 10
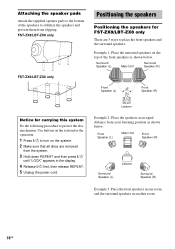
... REPEAT. 5 Unplug the power cord. Listener Example 2: Place the speakers at an equal distance from your listening position as shown below . FST-ZX8/LBT-ZX8 only FST-ZX6/LBT-ZX6 only Positioning the speakers Positioning the speakers for carrying this system Do the following procedure to place the front speakers and the surround speakers... that all discs are 3 ways to protect the disc mechanism. Surround Speaker (L) Main Unit Surround Speaker (R) Front 45 Speaker (L) Front Speaker (R) Notice for FST-ZX8/LBT-ZX8 only There are removed from slipping.
... REPEAT. 5 Unplug the power cord. Listener Example 2: Place the speakers at an equal distance from your listening position as shown below . FST-ZX8/LBT-ZX8 only FST-ZX6/LBT-ZX6 only Positioning the speakers Positioning the speakers for carrying this system Do the following procedure to place the front speakers and the surround speakers... that all discs are 3 ways to protect the disc mechanism. Surround Speaker (L) Main Unit Surround Speaker (R) Front 45 Speaker (L) Front Speaker (R) Notice for FST-ZX8/LBT-ZX8 only There are removed from slipping.
Operating Instructions
Page 11
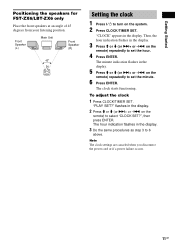
.... Note The clock settings are canceled when you disconnect the power cord or if a power failure occurs. 11GB Getting Started Positioning the speakers for FST-ZX6/LBT-ZX6 only Place the front speakers at an angle of 45 degrees from your listening position. Front Speaker (L) Main Unit Front Speaker (R) 45 Setting the clock...
.... Note The clock settings are canceled when you disconnect the power cord or if a power failure occurs. 11GB Getting Started Positioning the speakers for FST-ZX6/LBT-ZX6 only Place the front speakers at an angle of 45 degrees from your listening position. Front Speaker (L) Main Unit Front Speaker (R) 45 Setting the clock...
Operating Instructions
Page 12
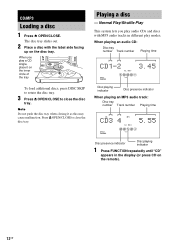
The disc tray slides out. 2 Place a disc with MP3 audio tracks in the display (or press CD on the remote). 12GB CD/MP3 Loading a disc 1 Press Z OPEN/CLOSE. When you play audio CDs and discs with the label side facing up on the inner circle of the tray To load additional discs, press DISC SKIP to rotate the disc tray. 3 Press Z OPEN/CLOSE to close the disc tray. Note Do not push the disc tray when closing it on the disc tray. Playing a disc - When playing an audio CD: Disc tray number Track number Playing time EFFECT X-GROOVE ALL DISC S 1 2 34 5 j Disc playing ...
The disc tray slides out. 2 Place a disc with MP3 audio tracks in the display (or press CD on the remote). 12GB CD/MP3 Loading a disc 1 Press Z OPEN/CLOSE. When you play audio CDs and discs with the label side facing up on the inner circle of the tray To load additional discs, press DISC SKIP to rotate the disc tray. 3 Press Z OPEN/CLOSE to close the disc tray. Note Do not push the disc tray when closing it on the disc tray. Playing a disc - When playing an audio CD: Disc tray number Track number Playing time EFFECT X-GROOVE ALL DISC S 1 2 34 5 j Disc playing ...
Operating Instructions
Page 13
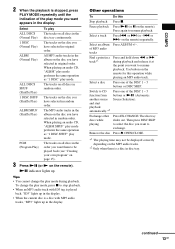
ALL DISCS SHUF (Shuffle Play) The tracks on all discs in random order. 1 DISC SHUF (Shuffle Play) The tracks on the MP3 audio tracks. *2 Only when there is a disc in disc tray. Other operations To Do this operation while playing an MP3 audio track. Select a track Press . The disc tray slides out. continued 13GB Tips • You cannot change the play mode, press x to stop playback. • When an MP3 audio track with ID3 tag is played back, "ID3" lights up in original order. Press again to be displayed correctly depending on the disc you have selected in ...
ALL DISCS SHUF (Shuffle Play) The tracks on all discs in random order. 1 DISC SHUF (Shuffle Play) The tracks on the MP3 audio tracks. *2 Only when there is a disc in disc tray. Other operations To Do this operation while playing an MP3 audio track. Select a track Press . The disc tray slides out. continued 13GB Tips • You cannot change the play mode, press x to stop playback. • When an MP3 audio track with ID3 tag is played back, "ID3" lights up in original order. Press again to be displayed correctly depending on the disc you have selected in ...

Operating Instructions
Page 14
Playing repeatedly - Note You cannot select "REP" and "ALL DISCS SHUF" at the time an MP3 audio track is recorded, you press NX while the system is selected as a function. If there are many albums or non MP3 audio tracks on the disc, it may take a longer time for playback to five times. REP: All the tracks on the disc, or all the tracks in that does not include an MP3 audio track is skipped. • The maximum number of albums on a disc which can be recognize by this system is 150 (including root album). • The maximum number of MPEG 1 Audio Layer 3, MPEG 2 Audio Layer 3 and ...
Playing repeatedly - Note You cannot select "REP" and "ALL DISCS SHUF" at the time an MP3 audio track is recorded, you press NX while the system is selected as a function. If there are many albums or non MP3 audio tracks on the disc, it may take a longer time for playback to five times. REP: All the tracks on the disc, or all the tracks in that does not include an MP3 audio track is skipped. • The maximum number of albums on a disc which can be recognize by this system is 150 (including root album). • The maximum number of MPEG 1 Audio Layer 3, MPEG 2 Audio Layer 3 and ...
Operating Instructions
Page 15
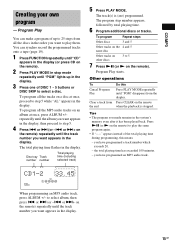
To program all the MP3 audio tracks on the remote). 2 Press PLAY MODE in stop mode repeatedly until the album you want to play the same program again. • If "--.--" appears instead of the total playing time during programming, this Press PLAY MODE repeatedly until the track number you want appears in the display. Program Play starts. the total playing time has exceeded 100 minutes. - EFFECT X-GROOVE PGM 1 2 34 5 j When programming an MP3 audio track, press ALBUM +/- You can make a program of DISC 1 ~ 5 buttons or DISC SKIP to 25 steps from all the tracks on the...
To program all the MP3 audio tracks on the remote). 2 Press PLAY MODE in stop mode repeatedly until the album you want to play the same program again. • If "--.--" appears instead of the total playing time during programming, this Press PLAY MODE repeatedly until the track number you want appears in the display. Program Play starts. the total playing time has exceeded 100 minutes. - EFFECT X-GROOVE PGM 1 2 34 5 j When programming an MP3 audio track, press ALBUM +/- You can make a program of DISC 1 ~ 5 buttons or DISC SKIP to 25 steps from all the tracks on the...
Operating Instructions
Page 16
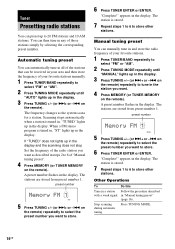
The frequency changes as described in steps 2 to store. 6 Press TUNER ENTER or ENTER. When a FM stereo program is stored. 7 Repeat steps 1 to 6 to store other stations. on the remote). preset number MANUAL 5 Press TUNING +/- (or >+ or -. A preset number flashes in the display. The station is tuned in, "ST" lights up in the display. on the remote) repeatedly to select the preset number you want to 6 of "Manual tuning preset". 4 Press MEMORY (or TUNER MEMORY on the remote) repeatedly to select the preset number you want to store. 6 Press TUNER ENTER or ENTER....
The frequency changes as described in steps 2 to store. 6 Press TUNER ENTER or ENTER. When a FM stereo program is stored. 7 Repeat steps 1 to 6 to store other stations. on the remote). preset number MANUAL 5 Press TUNING +/- (or >+ or -. A preset number flashes in the display. The station is tuned in, "ST" lights up in the display. on the remote) repeatedly to select the preset number you want to 6 of "Manual tuning preset". 4 Press MEMORY (or TUNER MEMORY on the remote) repeatedly to select the preset number you want to store. 6 Press TUNER ENTER or ENTER....

Operating Instructions
Page 17
"CD POWER OFF" appears in the display. Listening to the radio You can also press FUNCTION repeatedly to select "TUNER". When you want . Note You cannot change the AM tuning interval, select any AM station first, then turn off the system. 3 Press ?/1 while holding down x (CD). Listening to a radio station either by selecting a preset station, or by manually tuning in the station. There will be sure to preset them first (see "Manual Recording" (page 20). 17GB Use buttons on the system for the operation. 1 Press FUNCTION repeatedly until "CD" appears in the ...
"CD POWER OFF" appears in the display. Listening to the radio You can also press FUNCTION repeatedly to select "TUNER". When you want . Note You cannot change the AM tuning interval, select any AM station first, then turn off the system. 3 Press ?/1 while holding down x (CD). Listening to a radio station either by selecting a preset station, or by manually tuning in the station. There will be sure to preset them first (see "Manual Recording" (page 20). 17GB Use buttons on the system for the operation. 1 Press FUNCTION repeatedly until "CD" appears in the ...
Operating Instructions
Page 18
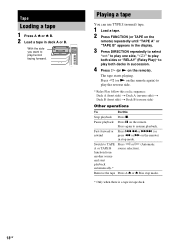
Tape Loading a tape 1 Press A Z or Z B. 2 Load a tape in stop mode. Pause playback Press X on the remote) repeatedly until "TAPE A" or "TAPE B" appears in tape deck. 18GB Press h (or N on the remote again) to play both decks in succession. 4 Press H (or N on the remote) in stop mode. * Only when there is a tape in the display. 3 Press DIRECTION repeatedly to select "g" to play one side, "j" to play both sides or "RELAY" (Relay Play)* to play /record facing forward. Fast-forward or rewind Press .m or M> (or press m or M on the remote). Playing a tape You can use TYPE ...
Tape Loading a tape 1 Press A Z or Z B. 2 Load a tape in stop mode. Pause playback Press X on the remote) repeatedly until "TAPE A" or "TAPE B" appears in tape deck. 18GB Press h (or N on the remote again) to play both decks in succession. 4 Press H (or N on the remote) in stop mode. * Only when there is a tape in the display. 3 Press DIRECTION repeatedly to select "g" to play one side, "j" to play both sides or "RELAY" (Relay Play)* to play /record facing forward. Fast-forward or rewind Press .m or M> (or press m or M on the remote). Playing a tape You can use TYPE ...
Operating Instructions
Page 19
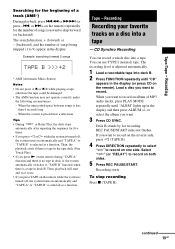
Then, the playback starts if there is tape in deck B. When you want to record on the reverse side, press h (TAPE B). 4 Press DIRECTION repeatedly to select "g" to "TAPE B" function when there is selected as a function. When the unrecorded space between songs is placed near a television. Load a disc you press N on the remote during "TAPE A" function and there is no tape in the display (or press CD on automatically and "TAPE A" or "TAPE B" is a tape in the tape deck (One Touch Play). • If you want to record. Recording starts. Example: searching forward...
Then, the playback starts if there is tape in deck B. When you want to record on the reverse side, press h (TAPE B). 4 Press DIRECTION repeatedly to select "g" to "TAPE B" function when there is selected as a function. When the unrecorded space between songs is placed near a television. Load a disc you press N on the remote during "TAPE A" function and there is no tape in the display (or press CD on automatically and "TAPE A" or "TAPE B" is a tape in the tape deck (One Touch Play). • If you want to record. Recording starts. Example: searching forward...
Operating Instructions
Page 20
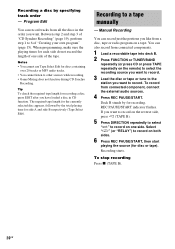
Tip To check the required tape length for each side do not exceed the length of one side. Manual Recording You can also record from a disc, tape or radio program on the remote) to select the recording source you want to record. 3 Load the disc or tape or tune to the station you want to record on one side of "Creating your own program" (page 15). To record from all the discs in CD function. To stop recording Press x (TAPE B). 20GB When programming, make sure the playing times for recording a disc, press EDIT after you have loaded a disc in the order you want. Recording to ...
Tip To check the required tape length for each side do not exceed the length of one side. Manual Recording You can also record from a disc, tape or radio program on the remote) to select the recording source you want to record. 3 Load the disc or tape or tune to the station you want to record on one side of "Creating your own program" (page 15). To record from all the discs in CD function. To stop recording Press x (TAPE B). 20GB When programming, make sure the playing times for recording a disc, press EDIT after you have loaded a disc in the order you want. Recording to ...
