Operating Instructions
Page 2
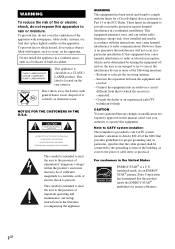
...; guidelines for a Class B digital device, pursuant to persons. Increase the separation between the equipment and receiver. - And don't place lighted candles on the apparatus. Note to CATV system installer: This reminder is intended to alert the user to the point of cable entry as close to the presence of important operating and maintenance (servicing) instructions in the literature accompanying...
...; guidelines for a Class B digital device, pursuant to persons. Increase the separation between the equipment and receiver. - And don't place lighted candles on the apparatus. Note to CATV system installer: This reminder is intended to alert the user to the point of cable entry as close to the presence of important operating and maintenance (servicing) instructions in the literature accompanying...
Operating Instructions
Page 3
... Mode Viewing information about the disc in another room 25 - Table of the display 32 continued 3GB Program Play Tuner Presetting radio stations 16 Listening to music 27 - Play Timer Timer recording radio programs........... 28 Display Turning off the display 29 - Normal Play/Shuffle Play Playing repeatedly 14 - FLASH Listening to the sound in the display 30 Changing the power illuminator 31 Changing the spectrum analyzer display 31 Adjusting the brightness of Contents About this manual 5 Playable discs 5 Getting Started Hooking...
... Mode Viewing information about the disc in another room 25 - Table of the display 32 continued 3GB Program Play Tuner Presetting radio stations 16 Listening to music 27 - Play Timer Timer recording radio programs........... 28 Display Turning off the display 29 - Normal Play/Shuffle Play Playing repeatedly 14 - FLASH Listening to the sound in the display 30 Changing the power illuminator 31 Changing the spectrum analyzer display 31 Adjusting the brightness of Contents About this manual 5 Playable discs 5 Getting Started Hooking...

Operating Instructions
Page 14
... display. To cancel Repeat Play Press REPEAT repeatedly until "REP1" is canceled. * When "ALBM" or "ALBM SHUF" is selected as a function. In this case, set "CD POWER ON" by CD power manage function (page 17). • If you press NX while the system is turned off , the system turns on automatically and "CD" is recorded, you may encounter problems such as a function...
... display. To cancel Repeat Play Press REPEAT repeatedly until "REP1" is canceled. * When "ALBM" or "ALBM SHUF" is selected as a function. In this case, set "CD POWER ON" by CD power manage function (page 17). • If you press NX while the system is turned off , the system turns on automatically and "CD" is recorded, you may encounter problems such as a function...
Operating Instructions
Page 16
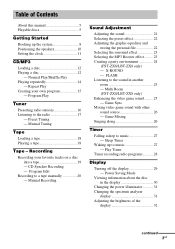
... "AUTO" lights up in the display and the scanning does not stop Set the frequency of your favorite stations. 1 Press TUNER/BAND repeatedly to select "FM" or "AM". 2 Press TUNING MODE repeatedly until "MANUAL" lights up in the display. 3 Press TUNING +/- (or >+ or -. on the remote). If "TUNED" does not lights up in the display. A preset number flashes in the display. The stations are stored from preset number 1. "Complete!" appears in the display. Manual tuning preset You can be received...
... "AUTO" lights up in the display and the scanning does not stop Set the frequency of your favorite stations. 1 Press TUNER/BAND repeatedly to select "FM" or "AM". 2 Press TUNING MODE repeatedly until "MANUAL" lights up in the display. 3 Press TUNING +/- (or >+ or -. on the remote). If "TUNED" does not lights up in the display. A preset number flashes in the display. The stations are stored from preset number 1. "Complete!" appears in the display. Manual tuning preset You can be received...

Operating Instructions
Page 17
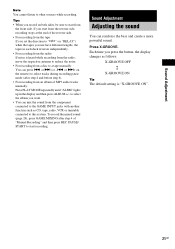
... the operation. on automatically and "TUNER" is "CD POWER ON". Use buttons on the system for some areas). Tips • To improve broadcast reception, adjust the supplied antennas, or connect an external antenna. • When an FM stereo program has static noise, press FM MODE repeatedly until "PRESET" lights up in the display. Use buttons on automatically. To set the CD power manage function to select "FM" or "AM". 2 Press TUNING MODE repeatedly...
... the operation. on automatically and "TUNER" is "CD POWER ON". Use buttons on the system for some areas). Tips • To improve broadcast reception, adjust the supplied antennas, or connect an external antenna. • When an FM stereo program has static noise, press FM MODE repeatedly until "PRESET" lights up in the display. Use buttons on automatically. To set the CD power manage function to select "FM" or "AM". 2 Press TUNING MODE repeatedly...
Operating Instructions
Page 21
... audio tracks manually: Press PLAY MODE repeatedly until "ALBM" lights up in each deck reverses independently. • For recording from the component connected to the GAME INPUT jacks with another function such as follows: X-GROOVE OFF Y X-GROOVE ON Tip The default setting is heard while recording from the radio, move the respective antenna to reduce the noise. • For recording from a disc to start recording. Sound Adjustment Adjusting...
... audio tracks manually: Press PLAY MODE repeatedly until "ALBM" lights up in each deck reverses independently. • For recording from the component connected to the GAME INPUT jacks with another function such as follows: X-GROOVE OFF Y X-GROOVE ON Tip The default setting is heard while recording from the radio, move the respective antenna to reduce the noise. • For recording from a disc to start recording. Sound Adjustment Adjusting...
Operating Instructions
Page 24
... mode, place your listening position (see Example 2 of sound movement by using X-ROUND for "moving" sound effect or/and FLASH for FST-ZX8/ LBT-ZX8 only" on page 10). The display changes cyclically as follows: MANUAL WAVE t MANUAL FADER t MANUAL BAL t AUTO WAVE t AUTO FADER t AUTO BAL t RANDOM POS t TWISTER Select To output sound MANUAL In circular motion WAVE1), AUTO WAVE2) MANUAL From front speakers to FADER1), AUTO surround speakers FADER2) MANUAL BAL1), From left speakers...
... mode, place your listening position (see Example 2 of sound movement by using X-ROUND for "moving" sound effect or/and FLASH for FST-ZX8/ LBT-ZX8 only" on page 10). The display changes cyclically as follows: MANUAL WAVE t MANUAL FADER t MANUAL BAL t AUTO WAVE t AUTO FADER t AUTO BAL t RANDOM POS t TWISTER Select To output sound MANUAL In circular motion WAVE1), AUTO WAVE2) MANUAL From front speakers to FADER1), AUTO surround speakers FADER2) MANUAL BAL1), From left speakers...
Operating Instructions
Page 25
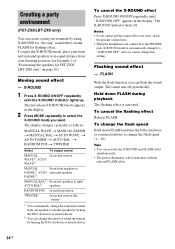
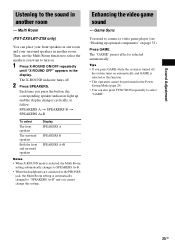
..., use the Multi Room function to select the speakers you want to connect a video game player (see "Hooking up and the display changes cyclically as the function. • This operation cannot be performed in the display. Game Sync You need to turn on page 33). The "GAME" preset effect is selected as follow: SPEAKERS A t SPEAKERS B t SPEAKERS A+B To select The front speakers The surround speakers Both the front and surround speakers Display SPEAKERS A SPEAKERS B SPEAKERS A+B Notes • When X-ROUND mode is selected, the Multi Room setting automatically changes...
..., use the Multi Room function to select the speakers you want to connect a video game player (see "Hooking up and the display changes cyclically as the function. • This operation cannot be performed in the display. Game Sync You need to turn on page 33). The "GAME" preset effect is selected as follow: SPEAKERS A t SPEAKERS B t SPEAKERS A+B To select The front speakers The surround speakers Both the front and surround speakers Display SPEAKERS A SPEAKERS B SPEAKERS A+B Notes • When X-ROUND mode is selected, the Multi Room setting automatically changes...
Operating Instructions
Page 26
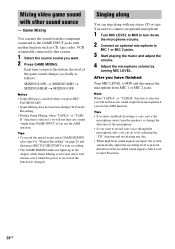
... have finished Turn MIC LEVEL to MIC 1 or MIC 2 jacks. 3 Start playing the music and adjust the volume. 4 Adjust the microphone volume by selecting the "CD" function and not playing any disc. • When high level sound signals are input, the system automatically adjust the recording level to start recording. • The GAME MIXING indicator lights up in the display while Game Mixing is activated and it will remain active while the power is on page...
... have finished Turn MIC LEVEL to MIC 1 or MIC 2 jacks. 3 Start playing the music and adjust the volume. 4 Adjust the microphone volume by selecting the "CD" function and not playing any disc. • When high level sound signals are input, the system automatically adjust the recording level to start recording. • The GAME MIXING indicator lights up in the display while Game Mixing is activated and it will remain active while the power is on page...
Operating Instructions
Page 27
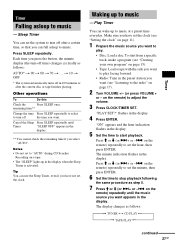
... from a specific track, make a program (see "Creating your own program" on page 15). • Tape: Load a tape with the side you want to play facing forward. • Radio: Tune in the preset station you want . Notes • Do not set to "AUTO" during CD Synchro Recording on the remote) repeatedly to turn -off the time you can wake up to music. Other operations To Do...
... from a specific track, make a program (see "Creating your own program" on page 15). • Tape: Load a tape with the side you want to play facing forward. • Radio: Tune in the preset station you want . Notes • Do not set to "AUTO" during CD Synchro Recording on the remote) repeatedly to turn -off the time you can wake up to music. Other operations To Do...
Operating Instructions
Page 28
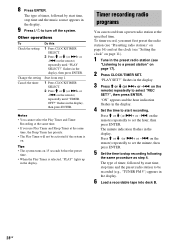
... selected, "PLAY" lights up in the display. 9 Press ?/1 to set the minute, then press ENTER. 5 Set the time to stop time and the preset radio station to select "REC SET?", then press ENTER. The type of timer, followed by start time, stop time and the music source appears in the display. on the remote) repeatedly to turn off the system. "PLAY SET?" on the remote) repeatedly until "TIMER OFF?" flashes...
... selected, "PLAY" lights up in the display. 9 Press ?/1 to set the minute, then press ENTER. 5 Set the time to stop time and the preset radio station to select "REC SET?", then press ENTER. The type of timer, followed by start time, stop time and the music source appears in the display. on the remote) repeatedly to turn off the system. "PLAY SET?" on the remote) repeatedly until "TIMER OFF?" flashes...

Operating Instructions
Page 30
...: - Viewing information about the disc in the display. Checking the remaining time Press DISPLAY repeatedly during Program Play and there is stopped during playback. while an MP3 audio track is selected. - When the CD-TEXT disc contains more , and the track number which exceeds 20 is played back. - Note Some characters may not be displayed for 8 seconds) Press DISPLAY repeatedly when playback is a program.
...: - Viewing information about the disc in the display. Checking the remaining time Press DISPLAY repeatedly during Program Play and there is stopped during playback. while an MP3 audio track is selected. - When the CD-TEXT disc contains more , and the track number which exceeds 20 is played back. - Note Some characters may not be displayed for 8 seconds) Press DISPLAY repeatedly when playback is a program.
Operating Instructions
Page 33
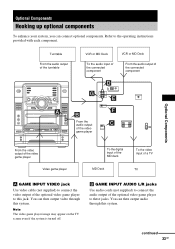
... audio output of the connected component D R L G E A B From the audio output of the video game player F C Optional Components From the video output of the video game player Video game player To the digital input of the MD deck To the video input of a TV MD Deck TV A GAME INPUT VIDEO jack Use video cable (not supplied) to connect the video output of the optional video game player to the operating instructions provided with each component. You can then output video through this system. Note The video game player...
... audio output of the connected component D R L G E A B From the audio output of the video game player F C Optional Components From the video output of the video game player Video game player To the digital input of the MD deck To the video input of a TV MD Deck TV A GAME INPUT VIDEO jack Use video cable (not supplied) to connect the video output of the optional video game player to the operating instructions provided with each component. You can then output video through this system. Note The video game player...
Operating Instructions
Page 34
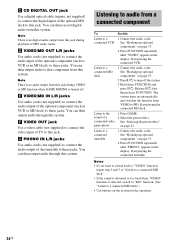
... turns on page 22. Listen to the sound of the turntable to these jacks. C CD DIGITAL OUT jack Use a digital optical cable (square, not supplied) to connect the digital input of the optional MD deck to this jack during VIDEO or MD function when GAME MIXING is turned off the system. 3 Hold down FUNCTION and press ?/1. G PHONO IN L/R jacks Use audio cords (not supplied) to connect the audio output of a connected video game player 1 Press GAME. 2 Select the preset...
... turns on page 22. Listen to the sound of the turntable to these jacks. C CD DIGITAL OUT jack Use a digital optical cable (square, not supplied) to connect the digital input of the optional MD deck to this jack during VIDEO or MD function when GAME MIXING is turned off the system. 3 Hold down FUNCTION and press ?/1. G PHONO IN L/R jacks Use audio cords (not supplied) to connect the audio output of a connected video game player 1 Press GAME. 2 Select the preset...
Operating Instructions
Page 36
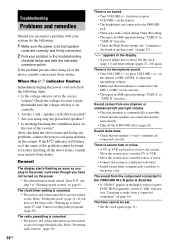
... Sony dealer. Redo "Presetting radio stations" (page 16). 36GB There is no sound. • Turn VOLUME +/- General The display starts flashing as soon as possible. • Check that the speaker's + and - on the remote) or MIC LEVEL to adjust the microphone volume. • Make sure the microphone is connected to the MIC 1 or MIC 2 jack correctly. • The tape is distorted. • If "VIDEO" appears in the power cord even though you using only the prescribed speakers...
... Sony dealer. Redo "Presetting radio stations" (page 16). 36GB There is no sound. • Turn VOLUME +/- General The display starts flashing as soon as possible. • Check that the speaker's + and - on the remote) or MIC LEVEL to adjust the microphone volume. • Make sure the microphone is connected to the MIC 1 or MIC 2 jack correctly. • The tape is distorted. • If "VIDEO" appears in the power cord even though you using only the prescribed speakers...
Operating Instructions
Page 37
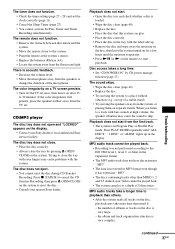
...; Place the disc correctly. • Always close the tray with the label side up in Program Play or Shuffle Play mode. CD/MP3 player The disc tray does not open and "LOCKED" appears on the system. Disc access takes a long time. • Set "CD POWER ON" by pressing Z OPEN/ CLOSE on the display. • Contact your Sony dealer or local authorized Sony service facility. the number of the microphone.
...; Place the disc correctly. • Always close the tray with the label side up in Program Play or Shuffle Play mode. CD/MP3 player The disc tray does not open and "LOCKED" appears on the system. Disc access takes a long time. • Set "CD POWER ON" by pressing Z OPEN/ CLOSE on the display. • Contact your Sony dealer or local authorized Sony service facility. the number of the microphone.
Operating Instructions
Page 38
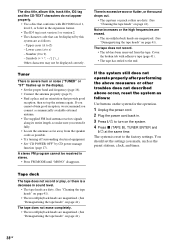
..., we recommend you connect a commercially available external antenna. • The supplied FM lead antenna receives signals along its entire length, so make sure you made, such as follows. - The tape does not record. • The tab has been removed from the speaker cords as follows: Use buttons on page 41). Upper cases (A to the factory settings. You should set up in sound level. • The tape...
..., we recommend you connect a commercially available external antenna. • The supplied FM lead antenna receives signals along its entire length, so make sure you made, such as follows. - The tape does not record. • The tab has been removed from the speaker cords as follows: Use buttons on page 41). Upper cases (A to the factory settings. You should set up in sound level. • The tape...
Operating Instructions
Page 40
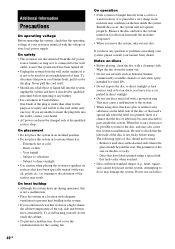
... up during operation, this is not a malfunction. • Place the system in direct sunlight. • Do not use solvents such as it is connected to the wall outlet, even if the system itself . • Should any solid object or liquid fall into the outlet, contact your dealer. • AC power cord must be changed only at a high volume, the...
... up during operation, this is not a malfunction. • Place the system in direct sunlight. • Do not use solvents such as it is connected to the wall outlet, even if the system itself . • Should any solid object or liquid fall into the outlet, contact your dealer. • AC power cord must be changed only at a high volume, the...
Operating Instructions
Page 42
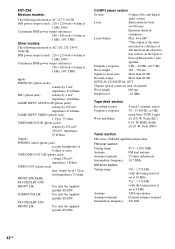
... Optical Pick-up Block with the tuning interval set at 9 kHz) AM loop antenna External antenna terminal 450 kHz 42GB RMS (NAB) ±0.2% W. output level 1 Vp-p, load impedance 75 ohms FRONT SPEAKER: FST-ZX8/LBT-ZX8: FRONT L/R Use only the supplied speaker SS-ZX8 SURROUND L/R Use only the supplied speaker SS-ZX8 FST-ZX6/LBT-ZX6: FRONT L/R Use only the supplied speaker SS-ZX6 CD/MP3 player section System Compact disc and digital audio...
... Optical Pick-up Block with the tuning interval set at 9 kHz) AM loop antenna External antenna terminal 450 kHz 42GB RMS (NAB) ±0.2% W. output level 1 Vp-p, load impedance 75 ohms FRONT SPEAKER: FST-ZX8/LBT-ZX8: FRONT L/R Use only the supplied speaker SS-ZX8 SURROUND L/R Use only the supplied speaker SS-ZX8 FST-ZX6/LBT-ZX6: FRONT L/R Use only the supplied speaker SS-ZX6 CD/MP3 player section System Compact disc and digital audio...
Operating Instructions
Page 44
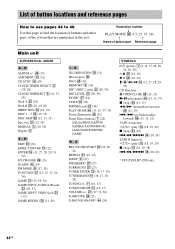
..., 17, 20, 29) TUNING +/- Q ILLUMINATION el (31) IR (receptor) ek JOG* rg (24) MEMORY 9 (16) MIC 1/MIC 2 jacks es (26, 36) MIC LEVEL ed (26, 36) MODE* rj (24) P FILE eg (22) PHONES jack wd (36) PLAY MODE r; (13, 15, 37, 39) Power illuminator wk (31) Preset Effect buttons 7 (22) SALSA/REGGAE/POP/ SAMBA/TANGO/ROCK/ JAZZ/DANCE/MOVIE/ GAME R - Illustration number r PLAY MODE r; (13, 15...
..., 17, 20, 29) TUNING +/- Q ILLUMINATION el (31) IR (receptor) ek JOG* rg (24) MEMORY 9 (16) MIC 1/MIC 2 jacks es (26, 36) MIC LEVEL ed (26, 36) MODE* rj (24) P FILE eg (22) PHONES jack wd (36) PLAY MODE r; (13, 15, 37, 39) Power illuminator wk (31) Preset Effect buttons 7 (22) SALSA/REGGAE/POP/ SAMBA/TANGO/ROCK/ JAZZ/DANCE/MOVIE/ GAME R - Illustration number r PLAY MODE r; (13, 15...


