Primary User Manual
Page 7
Contents Introducing the FD Trinitron Wega Overview 1 Presenting the FD Trinitron Wega 2 Package Contents 3 Using the Remote Control 3 Using the Features Overview 29 Using Favorite Channels 30 Using Twin View 31 Using the Freeze Function 34 Installing ... 27 Setting Up the TV Automatically 28 Using the Menus Overview 35 Using the Video Menu 36 Using the Audio Menu 38 Using the Channel Menu 40 Using the Parent Menu 42 Using the Timer Menu 46 Using the Setup Menu 47 Other Information Overview 49 Programming the Remote Control 50 Operating Other Equipment with Your...
Contents Introducing the FD Trinitron Wega Overview 1 Presenting the FD Trinitron Wega 2 Package Contents 3 Using the Remote Control 3 Using the Features Overview 29 Using Favorite Channels 30 Using Twin View 31 Using the Freeze Function 34 Installing ... 27 Setting Up the TV Automatically 28 Using the Menus Overview 35 Using the Video Menu 36 Using the Audio Menu 38 Using the Channel Menu 40 Using the Parent Menu 42 Using the Timer Menu 46 Using the Setup Menu 47 Other Information Overview 49 Programming the Remote Control 50 Operating Other Equipment with Your...
Primary User Manual
Page 12
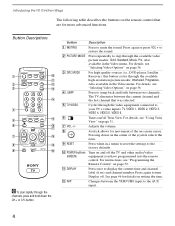
...Press again or press VOL + to display the current time and channel label (if set) and channel number. Also available in the Video menu. Turn on /off Twin View. Press once to restore the sound. Press repeatedly to step through the video equipment connected to turn Display off... 36. Adjusts the volume. Press when in a menu to reset the settings to mute the sound. The TV alternates between two channels. Joystick allows for details on -screen cursor. Pressing down the CH+ or CH- Introducing the FD Trinitron Wega The following table describes the buttons on page 50...
...Press again or press VOL + to display the current time and channel label (if set) and channel number. Also available in the Video menu. Turn on /off Twin View. Press once to restore the sound. Press repeatedly to step through the video equipment connected to turn Display off... 36. Adjusts the volume. Press when in a menu to reset the settings to mute the sound. The TV alternates between two channels. Joystick allows for details on -screen cursor. Pressing down the CH+ or CH- Introducing the FD Trinitron Wega The following table describes the buttons on page 50...
Primary User Manual
Page 13
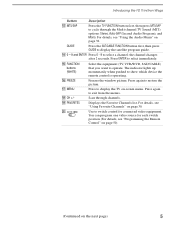
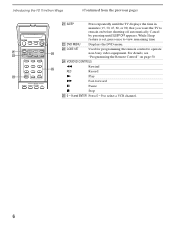
Introducing the FD Trinitron Wega Button Description qd MTS/SAP Press the TV FUNCTION button first, then press...remote control is operating. The indicator lights up momentarily when pushed to select immediately. qg FUNCTION buttons (WHITE) qh FREEZE qj MENU qk CH +/ql FAVORITES w; AV 1 2 3 DVD Select the equipment (TV, VCR/DVD, SAT/CABLE) that you... Program), and Mono. Displays the Favorite Channels list. For details, see "Using the Audio Menu" on -screen menu. Use to switch control for each switch position (For details, see "Using Favorite Channels" on the next page) 5...
Introducing the FD Trinitron Wega Button Description qd MTS/SAP Press the TV FUNCTION button first, then press...remote control is operating. The indicator lights up momentarily when pushed to select immediately. qg FUNCTION buttons (WHITE) qh FREEZE qj MENU qk CH +/ql FAVORITES w; AV 1 2 3 DVD Select the equipment (TV, VCR/DVD, SAT/CABLE) that you... Program), and Mono. Displays the Favorite Channels list. For details, see "Using the Audio Menu" on -screen menu. Use to switch control for each switch position (For details, see "Using Favorite Channels" on the next page) 5...
Primary User Manual
Page 14
While Sleep feature is set, press once to operate non-Sony video equipment. wd CODE SET Used for programming the remote control to view remaining time ws DVD MENU Displays the DVD menu. wf VCR/DVD CONTROLS m Rewind REC Record N Play M Fast-forward X Pause x Stop wg 0 - 9 and ENTER ... 30, 45, 60, or 90) that you want the TV to select a VCR channel. 6 Introducing the FD Trinitron Wega (Continued from the previous page) MUTING POWER VCR/DVD SAT/CABLE TV SLEEP wa ws DVD MENU REC wf 1 2 3 4 5 6 wg 7 8 9 CODE SET ENTER wd 0 FUNCTION TV/VIDEO VCR...
While Sleep feature is set, press once to operate non-Sony video equipment. wd CODE SET Used for programming the remote control to view remaining time ws DVD MENU Displays the DVD menu. wf VCR/DVD CONTROLS m Rewind REC Record N Play M Fast-forward X Pause x Stop wg 0 - 9 and ENTER ... 30, 45, 60, or 90) that you want the TV to select a VCR channel. 6 Introducing the FD Trinitron Wega (Continued from the previous page) MUTING POWER VCR/DVD SAT/CABLE TV SLEEP wa ws DVD MENU REC wf 1 2 3 4 5 6 wg 7 8 9 CODE SET ENTER wd 0 FUNCTION TV/VIDEO VCR...
Primary User Manual
Page 16
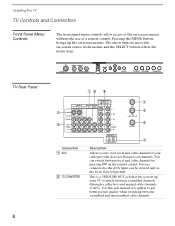
You can be viewed only in the menus and the SELECT button selects the menu item. Use this jack instead of a remote control. TV Rear Panel 8 78 9 1 2 5 3 6 Connection 1 AUX 2 TO CONVERTER 4 Description Allows you set up the on-screen menus. ...). The arrow buttons move the on-screen cursor in the Twin View left picture. Installing the TV TV Controls and Connectors Front Panel Menu Controls The front panel menu controls allow access to the on-screen menus without the use of a splitter to get better picture quality when switching between local and...
You can be viewed only in the menus and the SELECT button selects the menu item. Use this jack instead of a remote control. TV Rear Panel 8 78 9 1 2 5 3 6 Connection 1 AUX 2 TO CONVERTER 4 Description Allows you set up the on-screen menus. ...). The arrow buttons move the on-screen cursor in the Twin View left picture. Installing the TV TV Controls and Connectors Front Panel Menu Controls The front panel menu controls allow access to the on-screen menus without the use of a splitter to get better picture quality when switching between local and...
Primary User Manual
Page 20
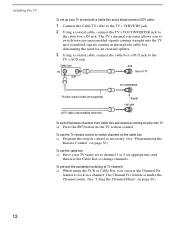
... jack. 2 Using a coaxial cable, connect the TV's TO CONVERTER jack to the cable box's IN jack. The Channel Fix feature is under the Channel menu. (See "Using the Channel Menu" on the TV remote control. The TV's internal converter allows you can use the Channel Fix feature to the TV's AUX jack.
... jack. 2 Using a coaxial cable, connect the TV's TO CONVERTER jack to the cable box's IN jack. The Channel Fix feature is under the Channel menu. (See "Using the Channel Menu" on the TV remote control. The TV's internal converter allows you can use the Channel Fix feature to the TV's AUX jack.
Primary User Manual
Page 21
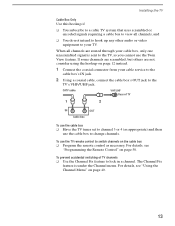
If some channels are scrambled, but others are routed through your cable box, only one unscrambled signal is under the Channel menu. For details, see "Programming the Remote Control" on the cable box ❑ Program the remote control as appropriate) and then use the TV remote control ... TV, so you cannot use the cable box ❑ Have the TV tuner set to channel 3 or 4 (as necessary. For details, see "Using the Channel Menu" on page 12 instead. 1 Connect the coaxial connector from your TV. The Channel Fix feature is sent to your cable service to the cable box...
If some channels are scrambled, but others are routed through your cable box, only one unscrambled signal is under the Channel menu. For details, see "Programming the Remote Control" on the cable box ❑ Program the remote control as appropriate) and then use the TV remote control ... TV, so you cannot use the cable box ❑ Have the TV tuner set to channel 3 or 4 (as necessary. For details, see "Using the Channel Menu" on page 12 instead. 1 Connect the coaxial connector from your TV. The Channel Fix feature is sent to your cable service to the cable box...
Primary User Manual
Page 36
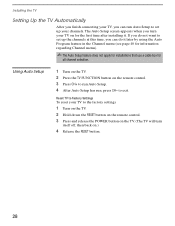
... TV Automatically After you finish connecting your TV, you can do it later by using the Auto Program feature in the Channel menu (see page 40 for information regarding Channel menu). ✍ The Auto Setup feature does not apply for installations that use a cable box for the first time after installing it...
... TV Automatically After you finish connecting your TV, you can do it later by using the Auto Program feature in the Channel menu (see page 40 for information regarding Channel menu). ✍ The Auto Setup feature does not apply for installations that use a cable box for the first time after installing it...

Primary User Manual
Page 43
... of the sound on their ratings. SETUP provides several options for scheduled viewing using the Timers. TIMER lets you to the menu icons. To end one menu session and move to another: Move the joystick upward to return to customize the Picture Mode based on moving through the features... up a Favorite Channel 40 list, run the Auto Program function, and more. Opening and choosing a menu: 1 Press the MENU button to display the Menu screen. 2 Move the joystick to the desired menu icon and press to second audio programming (SAP), or customizing the effect of the on-screen menus. ...
... of the sound on their ratings. SETUP provides several options for scheduled viewing using the Timers. TIMER lets you to the menu icons. To end one menu session and move to another: Move the joystick upward to return to customize the Picture Mode based on moving through the features... up a Favorite Channel 40 list, run the Auto Program function, and more. Opening and choosing a menu: 1 Press the MENU button to display the Menu screen. 2 Move the joystick to the desired menu icon and press to second audio programming (SAP), or customizing the effect of the on-screen menus. ...
Primary User Manual
Page 44
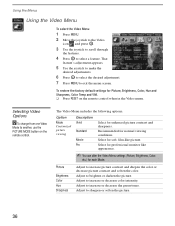
...for Picture, Brightness, Color, Hue and Sharpness, Color Temp and VM. ❑ Press RESET on the remote control. The Video Menu includes the following options. Picture Brightness Color Hue Sharpness Adjust to increase or decrease the green tones. Adjust to increase picture contrast and ...Mode to select a feature. Adjust to increase or decrease color intensity. Select for each Mode. Using the Menus Using the Video Menu To select the Video Menu 1 Press MENU. 2 Move the joystick to the Video icon and press . 3 Use the joystick to scroll through the features. 4 Press...
...for Picture, Brightness, Color, Hue and Sharpness, Color Temp and VM. ❑ Press RESET on the remote control. The Video Menu includes the following options. Picture Brightness Color Hue Sharpness Adjust to increase or decrease the green tones. Adjust to increase picture contrast and ...Mode to select a feature. Adjust to increase or decrease color intensity. Select for each Mode. Using the Menus Using the Video Menu To select the Video Menu 1 Press MENU. 2 Move the joystick to the Video icon and press . 3 Use the joystick to scroll through the features. 4 Press...
Primary User Manual
Page 46
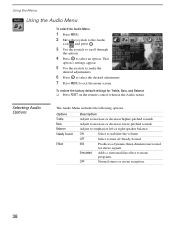
... to make the desired adjustments. 6 Press to select the desired adjustment. 7 Press MENU to stabilize the volume. ON Select to exit the menu screen. Using the Menus Using the Audio Menu To select the Audio Menu 1 Press MENU. 2 Move the joystick to the Audio icon and press . 3 Use the joystick...Produces a dynamic three-dimensional sound for Treble, Bass, and Balance ❑ Press RESET on the remote control when in the Audio menu. To restore the factory default settings for stereo signals. Adjust to increase or decrease higher-pitched sounds. Selecting Audio Options The Audio...
... to make the desired adjustments. 6 Press to select the desired adjustment. 7 Press MENU to stabilize the volume. ON Select to exit the menu screen. Using the Menus Using the Audio Menu To select the Audio Menu 1 Press MENU. 2 Move the joystick to the Audio icon and press . 3 Use the joystick...Produces a dynamic three-dimensional sound for Treble, Bass, and Balance ❑ Press RESET on the remote control when in the Audio menu. To restore the factory default settings for stereo signals. Adjust to increase or decrease higher-pitched sounds. Selecting Audio Options The Audio...
Primary User Manual
Page 48
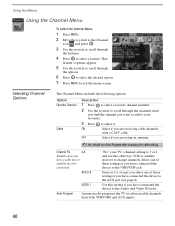
... 1 Press to select a favorite channel number. 2 Use the joystick to scroll through the options. 6 Press to select the desired option. 7 Press MENU to change channels. ON Select if you are using an antenna. ✍ You should run Auto Program after changing the cable setting. OFF Select if... through the channels until you find the channel you are receiving cable channels with a CATV cable. Using the Menus Using the Channel Menu To select the Channel Menu 1 Press MENU. 2 Move the joystick to the Channel icon and press . 3 Use the joystick to scroll through the features. 4 Press to...
... 1 Press to select a favorite channel number. 2 Use the joystick to scroll through the options. 6 Press to select the desired option. 7 Press MENU to change channels. ON Select if you are using an antenna. ✍ You should run Auto Program after changing the cable setting. OFF Select if... through the channels until you find the channel you are receiving cable channels with a CATV cable. Using the Menus Using the Channel Menu To select the Channel Menu 1 Press MENU. 2 Move the joystick to the Channel icon and press . 3 Use the joystick to scroll through the features. 4 Press to...
Primary User Manual
Page 50
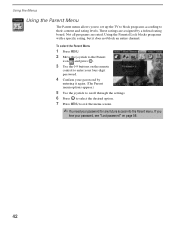
... joystick to scroll through the settings. 6 Press to select the desired option. 7 Press MENU to exit the menu screen. ✍ You need your password for any future access into the Parent menu. To select the Parent Menu 1 Press MENU. 2 Move the joystick to the Parent icon and press . 3 Use the 0-9 buttons... on page 56. 42 Using the Menus Using the Parent Menu The Parent menu allows you lose your password, see "Lost password...
... joystick to scroll through the settings. 6 Press to select the desired option. 7 Press MENU to exit the menu screen. ✍ You need your password for any future access into the Parent menu. To select the Parent Menu 1 Press MENU. 2 Move the joystick to the Parent icon and press . 3 Use the 0-9 buttons... on page 56. 42 Using the Menus Using the Parent Menu The Parent menu allows you lose your password, see "Lost password...
Primary User Manual
Page 51
.... 43 To set ratings manually. ❏ US: See page 44 for details. ❏ Canada: See page 45 for details. Using the Menus Using the Parent Menu z If you are not familiar with the Parental Guideline rating system, you should select Child, Youth, or Young Adult to set more restrictive ratings, select...
.... 43 To set ratings manually. ❏ US: See page 44 for details. ❏ Canada: See page 45 for details. Using the Menus Using the Parent Menu z If you are not familiar with the Parental Guideline rating system, you should select Child, Youth, or Young Adult to set more restrictive ratings, select...
Primary User Manual
Page 52
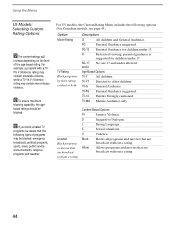
...-Based Options TV-Y All children. z If you block unrated TV programs, be aware that are broadcast without a rating. 44 For US models, the Custom Rating Menu includes the following types of the age-based rating. R Restricted viewing, parental guidance is suggested for children under allowed. TV-G General Audience. TV-Y7 Directed...
...-Based Options TV-Y All children. z If you block unrated TV programs, be aware that are broadcast without a rating. 44 For US models, the Custom Rating Menu includes the following types of the age-based rating. R Restricted viewing, parental guidance is suggested for children under allowed. TV-G General Audience. TV-Y7 Directed...
Primary User Manual
Page 53
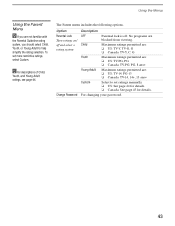
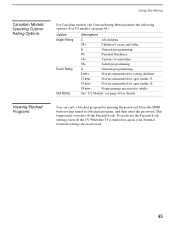
... older. 18+ Adult programming. This temporarily switches off the TV. Using the Menus Canadian Models: Selecting Custom Rating Options For Canadian models, the Custom Rating Menu includes the following options. (For US models, see page 44.) Option English Rating French Rating USA Rating Description C All children. C8+ Children 8 years and older...
... older. 18+ Adult programming. This temporarily switches off the TV. Using the Menus Canadian Models: Selecting Custom Rating Options For Canadian models, the Custom Rating Menu includes the following options. (For US models, see page 44.) Option English Rating French Rating USA Rating Description C All children. C8+ Children 8 years and older...
Primary User Manual
Page 54
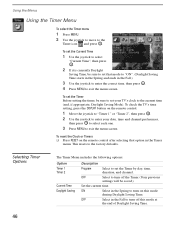
... the factory defaults. This resets to the Timer icon and press . OFF Select in the Timer menu. OFF Select to the current time (and, if appropriate, Daylight Saving Mode). To reset the... be sure to set your date, time and channel preferences, then press to select each one. 3 Press MENU to set the Timer Before setting the timer, be saved.) Set the current time. ON Select in the Fall....) 3 Use the joystick to enter the correct time, then press . 4 Press MENU to turn off this mode during Daylight Saving Time. To set the Timer by day, time, duration, and ...
... the factory defaults. This resets to the Timer icon and press . OFF Select in the Timer menu. OFF Select to the current time (and, if appropriate, Daylight Saving Mode). To reset the... be sure to set your date, time and channel preferences, then press to select each one. 3 Press MENU to set the Timer Before setting the timer, be saved.) Set the current time. ON Select in the Fall....) 3 Use the joystick to enter the correct time, then press . 4 Press MENU to turn off this mode during Daylight Saving Time. To set the Timer by day, time, duration, and ...
Primary User Manual
Page 55
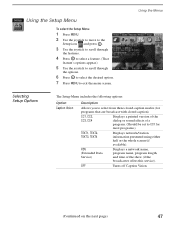
...dialog or sound effects of the show (if the broadcaster offers this service). Using the Menus Selecting Setup Options The Setup Menu includes the following options: Option Caption Vision Description Allows you to CC1 for programs that are broadcast with closed caption). Using the Setup... Menu To select the Setup Menu 1 Press MENU. 2 Use the joystick to move to the Setup icon and press . 3 Use the joystick to scroll through the features. ...
...dialog or sound effects of the show (if the broadcaster offers this service). Using the Menus Selecting Setup Options The Setup Menu includes the following options: Option Caption Vision Description Allows you to CC1 for programs that are broadcast with closed caption). Using the Setup... Menu To select the Setup Menu 1 Press MENU. 2 Use the joystick to move to the Setup icon and press . 3 Use the joystick to scroll through the features. ...
Primary User Manual
Page 56
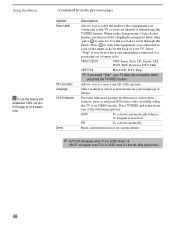
... set your TV skips this feature with widescreen DVDs, set of the following options: AUTO To activate automatically when a 16:9 signal is in the Setup menu's Video Label feature, use this connection when you press the TV/VIDEO button. VIDEO 1/2/3/4 VHS, 8mm, Beta, LD, Game, SAT, DVD, Web, Receiver, DTV, Skip...
... set your TV skips this feature with widescreen DVDs, set of the following options: AUTO To activate automatically when a 16:9 signal is in the Setup menu's Video Label feature, use this connection when you press the TV/VIDEO button. VIDEO 1/2/3/4 VHS, 8mm, Beta, LD, Game, SAT, DVD, Web, Receiver, DTV, Skip...
Primary User Manual
Page 58
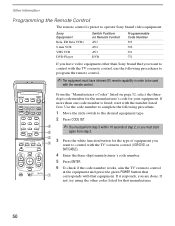
...The equipment must start with the number listed first. If more than Sony brand that you want to operate Sony brand video equipment. If it responds, you must have video equipment other codes listed for that equipment. VOL MENU CH 4 Enter the three-digit manufacturer's code number. 5 Press ... The remote control is listed, start 5 again from step 2. 2 3 Press the white function button for the type of step 2, or you are done. DVD MENU REC 1 Move the slide switch to the desired equipment type. 1 2 3 4 5 6 7 8 CODE SET 0 9 ENTER FUNCTION TV/VIDEO VCR/DVD SAT...
...The equipment must start with the number listed first. If more than Sony brand that you want to operate Sony brand video equipment. If it responds, you must have video equipment other codes listed for that equipment. VOL MENU CH 4 Enter the three-digit manufacturer's code number. 5 Press ... The remote control is listed, start 5 again from step 2. 2 3 Press the white function button for the type of step 2, or you are done. DVD MENU REC 1 Move the slide switch to the desired equipment type. 1 2 3 4 5 6 7 8 CODE SET 0 9 ENTER FUNCTION TV/VIDEO VCR/DVD SAT...


