
Warranty Card
Page 1
... to improper operation or maintenance, connection to improper voltage supply, or attempted repair by anyone other rights which is evidence that the unit is invalid if the factory applied serial number has been altered or removed from the Product. 4-557-166-02 ® Color TV Color Video TV LIMITED WARRANTY Sony Electronics Inc. ("Sony") warrants this Product is available from Sony authorized service facilities or a Sony Service Center...
... to improper operation or maintenance, connection to improper voltage supply, or attempted repair by anyone other rights which is evidence that the unit is invalid if the factory applied serial number has been altered or removed from the Product. 4-557-166-02 ® Color TV Color Video TV LIMITED WARRANTY Sony Electronics Inc. ("Sony") warrants this Product is available from Sony authorized service facilities or a Sony Service Center...

Child Safety: It Makes A Difference Where Your TV Stands
Page 1
..., have a television in mind: THE ISSUE If you are popular purchases and not always supported on dressers, bookcases, shelves, desks, audio speakers, chests or carts. Use appropriate angle braces, straps and anchors to secure your purchase! The home theater entertainment experience is committed to the wall (but never screw directly into the TV). As a result TV sets may stimulate...
..., have a television in mind: THE ISSUE If you are popular purchases and not always supported on dressers, bookcases, shelves, desks, audio speakers, chests or carts. Use appropriate angle braces, straps and anchors to secure your purchase! The home theater entertainment experience is committed to the wall (but never screw directly into the TV). As a result TV sets may stimulate...
Primary User Manual
Page 1
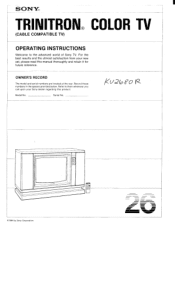
Model No. Serial No. SONY® TRINITRON® COLOR TV (CABLE COMPATIBLE TV) OPERATING INSTRUCTIONS Welcome to them whenever you call upon your new set, please read this product. Kvowo R 00 ©1984 by Sony Corporation , MMOMIN• =EL Ai= '41111111Pw Refer to the advanced world of Sony TV. Record these numbers in the spaces provided below. OWNER'S RECORD The model and serial numbers are located at the rear. For the best results and the utmost satisfaction from your Sony dealer regarding this manual thoroughly and retain it for future reference.
Model No. Serial No. SONY® TRINITRON® COLOR TV (CABLE COMPATIBLE TV) OPERATING INSTRUCTIONS Welcome to them whenever you call upon your new set, please read this product. Kvowo R 00 ©1984 by Sony Corporation , MMOMIN• =EL Ai= '41111111Pw Refer to the advanced world of Sony TV. Record these numbers in the spaces provided below. OWNER'S RECORD The model and serial numbers are located at the rear. For the best results and the utmost satisfaction from your Sony dealer regarding this manual thoroughly and retain it for future reference.
Primary User Manual
Page 2
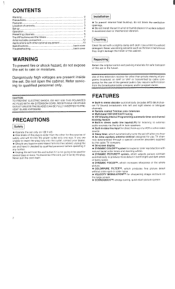
... Location of controls Set-up Operation Presetting channels The VIP buttons and the timers Antenna/cable connection Applications with other optional equipment Specifications Troubleshooting 2 2 2 3 4 4 6 7 12 13 back cover back cover WARNING To prevent fire or shock hazard, do not block the ventilation openings. • Do not install the set in a hot or humid place or in a place subject to external audio sources via the built-in twin speakers...
... Location of controls Set-up Operation Presetting channels The VIP buttons and the timers Antenna/cable connection Applications with other optional equipment Specifications Troubleshooting 2 2 2 3 4 4 6 7 12 13 back cover back cover WARNING To prevent fire or shock hazard, do not block the ventilation openings. • Do not install the set in a hot or humid place or in a place subject to external audio sources via the built-in twin speakers...

Primary User Manual
Page 3
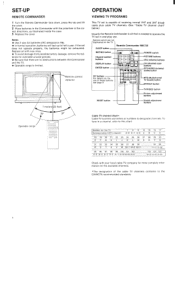
... in brackets. LOCATION OF CONTROLS For details on the use of the display shows channel numbers, "AUX", "MUTING", "SLEEP", and "VIDEO" indicators. POWER switch [5] r -, i CHANNEL scan buttons [5] VOLUME buttons [5] PICTURE buttons [5] Bar display Indicates various picture and sound level adjustments. Front Program SELECT lamp [9] On-screen displays indicator The top portion of each control, refer to open the panel. Indicates which adjustment is being made. ERASE button [6] O O O O O O O ADD button [6] HUE buttons [5] COLOR buttons [5] BRIGHT buttons [5] SHARP buttons...
... in brackets. LOCATION OF CONTROLS For details on the use of the display shows channel numbers, "AUX", "MUTING", "SLEEP", and "VIDEO" indicators. POWER switch [5] r -, i CHANNEL scan buttons [5] VOLUME buttons [5] PICTURE buttons [5] Bar display Indicates various picture and sound level adjustments. Front Program SELECT lamp [9] On-screen displays indicator The top portion of each control, refer to open the panel. Indicates which adjustment is being made. ERASE button [6] O O O O O O O ADD button [6] HUE buttons [5] COLOR buttons [5] BRIGHT buttons [5] SHARP buttons...
Primary User Manual
Page 4
...the TV SLEEP button Remote Commander RM-720 MUTING button aal---POWER switch Channel number buttons O O O O O -1 DISPLAY button o ENTER button -17tHi=. 1 VIP buttons For details on the use of these buttons see page 8. -1Li LJ O0 0 r=1t l3] PICTURE buttons VOL (volume) buttons CH (channel) scan buttons EXT-AUDIO (external audio) button MTS (Multichannel TV Sound) button _ANT/AUX button RESET button -TVIVIDEO button Picture adjustment buttons Sound adjustment buttons Cable TV channel chart* Cable TV systems use letters or numbers to operate the TV set in everyday use. OPERATION...
...the TV SLEEP button Remote Commander RM-720 MUTING button aal---POWER switch Channel number buttons O O O O O -1 DISPLAY button o ENTER button -17tHi=. 1 VIP buttons For details on the use of these buttons see page 8. -1Li LJ O0 0 r=1t l3] PICTURE buttons VOL (volume) buttons CH (channel) scan buttons EXT-AUDIO (external audio) button MTS (Multichannel TV Sound) button _ANT/AUX button RESET button -TVIVIDEO button Picture adjustment buttons Sound adjustment buttons Cable TV channel chart* Cable TV systems use letters or numbers to operate the TV set in everyday use. OPERATION...
Primary User Manual
Page 5
... right speakers. ing broadcast signals. played. The MAIN and SAP sounds will be off . Note There may be cases of the above buttons is received. By switching the AUTO STEREO selector to OFF and returning to a monaural mode, the noise should be displayed on the screen, press DISPLAY. 3 Adjust volume and picture to decrease it again to ON. The channel number will light whenever a stereo broadcast is pressed, a colored...
... right speakers. ing broadcast signals. played. The MAIN and SAP sounds will be off . Note There may be cases of the above buttons is received. By switching the AUTO STEREO selector to OFF and returning to a monaural mode, the noise should be displayed on the screen, press DISPLAY. 3 Adjust volume and picture to decrease it again to ON. The channel number will light whenever a stereo broadcast is pressed, a colored...
Primary User Manual
Page 6
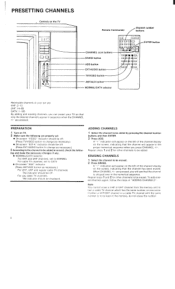
... UHF channel from the memory and retain a cable TV channel which has the same number, or vice versa. PREPARATION 1 Turn on the TV C3 0 CI 0 0 o 41,, O O O O 00/0O Remote Commander Channel number buttons CHANNEL scan buttons ERASE button ADD button EXT•AUDIO button TV/VIDEO button ANT/AUX button NORMAL/CATV selector o 0 = O I 0 ENTER button Receivable channels of your TV so that the channel has been erased. ing and make the necessary changes if...
... UHF channel from the memory and retain a cable TV channel which has the same number, or vice versa. PREPARATION 1 Turn on the TV C3 0 CI 0 0 o 41,, O O O O 00/0O Remote Commander Channel number buttons CHANNEL scan buttons ERASE button ADD button EXT•AUDIO button TV/VIDEO button ANT/AUX button NORMAL/CATV selector o 0 = O I 0 ENTER button Receivable channels of your TV so that the channel has been erased. ing and make the necessary changes if...
Primary User Manual
Page 7
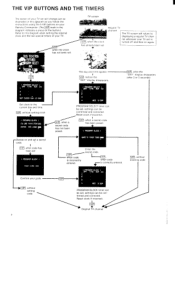
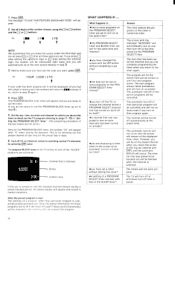
... TIME DUR CH • 1 2 3 WED 2'59P PROGRAM SELECT timer can be set, settings can be confirmed and corrected. VIP, when code is correctly entered. •1 (DPARYOGRTAIMMEBLODCUKR CH 2 VIP 3 WED 3'OOP PROGRAM BLOCK timer can be set, settings can be confirmed and corrected. Regular TV channel The TV screen will change just as illustrated in this diagram as you follow the instructions using the 5 VIP buttons on your Remote...
... TIME DUR CH • 1 2 3 WED 2'59P PROGRAM SELECT timer can be set, settings can be confirmed and corrected. VIP, when code is correctly entered. •1 (DPARYOGRTAIMMEBLODCUKR CH 2 VIP 3 WED 3'OOP PROGRAM BLOCK timer can be set, settings can be confirmed and corrected. Regular TV channel The TV screen will change just as illustrated in this diagram as you follow the instructions using the 5 VIP buttons on your Remote...

Primary User Manual
Page 8
... viewing certain TV programs even when you do at a time or hold the buttons down to work properly unless the clock is essential also to set the clock correctly to move the cursor. The timers will move the screen cursor (arrow) to be preset. DAY 1 TIME DLIR CH (If you are used to "Setting a secret code and the PROGRAM BLOCK timer".) 8 The PROGRAM SELECT timer turns on...
... viewing certain TV programs even when you do at a time or hold the buttons down to work properly unless the clock is essential also to set the clock correctly to move the cursor. The timers will move the screen cursor (arrow) to be preset. DAY 1 TIME DLIR CH (If you are used to "Setting a secret code and the PROGRAM BLOCK timer".) 8 The PROGRAM SELECT timer turns on...
Primary User Manual
Page 9
... is displayed when the screen is set . 5 Press a The cursor will be able to be. If you desire the timer to work if the VIP SELECT switch on page 11. 9 next Wednesday and then turn on the TV will move to the CHANNEL setting position. 10 Set the channel with other programs or channels, repeat steps 1--11 for pay cable TV programs, press ANT/AUX button...
... is displayed when the screen is set . 5 Press a The cursor will be able to be. If you desire the timer to work if the VIP SELECT switch on page 11. 9 next Wednesday and then turn on the TV will move to the CHANNEL setting position. 10 Set the channel with other programs or channels, repeat steps 1--11 for pay cable TV programs, press ANT/AUX button...
Primary User Manual
Page 10
... same time? •the PROGRAM SELECT timer and BLOCK timer are set the code you cancel the program. The screen with VIP , and the automatic turn -on or blockout time? • you have set for the same time and channel? •you have changed the screen with the VIP button without setting the clock? • a setting of a PROGRAM SELECT timer overlaps with that was preset to turn on the PROGRAM SELECT timer are set...
... same time? •the PROGRAM SELECT timer and BLOCK timer are set the code you cancel the program. The screen with VIP , and the automatic turn -on or blockout time? • you have set for the same time and channel? •you have changed the screen with the VIP button without setting the clock? • a setting of a PROGRAM SELECT timer overlaps with that was preset to turn on the PROGRAM SELECT timer are set...
Primary User Manual
Page 11
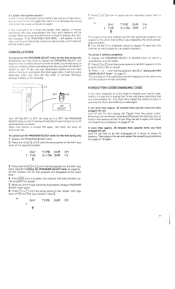
... need to the DAY seg- The channel will be away on page 9.) All the numbers set the originally preset DAY or DAYs. FORGOTTEN CODE/CHANGING CODE If you have already set the timers again. Everything will be useful especially when you have passed since you are not fixed in step 3. will work as preset. CANCELLATIONS To cancel out the PROGRAM SELECT timer for the time...
... need to the DAY seg- The channel will be away on page 9.) All the numbers set the originally preset DAY or DAYs. FORGOTTEN CODE/CHANGING CODE If you have already set the timers again. Everything will be useful especially when you have passed since you are not fixed in step 3. will work as preset. CANCELLATIONS To cancel out the PROGRAM SELECT timer for the time...

Primary User Manual
Page 12
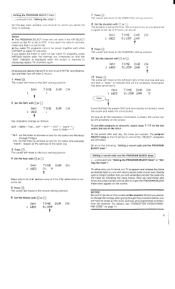
... the VHF antenna end using the appropriate connector, and connect the antenna or cable to the cable type. ANTENNA/CABLE CONNECTION B I ,Alhen both VHF and UHF antennas are connected If your local cable operator. Attach the supplied antenna connector. Output Input Special converter (decoder) Pay TV Cable *The special converter (decoder) will be necessary. Prepare the antenna or cable end using the appropriate connector as illustrated in (flat) a EAC-66 Use an optional F-type connector...
... the VHF antenna end using the appropriate connector, and connect the antenna or cable to the cable type. ANTENNA/CABLE CONNECTION B I ,Alhen both VHF and UHF antennas are connected If your local cable operator. Attach the supplied antenna connector. Output Input Special converter (decoder) Pay TV Cable *The special converter (decoder) will be necessary. Prepare the antenna or cable end using the appropriate connector as illustrated in (flat) a EAC-66 Use an optional F-type connector...
Primary User Manual
Page 13
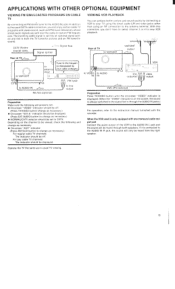
... audio output jack Connect the auido output of TVjr to VHF/UHF 00 to antenna input Tune to the frequency designated by an optional signal splitter and fed to both speakers. Operate the TV the same as necessary.) For regular cable TV channels: The indicator should be off . (Press TV/VIDEO button change as necessary.) • On-screen "EXT-A" indicator should be displayed. (Press EXT-AUDIO button to change...
... audio output jack Connect the auido output of TVjr to VHF/UHF 00 to antenna input Tune to the frequency designated by an optional signal splitter and fed to both speakers. Operate the TV the same as necessary.) For regular cable TV channels: The indicator should be off . (Press TV/VIDEO button change as necessary.) • On-screen "EXT-A" indicator should be displayed. (Press EXT-AUDIO button to change...
Primary User Manual
Page 14
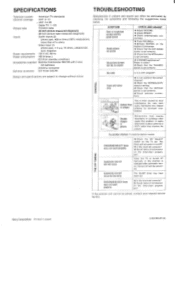
... picture (screen not lit), no sound CHECK AND ADJUST • Adjust PICTURE. • Adjust BRIGHT. • Check antenna/cable connections. . • Press VOLUME)+. • Release MUTING on the Remote Commander. • Check that the EXT-AUDIO button is set correctly. • Check that the TV/VIDEO button is set . Power in picture and sound can often be solved, contact your nearest service facility. or stripes --ili_li L • Is it a color program? Try another channel. Automatic turn...
... picture (screen not lit), no sound CHECK AND ADJUST • Adjust PICTURE. • Adjust BRIGHT. • Check antenna/cable connections. . • Press VOLUME)+. • Release MUTING on the Remote Commander. • Check that the EXT-AUDIO button is set correctly. • Check that the TV/VIDEO button is set . Power in picture and sound can often be solved, contact your nearest service facility. or stripes --ili_li L • Is it a color program? Try another channel. Automatic turn...


