

Operating Instructions
Page 2
...a risk of electric shock to persons. As an ENERGY STAR Partner, Sony Corporation has determined that provides guidelines for proper grounding and, in this manual could void your projection TV, make sure to adjust convergence. CAUTION When using TV games, computers, and similar products with the ... may be connected to the grounding system of the building, as close to the point of _ble-entry as practical. MODELS: KP-48V75 / 53V75 / 53V75C / 61V75. Please keep the brightness and contrast functions at a high brightness" or contrast setting, the image can be fully inserted to ...
...a risk of electric shock to persons. As an ENERGY STAR Partner, Sony Corporation has determined that provides guidelines for proper grounding and, in this manual could void your projection TV, make sure to adjust convergence. CAUTION When using TV games, computers, and similar products with the ... may be connected to the grounding system of the building, as close to the point of _ble-entry as practical. MODELS: KP-48V75 / 53V75 / 53V75C / 61V75. Please keep the brightness and contrast functions at a high brightness" or contrast setting, the image can be fully inserted to ...
Operating Instructions
Page 5
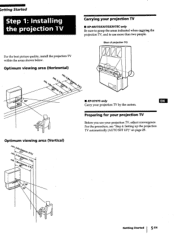
...KP-48V75/53V75/53V75C only Be sure to grasp the areas indicated when caliI3ril_g the projection TV, and to use more than two people. (Rear of projection TV) For the best picture quality, install the projection TV within the areas shown below. ;etting Started Carrying your projection TV, adjust convergence.... Getting Started I 5"EN For the procedure, see "Step 4: Setting up the projection TV automatically (AUTO SET UP)" on page 21. Optimum viewing area (Horizontal) % Optimum viewing area (Vertical) • KP-61_5 only Carry your projection...
...KP-48V75/53V75/53V75C only Be sure to grasp the areas indicated when caliI3ril_g the projection TV, and to use more than two people. (Rear of projection TV) For the best picture quality, install the projection TV within the areas shown below. ;etting Started Carrying your projection TV, adjust convergence.... Getting Started I 5"EN For the procedure, see "Step 4: Setting up the projection TV automatically (AUTO SET UP)" on page 21. Optimum viewing area (Horizontal) % Optimum viewing area (Vertical) • KP-61_5 only Carry your projection...

Operating Instructions
Page 21
... will be sure to connect the antenna or cable to exP. VOLUME + -CHARNEL + POWER _ STAN0_ I NUE TO CONVERGENCE? CHANNEL+ AUTO PROGRAM Before you can set up the projection TV manually, see page 6). 1 Press POWER to a video input, you cannot perform AUTO SET UP. CONT I -]1--11-III o"" 3 Press CHANNEL +1- SETUP ENGLISH : ESPN_OL : |CH...
... will be sure to connect the antenna or cable to exP. VOLUME + -CHARNEL + POWER _ STAN0_ I NUE TO CONVERGENCE? CHANNEL+ AUTO PROGRAM Before you can set up the projection TV manually, see page 6). 1 Press POWER to a video input, you cannot perform AUTO SET UP. CONT I -]1--11-III o"" 3 Press CHANNEL +1- SETUP ENGLISH : ESPN_OL : |CH...

Operating Instructions
Page 22
...(FUNCTION) (Z) (UD _ G[_ oe_e o®®® CD (:D CC) 0 ._ I®®(_ I CONVERGENCE : BLUE f [CH +] [VO-L]_ _[VOL +1 Wh0.°ro.i// R ED ISEB[LxC__ETt-_! To preview the main functions (DEMO) Press TV/VIDEO on the screen. To exit DEMO Press any button. To move vertical line right/left, press... The main menu appears. The SET UP menu appears. 22"EN I -/--. Then follow the steps 2 to 6 above to select 8, and press _. TVNIDEO CONVERGENCE : RED t [CH+] [VOL-]_ _ _[VOL+| _,[CH-] . B _LcONVERGENC E :RED M_"_ B_ G+R RED/BLUE:_-01 Ex i t :[SET(I_ To move...
...(FUNCTION) (Z) (UD _ G[_ oe_e o®®® CD (:D CC) 0 ._ I®®(_ I CONVERGENCE : BLUE f [CH +] [VO-L]_ _[VOL +1 Wh0.°ro.i// R ED ISEB[LxC__ETt-_! To preview the main functions (DEMO) Press TV/VIDEO on the screen. To exit DEMO Press any button. To move vertical line right/left, press... The main menu appears. The SET UP menu appears. 22"EN I -/--. Then follow the steps 2 to 6 above to select 8, and press _. TVNIDEO CONVERGENCE : RED t [CH+] [VOL-]_ _ _[VOL+| _,[CH-] . B _LcONVERGENC E :RED M_"_ B_ G+R RED/BLUE:_-01 Ex i t :[SET(I_ To move...

Operating Instructions
Page 23
... procedure only when you want to adjust it manually. 1 Press MENU. 2 Press t or • to select _, and press _. 3 Press • or • to do not converge, the color is erased from thepreset memory. R N,N[CON_RGENC E B B G R R=Red G=Green B=Blue Exit _1 Getting Started I 5 Erase and/or add channels: To erase an unwanted channel (l) Make...
... procedure only when you want to adjust it manually. 1 Press MENU. 2 Press t or • to select _, and press _. 3 Press • or • to do not converge, the color is erased from thepreset memory. R N,N[CON_RGENC E B B G R R=Red G=Green B=Blue Exit _1 Getting Started I 5 Erase and/or add channels: To erase an unwanted channel (l) Make...

Operating Instructions
Page 24
... 4 and 5 to adjust the other lines until it manually. 1 Press MENU. 2 Press _ or t to select 8, and press _. 3 set to a video input and you want to set it converges with the center green line, and press _. 4 Press • or t to move the cursor (1_) to the symbol showing the line you... down adjustment) +BLUE :Blue vertical and horizontal line (left/right/up/ down adjustment) 5 Press t, _, t, or _ to move the line until all three lines converge and are seen as a white cross. 7 Press MENU to return to the original screen. (_ _ SETUP Exit_ 4 Press MENU to return to adjust, and press ...
... 4 and 5 to adjust the other lines until it manually. 1 Press MENU. 2 Press _ or t to select 8, and press _. 3 set to a video input and you want to set it converges with the center green line, and press _. 4 Press • or t to move the cursor (1_) to the symbol showing the line you... down adjustment) +BLUE :Blue vertical and horizontal line (left/right/up/ down adjustment) 5 Press t, _, t, or _ to move the line until all three lines converge and are seen as a white cross. 7 Press MENU to return to the original screen. (_ _ SETUP Exit_ 4 Press MENU to return to adjust, and press ...

Operating Instructions
Page 46
...8226; .b Make sure the channel is connected securely to the wall outlet. ,_ Press TV (FUNCTION) when operating your nearest Sony dealer. Try another channel. Replace the batteries. (page 20) Make sure the projection TV's power cord is broadcasting programs. ...convergence. (page 23) •,_ Check antenna/cable connections. (page 6) •,_ Perform AUTO SET UP again using the S-Link function "_ Make sure the projection TV's power cord is ON in the SET UP menu. (page 24) •,_ Use AUTO PROGRAM to the factory preset condition. (page 21) No color Adjust the COLOR in the VIDEO...
...8226; .b Make sure the channel is connected securely to the wall outlet. ,_ Press TV (FUNCTION) when operating your nearest Sony dealer. Try another channel. Replace the batteries. (page 20) Make sure the projection TV's power cord is broadcasting programs. ...convergence. (page 23) •,_ Check antenna/cable connections. (page 6) •,_ Perform AUTO SET UP again using the S-Link function "_ Make sure the projection TV's power cord is ON in the SET UP menu. (page 24) •,_ Use AUTO PROGRAM to the factory preset condition. (page 21) No color Adjust the COLOR in the VIDEO...

Operating Instructions
Page 50
...12 MTS button 34 MUTING button 26 PIP OFF button 28 POSITION button 29 POWER switch 21 RESET button 31 SETUP button 21 S VIDEO input connector 8. 13 S VIDEO/VIDEO 2 INPUT (VIDEO/AUDIO L (MONO)/R) jacks 10 SLEEP button 27 SWAP button 29 SYSTEM OFF button 44 TV/DBS _) button 33. 45 TV...) 28 TV/VTR CH +/-buttons (yellow labelled button) 29 VI-IF/UHF antenna terminal 6 VIDEO 1 IN jacks 7 VIDEO 2 INPUT jacks 10 VIDEO 3 IN jacks 7 VIDEO 4 IN jacks 7 VOLUME +/-buttons 21 VOL (volume) +/- Adjusting the convergence 23 the picture 30 the sound 32 Antenna 6 Audio effect _) 33 Audio out 36 Auto program...
...12 MTS button 34 MUTING button 26 PIP OFF button 28 POSITION button 29 POWER switch 21 RESET button 31 SETUP button 21 S VIDEO input connector 8. 13 S VIDEO/VIDEO 2 INPUT (VIDEO/AUDIO L (MONO)/R) jacks 10 SLEEP button 27 SWAP button 29 SYSTEM OFF button 44 TV/DBS _) button 33. 45 TV...) 28 TV/VTR CH +/-buttons (yellow labelled button) 29 VI-IF/UHF antenna terminal 6 VIDEO 1 IN jacks 7 VIDEO 2 INPUT jacks 10 VIDEO 3 IN jacks 7 VIDEO 4 IN jacks 7 VOLUME +/-buttons 21 VOL (volume) +/- Adjusting the convergence 23 the picture 30 the sound 32 Antenna 6 Audio effect _) 33 Audio out 36 Auto program...


