
The Sony Guide to Home Theater
Page 11
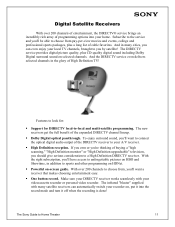
...DIRECTV receiver to sports and other programming on HDNet. ƒ Powerful on selected channels. To enjoy surround sound, you can automatically...that makes choosing entertainment easy. ƒ One button record. The infrared "blaster" supplied with your recorder on HBO and Showtime, in addition to your A/V receiver. &#...pictures on , put it off when the recording is done! The Sony Guide to choose from pay-per-view movies and events, college and... options into the record mode and turn it into your local TV channels, brought to -local and multi-satellite programming. Subscribe to...
...DIRECTV receiver to sports and other programming on HDNet. ƒ Powerful on selected channels. To enjoy surround sound, you can automatically...that makes choosing entertainment easy. ƒ One button record. The infrared "blaster" supplied with your recorder on HBO and Showtime, in addition to your A/V receiver. &#...pictures on , put it off when the recording is done! The Sony Guide to choose from pay-per-view movies and events, college and... options into the record mode and turn it into your local TV channels, brought to -local and multi-satellite programming. Subscribe to...

Dimensions Diagrams
Page 1
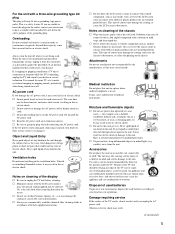
KLV-32M1 SUPPLIED REMOTE RMY-1003 MDDEEOSSDCCERRLII:PPTTIIOONN:: DIMENSIONS 32" LCD Wega® Monitor/Receiver POWER REQUIREMENTS:120VAC (W(WWEHHIGDDH))::T3:2 7/8 "x 26 3/8 " x 4 3/8" WEIGHT: 43 lbs 7 oz With TV Stand POWER CONSUMPTION: 60Hz 155 w
KLV-32M1 SUPPLIED REMOTE RMY-1003 MDDEEOSSDCCERRLII:PPTTIIOONN:: DIMENSIONS 32" LCD Wega® Monitor/Receiver POWER REQUIREMENTS:120VAC (W(WWEHHIGDDH))::T3:2 7/8 "x 26 3/8 " x 4 3/8" WEIGHT: 43 lbs 7 oz With TV Stand POWER CONSUMPTION: 60Hz 155 w

Operating Instructions
Page 4
...power plug regularly. If the plug is equipped with a polarized AC power cord plug (a plug having a third pin for future reference. KLV-32M1 SONY WALL-MOUNT BRACKET MODEL NO. As an ENERGY STAR® Partner, Sony...under license from battery power, refer to operate from SRS Labs, Inc. This TV incorporates High-Definition Multimedia Interface (HDMI™) technology. Wega, Steady Sound, Digital ... the AC power plug and clean it regularly. "BBE" and BBE symbol are trademarks or registered trademarks of electrical power supplied to your home, consult your TV, please read...
...power plug regularly. If the plug is equipped with a polarized AC power cord plug (a plug having a third pin for future reference. KLV-32M1 SONY WALL-MOUNT BRACKET MODEL NO. As an ENERGY STAR® Partner, Sony...under license from battery power, refer to operate from SRS Labs, Inc. This TV incorporates High-Definition Multimedia Interface (HDMI™) technology. Wega, Steady Sound, Digital ... the AC power plug and clean it regularly. "BBE" and BBE symbol are trademarks or registered trademarks of electrical power supplied to your home, consult your TV, please read...
Operating Instructions
Page 5
... receptacles beyond their supplied instructions. s Do not pinch, bend, or twist the cord excessively. s Keep the AC power cord away from a TV unit is continuous or frequent while the TV is in use power-line operated sets ..., table or shelf. Notes on the unit. s Do not allow the LCD screen to deteriorate, or efface the printing on the unit. s Never subject the chassis to ...cause the appliance and cart combination to deteriorate. Use only a cart or stand recommended by Sony for long periods of time. Quick stops, excessive force, and uneven surfaces may result in...
... receptacles beyond their supplied instructions. s Do not pinch, bend, or twist the cord excessively. s Keep the AC power cord away from a TV unit is continuous or frequent while the TV is in use power-line operated sets ..., table or shelf. Notes on the unit. s Do not allow the LCD screen to deteriorate, or efface the printing on the unit. s Never subject the chassis to ...cause the appliance and cart combination to deteriorate. Use only a cart or stand recommended by Sony for long periods of time. Quick stops, excessive force, and uneven surfaces may result in...

Operating Instructions
Page 9
...qualified service personnel. A polarized plug has two blades with the manufacturer's instructions. 8) Do not install near any heat sources such as power-supply cord or plug is required when the apparatus has been damaged in accordance with one wider than the other apparatus (including amplifiers) that ...produce heat. 9) Do not defeat the safety purpose of the obsolete outlet. 10) Protect the power cord from being walked on or pinched particularly at plugs, convenience receptacles, and the point where they exit from tip-over. 13) ...
...qualified service personnel. A polarized plug has two blades with the manufacturer's instructions. 8) Do not install near any heat sources such as power-supply cord or plug is required when the apparatus has been damaged in accordance with one wider than the other apparatus (including amplifiers) that ...produce heat. 9) Do not defeat the safety purpose of the obsolete outlet. 10) Protect the power cord from being walked on or pinched particularly at plugs, convenience receptacles, and the point where they exit from tip-over. 13) ...

Operating Instructions
Page 13
...Guide (1) Warranty Card (1) 13 Notes • Remove the batteries to the diagram inside the remote control's battery compartment. Installing the TV Installing the TV Unpacking When you anticipate that the remote control will not be programmed to operate most video equipment (see "Programming the Remote Control" ... dropping it, getting it wet, or placing it includes the following: Remote control (1) and size AA batteries (2) AC power cord (1) 75-ohm coaxial cable (1) Overview of the Remote Control Insert two size AA batteries (supplied) by matching the e and E on page 16).
...Guide (1) Warranty Card (1) 13 Notes • Remove the batteries to the diagram inside the remote control's battery compartment. Installing the TV Installing the TV Unpacking When you anticipate that the remote control will not be programmed to operate most video equipment (see "Programming the Remote Control" ... dropping it, getting it wet, or placing it includes the following: Remote control (1) and size AA batteries (2) AC power cord (1) 75-ohm coaxial cable (1) Overview of the Remote Control Insert two size AA batteries (supplied) by matching the e and E on page 16).

Operating Instructions
Page 20
...remote control. 2 (Timer) LED When lit, indicates one of the timers is set , this may indicate the TV needs LED servicing (see page 75. 3 1 (Power) and Press 1 (Power) to turn on your TV, push up the panel door just under the "v PUSH-OPEN" mark until you hear a click, then the...either CHANNEL. 20 When the timer is turned on your headphones. If your headphones do not match the jack, use a suitable plug adaptor (not supplied). 5 VIDEO 2 IN S VIDEO Connects to your camcorder or other video equipment. To scan quickly through channels. The LED lights up in red....
...remote control. 2 (Timer) LED When lit, indicates one of the timers is set , this may indicate the TV needs LED servicing (see page 75. 3 1 (Power) and Press 1 (Power) to turn on your TV, push up the panel door just under the "v PUSH-OPEN" mark until you hear a click, then the...either CHANNEL. 20 When the timer is turned on your headphones. If your headphones do not match the jack, use a suitable plug adaptor (not supplied). 5 VIDEO 2 IN S VIDEO Connects to your camcorder or other video equipment. To scan quickly through channels. The LED lights up in red....

Operating Instructions
Page 21
.../L-AUDIO-R 6 AUDIO OUT (VAR/FIX) L/R 7 5 CENTER SPEAKER IN 180W (6Ω) MAX 8 VIDEO 1/3 IN S VIDEO Connects the supplied AC power cord. HDMI (High-Definition Multimedia Interface) provides an uncompressed, all-digital audio/video interface between this TV and any HDMI-equipped audio/video component, such as a center speaker. Connect to the left and right...
.../L-AUDIO-R 6 AUDIO OUT (VAR/FIX) L/R 7 5 CENTER SPEAKER IN 180W (6Ω) MAX 8 VIDEO 1/3 IN S VIDEO Connects the supplied AC power cord. HDMI (High-Definition Multimedia Interface) provides an uncompressed, all-digital audio/video interface between this TV and any HDMI-equipped audio/video component, such as a center speaker. Connect to the left and right...

Operating Instructions
Page 24
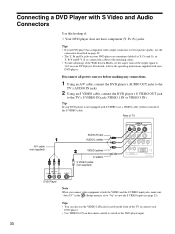
For 120 V AC Wall outlet AC IN AC power cord (supplied) 24 Connecting Optional Equipment Use the instructions in this section to connect the following optional equipment: If you are connecting VCR and Cable TV Satellite Receiver Satellite Receiver and VCR AV Receiver DVD Player with Component Video Connectors DVD ...28 page 29 page 30 page 31 page 32 page 33 page 35 page 36 page Connecting the Power Cord Complete other connections prior to connecting the power cord. 1 Connect the power cord to the AC IN connector of the TV. 2 Connect the other plug of the power cord to a wall outlet.
For 120 V AC Wall outlet AC IN AC power cord (supplied) 24 Connecting Optional Equipment Use the instructions in this section to connect the following optional equipment: If you are connecting VCR and Cable TV Satellite Receiver Satellite Receiver and VCR AV Receiver DVD Player with Component Video Connectors DVD ...28 page 29 page 30 page 31 page 32 page 33 page 35 page 36 page Connecting the Power Cord Complete other connections prior to connecting the power cord. 1 Connect the power cord to the AC IN connector of the TV. 2 Connect the other plug of the power cord to a wall outlet.

Operating Instructions
Page 25
..., VIDEO 2 IN and VIDEO 3 IN) separately. Tip If your VCR. Disconnect all power sources before making any connections. 1 Connect the CATV cable to the VCR's IN jack. 2 Using the supplied 75-ohm coaxial cable, connect the VCR's OUT jack to the TV's VHF/UHF jack. 3 Using A/V and S VIDEO cables, connect the VCR's AUDIO...
..., VIDEO 2 IN and VIDEO 3 IN) separately. Tip If your VCR. Disconnect all power sources before making any connections. 1 Connect the CATV cable to the VCR's IN jack. 2 Using the supplied 75-ohm coaxial cable, connect the VCR's OUT jack to the TV's VHF/UHF jack. 3 Using A/V and S VIDEO cables, connect the VCR's AUDIO...

Operating Instructions
Page 26
... CENTER SPEAKER IN 180W (6 ) MAX Note When you use the VIDEO 3 IN jacks for this hookup) to the TV's VHF/UHF jack. Connecting a Satellite Receiver Disconnect all power sources before making any connections. 1 Connect the satellite antenna cable to the satellite receiver's SATELLITE IN jack. 2 Using ... Receiver Satellite antenna cable S VIDEO cable (not supplied) A/V cable (not supplied) 75-ohm coaxial cable (supplied) Rear of the TV to connect your cable or antenna to watch satellite TV. 26 Tip If your satellite receiver is set to "On" to the TV's AUDIO and S VIDEO IN jacks (VIDEO 1...
... CENTER SPEAKER IN 180W (6 ) MAX Note When you use the VIDEO 3 IN jacks for this hookup) to the TV's VHF/UHF jack. Connecting a Satellite Receiver Disconnect all power sources before making any connections. 1 Connect the satellite antenna cable to the satellite receiver's SATELLITE IN jack. 2 Using ... Receiver Satellite antenna cable S VIDEO cable (not supplied) A/V cable (not supplied) 75-ohm coaxial cable (supplied) Rear of the TV to connect your cable or antenna to watch satellite TV. 26 Tip If your satellite receiver is set to "On" to the TV's AUDIO and S VIDEO IN jacks (VIDEO 1...

Operating Instructions
Page 27
... supplied) 75-ohm coaxial cable (supplied) A/V cable (not supplied) 75-ohm coaxial cable (supplied) Rear of the S VIDEO cable. 5 Using A/V and S VIDEO cables, connect the VCR's AUDIO and S VIDEO OUT jacks to the TV's AUDIO and S VIDEO IN jacks (VIDEO 1 IN or VIDEO 3 IN). Connecting and Setting the TV Connecting a Satellite Receiver and a VCR Disconnect all power...
... supplied) 75-ohm coaxial cable (supplied) A/V cable (not supplied) 75-ohm coaxial cable (supplied) Rear of the S VIDEO cable. 5 Using A/V and S VIDEO cables, connect the VCR's AUDIO and S VIDEO OUT jacks to the TV's AUDIO and S VIDEO IN jacks (VIDEO 1 IN or VIDEO 3 IN). Connecting and Setting the TV Connecting a Satellite Receiver and a VCR Disconnect all power...

Operating Instructions
Page 28
Using an AUDIO cable, connect the TV's AUDIO OUT jacks to "On." Otherwise, the speaker volume may be too loud. 28 Notes • The video signal is moderate before making any connections. Connecting an AV Receiver Disconnect all power sources before switching "Speaker" from your audio ...PB PR R L AUDIO OUT (VAR/FIX) CENTER SPEAKER IN 180W (6 ) MAX AUDIO-L (white) AUDIO cable (not supplied) Audio input AV Receiver (Compact AV system, etc.) When using the TV's remote control (see "Programming the Remote Control" on page 16), by setting "Audio Out" in the (Audio) menu...
Using an AUDIO cable, connect the TV's AUDIO OUT jacks to "On." Otherwise, the speaker volume may be too loud. 28 Notes • The video signal is moderate before making any connections. Connecting an AV Receiver Disconnect all power sources before switching "Speaker" from your audio ...PB PR R L AUDIO OUT (VAR/FIX) CENTER SPEAKER IN 180W (6 ) MAX AUDIO-L (white) AUDIO cable (not supplied) Audio input AV Receiver (Compact AV system, etc.) When using the TV's remote control (see "Programming the Remote Control" on page 16), by setting "Audio Out" in the (Audio) menu...

Operating Instructions
Page 29
...power sources before making any connections. 1 Using a component video cable, connect the DVD player's Y, PB and PR jacks to the Y, PB and PR jacks on your DVD player. If so, connect the cables to the matching colors. • To take advantage of the Wide Screen Modes, set the aspect ratio of TV... AUDIO-L (white) AUDIO-R (red) AUDIO cable (not supplied) Y PB VIDEO IN 1 AUDIO VIDEO S VIDEO R L (MONO) 3 4 AUDIO HD/DVD IN R...
...power sources before making any connections. 1 Using a component video cable, connect the DVD player's Y, PB and PR jacks to the Y, PB and PR jacks on your DVD player. If so, connect the cables to the matching colors. • To take advantage of the Wide Screen Modes, set the aspect ratio of TV... AUDIO-L (white) AUDIO-R (red) AUDIO cable (not supplied) Y PB VIDEO IN 1 AUDIO VIDEO S VIDEO R L (MONO) 3 4 AUDIO HD/DVD IN R...
Operating Instructions
Page 30
... Y, PB and PR jacks on your DVD player is set the aspect ratio of the S VIDEO cable. If so, connect the cables to the matching colors. • To take advantage of the Wide Screen Modes, set to "On" to both the VIDEO and the S VIDEO input jacks, make sure ... 1 IN or VIDEO 3 IN). Disconnect all power sources before making any connections. 1 Using an A/V cable, connect the DVD player's AUDIO OUT jacks to the TV's AUDIO IN jacks. 2 Using an S VIDEO cable, connect the DVD player's S VIDEO OUT jack to the operating instructions supplied with S Video and Audio Connectors Use this hookup...
... Y, PB and PR jacks on your DVD player is set the aspect ratio of the S VIDEO cable. If so, connect the cables to the matching colors. • To take advantage of the Wide Screen Modes, set to "On" to both the VIDEO and the S VIDEO input jacks, make sure ... 1 IN or VIDEO 3 IN). Disconnect all power sources before making any connections. 1 Using an A/V cable, connect the DVD player's AUDIO OUT jacks to the TV's AUDIO IN jacks. 2 Using an S VIDEO cable, connect the DVD player's S VIDEO OUT jack to the operating instructions supplied with S Video and Audio Connectors Use this hookup...

Operating Instructions
Page 31
...PR) connection is necessary to provide sound. Note that this TV displays all power sources before making any connections. 1 Using a component video cable, connect the Digital Cable Box's Y, PB and PR jacks to the Y, PB and PR jacks on the TV. Note The Y, PB and PR jacks do not provide...) Digital Cable Box Y PB Component video cable (not supplied) PR Rear of 1,366 dots × 768 lines. 2 Using an AUDIO cable, connect the Digital Cable Box's AUDIO OUT jacks to the TV's AUDIO IN jacks. Connecting and Setting the TV Connecting a Digital Cable Box Disconnect all format types of ...
...PR) connection is necessary to provide sound. Note that this TV displays all power sources before making any connections. 1 Using a component video cable, connect the Digital Cable Box's Y, PB and PR jacks to the Y, PB and PR jacks on the TV. Note The Y, PB and PR jacks do not provide...) Digital Cable Box Y PB Component video cable (not supplied) PR Rear of 1,366 dots × 768 lines. 2 Using an AUDIO cable, connect the Digital Cable Box's AUDIO OUT jacks to the TV's AUDIO IN jacks. Connecting and Setting the TV Connecting a Digital Cable Box Disconnect all format types of ...

Operating Instructions
Page 32
... provide sound. Note that this TV displays all power sources before making any connections. 1 Using a component video cable, connect the Digital Satellite Receiver's Y, PB and PR jacks to the TV's AUDIO IN jacks. Connecting a Digital Satellite Receiver Disconnect all format types of picture in a resolution of TV AUDIO cable (not supplied) AUDIO-L (white) AUDIO-R (red...
... provide sound. Note that this TV displays all power sources before making any connections. 1 Using a component video cable, connect the Digital Satellite Receiver's Y, PB and PR jacks to the TV's AUDIO IN jacks. Connecting a Digital Satellite Receiver Disconnect all format types of picture in a resolution of TV AUDIO cable (not supplied) AUDIO-L (white) AUDIO-R (red...

Operating Instructions
Page 33
... both video and audio signals, so it is not necessary to the TV's HDMI IN connector. Disconnect all power sources before making any connections. Use the HDMI 5 IN connection. Connecting and Setting the TV Connecting a Digital Satellite Receiver with HDMI Connector Use this hookup if: ...a High-Definition Multimedia Interface (HDMI). Rear of TV VIDEO IN VIDEO S VIDEO MONO) HD/DVD IN L Y PB PR Digital Satellite Receiver R L AUDIO IN 5 IN HDMI cable (not supplied) (Continued) 33 Using an HDMI cable (not supplied), connect the Digital Satellite Receiver's HDMI OUT connector ...
... both video and audio signals, so it is not necessary to the TV's HDMI IN connector. Disconnect all power sources before making any connections. Use the HDMI 5 IN connection. Connecting and Setting the TV Connecting a Digital Satellite Receiver with HDMI Connector Use this hookup if: ...a High-Definition Multimedia Interface (HDMI). Rear of TV VIDEO IN VIDEO S VIDEO MONO) HD/DVD IN L Y PB PR Digital Satellite Receiver R L AUDIO IN 5 IN HDMI cable (not supplied) (Continued) 33 Using an HDMI cable (not supplied), connect the Digital Satellite Receiver's HDMI OUT connector ...

Operating Instructions
Page 35
...S VIDEO Y PB/CB PR/CR COMPONENT VIDEO OUT OPTICAL DIGITAL IN VIDEO 2 AV Receiver AM FM 75 COAXIAL Optical digital cable (not supplied) When using the TV's speakers as the center speaker Using "Center Speaker Mode" in (Audio) menu, select the video input that has multi-channel speaker outputs... Satellite Receiver to the Y, PB and PR jacks on the TV. For more details, see "Using the Center Speaker Feature" on page 50. 35 Disconnect all power sources before making any connections. 1 Using a SPEAKER cord, connect the TV's CENTER SPEAKER IN terminals to the AV Receiver's CENTER SPEAKER ...
...S VIDEO Y PB/CB PR/CR COMPONENT VIDEO OUT OPTICAL DIGITAL IN VIDEO 2 AV Receiver AM FM 75 COAXIAL Optical digital cable (not supplied) When using the TV's speakers as the center speaker Using "Center Speaker Mode" in (Audio) menu, select the video input that has multi-channel speaker outputs... Satellite Receiver to the Y, PB and PR jacks on the TV. For more details, see "Using the Center Speaker Feature" on page 50. 35 Disconnect all power sources before making any connections. 1 Using a SPEAKER cord, connect the TV's CENTER SPEAKER IN terminals to the AV Receiver's CENTER SPEAKER ...

Marketing Specifications
Page 2
... KLV-32M1 32" M Series LCD WEGA™ Television Features General Auto SAP: Yes Channel Fix: Yes Closed Caption (CC): Yes ID1 Detection: Yes Video Label: Yes XDS (Extended Data Service): Yes Video Screen or Display Technology: LCD Tuner: Analog Video Processing: Yes Color ...(1 Front / 2 Rear) Center Channel Speaker Input: 1 (Rear) Headphone Output(s): 1 (Front) Power Internal Power Supply: Yes Power Consumption (in Operation): 155W Power Consumption (in Standby): Less than 1W Power Requirements: AC 120V, 60Hz Regulation and Standard Compliance Energy Star® Compliant: Yes VESA: Yes Service...
... KLV-32M1 32" M Series LCD WEGA™ Television Features General Auto SAP: Yes Channel Fix: Yes Closed Caption (CC): Yes ID1 Detection: Yes Video Label: Yes XDS (Extended Data Service): Yes Video Screen or Display Technology: LCD Tuner: Analog Video Processing: Yes Color ...(1 Front / 2 Rear) Center Channel Speaker Input: 1 (Rear) Headphone Output(s): 1 (Front) Power Internal Power Supply: Yes Power Consumption (in Operation): 155W Power Consumption (in Standby): Less than 1W Power Requirements: AC 120V, 60Hz Regulation and Standard Compliance Energy Star® Compliant: Yes VESA: Yes Service...


