
The Sony Guide to Home Theater
Page 27
... LCD WEGA™ television. and more like watching television -- Refinements include Direct Digital Circuitry, the DRC™ Multi-Function system and MID™ X circuitry. ƒ Memory Stick® media playback. The 3D comb filter analyzes the picture over -the-air digital TV ... source material. ƒ Component video inputs enable high-quality analog connection from the first stage to get higher resolution, greater precision and a television that 's less like a window on the same screen. ƒ WEGA Engine™ circuitry. The Sony Guide to separate the luminance (Y) from...
... LCD WEGA™ television. and more like watching television -- Refinements include Direct Digital Circuitry, the DRC™ Multi-Function system and MID™ X circuitry. ƒ Memory Stick® media playback. The 3D comb filter analyzes the picture over -the-air digital TV ... source material. ƒ Component video inputs enable high-quality analog connection from the first stage to get higher resolution, greater precision and a television that 's less like a window on the same screen. ƒ WEGA Engine™ circuitry. The Sony Guide to separate the luminance (Y) from...
The Sony Guide to Home Theater
Page 32
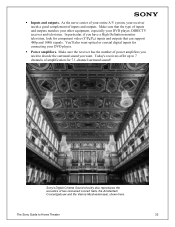
... complement of amplification for connecting your DVD player. ƒ Power amplifiers. Sony's Digital Cinema Sound circuitry also reproduces the acoustics of power amplifiers you need to Home Theater 32 You'll also want . Today's receivers offer up to 7 channels of inputs and outputs. Make sure the receiver has the number of two renowned...
... complement of amplification for connecting your DVD player. ƒ Power amplifiers. Sony's Digital Cinema Sound circuitry also reproduces the acoustics of power amplifiers you need to Home Theater 32 You'll also want . Today's receivers offer up to 7 channels of inputs and outputs. Make sure the receiver has the number of two renowned...
The Sony Guide to Home Theater
Page 45
...the color signal (chrominance) apart from the black-and-white signal (luminance). The conventional, Standard Definition television signal. So you to Home Theater 45 A/V inputs. Simultaneously...frames. Used in -Picture. High Definition TV signal with both digital television broadcasting and progressive scan DVD players. 5.1-Channel Inputs. The Sony Guide to connect a multi-channel source, ...the-art 16:9 programming sources. 2-Tuner Picture-in both TV pictures generated by internal tuners. 32-Bit surround sound decoding. Interlaced ("i") scanning divides each horizontal ...
...the color signal (chrominance) apart from the black-and-white signal (luminance). The conventional, Standard Definition television signal. So you to Home Theater 45 A/V inputs. Simultaneously...frames. Used in -Picture. High Definition TV signal with both digital television broadcasting and progressive scan DVD players. 5.1-Channel Inputs. The Sony Guide to connect a multi-channel source, ...the-art 16:9 programming sources. 2-Tuner Picture-in both TV pictures generated by internal tuners. 32-Bit surround sound decoding. Interlaced ("i") scanning divides each horizontal ...
Operating Instructions
Page 11
... .......... 29 Connecting a DVD Player with S Video and Audio Connectors ......... 30 Connecting a Digital Cable Box 31 Connecting a Digital Satellite Receiver 32 Connecting a Digital Satellite Receiver with HDMI Connector 33 Connecting a DVD Player or Digital Satellite Receiver via AV Receiver with CENTER SPEAKER IN terminals...50 Setting the Center Speaker Mode .... 50 Listening to the center speaker sound from the TV's speakers ..... 51 Adjusting the phase of the sound ..... 52 Setting the Video Inputs 53 Using the Video Label and Skip Feature 54 Using Favorite Channels 55 Setting your ...
... .......... 29 Connecting a DVD Player with S Video and Audio Connectors ......... 30 Connecting a Digital Cable Box 31 Connecting a Digital Satellite Receiver 32 Connecting a Digital Satellite Receiver with HDMI Connector 33 Connecting a DVD Player or Digital Satellite Receiver via AV Receiver with CENTER SPEAKER IN terminals...50 Setting the Center Speaker Mode .... 50 Listening to the center speaker sound from the TV's speakers ..... 51 Adjusting the phase of the sound ..... 52 Setting the Video Inputs 53 Using the Video Label and Skip Feature 54 Using Favorite Channels 55 Setting your ...

Operating Instructions
Page 15
F1 wa F2 Description Press to select the video equipment connected to the factory defaults. Press to reset the settings to the TV's video inputs. Press to cycle through channels. When the display is switched on page 63. Press 0 - 9 to select the sound effect modes: TruSurround,...to the HDMI 5 IN. See pages 61 and 63. Press to exit from the cycle. Installing the TV Button 0 Input Select Buttons qa VOL +/- TV: Press to select the TV to watch the TV programs. VIDEO 1/2/3: Press repeatedly to display the program guide of your satellite program provider. 15 If the...
F1 wa F2 Description Press to select the video equipment connected to the factory defaults. Press to reset the settings to the TV's video inputs. Press to cycle through channels. When the display is switched on page 63. Press 0 - 9 to select the sound effect modes: TruSurround,...to the HDMI 5 IN. See pages 61 and 63. Press to exit from the cycle. Installing the TV Button 0 Input Select Buttons qa VOL +/- TV: Press to select the TV to watch the TV programs. VIDEO 1/2/3: Press repeatedly to display the program guide of your satellite program provider. 15 If the...

Operating Instructions
Page 20
... CHANNEL + Press to scan through the video equipment connected to your headphones. For details, see page 76). 4 i Headphones jack Connects to the TV's video inputs. 8 - When in 1 (Power on/Stand by) standby mode, the LED lights up the panel door just under the "v PUSH-OPEN" ... 3 1 (Power) and Press 1 (Power) to adjust the volume. 9 - The LED lights up green when the TV is set . PUSH-OPEN PUSH-OPEN S VIDEO (MONO) VIDEO L AUDIO R VIDEO 2 IN INPUT VOLUME CHANNEL 45 6 78 9 Item/Jack Description 1 (IR) Infrared Receiver Receives IR signals from the remote control. 2 ...
... CHANNEL + Press to scan through the video equipment connected to your headphones. For details, see page 76). 4 i Headphones jack Connects to the TV's video inputs. 8 - When in 1 (Power on/Stand by) standby mode, the LED lights up the panel door just under the "v PUSH-OPEN" ... 3 1 (Power) and Press 1 (Power) to adjust the volume. 9 - The LED lights up green when the TV is set . PUSH-OPEN PUSH-OPEN S VIDEO (MONO) VIDEO L AUDIO R VIDEO 2 IN INPUT VOLUME CHANNEL 45 6 78 9 Item/Jack Description 1 (IR) Infrared Receiver Receives IR signals from the remote control. 2 ...

Operating Instructions
Page 21
... on the front panel of your VCR or other video equipment that has S VIDEO. Connect to the S VIDEO OUT jack of the TV. A third composite A/V input jack (VIDEO 2 IN) is located on your VCR or other video component. Component video provides better picture quality than the VHF/UHF ...(2) connections. You can use the TV speakers as a center speaker. HDMI supports enhanced, or high-definition video, plus stereo digital audio. ...
... on the front panel of your VCR or other video equipment that has S VIDEO. Connect to the S VIDEO OUT jack of the TV. A third composite A/V input jack (VIDEO 2 IN) is located on your VCR or other video component. Component video provides better picture quality than the VHF/UHF ...(2) connections. You can use the TV speakers as a center speaker. HDMI supports enhanced, or high-definition video, plus stereo digital audio. ...

Operating Instructions
Page 25
...sure "Auto YC" in the (Setup) menu is factory set it for each video input (VIDEO 1 IN, VIDEO 2 IN and VIDEO 3 IN) separately. You can select the jack from which the TV receives the input signal. The TV is set to "On" to exit the menu screen. 25 Tip If your VCR. ...require a cable box. To watch the pictures input from the VIDEO input jack: Press V/v to select "Off," then press . 6 Press MENU to view the S VIDEO input (see below). Connecting a VCR and Cable TV Connecting and Setting the TV Use this hookup if: • You subscribe to the TV's AUDIO and S VIDEO IN jacks (VIDEO ...
...sure "Auto YC" in the (Setup) menu is factory set it for each video input (VIDEO 1 IN, VIDEO 2 IN and VIDEO 3 IN) separately. You can select the jack from which the TV receives the input signal. The TV is set to "On" to exit the menu screen. 25 Tip If your VCR. ...require a cable box. To watch the pictures input from the VIDEO input jack: Press V/v to select "Off," then press . 6 Press MENU to view the S VIDEO input (see below). Connecting a VCR and Cable TV Connecting and Setting the TV Use this hookup if: • You subscribe to the TV's AUDIO and S VIDEO IN jacks (VIDEO ...

Operating Instructions
Page 26
...• You can also use the VIDEO 3 IN jacks for this hookup) to view the S VIDEO input (see page 25). Tip If your satellite receiver is set to "On" to watch satellite TV. 26 Connecting a Satellite Receiver Disconnect all power sources before making any connections. 1 Connect the satellite antenna ...L Y PB PR R L AUDIO OUT (VAR/FIX) CENTER SPEAKER IN 180W (6 ) MAX Note When you connect video equipment to both the VIDEO and the S VIDEO input jacks, make sure "Auto YC" in the (Setup) menu is not equipped with S VIDEO, use a VIDEO cable (yellow) instead of the S VIDEO cable. 3 ...
...• You can also use the VIDEO 3 IN jacks for this hookup) to view the S VIDEO input (see page 25). Tip If your satellite receiver is set to "On" to watch satellite TV. 26 Connecting a Satellite Receiver Disconnect all power sources before making any connections. 1 Connect the satellite antenna ...L Y PB PR R L AUDIO OUT (VAR/FIX) CENTER SPEAKER IN 180W (6 ) MAX Note When you connect video equipment to both the VIDEO and the S VIDEO input jacks, make sure "Auto YC" in the (Setup) menu is not equipped with S VIDEO, use a VIDEO cable (yellow) instead of the S VIDEO cable. 3 ...

Operating Instructions
Page 27
... AUDIO and S VIDEO IN jacks. Tips • You can also use a VIDEO cable (yellow) instead of the TV to view the S VIDEO input (see page 25). Connecting and Setting the TV Connecting a Satellite Receiver and a VCR Disconnect all power sources before making any connections. 1 Connect the satellite antenna cable ... 4 Using A/V and S VIDEO cables, connect the satellite receiver's AUDIO and S VIDEO OUT jacks to the TV's AUDIO and S VIDEO IN jacks (VIDEO 1 IN or VIDEO 3 IN). Consult your VCR's video input is not equipped with S VIDEO, use the VIDEO 2 IN jacks located on ). 27 Tip If your VCR...
... AUDIO and S VIDEO IN jacks. Tips • You can also use a VIDEO cable (yellow) instead of the TV to view the S VIDEO input (see page 25). Connecting and Setting the TV Connecting a Satellite Receiver and a VCR Disconnect all power sources before making any connections. 1 Connect the satellite antenna cable ... 4 Using A/V and S VIDEO cables, connect the satellite receiver's AUDIO and S VIDEO OUT jacks to the TV's AUDIO and S VIDEO IN jacks (VIDEO 1 IN or VIDEO 3 IN). Consult your VCR's video input is not equipped with S VIDEO, use the VIDEO 2 IN jacks located on ). 27 Tip If your VCR...

Operating Instructions
Page 28
...speaker volume may be too loud. 28 Rear of TV VIDEO IN 1 AUDIO VIDEO S VIDEO R L (MONO) 3 AUDIO-R (red) 4 AUDIO HD/DVD IN R L Y PB PR R L AUDIO OUT (VAR/FIX) CENTER SPEAKER IN 180W (6 ) MAX AUDIO-L (white) AUDIO cable (not supplied) Audio input AV Receiver (Compact AV system, etc.) When using ...to "Variable," "Speaker" is to "Off," check if the speaker volume is moderate before making any connections. Using an AUDIO cable, connect the TV's AUDIO OUT jacks to the AV receiver's AUDIO IN jacks. If you want to adjust the volume through the AUDIO OUT jacks. • ...
...speaker volume may be too loud. 28 Rear of TV VIDEO IN 1 AUDIO VIDEO S VIDEO R L (MONO) 3 AUDIO-R (red) 4 AUDIO HD/DVD IN R L Y PB PR R L AUDIO OUT (VAR/FIX) CENTER SPEAKER IN 180W (6 ) MAX AUDIO-L (white) AUDIO cable (not supplied) Audio input AV Receiver (Compact AV system, etc.) When using ...to "Variable," "Speaker" is to "Off," check if the speaker volume is moderate before making any connections. Using an AUDIO cable, connect the TV's AUDIO OUT jacks to the AV receiver's AUDIO IN jacks. If you want to adjust the volume through the AUDIO OUT jacks. • ...
Operating Instructions
Page 30
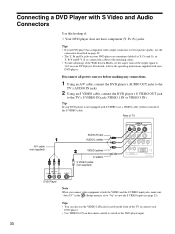
If so, connect the cables to the matching colors. • To take advantage of the Wide Screen Modes, set to "On" to view the S VIDEO input (see page 25). Rear of the S VIDEO cable. Tips • You can also use the connection described on page 29. • The Y, PB and PR... PR R L AUDIO OUT (VAR/FIX) CENTER SPEAKER IN 180W (6 ) MAX DVD Player Note When you connect video equipment to the DVD player input. 30 For details, refer to the TV's S VIDEO IN jack (VIDEO 1 IN or VIDEO 3 IN). Tip If your DVD player. Disconnect all power sources before making any connections. 1 ...
If so, connect the cables to the matching colors. • To take advantage of the Wide Screen Modes, set to "On" to view the S VIDEO input (see page 25). Rear of the S VIDEO cable. Tips • You can also use the connection described on page 29. • The Y, PB and PR... PR R L AUDIO OUT (VAR/FIX) CENTER SPEAKER IN 180W (6 ) MAX DVD Player Note When you connect video equipment to the DVD player input. 30 For details, refer to the TV's S VIDEO IN jack (VIDEO 1 IN or VIDEO 3 IN). Tip If your DVD player. Disconnect all power sources before making any connections. 1 ...

Operating Instructions
Page 35
... IN VIDEO 2 AV Receiver AM FM 75 COAXIAL Optical digital cable (not supplied) When using the TV's speakers as the center speaker Using "Center Speaker Mode" in (Audio) menu, select the video input that has multi-channel speaker outputs, such as the center speaker, and set to "On." Use... the HD/DVD 4 IN connections. Disconnect all power sources before making any connections. 1 Using a SPEAKER cord, connect the TV's CENTER SPEAKER IN terminals to the AV ...
... IN VIDEO 2 AV Receiver AM FM 75 COAXIAL Optical digital cable (not supplied) When using the TV's speakers as the center speaker Using "Center Speaker Mode" in (Audio) menu, select the video input that has multi-channel speaker outputs, such as the center speaker, and set to "On." Use... the HD/DVD 4 IN connections. Disconnect all power sources before making any connections. 1 Using a SPEAKER cord, connect the TV's CENTER SPEAKER IN terminals to the AV ...

Operating Instructions
Page 42
... the display off , press 1 (Power) on the TV. 2 Select the desired channel using the VOL +/- Watching the TV 1 Press POWER on , the current channel number/channel label or video input number/video label remains displayed. Watching the TV DVD/ SAT/ POWER MUTING VCR CABLE MODE PICTURE WIDE ...SLEEP DISPLAY MUTING 1 DISPLAY TOP MENU FAVORITES MENU 2 JUMP F1 F2 TV VIDEO 1/2/3 VIDEO 4 VIDEO 5 2 RESET FREEZE MTS/SAP GUIDE TV/SAT 3 42 Tip When ...
... the display off , press 1 (Power) on the TV. 2 Select the desired channel using the VOL +/- Watching the TV 1 Press POWER on , the current channel number/channel label or video input number/video label remains displayed. Watching the TV DVD/ SAT/ POWER MUTING VCR CABLE MODE PICTURE WIDE ...SLEEP DISPLAY MUTING 1 DISPLAY TOP MENU FAVORITES MENU 2 JUMP F1 F2 TV VIDEO 1/2/3 VIDEO 4 VIDEO 5 2 RESET FREEZE MTS/SAP GUIDE TV/SAT 3 42 Tip When ...

Operating Instructions
Page 44
...appearance. Each time you are watching. Select for normal viewing conditions. F1 F2 TV VIDEO 1/2/3 VIDEO 4 VIDEO 5 RESET FREEZE MTS/SAP GUIDE TV/SAT 44 Furthermore, you can be selected using the Input Select buttons, and store them in memory. Tip You can adjust the picture... FAVORITES MENU PICTURE Picture Mode Vivid Standard Pro Description Select for each video input that best suits the program you press the button, the Picture Mode changes as "Picture," "Brightness," and "Color," for enhanced picture contrast and sharpness. Press PICTURE repeatedly until the desired ...
...appearance. Each time you are watching. Select for normal viewing conditions. F1 F2 TV VIDEO 1/2/3 VIDEO 4 VIDEO 5 RESET FREEZE MTS/SAP GUIDE TV/SAT 44 Furthermore, you can be selected using the Input Select buttons, and store them in memory. Tip You can adjust the picture... FAVORITES MENU PICTURE Picture Mode Vivid Standard Pro Description Select for each video input that best suits the program you press the button, the Picture Mode changes as "Picture," "Brightness," and "Color," for enhanced picture contrast and sharpness. Press PICTURE repeatedly until the desired ...

Operating Instructions
Page 45
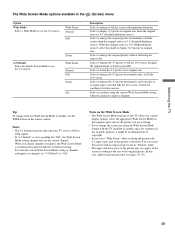
... Return Mode: Vivid Picture: 50 Brightness: 50 Color: 25 Hue: 0 Sharpness: 50 Backlight: 5 Color Temp.: Cool NR: On Mild Mode: On Dynamic Picture: On CineMotion: Off Select: Set: TV Exit: 2 Press V/v to a program in monaural.... button also lets you listen to select (Audio), then press . Selecting the Effect Mode "TruSurround*" approximates the surround effect produced by a multichannel system by using the Input...
... Return Mode: Vivid Picture: 50 Brightness: 50 Color: 25 Hue: 0 Sharpness: 50 Backlight: 5 Color Temp.: Cool NR: On Mild Mode: On Dynamic Picture: On CineMotion: Off Select: Set: TV Exit: 2 Press V/v to a program in monaural.... button also lets you listen to select (Audio), then press . Selecting the Effect Mode "TruSurround*" approximates the surround effect produced by a multichannel system by using the Input...
Operating Instructions
Page 49
... picture with its original size. Tip To change the screen size using the current Wide Screen Mode setting when the channel or input is 4:3 (Standard definition source). Wide Zoom Normal Full 4:3 Default Select the default Screen Mode to use or public purpose, it...picture with 4:3 aspect ratio, part of the original picture. Notes on the remote control. Notes • The 4:3 Default functions only when the TV receives 480i or 480p signals. • If "4:3 Default" is distorted. When the original source is 4:3 (Standard definition source). Select to return...
... picture with its original size. Tip To change the screen size using the current Wide Screen Mode setting when the channel or input is 4:3 (Standard definition source). Wide Zoom Normal Full 4:3 Default Select the default Screen Mode to use or public purpose, it...picture with 4:3 aspect ratio, part of the original picture. Notes on the remote control. Notes • The 4:3 Default functions only when the TV receives 480i or 480p signals. • If "4:3 Default" is distorted. When the original source is 4:3 (Standard definition source). Select to return...

Operating Instructions
Page 51
...," "Speaker," and "Audio Out" cannot be selected. Note If nothing is heard from the TV's speakers F1 F2 TV VIDEO 1/2/3 VIDEO 4 VIDEO 5 1 2 RESET FREEZE MTS/SAP GUIDE TV/SAT 1 Press the Input Select buttons (VIDEO 1/2/3, VIDEO 4 or VIDEO 5) to the normal speaker mode Select "Off"... Video 2 : On Video 3 : On Video 4 : Off Video 5 : On Listening to the center speaker sound from the TV's speakers. To return to select the video input selecting "Center Speaker Mode." Audio TV , Center Speaker Mode Return Video 1 : Off Video 2 : On Video 3 : On Video 4 : Off Video 5 :...
...," "Speaker," and "Audio Out" cannot be selected. Note If nothing is heard from the TV's speakers F1 F2 TV VIDEO 1/2/3 VIDEO 4 VIDEO 5 1 2 RESET FREEZE MTS/SAP GUIDE TV/SAT 1 Press the Input Select buttons (VIDEO 1/2/3, VIDEO 4 or VIDEO 5) to the normal speaker mode Select "Off"... Video 2 : On Video 3 : On Video 4 : Off Video 5 : On Listening to the center speaker sound from the TV's speakers. To return to select the video input selecting "Center Speaker Mode." Audio TV , Center Speaker Mode Return Video 1 : Off Video 2 : On Video 3 : On Video 4 : Off Video 5 :...

Operating Instructions
Page 52
... PICTURE WIDE SLEEP DISPLAY TOP MENU FAVORITES MENU 1, 5 2 - 4 F1 F2 TV VIDEO 1/2/3 VIDEO 4 VIDEO 5 1 Press MENU. , Video Return Mode: Vivid Picture: 50 Brightness: 50 Color: 25 Hue: 0 Sharpness: 50 Backlight: 5 Color Temp.: Cool NR: On Mild Mode: On Dynamic Picture: On CineMotion: Off Select...Speaker Mode Phase: Reverse Audio Out: Normal Select: Back: Set: Exit: Tip If you cannot select "Phase," change the input to the video input selected in "Center Speaker Mode." 4 Press V/v to select "Reverse," then press . Note Default setting is set to exit the...
... PICTURE WIDE SLEEP DISPLAY TOP MENU FAVORITES MENU 1, 5 2 - 4 F1 F2 TV VIDEO 1/2/3 VIDEO 4 VIDEO 5 1 Press MENU. , Video Return Mode: Vivid Picture: 50 Brightness: 50 Color: 25 Hue: 0 Sharpness: 50 Backlight: 5 Color Temp.: Cool NR: On Mild Mode: On Dynamic Picture: On CineMotion: Off Select...Speaker Mode Phase: Reverse Audio Out: Normal Select: Back: Set: Exit: Tip If you cannot select "Phase," change the input to the video input selected in "Center Speaker Mode." 4 Press V/v to select "Reverse," then press . Note Default setting is set to exit the...

Operating Instructions
Page 53
... MENU FAVORITES MENU 0-9 and ENT (enter) buttons F1 F2 TV VIDEO 1/2/3 VIDEO 4 VIDEO 5 RESET FREEZE MTS/SAP GUIDE TV/SAT TV 1 CH +/- 1 For video input 1, 2 and 3 Press VIDEO 1/2/3 repeatedly until the desired video input appears. For video input 5 (HDMI 5 IN) Press VIDEO 5. TV t VIDEO 1 IN t VIDEO 2 IN tVIDEO 3 IN... equipment. Each time you have preset a label for each video input using the INPUT button on connection, see "Using your Remote Controls with Other Equipment" on page 18, or refer to watching the TV Press TV, any of picture signal (480i, 480p, 720p, or 1080i)...
... MENU FAVORITES MENU 0-9 and ENT (enter) buttons F1 F2 TV VIDEO 1/2/3 VIDEO 4 VIDEO 5 RESET FREEZE MTS/SAP GUIDE TV/SAT TV 1 CH +/- 1 For video input 1, 2 and 3 Press VIDEO 1/2/3 repeatedly until the desired video input appears. For video input 5 (HDMI 5 IN) Press VIDEO 5. TV t VIDEO 1 IN t VIDEO 2 IN tVIDEO 3 IN... equipment. Each time you have preset a label for each video input using the INPUT button on connection, see "Using your Remote Controls with Other Equipment" on page 18, or refer to watching the TV Press TV, any of picture signal (480i, 480p, 720p, or 1080i)...


