Operating Instructions
Page 34
... accept any changes or modifications not expressly approved in a residential installation. WARNING Owner's Record The model and serial numbers are located on a circuit different from that to which can be easily accessible. Operation is subject to correct the interference by BBE Sound, Inc. DISPOSE OF USED BATTERIES ACCORDING TO THE LOCAL RULES. under license from BBE Sound, Inc. Sony Customer Information Services Center 1-800...
... accept any changes or modifications not expressly approved in a residential installation. WARNING Owner's Record The model and serial numbers are located on a circuit different from that to which can be easily accessible. Operation is subject to correct the interference by BBE Sound, Inc. DISPOSE OF USED BATTERIES ACCORDING TO THE LOCAL RULES. under license from BBE Sound, Inc. Sony Customer Information Services Center 1-800...
Operating Instructions
Page 35
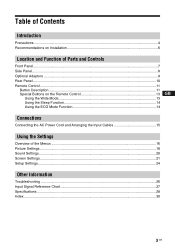
... 6 Location and Function of Parts and Controls Front Panel...7 Side Panel...8 Optional Adaptors ...9 Rear Panel ...10 Remote Control ...11 Button Description...11 Special Buttons on the Remote Control 13 GB Using the Wide Mode...13 Using the Sleep Function 14 Using the ECO Mode Function 14 Connections Connecting the AC Power Cord and Arranging the Input Cables 15 Using the Settings Overview of the Menus ...16 Picture Settings ...18 Sound Settings...20 Screen Settings...21 Setup Settings...24 Other Information Troubleshooting ...26 Input Signal Reference Chart 27 Specifications ...28...
... 6 Location and Function of Parts and Controls Front Panel...7 Side Panel...8 Optional Adaptors ...9 Rear Panel ...10 Remote Control ...11 Button Description...11 Special Buttons on the Remote Control 13 GB Using the Wide Mode...13 Using the Sleep Function 14 Using the ECO Mode Function 14 Connections Connecting the AC Power Cord and Arranging the Input Cables 15 Using the Settings Overview of the Menus ...16 Picture Settings ...18 Sound Settings...20 Screen Settings...21 Setup Settings...24 Other Information Troubleshooting ...26 Input Signal Reference Chart 27 Specifications ...28...
Operating Instructions
Page 36
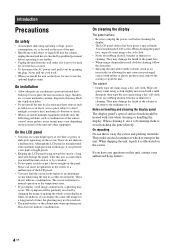
... carton. On installation • Allow adequate air circulation to transport the unit. These can remove the markings on the screen. On cleaning the display The panel surface • Be sure to unplug the power cord before operating it checked by changing the image or making the whole screen display in which to prevent internal heat build-up during use the optional display stand. They...
... carton. On installation • Allow adequate air circulation to transport the unit. These can remove the markings on the screen. On cleaning the display The panel surface • Be sure to unplug the power cord before operating it checked by changing the image or making the whole screen display in which to prevent internal heat build-up during use the optional display stand. They...
Operating Instructions
Page 39
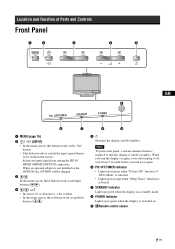
... OFF/TIMER indicator • Lights up in green when "Picture Off" function of Parts and Controls Front Panel MENU GB PIC OFF/TIMER STANDBY POWER 1 MENU (page 16) 2 / (INPUT) • In the menu screen, this button works as up in the menu screen. Location and Function of "ECO Mode" is selected. • Lights up in orange when "Sleep Timer" function is activated. 7 STANDBY indicator Lights up in red when the display is in standby mode. 8 POWER indicator Lights up /down buttons ( / ). 51 Switches the display...
... OFF/TIMER indicator • Lights up in green when "Picture Off" function of Parts and Controls Front Panel MENU GB PIC OFF/TIMER STANDBY POWER 1 MENU (page 16) 2 / (INPUT) • In the menu screen, this button works as up in the menu screen. Location and Function of "ECO Mode" is selected. • Lights up in orange when "Sleep Timer" function is activated. 7 STANDBY indicator Lights up in red when the display is in standby mode. 8 POWER indicator Lights up /down buttons ( / ). 51 Switches the display...
Operating Instructions
Page 40
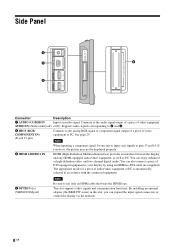
... input signal connectors or control the display via the network. 8 GB This slot supports video signals and communication functions. Connects to use only an HDMI cable that bears the HDMI logo. The appropriate mode for a piece of audio/video equipment or PC is automatically selected in this slot, you do so, the picture may not be sure not to input sync signals to the analog RGB signal or component signal output of a piece of video...
... input signal connectors or control the display via the network. 8 GB This slot supports video signals and communication functions. Connects to use only an HDMI cable that bears the HDMI logo. The appropriate mode for a piece of audio/video equipment or PC is automatically selected in this slot, you do so, the picture may not be sure not to input sync signals to the analog RGB signal or component signal output of a piece of video...
Operating Instructions
Page 41
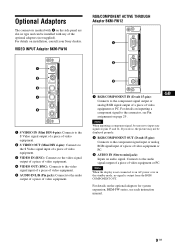
...): Connects to the component signal output or analog RGB signal output of a piece of the optional adaptors (not supplied). If you do so, the picture may not be sure not to input sync signals to the audio output of a piece of video equipment or PC. 3 AUDIO IN (Stereo mini jack): Inputs an audio signal. Note When the display is not connected to the audio signal output of a piece of video equipment or PC. VIDEO INPUT Adaptor...
...): Connects to the component signal output or analog RGB signal output of a piece of the optional adaptors (not supplied). If you do so, the picture may not be sure not to input sync signals to the audio output of a piece of video equipment or PC. 3 AUDIO IN (Stereo mini jack): Inputs an audio signal. Note When the display is not connected to the audio signal output of a piece of video equipment or PC. VIDEO INPUT Adaptor...
Operating Instructions
Page 43
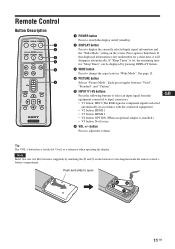
... GB Remote Control Button Description MUTING DISPLAY POWER MODE SOUND PICTURE WIDE INPUT V1 V2 V3 V4 V5 VOL POWER SAVING MENU FREEZE SLEEP 1 POWER button Press to switch the display on/off (standby). 2 DISPLAY button Press to display the currently selected input signal information and the "Wide Mode" setting on the batteries to the diagram inside the remote control's battery compartment. If this displayed information is set, the remaining time for "Sleep Timer" can be displayed by matching the 3 and # on the screen...
... GB Remote Control Button Description MUTING DISPLAY POWER MODE SOUND PICTURE WIDE INPUT V1 V2 V3 V4 V5 VOL POWER SAVING MENU FREEZE SLEEP 1 POWER button Press to switch the display on/off (standby). 2 DISPLAY button Press to display the currently selected input signal information and the "Wide Mode" setting on the batteries to the diagram inside the remote control's battery compartment. If this displayed information is set, the remaining time for "Sleep Timer" can be displayed by matching the 3 and # on the screen...

Operating Instructions
Page 44
... changing the backlight brightness. qd MUTING button Press to hide them. Press again to mute the sound. MUTING DISPLAY POWER MODE SOUND PICTURE WIDE INPUT V1 V2 V3 V4 V5 VOL POWER SAVING MENU FREEZE SLEEP 7 MENU button Press to remain on before shutting off. See page 16. 8 V/v/B/b/ buttons The V/v/B/b buttons move the menu cursor (yellow) and set values, etc. qa POWER SAVING button Changes the options of "ECO Mode". qs SOUND button Selects "Sound Mode...
... changing the backlight brightness. qd MUTING button Press to hide them. Press again to mute the sound. MUTING DISPLAY POWER MODE SOUND PICTURE WIDE INPUT V1 V2 V3 V4 V5 VOL POWER SAVING MENU FREEZE SLEEP 7 MENU button Press to remain on before shutting off. See page 16. 8 V/v/B/b/ buttons The V/v/B/b buttons move the menu cursor (yellow) and set values, etc. qa POWER SAVING button Changes the options of "ECO Mode". qs SOUND button Selects "Sound Mode...
Operating Instructions
Page 46
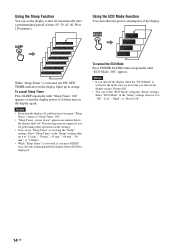
...". • While "Sleep Timer" is activated, the PIC OFF/ TIMER indicator on next time you are performing other operations in orange. To cancel the ECO Mode Press POWER SAVING button repeatedly until "Sleep Timer : Off" appears or turn the display power to "Sleep Timer : Off". • "Sleep Timer - Select "ECO Mode" in the "Setup" settings, then set the display to turn on the display except "Picture Off". • You can set "Sleep Timer" to on again, "Sleep Timer" returns to...
...". • While "Sleep Timer" is activated, the PIC OFF/ TIMER indicator on next time you are performing other operations in orange. To cancel the ECO Mode Press POWER SAVING button repeatedly until "Sleep Timer : Off" appears or turn the display power to "Sleep Timer : Off". • "Sleep Timer - Select "ECO Mode" in the "Setup" settings, then set the display to turn on the display except "Picture Off". • You can set "Sleep Timer" to on again, "Sleep Timer" returns to...

Operating Instructions
Page 50
... the screen display automatically detecting film content and applying a reverse 3-2 pull down or 2-2 pull down process. The "Picture" settings include the following options: : : : : Picture Mode "Vivid": Select for standard picture settings. "Custom": Allows you can also use PICTURE on the remote control instead. • You can alter the "Picture" settings ("Picture", "Brightness", "Color", etc.) for each input. Picture Adjust to give the white colors a red tint. Hue Color Temp. Sharpness Adjusts the color tones of connected...
... the screen display automatically detecting film content and applying a reverse 3-2 pull down or 2-2 pull down process. The "Picture" settings include the following options: : : : : Picture Mode "Vivid": Select for standard picture settings. "Custom": Allows you can also use PICTURE on the remote control instead. • You can alter the "Picture" settings ("Picture", "Brightness", "Color", etc.) for each input. Picture Adjust to give the white colors a red tint. Hue Color Temp. Sharpness Adjusts the color tones of connected...

Operating Instructions
Page 51
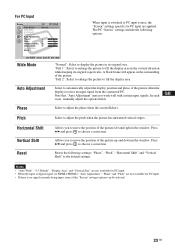
... to give the white colors a red tint. "Neutral": Select to store preferred settings. The PC "Picture" settings include the following options: : : : Picture Mode "Vivid": Select for the options grayed out). GB Picture Adjust to brighten or darken the picture. "Standard": Select for standard picture settings. Brightness Adjust to increase or decrease picture contrast. For PC Input When input is switched to a PC input source, the "Picture" settings specific to PC input are not available...
... to give the white colors a red tint. "Neutral": Select to store preferred settings. The PC "Picture" settings include the following options: : : : Picture Mode "Vivid": Select for the options grayed out). GB Picture Adjust to brighten or darken the picture. "Standard": Select for standard picture settings. Brightness Adjust to increase or decrease picture contrast. For PC Input When input is switched to a PC input source, the "Picture" settings specific to PC input are not available...
Operating Instructions
Page 52
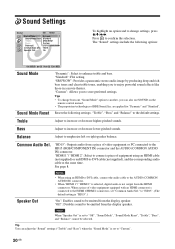
... enjoy powerful sound effects like those in a movie theater. are applied for "Dynamic" and "Standard". "HDMI 1"/ "HDMI 2": Select to connect a piece of video equipment equipped with an HDMI connector is connected to the HDMI 1/HDMI 2 connectors, set to "Off", "Sound Mode", "Sound Mode Reset", "Treble", "Bass", and "Balance" cannot be selected. "Off": Disables sound to be emitted from the display speaker. "Standard": Flat setting. See page 8. to "HD15". (The default setting is set "Common Audio Sel...
... enjoy powerful sound effects like those in a movie theater. are applied for "Dynamic" and "Standard". "HDMI 1"/ "HDMI 2": Select to connect a piece of video equipment equipped with an HDMI connector is connected to the HDMI 1/HDMI 2 connectors, set to "Off", "Sound Mode", "Sound Mode Reset", "Treble", "Bass", and "Balance" cannot be selected. "Off": Disables sound to be emitted from the display speaker. "Standard": Flat setting. See page 8. to "HD15". (The default setting is set "Common Audio Sel...

Operating Instructions
Page 53
... the original picture horizontally to the component or HDMI connectors. GB "On": Select to detect the image and change settings, press V/v/B/b. Tips • To change automatically. Note While inputting digital and analog RGB signals, you can also use WIDE on the remote control instead. • Select "Zoom" to confirm the selection. "Zoom": Select to the appropriate screen mode. "4:3": Select to fill screen with black bands, using the entire...
... the original picture horizontally to the component or HDMI connectors. GB "On": Select to detect the image and change settings, press V/v/B/b. Tips • To change automatically. Note While inputting digital and analog RGB signals, you can also use WIDE on the remote control instead. • Select "Zoom" to confirm the selection. "Zoom": Select to the appropriate screen mode. "4:3": Select to fill screen with black bands, using the entire...
Operating Instructions
Page 55
... picture when the display receives an input signal from the connected PC. Horizontal Shift Vertical Shift Reset Allows you to move the position of the picture up and down in its original aspect ratio. For PC Input When input is switched to PC input source, the "Screen" settings specific for PC input are not available for PC input. • When the input is no signal currently being input, none of the picture...
... picture when the display receives an input signal from the connected PC. Horizontal Shift Vertical Shift Reset Allows you to move the position of the picture up and down in its original aspect ratio. For PC Input When input is switched to PC input source, the "Screen" settings specific for PC input are not available for PC input. • When the input is no signal currently being input, none of the picture...
Operating Instructions
Page 56
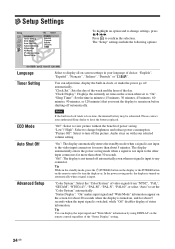
... input signal is not input to change settings, press V/v/B/b. The display automatically enters the power saving mode when a signal is switched, while "Off" disables display of video signals from "NTSC", "PAL", "SECAM", "NTSC4.43", "PAL-M", "PAL-N", "PAL60", or select "Auto" to remain on before shutting off the picture. "Color System": Select the "Color System" of status information. "Sleep Timer": Set the time in the standby mode, press the 1 (POWER) button on the display or the POWER button on the remote control...
... input signal is not input to change settings, press V/v/B/b. The display automatically enters the power saving mode when a signal is switched, while "Off" disables display of video signals from "NTSC", "PAL", "SECAM", "NTSC4.43", "PAL-M", "PAL-N", "PAL60", or select "Auto" to remain on before shutting off the picture. "Color System": Select the "Color System" of status information. "Sleep Timer": Set the time in the standby mode, press the 1 (POWER) button on the display or the POWER button on the remote control...

Operating Instructions
Page 57
...-FW32/FW50, installed in the display, and the equipment such as a PC connected with the LAN cable. Select "OK" and press . Resets all the desired items, select "Execute" with V/v, then press . Information All Reset IP Address Setup Speed Setup Displays the "Model Name", "Serial Number", "Operation Time", "Software Version" and "IP Address" of the four boxes and press . 4 Select the next item to be set manually with V/v and...
...-FW32/FW50, installed in the display, and the equipment such as a PC connected with the LAN cable. Select "OK" and press . Resets all the desired items, select "Execute" with V/v, then press . Information All Reset IP Address Setup Speed Setup Displays the "Model Name", "Serial Number", "Operation Time", "Software Version" and "IP Address" of the four boxes and press . 4 Select the next item to be set manually with V/v and...
Operating Instructions
Page 58
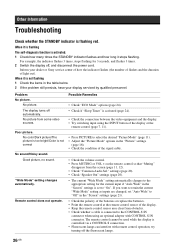
... replace the batteries. • Point the remote control at the remote control sensor of light out). try turning off automatically. When it stops flashing. Good picture, no sound. Other Information Troubleshooting Check whether the STANDBY indicator is controlled via a CONTROL S connection. • Fluorescent lamps can interfere with CONTROL S IN connector. No color/Dark picture/The picture is too bright/Color is connected to the CONTROL S IN connector when using the INPUT button of the display or the remote control...
... replace the batteries. • Point the remote control at the remote control sensor of light out). try turning off automatically. When it stops flashing. Good picture, no sound. Other Information Troubleshooting Check whether the STANDBY indicator is controlled via a CONTROL S connection. • Fluorescent lamps can interfere with CONTROL S IN connector. No color/Dark picture/The picture is too bright/Color is connected to the CONTROL S IN connector when using the INPUT button of the display or the remote control...
Operating Instructions
Page 60
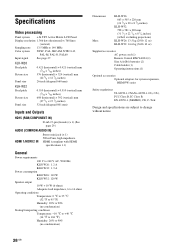
... AC power cord (1) Remote Control RM-YA004 (1) Size AA (R6) batteries (2) Cable holder (1) Operating instructions (1) Optional accessories Optional adaptors for system expansion, BKM-FW series Safety regulations UL 60950-1, CSA No. 60950-1-03 (c-UL), FCC Class B, IC Class B, EN 60950-1 (NEMKO), CE, C-Tick Design and specifications are subject to 140 MHz Color system NTSC, PAL, SECAM, NTSC4.43, PAL-M, PAL-N, PAL60 Input signal...
... AC power cord (1) Remote Control RM-YA004 (1) Size AA (R6) batteries (2) Cable holder (1) Operating instructions (1) Optional accessories Optional adaptors for system expansion, BKM-FW series Safety regulations UL 60950-1, CSA No. 60950-1-03 (c-UL), FCC Class B, IC Class B, EN 60950-1 (NEMKO), CE, C-Tick Design and specifications are subject to 140 MHz Color system NTSC, PAL, SECAM, NTSC4.43, PAL-M, PAL-N, PAL60 Input signal...
Operating Instructions
Page 62
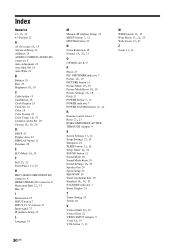
... Pitch 23 POWER button 7, 11 POWER POWER indicator 7 SAVING button 12, 14 R RReemseot t2e2c,on2t3rol sensor 7 RGB/COMPONENT ACTIVE THROUGH Adaptor 9 S SSectrueepnSSetettitninggs s1177, ,2241 SSSlhLeaEerpEpnPTeibsmsuet1tro8n141,22,414 SOUND button 12 Sound Mode 20 Sound Sound MSeottdinegRse1se6t, 20 20 Speaker Out 20 Speed Setup 25 SRS WOW 20 SSttaannddaartdta1ch8m, 1en9t, hole 20 10 STANDBY indicator 7 Status Display 24 T Timer Setting 24 Treble 20 V Vertical Shift 22, 23 Vertical Size 22 VVVIiOvDLidEbO1u8tIt...
... Pitch 23 POWER button 7, 11 POWER POWER indicator 7 SAVING button 12, 14 R RReemseot t2e2c,on2t3rol sensor 7 RGB/COMPONENT ACTIVE THROUGH Adaptor 9 S SSectrueepnSSetettitninggs s1177, ,2241 SSSlhLeaEerpEpnPTeibsmsuet1tro8n141,22,414 SOUND button 12 Sound Mode 20 Sound Sound MSeottdinegRse1se6t, 20 20 Speaker Out 20 Speed Setup 25 SRS WOW 20 SSttaannddaartdta1ch8m, 1en9t, hole 20 10 STANDBY indicator 7 Status Display 24 T Timer Setting 24 Treble 20 V Vertical Shift 22, 23 Vertical Size 22 VVVIiOvDLidEbO1u8tIt...
Operating Instructions
Page 212
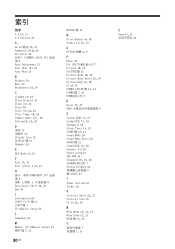
..., 14 POWER 指示灯 7 R Reset 22, 23 RGB 9 S SScerteuepn设设定定117,7,2241 SSSLlhEeaEerPppn键Teisms1e21r,81144, 24 Sound Mode 20 Sound Mode Reset 20 SOUND Sound 键设定1216, 20 Speaker Out 20 Speed Setup 25 SStRaSndWaOrWd2018, 19, 20 STANDBY 指示灯 7 Status Display 24 9 27 T Timer Setting 24 Treble 20 V Vertical Shift 22, 23 Vertical Vivid 18, Size 19...
..., 14 POWER 指示灯 7 R Reset 22, 23 RGB 9 S SScerteuepn设设定定117,7,2241 SSSLlhEeaEerPppn键Teisms1e21r,81144, 24 Sound Mode 20 Sound Mode Reset 20 SOUND Sound 键设定1216, 20 Speaker Out 20 Speed Setup 25 SStRaSndWaOrWd2018, 19, 20 STANDBY 指示灯 7 Status Display 24 9 27 T Timer Setting 24 Treble 20 V Vertical Shift 22, 23 Vertical Vivid 18, Size 19...


