
Operating Instructions
Page 2
...onto the screen. Operate the TV only on Cleaning the TV Clean the TV with your dealer. - Installing - KE-32TS2U KE-42TS2U TV STAND MODEL NO.: SU-TS1U SONY ELECTRONICS INC. CAUTION When using TV games, computers, and similar products... which might damage the finish of the cabinet. If this Plasma Display Panel may require authorization from the broadcaster/cable company and/or program owner. Increase the... into the wall outlet only one or more of the following TV STAND. This symbol is connected. - The AC power cord is designed, for proper grounding and, in accordance with ...
...onto the screen. Operate the TV only on Cleaning the TV Clean the TV with your dealer. - Installing - KE-32TS2U KE-42TS2U TV STAND MODEL NO.: SU-TS1U SONY ELECTRONICS INC. CAUTION When using TV games, computers, and similar products... which might damage the finish of the cabinet. If this Plasma Display Panel may require authorization from the broadcaster/cable company and/or program owner. Increase the... into the wall outlet only one or more of the following TV STAND. This symbol is connected. - The AC power cord is designed, for proper grounding and, in accordance with ...
Operating Instructions
Page 3
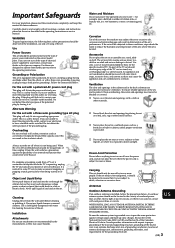
...exterior of the set is grounded so as a bookcase or built-in the vicinity of power source indicated on or off when it from battery power, refer to overturn. No part of the TV cart or stand; Quick stops, excessive force, and uneven surfaces may subject the set should... snapping or popping sounds, particularly when being used. Do not defeat the safety purpose of the set in the installation, use attachments not recommended by Sony for the grounding electrode. 3 (US) Use a cloth lightly dampened with all warnings, cautions and instructions placed on a bed, sofa, rug or ...
...exterior of the set is grounded so as a bookcase or built-in the vicinity of power source indicated on or off when it from battery power, refer to overturn. No part of the TV cart or stand; Quick stops, excessive force, and uneven surfaces may subject the set should... snapping or popping sounds, particularly when being used. Do not defeat the safety purpose of the set in the installation, use attachments not recommended by Sony for the grounding electrode. 3 (US) Use a cloth lightly dampened with all warnings, cautions and instructions placed on a bed, sofa, rug or ...
Operating Instructions
Page 4
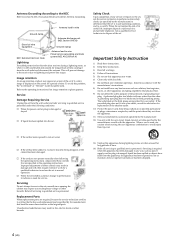
...by the manufacturer) to determine that are provided for your outlet, consult an electrician for replacement of the obsolete outlet. 10) Protect the power cord from being dropped, or the cabinet has been damaged. Important Safety Instruction 1) Read these instructions. 2) Keep these instructions. 3) Heed ... of time. 14) Refer all servicing to qualified service personnel. Servicing is required when the apparatus has been damaged in wire Power service grounding electrode system (NEC Art 250 Part H) Lightning For added protection for Antenna Grounding. Antenna Grounding According to the NEC...
...by the manufacturer) to determine that are provided for your outlet, consult an electrician for replacement of the obsolete outlet. 10) Protect the power cord from being dropped, or the cabinet has been damaged. Important Safety Instruction 1) Read these instructions. 2) Keep these instructions. 3) Heed ... of time. 14) Refer all servicing to qualified service personnel. Servicing is required when the apparatus has been damaged in wire Power service grounding electrode system (NEC Art 250 Part H) Lightning For added protection for Antenna Grounding. Antenna Grounding According to the NEC...
Operating Instructions
Page 5
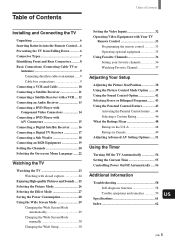
... 27 Saving the Power Consumption 28 Using the Wide Screen Mode 29 Changing the Wide Screen Mode automatically 29 Changing the Wide Screen Mode manually 30 Changing the Wide Setup 30 Setting the Video Inputs 32 Operating Video Equipment with Your TV Remote Control 33... 48 Ratings in Canada 49 Adjusting Advanced AV Setting Options ...... 51 Using the Timer Turning Off the TV Automatically 54 Setting the Current Time 55 Controlling Power On/Off Automatically ..... 56 Additional Information Troubleshooting 58 Self-diagnosis function 58 Trouble symptoms and remedies 59 ...
... 27 Saving the Power Consumption 28 Using the Wide Screen Mode 29 Changing the Wide Screen Mode automatically 29 Changing the Wide Screen Mode manually 30 Changing the Wide Setup 30 Setting the Video Inputs 32 Operating Video Equipment with Your TV Remote Control 33... 48 Ratings in Canada 49 Adjusting Advanced AV Setting Options ...... 51 Using the Timer Turning Off the TV Automatically 54 Setting the Current Time 55 Controlling Power On/Off Automatically ..... 56 Additional Information Troubleshooting 58 Self-diagnosis function 58 Trouble symptoms and remedies 59 ...
Operating Instructions
Page 6
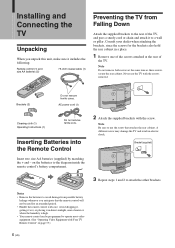
... includes the following: Remote control (1) and size AA batteries (2) 75-ohm coaxial cable (1) Preventing the TV from possible battery leakage whenever you anticipate that attaches the rear cabinet. AC power cord (1) Cleaning cloth (1) Operating Instructions (1) Do not remove ferrite core. Note Be sure to attach ...the other brackets. on page 33.) 6 (US) Note Do not remove both screws at the rear of the TV, and pass a sturdy cord ...
... includes the following: Remote control (1) and size AA batteries (2) 75-ohm coaxial cable (1) Preventing the TV from possible battery leakage whenever you anticipate that attaches the rear cabinet. AC power cord (1) Cleaning cloth (1) Operating Instructions (1) Do not remove ferrite core. Note Be sure to attach ...the other brackets. on page 33.) 6 (US) Note Do not remove both screws at the rear of the TV, and pass a sturdy cord ...
Operating Instructions
Page 9
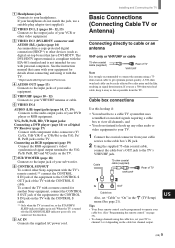
..., 15) Connects to the output jacks of your headphones do not intend to hook up in the (TV Setup) menu (See page 21). Cable box connections Use this function. 9 AC IN Connects the supplied AC power cord. If your VCR or other video equipment. 3 VIDEO IN 3 (DVI-HDTV connector and AUDIO (R/L) ...) Connecting directly to cable or an antenna VHF only or VHF/UHF or cable 75-ohm coaxial cable (supplied) Rear of TV VHF/UHF Note It is not intended for another Sony equipment, connect the CONTROL S OUT jack of the equipment to the CONTROL S IN jack on , or the STANDBY/ SLEEP indicator...
..., 15) Connects to the output jacks of your headphones do not intend to hook up in the (TV Setup) menu (See page 21). Cable box connections Use this function. 9 AC IN Connects the supplied AC power cord. If your VCR or other video equipment. 3 VIDEO IN 3 (DVI-HDTV connector and AUDIO (R/L) ...) Connecting directly to cable or an antenna VHF only or VHF/UHF or cable 75-ohm coaxial cable (supplied) Rear of TV VHF/UHF Note It is not intended for another Sony equipment, connect the CONTROL S OUT jack of the equipment to the CONTROL S IN jack on , or the STANDBY/ SLEEP indicator...
Operating Instructions
Page 10
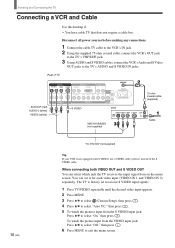
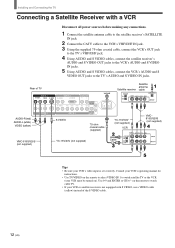
Disconnect all power sources before making any connections. 1 Connect the cable TV cable to the VCR's IN jack. 2 Using the supplied 75-ohm coaxial cable, connect the VCR's OUT jack to the TV's VHF/UHF jack. 3 Using AUDIO and S VIDEO cables, connect the VCR's Audio and S Video OUT jacks ... input (VIDEO IN 1 and VIDEO IN 2) separately. When connecting both VIDEO OUT and S VIDEO OUT You can set to receive S VIDEO input signals. 1 Press TV/VIDEO repeatedly until the desired video input appears. 2 Press MENU. 3 Press V/v to select (Custom Setup), then press . 4 Press V/v to select "Auto YC,"...
Disconnect all power sources before making any connections. 1 Connect the cable TV cable to the VCR's IN jack. 2 Using the supplied 75-ohm coaxial cable, connect the VCR's OUT jack to the TV's VHF/UHF jack. 3 Using AUDIO and S VIDEO cables, connect the VCR's Audio and S Video OUT jacks ... input (VIDEO IN 1 and VIDEO IN 2) separately. When connecting both VIDEO OUT and S VIDEO OUT You can set to receive S VIDEO input signals. 1 Press TV/VIDEO repeatedly until the desired video input appears. 2 Press MENU. 3 Press V/v to select (Custom Setup), then press . 4 Press V/v to select "Auto YC,"...
Operating Instructions
Page 11
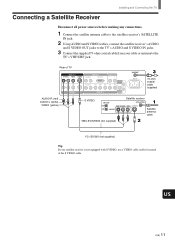
...Receiver Installing and Connecting the TV Disconnect all power sources before making any connections. 1 Connect the satellite antenna cable to the satellite receiver's SATELLITE IN jack. 2 Using AUDIO and S VIDEO cables, connect the satellite receiver's AUDIO and S VIDEO OUT jacks to the TV's AUDIO and S VIDEO ...IN jacks. 3 Connect the supplied 75-ohm coaxial cable from your satellite receiver is not equipped with S VIDEO, use a VIDEO cable (yellow) instead of TV VIDEO IN 1 R AUDIO L VIDEO S VIDEO VIDEO IN 2 VIDEO IN 3 R AUDIO L DVI-HDTV AUDIO OUT R L R AUDIO L Y/G PB/B PR/R...
...Receiver Installing and Connecting the TV Disconnect all power sources before making any connections. 1 Connect the satellite antenna cable to the satellite receiver's SATELLITE IN jack. 2 Using AUDIO and S VIDEO cables, connect the satellite receiver's AUDIO and S VIDEO OUT jacks to the TV's AUDIO and S VIDEO ...IN jacks. 3 Connect the supplied 75-ohm coaxial cable from your satellite receiver is not equipped with S VIDEO, use a VIDEO cable (yellow) instead of TV VIDEO IN 1 R AUDIO L VIDEO S VIDEO VIDEO IN 2 VIDEO IN 3 R AUDIO L DVI-HDTV AUDIO OUT R L R AUDIO L Y/G PB/B PR/R...
Operating Instructions
Page 12
on the remote to watch cable TV. • If your VCR or satellite receiver is not equipped with a VCR Disconnect all power sources before making any connections. 1 Connect the satellite antenna cable to the satellite receiver's SATELLITE IN jack. 2 Connect the CATV cable to the VCR's ...VHF/UHF IN jack. 3 Using the supplied 75-ohm coaxial cable, connect the VCR's OUT jack to the TV's VHF/UHF jack. 4...
on the remote to watch cable TV. • If your VCR or satellite receiver is not equipped with a VCR Disconnect all power sources before making any connections. 1 Connect the satellite antenna cable to the satellite receiver's SATELLITE IN jack. 2 Connect the CATV cable to the VCR's ...VHF/UHF IN jack. 3 Using the supplied 75-ohm coaxial cable, connect the VCR's OUT jack to the TV's VHF/UHF jack. 4...
Operating Instructions
Page 13
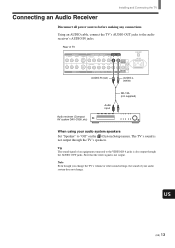
... of an equipment connected to the audio receiver's AUDIO IN jacks. US (US) 13 The TV's sound is also output through the TV's speakers. Note Even though you change the TV's volume or other sound settings, the sound of TV VIDEO IN 1 R AUDIO L VIDEO S VIDEO VIDEO IN 2 COMPONENT VIDEO IN 1 AUDIO OUT R ...) When using your audio system does not change. Note that the video signal is not output. Using an AUDIO cable, connect the TV's AUDIO OUT jacks to the VIDEO IN 4 jacks is not output through the AUDIO OUT jacks. Connecting an Audio Receiver Installing and Connecting the...
... of an equipment connected to the audio receiver's AUDIO IN jacks. US (US) 13 The TV's sound is also output through the TV's speakers. Note Even though you change the TV's volume or other sound settings, the sound of TV VIDEO IN 1 R AUDIO L VIDEO S VIDEO VIDEO IN 2 COMPONENT VIDEO IN 1 AUDIO OUT R ...) When using your audio system does not change. Note that the video signal is not output. Using an AUDIO cable, connect the TV's AUDIO OUT jacks to the VIDEO IN 4 jacks is not output through the AUDIO OUT jacks. Connecting an Audio Receiver Installing and Connecting the...

Operating Instructions
Page 14
Use the VIDEO IN 4 connections. Disconnect all power sources before making any connections. 1 Using three separate component video cables, connect the ...supplied with your DVD player. If so, connect the cables to the matching colors. 2 Using an AUDIO cable, connect the DVD player's AUDIO OUT jacks to the TV's AUDIO IN jacks. Be sure to use if: • Your DVD player... Set "Video 4 Mode" to "Y/PB/ PR" in the (Initial Setup) menu (see page 32). Installing and Connecting the TV Connecting a DVD Player with Component Video Connectors This is the preferred hookup to use the same row of...
Use the VIDEO IN 4 connections. Disconnect all power sources before making any connections. 1 Using three separate component video cables, connect the ...supplied with your DVD player. If so, connect the cables to the matching colors. 2 Using an AUDIO cable, connect the DVD player's AUDIO OUT jacks to the TV's AUDIO IN jacks. Be sure to use if: • Your DVD player... Set "Video 4 Mode" to "Y/PB/ PR" in the (Initial Setup) menu (see page 32). Installing and Connecting the TV Connecting a DVD Player with Component Video Connectors This is the preferred hookup to use the same row of...

Operating Instructions
Page 15
... (yellow) instead of the S VIDEO cable. Use 0-9 and ENTER or CH +/- Rear of the Wide Screen Modes, set "Auto YC" to watch cable TV. • If your DVD player is not equipped with S VIDEO, use the connection described on page 14. For details, refer to the operating instructions supplied... (not supplied) DVD player Note To watch the pictures input from the S VIDEO input jack, set the TV's aspect ratio to switch between the VCR and DVD player inputs. Disconnect all power sources before making any connections. 1 Using an AUDIO cable, connect the DVD player's AUDIO OUT jacks to ...
... (yellow) instead of the S VIDEO cable. Use 0-9 and ENTER or CH +/- Rear of the Wide Screen Modes, set "Auto YC" to watch cable TV. • If your DVD player is not equipped with S VIDEO, use the connection described on page 14. For details, refer to the operating instructions supplied... (not supplied) DVD player Note To watch the pictures input from the S VIDEO input jack, set the TV's aspect ratio to switch between the VCR and DVD player inputs. Disconnect all power sources before making any connections. 1 Using an AUDIO cable, connect the DVD player's AUDIO OUT jacks to ...
Operating Instructions
Page 16
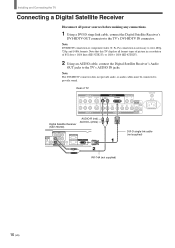
... necessary to provide sound. Rear of 852 dots × 1024 lines (KE-32TS2U), or 1024 × 1024 (KE-42TS2U). 2 Using an AUDIO cable, connect the Digital Satellite Receiver's Audio OUT jacks to the TV's DVI-HDTV IN connector. Note that this TV displays all power sources before making any connections. 1 Using a DVI-D singe link cable, connect...
... necessary to provide sound. Rear of 852 dots × 1024 lines (KE-32TS2U), or 1024 × 1024 (KE-42TS2U). 2 Using an AUDIO cable, connect the Digital Satellite Receiver's Audio OUT jacks to the TV's DVI-HDTV IN connector. Note that this TV displays all power sources before making any connections. 1 Using a DVI-D singe link cable, connect...
Operating Instructions
Page 17
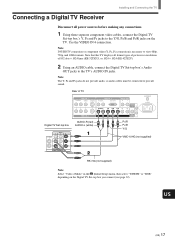
... do not provide audio, so audio cables must be connected to the TV's AUDIO IN jacks. US (US) 17 Note that this TV displays all power sources before making any connections. 1 Using three separate component video cables, connect the Digital TV Set-top box's Y, PB and PR jacks to view 480p, 720p...the Y/G, PB/B and PR/R jacks on the Digital TV Set-top box you connect (see page 32). Use the VIDEO IN 4 connection. Rear of 852 dots × 1024 lines (KE-32TS2U), or 1024 × 1024 (KE-42TS2U). 2 Using an AUDIO cable, connect the Digital TV Set-top box's Audio OUT jacks to provide sound.
... do not provide audio, so audio cables must be connected to the TV's AUDIO IN jacks. US (US) 17 Note that this TV displays all power sources before making any connections. 1 Using three separate component video cables, connect the Digital TV Set-top box's Y, PB and PR jacks to view 480p, 720p...the Y/G, PB/B and PR/R jacks on the Digital TV Set-top box you connect (see page 32). Use the VIDEO IN 4 connection. Rear of 852 dots × 1024 lines (KE-32TS2U), or 1024 × 1024 (KE-42TS2U). 2 Using an AUDIO cable, connect the Digital TV Set-top box's Audio OUT jacks to provide sound.
Operating Instructions
Page 18
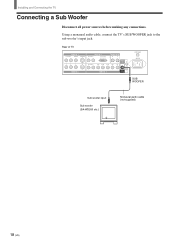
Rear of TV VIDEO IN 1 R AUDIO L VIDEO S VIDEO VIDEO IN 2 VIDEO IN 3 R AUDIO L DVI-HDTV AUDIO OUT R L R AUDIO L Y/G PB/B PR/R HD CONTROL S IN VD OUT VIDEO IN 4 SUB WOOFER VHF/UHF AC IN SUB WOOFER Sub woofer input Sub woofer (SA-WD200 etc.) Monaural audio cable (not supplied) 18 (US) Using a monaural audio cable, connect the TV's SUB WOOFER jack to the sub woofer's input jack. Installing and Connecting the TV Connecting a Sub Woofer Disconnect all power sources before making any connections.
Rear of TV VIDEO IN 1 R AUDIO L VIDEO S VIDEO VIDEO IN 2 VIDEO IN 3 R AUDIO L DVI-HDTV AUDIO OUT R L R AUDIO L Y/G PB/B PR/R HD CONTROL S IN VD OUT VIDEO IN 4 SUB WOOFER VHF/UHF AC IN SUB WOOFER Sub woofer input Sub woofer (SA-WD200 etc.) Monaural audio cable (not supplied) 18 (US) Using a monaural audio cable, connect the TV's SUB WOOFER jack to the sub woofer's input jack. Installing and Connecting the TV Connecting a Sub Woofer Disconnect all power sources before making any connections.

Operating Instructions
Page 19
... Setup) menu (see page 32). Rear of inputs that you used for the video connection. US (US) 19 Be sure to the Y/G, PB/B, PR/R, HD, and VD jacks on the TV. Connecting an RGB Equipment Installing and Connecting the TV Disconnect all power sources before making any connections.... 1 Using an RGB cable, connect the RGB equipment's video/synchronized signal output terminal to use the same row of TV VIDEO IN 1 R AUDIO L VIDEO S...
... Setup) menu (see page 32). Rear of inputs that you used for the video connection. US (US) 19 Be sure to the Y/G, PB/B, PR/R, HD, and VD jacks on the TV. Connecting an RGB Equipment Installing and Connecting the TV Disconnect all power sources before making any connections.... 1 Using an RGB cable, connect the RGB equipment's video/synchronized signal output terminal to use the same row of TV VIDEO IN 1 R AUDIO L VIDEO S...
Operating Instructions
Page 20
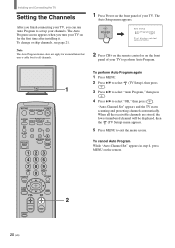
.../antenna 2 Press CH+ on the remote control or on the front panel of your channels. When all channels. 1 Press Power on the remote. The Auto Setup menu appears. "Auto-Channel Set" appears and the TV starts scanning and presetting channels automatically. The Auto Program screen appears when...4, press MENU on the front panel of your TV to perform Auto Program. 1 MUTING POWER VCR/DVD SAT/CABLE TV SYSTEM FUNCTION OFF VCR/DVD SAT/CABLE TV SLEEP PICTURE MODE WIDE MODE DISPLAY TV/VIDEO 123 456 7 JUMP FAVORITES 89 ENTER 0 MTS/SAP TV/SAT GUIDE POWER SAVING MENU VOL CH 2 To...
.../antenna 2 Press CH+ on the remote control or on the front panel of your channels. When all channels. 1 Press Power on the remote. The Auto Setup menu appears. "Auto-Channel Set" appears and the TV starts scanning and presetting channels automatically. The Auto Program screen appears when...4, press MENU on the front panel of your TV to perform Auto Program. 1 MUTING POWER VCR/DVD SAT/CABLE TV SYSTEM FUNCTION OFF VCR/DVD SAT/CABLE TV SLEEP PICTURE MODE WIDE MODE DISPLAY TV/VIDEO 123 456 7 JUMP FAVORITES 89 ENTER 0 MTS/SAP TV/SAT GUIDE POWER SAVING MENU VOL CH 2 To...
Operating Instructions
Page 22
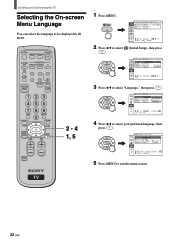
...; l e c t i o n n e r , ENTER pour régler 5 Press MENU to select . , t o s e l e c t , ENTER , t o e n t e r a d j . Rm. MUTING POWER VCR/DVD SAT/CABLE TV SYSTEM FUNCTION OFF VCR/DVD SAT/CABLE TV SLEEP PICTURE MODE WIDE MODE DISPLAY TV/VIDEO 123 456 7 JUMP FAVORITES 89 ENTER 0 MTS/SAP TV/SAT GUIDE POWER SAVING VOL MENU CH 2 - 4 1, 5 CODE SET 1 Press MENU. Adjust Picture Adj...
...; l e c t i o n n e r , ENTER pour régler 5 Press MENU to select . , t o s e l e c t , ENTER , t o e n t e r a d j . Rm. MUTING POWER VCR/DVD SAT/CABLE TV SYSTEM FUNCTION OFF VCR/DVD SAT/CABLE TV SLEEP PICTURE MODE WIDE MODE DISPLAY TV/VIDEO 123 456 7 JUMP FAVORITES 89 ENTER 0 MTS/SAP TV/SAT GUIDE POWER SAVING VOL MENU CH 2 - 4 1, 5 CODE SET 1 Press MENU. Adjust Picture Adj...
Operating Instructions
Page 23
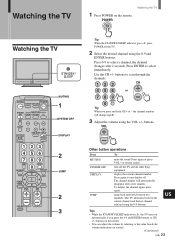
turn display off. POWER TV Watching the TV Tip When the STANDBY/SLEEP indicator goes off the TV and all other Sony equipment. buttons to the value beside the volume indication (on the remote. The channel display will change rapidly. 3 Adjust the volume ...the STANDBY/SLEEP indicator is lit, the TV turns on the TV. 2 Select the desired channel using the VOL +/- Watching the TV Watching the TV STANDBY/ SLEEP MUTING POWER VCR/DVD SAT/CABLE TV SYSTEM FUNCTION OFF VCR/DVD SAT/CABLE TV SLEEP PICTURE MODE WIDE MODE DISPLAY TV/VIDEO 123 456 7 JUMP FAVORITES 89...
turn display off. POWER TV Watching the TV Tip When the STANDBY/SLEEP indicator goes off the TV and all other Sony equipment. buttons to the value beside the volume indication (on the remote. The channel display will change rapidly. 3 Adjust the volume ...the STANDBY/SLEEP indicator is lit, the TV turns on the TV. 2 Select the desired channel using the VOL +/- Watching the TV Watching the TV STANDBY/ SLEEP MUTING POWER VCR/DVD SAT/CABLE TV SYSTEM FUNCTION OFF VCR/DVD SAT/CABLE TV SLEEP PICTURE MODE WIDE MODE DISPLAY TV/VIDEO 123 456 7 JUMP FAVORITES 89...
Operating Instructions
Page 24
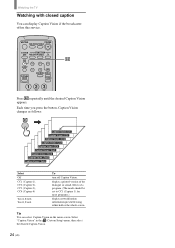
...Off CC1 (Capture 1), CC2 (Capture 2), CC3 (Capture 3), CC4 (Capture 4) Text1, Text2, Text3, Text4 To turn off Caption Vision. Watching the TV Watching with closed caption You can select Caption Vision on the menu screen. display a printed version of the dialogue or sound effects of a program. (The... "Caption Vision" in the (Custom Setup) menu, then select the desired Caption Vision. 24 (US) MUTING POWER VCR/DVD SAT/CABLE TV SYSTEM FUNCTION OFF VCR/DVD SAT/CABLE TV SLEEP PICTURE MODE WIDE MODE DISPLAY TV/VIDEO 123 Press repeatedly until the desired Caption Vision appears.
...Off CC1 (Capture 1), CC2 (Capture 2), CC3 (Capture 3), CC4 (Capture 4) Text1, Text2, Text3, Text4 To turn off Caption Vision. Watching the TV Watching with closed caption You can select Caption Vision on the menu screen. display a printed version of the dialogue or sound effects of a program. (The... "Caption Vision" in the (Custom Setup) menu, then select the desired Caption Vision. 24 (US) MUTING POWER VCR/DVD SAT/CABLE TV SYSTEM FUNCTION OFF VCR/DVD SAT/CABLE TV SLEEP PICTURE MODE WIDE MODE DISPLAY TV/VIDEO 123 Press repeatedly until the desired Caption Vision appears.


