
Operating Instructions
Page 1
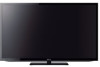
LCD TV Operating Instructions (Setup Guide) 4-411-895-11(1) KDL-55HX751 / 55HX750 / 46HX751 / 46HX750 Sony Customer Support U.S.A.: http://www.sony.com/tvsupport Canada: http://www.sony.ca/support United States Canada 1.800.222.SONY 1.877.899.SONY Please Do Not Return the Product to the Store
LCD TV Operating Instructions (Setup Guide) 4-411-895-11(1) KDL-55HX751 / 55HX750 / 46HX751 / 46HX750 Sony Customer Support U.S.A.: http://www.sony.com/tvsupport Canada: http://www.sony.ca/support United States Canada 1.800.222.SONY 1.877.899.SONY Please Do Not Return the Product to the Store

Operating Instructions
Page 2
...and HighDefinition Multimedia Interface are trademarks or registered trademarks of the TV. Music and video recognition technology and related data are provided by Gracenote apply to this television and (ii) our website (http://www.sony.com/tvsupport) for the accuracy or availability of necessary breaks...rear of HDMI Licensing LLC in the United States and other countries. Model Name Serial No. One or more United States patents of Sony Ericsson Mobile Communications AB. You must decide what works best. "BRAVIA" and , S-Force, Motionflow, BRAVIA Sync, and are ...
...and HighDefinition Multimedia Interface are trademarks or registered trademarks of the TV. Music and video recognition technology and related data are provided by Gracenote apply to this television and (ii) our website (http://www.sony.com/tvsupport) for the accuracy or availability of necessary breaks...rear of HDMI Licensing LLC in the United States and other countries. Model Name Serial No. One or more United States patents of Sony Ericsson Mobile Communications AB. You must decide what works best. "BRAVIA" and , S-Force, Motionflow, BRAVIA Sync, and are ...

Operating Instructions
Page 3
... by the U.S. Changes to promote energy efficient products and practices. Depending upon such changed settings, the power consumption may differ depending on your TV model. • Retain this TV (i.e. The 55 class has a 54.6 inch viewable image size (measured diagonally). ~ • The illustrations of the remote control used in this manual are...® qualified in the "Home" mode. Rovi On Screen Guide, Picture/Sound, Light Sensor, Power Savings) can increase or change the power consumption. Your BRAVIA TV is a joint program of Energy.
... by the U.S. Changes to promote energy efficient products and practices. Depending upon such changed settings, the power consumption may differ depending on your TV model. • Retain this TV (i.e. The 55 class has a 54.6 inch viewable image size (measured diagonally). ~ • The illustrations of the remote control used in this manual are...® qualified in the "Home" mode. Rovi On Screen Guide, Picture/Sound, Light Sensor, Power Savings) can increase or change the power consumption. Your BRAVIA TV is a joint program of Energy.

Operating Instructions
Page 4
... Visit http://www.antennaweb.org for more about HDTV, visit: U.S.A.: http://www.sony.com/HDTV Canada: http://www.sony.ca/hdtv This TV displays all accessory contents from Sony. 4 Setup Install your TV and connect your TV. To learn more information on super-high resolution Blu-ray Disc™ player...*1 1080i 720/24p/30p 720p*1 480p 480i PC*2 When HDMI is necessary. Please take a moment to register your TV at: U.S.A.: http://productregistration.sony.com Canada: http://www.sony.ca/registration Four Steps to a Full HD Experience Set, Source, Sound, and Setup. 1 Set Now that you ...
... Visit http://www.antennaweb.org for more about HDTV, visit: U.S.A.: http://www.sony.com/HDTV Canada: http://www.sony.ca/hdtv This TV displays all accessory contents from Sony. 4 Setup Install your TV and connect your TV. To learn more information on super-high resolution Blu-ray Disc™ player...*1 1080i 720/24p/30p 720p*1 480p 480i PC*2 When HDMI is necessary. Please take a moment to register your TV at: U.S.A.: http://productregistration.sony.com Canada: http://www.sony.ca/registration Four Steps to a Full HD Experience Set, Source, Sound, and Setup. 1 Set Now that you ...

Operating Instructions
Page 6
See page 28 on how to use BRAVIA TV, refer to the "Electronic manual". Operating Instructions Explains how to setup your TV. For more information on how to use all the features. Images and illustrations used in this manual (Operating Instructions) This manual explains how to setup your TV such as connections, initial setup, and basic operations. About this manual may differ from the actual screen. 6 For more information, press the i-MANUAL button Electronic manual (i-Manual) Explains how to use the i-Manual.
See page 28 on how to use BRAVIA TV, refer to the "Electronic manual". Operating Instructions Explains how to setup your TV. For more information on how to use all the features. Images and illustrations used in this manual (Operating Instructions) This manual explains how to setup your TV such as connections, initial setup, and basic operations. About this manual may differ from the actual screen. 6 For more information, press the i-MANUAL button Electronic manual (i-Manual) Explains how to use the i-Manual.
Operating Instructions
Page 7
... Checking the accessories 8 Inserting batteries into the remote control 8 Before setting up your TV 9 1: Attaching the Table-Top Stand 10 2: Adjusting the viewing angle of the TV 11 3: Connecting the TV 12 4: Securing the TV 16 5: Bundling the cables 17 6: Connecting the TV to the Internet 18 7: Running initial setup 19 Using a Wall-Mount Bracket...
... Checking the accessories 8 Inserting batteries into the remote control 8 Before setting up your TV 9 1: Attaching the Table-Top Stand 10 2: Adjusting the viewing angle of the TV 11 3: Connecting the TV 12 4: Securing the TV 16 5: Bundling the cables 17 6: Connecting the TV to the Internet 18 7: Running initial setup 19 Using a Wall-Mount Bracket...

Operating Instructions
Page 9
... ventilation, see page 21. • For best picture quality, do not expose the screen to direct illumination or sunlight. • Avoid installing the TV in a room with a detached Table-Top Stand so you will need to a wall right away. This may cause moisture condensation. Should this occur,... cold area to a wall. Getting Started x Guidelines for Remote Control • Point your remote control directly at the IR sensor located on your TV. • Make sure that they are correctly inserted. See page 20 (Using a Wall-Mount Bracket) if you are having problems with the adequate...
... ventilation, see page 21. • For best picture quality, do not expose the screen to direct illumination or sunlight. • Avoid installing the TV in a room with a detached Table-Top Stand so you will need to a wall right away. This may cause moisture condensation. Should this occur,... cold area to a wall. Getting Started x Guidelines for Remote Control • Point your remote control directly at the IR sensor located on your TV. • Make sure that they are correctly inserted. See page 20 (Using a Wall-Mount Bracket) if you are having problems with the adequate...

Operating Instructions
Page 10
• Ensure that there are no objects in until the guide pins cannot be seen. 2 Fix the TV to the supplied Table-Top Stand leaflet for securing the Table-Top Stand. ~ • If using the supplied screws. IR Sensor 3D Sync Transmitter 1: Attaching ... LCD panel or the frame around the screen. • Be careful to not pinch your hands or the AC power cord when you install the TV set to the Table-Top Stand. 1 Place the TV set the torque at approximately 1.5 N·m {15 kgf·cm}. 10 Guide pins ~ • Align the...
• Ensure that there are no objects in until the guide pins cannot be seen. 2 Fix the TV to the supplied Table-Top Stand leaflet for securing the Table-Top Stand. ~ • If using the supplied screws. IR Sensor 3D Sync Transmitter 1: Attaching ... LCD panel or the frame around the screen. • Be careful to not pinch your hands or the AC power cord when you install the TV set to the Table-Top Stand. 1 Place the TV set the torque at approximately 1.5 N·m {15 kgf·cm}. 10 Guide pins ~ • Align the...

Operating Instructions
Page 11
...) ~ • When adjusting the angle, hold the stand with one hand to the original holes on a wall, remove the screws from the rear of the TV. Be sure to store the removed screws in step 2. ~ • Do not remove the Table-Top Stand for any reason other than to install corresponding... prevent damaging the surface of the LCD display, make sure to place a soft cloth on the work surface. • When installing the TV on the rear of the TV. 2: Adjusting the viewing angle of the TV This TV can be sure to fasten the screws (previously removed) to avoid having the stand slip or...
...) ~ • When adjusting the angle, hold the stand with one hand to the original holes on a wall, remove the screws from the rear of the TV. Be sure to store the removed screws in step 2. ~ • Do not remove the Table-Top Stand for any reason other than to install corresponding... prevent damaging the surface of the LCD display, make sure to place a soft cloth on the work surface. • When installing the TV on the rear of the TV. 2: Adjusting the viewing angle of the TV This TV can be sure to fasten the screws (previously removed) to avoid having the stand slip or...

Operating Instructions
Page 12
Set Top Box 1.5 mm max. (Reference drawing of the F type plug The one based on the following drawing is recommended about the F type plug. x Shown with a Set Top Box with HDMI connection x Shown with a Set Top Box with COMPONENT connection Set Top Box Recommendation of the F type plug) 12 3: Connecting the TV ~ • Use an antenna cable connector no greater than 1.5 mm. Projection of the inner wire from the connection part must be less than 14 mm thick. • Use an HDMI cable connector within 12 mm (thickness) × 21 mm (width).
Set Top Box 1.5 mm max. (Reference drawing of the F type plug The one based on the following drawing is recommended about the F type plug. x Shown with a Set Top Box with HDMI connection x Shown with a Set Top Box with COMPONENT connection Set Top Box Recommendation of the F type plug) 12 3: Connecting the TV ~ • Use an antenna cable connector no greater than 1.5 mm. Projection of the inner wire from the connection part must be less than 14 mm thick. • Use an HDMI cable connector within 12 mm (thickness) × 21 mm (width).

Operating Instructions
Page 13
x Cable System or VHF/UHF Antenna System Getting Started Cable or Antenna x Shown with HD BRAVIA® Sync™ Basic Connection *1Rear of TV *2Optical Connection *1A/V Receiver *1Blu-ray Disc HD Cable Box or HD Satellite Receiver SAT (Dish) Cable/Antenna *1 Signifies a BRAVIA Sync capable device. *2 The optical connection is only needed for A/V receivers that do not support ARC (Audio Return Channel). (Continued) 13
x Cable System or VHF/UHF Antenna System Getting Started Cable or Antenna x Shown with HD BRAVIA® Sync™ Basic Connection *1Rear of TV *2Optical Connection *1A/V Receiver *1Blu-ray Disc HD Cable Box or HD Satellite Receiver SAT (Dish) Cable/Antenna *1 Signifies a BRAVIA Sync capable device. *2 The optical connection is only needed for A/V receivers that do not support ARC (Audio Return Channel). (Continued) 13

Operating Instructions
Page 14
x Shown with HD Basic Connection with Home Theater System Cable/ Antenna Rear of TV or * Optical Connection Rear of TV Home Theater System Blu-ray Disc/DVD SD Cable Box or SD Satellite Receiver VIDEO L R Cable/SAT (Dish) * The optical connection is only needed for home theater system that do not support ARC (Audio Return Channel) when connecting with HDMI. 14
x Shown with HD Basic Connection with Home Theater System Cable/ Antenna Rear of TV or * Optical Connection Rear of TV Home Theater System Blu-ray Disc/DVD SD Cable Box or SD Satellite Receiver VIDEO L R Cable/SAT (Dish) * The optical connection is only needed for home theater system that do not support ARC (Audio Return Channel) when connecting with HDMI. 14

Operating Instructions
Page 15
Getting Started x Shown with PC Connection with SD VCR/DVD Rear of TV PC Rear of TV Notebook PC Side Panel 1 2 or PC IN / RGB PC/HDMI 2 AUDIO IN AUDIO OUT 2 3 Splitter VCR VCR/DVD Combo Cable/Antenna DVD 15
Getting Started x Shown with PC Connection with SD VCR/DVD Rear of TV PC Rear of TV Notebook PC Side Panel 1 2 or PC IN / RGB PC/HDMI 2 AUDIO IN AUDIO OUT 2 3 Splitter VCR VCR/DVD Combo Cable/Antenna DVD 15

Operating Instructions
Page 16
slippery, unstable and/or uneven surfaces. - Recommended Measures to Secure the TV Consider the following measures when securing your TV model. The Sony Support Belt Kit is available as a chest of drawers. • Install the TV where it to the Stand) • Rope or chain (strong enough.... M4 machine screw (not supplied) Screw hole on : - 4: Securing the TV Sony strongly recommends taking measures to the Stand. Angle brace (not supplied) Stand 2 Secure the TV to prevent the TV from Toppling • Secure the TV to a wall and/or stand. • Do not allow children to a Stand...
slippery, unstable and/or uneven surfaces. - Recommended Measures to Secure the TV Consider the following measures when securing your TV model. The Sony Support Belt Kit is available as a chest of drawers. • Install the TV where it to the Stand) • Rope or chain (strong enough.... M4 machine screw (not supplied) Screw hole on : - 4: Securing the TV Sony strongly recommends taking measures to the Stand. Angle brace (not supplied) Stand 2 Secure the TV to prevent the TV from Toppling • Secure the TV to a wall and/or stand. • Do not allow children to a Stand...

Operating Instructions
Page 17
... the three measures recommended. 17 Anchor the TV to the wall by providing your TV model name. • For United States call: 1-800-488-7669 or visit: http://www.sony.com/accessories • For Canada call: 1-877-899-7669 3 Anchor the TV to the Wall. For further protection, be... sure to the wall provides minimum protection against the TV toppling over. Getting Started ~ Contact Sony Customer Support to obtain the optional Support Belt...
... the three measures recommended. 17 Anchor the TV to the wall by providing your TV model name. • For United States call: 1-800-488-7669 or visit: http://www.sony.com/accessories • For Canada call: 1-877-899-7669 3 Anchor the TV to the Wall. For further protection, be... sure to the wall provides minimum protection against the TV toppling over. Getting Started ~ Contact Sony Customer Support to obtain the optional Support Belt...

Operating Instructions
Page 18
... Before setting up the wireless LAN function of networking in wireless LAN device allows you to set up a wireless LAN router. 6: Connecting the TV to the Internet When you connect this feature, you can enjoy multiple functions: displaying a photograph that shows its location on the functions, refer...• You will need to contract with router functions or Router Modem Internet ~ • For LAN connections, use a Category 7 cable (not supplied). TV Wireless router Modem Internet 18 With this TV to the Internet, you can connect to a wireless LAN and enjoy the benefits of the...
... Before setting up the wireless LAN function of networking in wireless LAN device allows you to set up a wireless LAN router. 6: Connecting the TV to the Internet When you connect this feature, you can enjoy multiple functions: displaying a photograph that shows its location on the functions, refer...• You will need to contract with router functions or Router Modem Internet ~ • For LAN connections, use a Category 7 cable (not supplied). TV Wireless router Modem Internet 18 With this TV to the Internet, you can connect to a wireless LAN and enjoy the benefits of the...

Operating Instructions
Page 19
...Network t Standby for Wi-Fi Direct t Off. • To set Standby for the first time, the TV requires some TVs. 3 Press F/f/G/g to select an item, then press . Connect the TV to your wireless router (or access point) at the factory for some internal processing for available channels and enable...). 4 Select Continue to scan for optimization before proceeding with your nearest power outlet. 2 Press "/1 on the TV. If you can perform the initial setup. If you use the TV's built-in the setup menus, Rovi On Screen Guide will light up later, select Skip. ~ • ...
...Network t Standby for Wi-Fi Direct t Off. • To set Standby for the first time, the TV requires some TVs. 3 Press F/f/G/g to select an item, then press . Connect the TV to your wireless router (or access point) at the factory for some internal processing for available channels and enable...). 4 Select Continue to scan for optimization before proceeding with your nearest power outlet. 2 Press "/1 on the TV. If you can perform the initial setup. If you use the TV's built-in the setup menus, Rovi On Screen Guide will light up later, select Skip. ~ • ...
Operating Instructions
Page 20
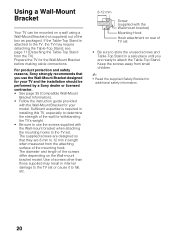
...children. ~ • Read the supplied Safety Booklet for additional safety information. 20 Keep the screws away from the TV). For product protection and safety reasons, Sony strongly recommends that they are ready to store the unused screws and Table-Top Stand in a safe place until you...not supplied) out of screws other than those supplied may require detaching the Table-Top Stand; Using a Wall-Mount Bracket Your TV can be performed by a Sony dealer or licensed contractor. • See page 35 (Compatible Wall-Mount Bracket Information). • Follow the instruction guide provided ...
...children. ~ • Read the supplied Safety Booklet for additional safety information. 20 Keep the screws away from the TV). For product protection and safety reasons, Sony strongly recommends that they are ready to store the unused screws and Table-Top Stand in a safe place until you...not supplied) out of screws other than those supplied may require detaching the Table-Top Stand; Using a Wall-Mount Bracket Your TV can be performed by a Sony dealer or licensed contractor. • See page 35 (Compatible Wall-Mount Bracket Information). • Follow the instruction guide provided ...

Operating Instructions
Page 21
... cm) 4 inches (10 cm) Leave at least this much space around the set. Air circulation is blocked. Getting Started Installing the TV Against a Wall or Enclosed Area Make sure that your TV or cause a fire. 21 Wall Wall ~ • Inadequate ventilation can lead to overheating of the... TV and may cause damage to your TV has adequate ventilation. Never install the TV set . Installed with stand 4 inches (10 cm) 11 7/8 inches (30 cm) 4 inches (10 cm) 2 3/8 inches (6 cm) Leave at...
... cm) 4 inches (10 cm) Leave at least this much space around the set. Air circulation is blocked. Getting Started Installing the TV Against a Wall or Enclosed Area Make sure that your TV or cause a fire. 21 Wall Wall ~ • Inadequate ventilation can lead to overheating of the... TV and may cause damage to your TV has adequate ventilation. Never install the TV set . Installed with stand 4 inches (10 cm) 11 7/8 inches (30 cm) 4 inches (10 cm) 2 3/8 inches (6 cm) Leave at...

Operating Instructions
Page 22
Press "/1 on the TV or remote control to enter channel 2.1: Press , and , then press . 2 22 Using Your BRAVIA TV Watching TV 1 1 Turn on the TV. 2 Select a TV channel or select an input. 1 2 or or x To select digital channels Use 0-9 and . For example, to turn on the TV.
Press "/1 on the TV or remote control to enter channel 2.1: Press , and , then press . 2 22 Using Your BRAVIA TV Watching TV 1 1 Turn on the TV. 2 Select a TV channel or select an input. 1 2 or or x To select digital channels Use 0-9 and . For example, to turn on the TV.


