
Operating Instructions
Page 1
LCD TV Operating Instructions (Setup Guide) 4-411-895-11(1) KDL-55HX751 / 55HX750 / 46HX751 / 46HX750 Sony Customer Support U.S.A.: http://www.sony.com/tvsupport Canada: http://www.sony.ca/support United States Canada 1.800.222.SONY 1.877.899.SONY Please Do Not Return the Product to the Store
LCD TV Operating Instructions (Setup Guide) 4-411-895-11(1) KDL-55HX751 / 55HX750 / 46HX751 / 46HX750 Sony Customer Support U.S.A.: http://www.sony.com/tvsupport Canada: http://www.sony.ca/support United States Canada 1.800.222.SONY 1.877.899.SONY Please Do Not Return the Product to the Store

Operating Instructions
Page 2
Sony recommends that the displayed image is modified from person to this product and service. The length and frequency of necessary breaks will vary from the original due to the conversion done by this TV. Patent No. 5,717,422 U.S. "BRAVIA" and , S-Force, Motionflow, BRAVIA Sync,... and are either registered trademarks or trademarks of Gracenote in the United States and/or other countries. Gracenote is a mark of Sony Ericsson Mobile Communications AB. CD, ...
Sony recommends that the displayed image is modified from person to this product and service. The length and frequency of necessary breaks will vary from the original due to the conversion done by this TV. Patent No. 5,717,422 U.S. "BRAVIA" and , S-Force, Motionflow, BRAVIA Sync,... and are either registered trademarks or trademarks of Gracenote in the United States and/or other countries. Gracenote is a mark of Sony Ericsson Mobile Communications AB. CD, ...

Operating Instructions
Page 3
ENERGY STAR is ENERGY STAR® qualified in this manual are of Energy. Your BRAVIA TV is a joint program of this TV (i.e. Changes to certain features, settings, and functionalities of these government agencies, designed to promote energy efficient products and practices. ...Sensor, Power Savings) can increase or change the power consumption. Depending upon such changed settings, the power consumption may differ depending on your TV model. • Retain this manual may exceed the limits required for future reference. 3 It meets strict energy efficiency guidelines set by the ...
ENERGY STAR is ENERGY STAR® qualified in this manual are of Energy. Your BRAVIA TV is a joint program of this TV (i.e. Changes to certain features, settings, and functionalities of these government agencies, designed to promote energy efficient products and practices. ...Sensor, Power Savings) can increase or change the power consumption. Depending upon such changed settings, the power consumption may differ depending on your TV model. • Retain this manual may exceed the limits required for future reference. 3 It meets strict energy efficiency guidelines set by the ...

Operating Instructions
Page 4
... lines. Visit http://www.antennaweb.org for more about HDTV, visit: U.S.A.: http://www.sony.com/HDTV Canada: http://www.sony.ca/hdtv This TV displays all accessory contents from Sony. 4 Setup Install your TV and connect your sources. INPUT HDMI HD VIDEO AUDIO SUPPORTED FORMATS 1080/24p/30p 1080p*1... with an HD-quality antenna connected directly to the "Full HDTV Experience." Please take a moment to register your TV at: U.S.A.: http://productregistration.sony.com Canada: http://www.sony.ca/registration Four Steps to a Full HD Experience Set, Source, Sound, and Setup. 1 Set Now that ...
... lines. Visit http://www.antennaweb.org for more about HDTV, visit: U.S.A.: http://www.sony.com/HDTV Canada: http://www.sony.ca/hdtv This TV displays all accessory contents from Sony. 4 Setup Install your TV and connect your sources. INPUT HDMI HD VIDEO AUDIO SUPPORTED FORMATS 1080/24p/30p 1080p*1... with an HD-quality antenna connected directly to the "Full HDTV Experience." Please take a moment to register your TV at: U.S.A.: http://productregistration.sony.com Canada: http://www.sony.ca/registration Four Steps to a Full HD Experience Set, Source, Sound, and Setup. 1 Set Now that ...

Operating Instructions
Page 6
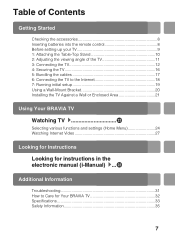
See page 28 on how to use all the features. For more information, press the i-MANUAL button Electronic manual (i-Manual) Explains how to use the i-Manual. For more information on how to use BRAVIA TV, refer to the "Electronic manual". Images and illustrations used in this manual (Operating Instructions) This manual explains how to setup your TV. About this manual may differ from the actual screen. 6 Operating Instructions Explains how to setup your TV such as connections, initial setup, and basic operations.
See page 28 on how to use all the features. For more information, press the i-MANUAL button Electronic manual (i-Manual) Explains how to use the i-Manual. For more information on how to use BRAVIA TV, refer to the "Electronic manual". Images and illustrations used in this manual (Operating Instructions) This manual explains how to setup your TV. About this manual may differ from the actual screen. 6 Operating Instructions Explains how to setup your TV such as connections, initial setup, and basic operations.
Operating Instructions
Page 7
... Checking the accessories 8 Inserting batteries into the remote control 8 Before setting up your TV 9 1: Attaching the Table-Top Stand 10 2: Adjusting the viewing angle of the TV 11 3: Connecting the TV 12 4: Securing the TV 16 5: Bundling the cables 17 6: Connecting the TV to the Internet 18 7: Running initial setup 19 Using a Wall-Mount Bracket...
... Checking the accessories 8 Inserting batteries into the remote control 8 Before setting up your TV 9 1: Attaching the Table-Top Stand 10 2: Adjusting the viewing angle of the TV 11 3: Connecting the TV 12 4: Securing the TV 16 5: Bundling the cables 17 6: Connecting the TV to the Internet 18 7: Running initial setup 19 Using a Wall-Mount Bracket...

Operating Instructions
Page 9
... having problems with the adequate number of people; Sudden room temperature changes may cause the TV to avoid damage. • Ensure your TV: • Disconnect all cables when carrying the TV. • Carry the TV with the remote control, reinsert or replace your batteries and make sure that no objects.... This may cause moisture condensation. try turning off the fluorescent lamps. • If you want to mount the TV to attach the Table-Top Stand. Before setting up your TV has adequate ventilation, see page 21. • For best picture quality, do not expose the screen to direct...
... having problems with the adequate number of people; Sudden room temperature changes may cause the TV to avoid damage. • Ensure your TV: • Disconnect all cables when carrying the TV. • Carry the TV with the remote control, reinsert or replace your batteries and make sure that no objects.... This may cause moisture condensation. try turning off the fluorescent lamps. • If you want to mount the TV to attach the Table-Top Stand. Before setting up your TV has adequate ventilation, see page 21. • For best picture quality, do not expose the screen to direct...

Operating Instructions
Page 10
...-Top Stand leaflet for securing the Table-Top Stand. ~ • If using the supplied screws. The arrow marks indicate the location of the TV. Guide pins ~ • Align the TV from the top, slide it in front of the screw holes used for proper attachment. ~ • Do not put stress on the... frame around the screen. • Be careful to not pinch your hands or the AC power cord when you install the TV set to the Table-Top Stand. 1 Place the TV set the torque at approximately 1.5 N·m {15 kgf·cm}. 10 IR Sensor 3D Sync Transmitter 1: Attaching the Table-Top Stand...
...-Top Stand leaflet for securing the Table-Top Stand. ~ • If using the supplied screws. The arrow marks indicate the location of the TV. Guide pins ~ • Align the TV from the top, slide it in front of the screw holes used for proper attachment. ~ • Do not put stress on the... frame around the screen. • Be careful to not pinch your hands or the AC power cord when you install the TV set to the Table-Top Stand. 1 Place the TV set the torque at approximately 1.5 N·m {15 kgf·cm}. 10 IR Sensor 3D Sync Transmitter 1: Attaching the Table-Top Stand...

Operating Instructions
Page 11
...; To prevent damaging the surface of the LCD display, make sure to place a soft cloth on the work surface. • When installing the TV on a wall, remove the screws from children. • When attaching the Table-Top Stand again, be sure to fasten the screws (previously removed) to avoid...° 15° 11 Getting Started Detaching the Table-Top Stand from the TV To detach the Table-Top Stand from the TV, remove the screws fixed in a safe place, keeping them away from the rear of the TV This TV can be adjusted within the angles as illustrated. x Angle adjustment (Swivel) ~ • ...
...; To prevent damaging the surface of the LCD display, make sure to place a soft cloth on the work surface. • When installing the TV on a wall, remove the screws from children. • When attaching the Table-Top Stand again, be sure to fasten the screws (previously removed) to avoid...° 15° 11 Getting Started Detaching the Table-Top Stand from the TV To detach the Table-Top Stand from the TV, remove the screws fixed in a safe place, keeping them away from the rear of the TV This TV can be adjusted within the angles as illustrated. x Angle adjustment (Swivel) ~ • ...

Operating Instructions
Page 12
3: Connecting the TV ~ • Use an antenna cable connector no greater than 1.5 mm. Set Top Box 1.5 mm max. (Reference drawing of the F type plug The one based on the following drawing is recommended about the F type plug. x Shown with a Set Top Box with HDMI connection x Shown with a Set Top Box with COMPONENT connection Set Top Box Recommendation of the F type plug) 12 Projection of the inner wire from the connection part must be less than 14 mm thick. • Use an HDMI cable connector within 12 mm (thickness) × 21 mm (width).
3: Connecting the TV ~ • Use an antenna cable connector no greater than 1.5 mm. Set Top Box 1.5 mm max. (Reference drawing of the F type plug The one based on the following drawing is recommended about the F type plug. x Shown with a Set Top Box with HDMI connection x Shown with a Set Top Box with COMPONENT connection Set Top Box Recommendation of the F type plug) 12 Projection of the inner wire from the connection part must be less than 14 mm thick. • Use an HDMI cable connector within 12 mm (thickness) × 21 mm (width).

Operating Instructions
Page 13
x Cable System or VHF/UHF Antenna System Getting Started Cable or Antenna x Shown with HD BRAVIA® Sync™ Basic Connection *1Rear of TV *2Optical Connection *1A/V Receiver *1Blu-ray Disc HD Cable Box or HD Satellite Receiver SAT (Dish) Cable/Antenna *1 Signifies a BRAVIA Sync capable device. *2 The optical connection is only needed for A/V receivers that do not support ARC (Audio Return Channel). (Continued) 13
x Cable System or VHF/UHF Antenna System Getting Started Cable or Antenna x Shown with HD BRAVIA® Sync™ Basic Connection *1Rear of TV *2Optical Connection *1A/V Receiver *1Blu-ray Disc HD Cable Box or HD Satellite Receiver SAT (Dish) Cable/Antenna *1 Signifies a BRAVIA Sync capable device. *2 The optical connection is only needed for A/V receivers that do not support ARC (Audio Return Channel). (Continued) 13

Operating Instructions
Page 14
x Shown with HD Basic Connection with Home Theater System Cable/ Antenna Rear of TV or * Optical Connection Rear of TV Home Theater System Blu-ray Disc/DVD SD Cable Box or SD Satellite Receiver VIDEO L R Cable/SAT (Dish) * The optical connection is only needed for home theater system that do not support ARC (Audio Return Channel) when connecting with HDMI. 14
x Shown with HD Basic Connection with Home Theater System Cable/ Antenna Rear of TV or * Optical Connection Rear of TV Home Theater System Blu-ray Disc/DVD SD Cable Box or SD Satellite Receiver VIDEO L R Cable/SAT (Dish) * The optical connection is only needed for home theater system that do not support ARC (Audio Return Channel) when connecting with HDMI. 14

Operating Instructions
Page 15
Getting Started x Shown with PC Connection with SD VCR/DVD Rear of TV PC Rear of TV Notebook PC Side Panel 1 2 or PC IN / RGB PC/HDMI 2 AUDIO IN AUDIO OUT 2 3 Splitter VCR VCR/DVD Combo Cable/Antenna DVD 15
Getting Started x Shown with PC Connection with SD VCR/DVD Rear of TV PC Rear of TV Notebook PC Side Panel 1 2 or PC IN / RGB PC/HDMI 2 AUDIO IN AUDIO OUT 2 3 Splitter VCR VCR/DVD Combo Cable/Antenna DVD 15

Operating Instructions
Page 16
...supplied): • M4 machine screw (screwed into the TV's Table-Top Stand) • A screw or similar (attach it cannot be pulled, pushed, or knocked over . 4: Securing the TV Sony strongly recommends taking measures to prevent the TV from Toppling • Secure the TV to a wall and/or stand. • Do ...not allow children to play or climb on furniture and TV sets. • Avoid placing or hanging items on the...
...supplied): • M4 machine screw (screwed into the TV's Table-Top Stand) • A screw or similar (attach it cannot be pulled, pushed, or knocked over . 4: Securing the TV Sony strongly recommends taking measures to prevent the TV from Toppling • Secure the TV to a wall and/or stand. • Do ...not allow children to play or climb on furniture and TV sets. • Avoid placing or hanging items on the...

Operating Instructions
Page 17
... to the wall provides minimum protection against the TV toppling over. Anchor the TV to the wall by providing your TV model name. • For United States call: 1-800-488-7669 or visit: http://www.sony.com/accessories • For Canada call: 1-877-899-7669 3 Anchor the TV to the Wall. Reuse the cable holder...
... to the wall provides minimum protection against the TV toppling over. Anchor the TV to the wall by providing your TV model name. • For United States call: 1-800-488-7669 or visit: http://www.sony.com/accessories • For Canada call: 1-877-899-7669 3 Anchor the TV to the Wall. Reuse the cable holder...

Operating Instructions
Page 18
...Internet When you connect this feature, you can connect to a wireless LAN and enjoy the benefits of the TV, be sure to set up a wireless LAN router. With this TV to the Internet, you to access the Internet and your home network. Before setting up the wireless LAN ...refer to the i-Manual. ~ • You will need to the Internet. For details on the map, enjoying Internet video, etc. Preparing a wired network TV Internet Modem with an Internet service provider to connect to contract with router functions or Router Modem Internet ~ • For LAN connections, use a Category 7 ...
...Internet When you connect this feature, you can connect to a wireless LAN and enjoy the benefits of the TV, be sure to set up a wireless LAN router. With this TV to the Internet, you to access the Internet and your home network. Before setting up the wireless LAN ...refer to the i-Manual. ~ • You will need to the Internet. For details on the map, enjoying Internet video, etc. Preparing a wired network TV Internet Modem with an Internet service provider to connect to contract with router functions or Router Modem Internet ~ • For LAN connections, use a Category 7 ...

Operating Instructions
Page 19
... connect with the Initial Setup. Getting Started 7: Running initial setup 1 Complete your nearest power outlet. 2 Press "/1 on the TV for the first time, the TV requires some TVs. 3 Press F/f/G/g to the network automatically. There will be disabled. 5 Set up the Internet settings. Follow the instructions on ... Rovi On Screen Guide will be no picture and sound, and the timer indicator on the screen. ~ • Home mode sets the TV to settings optimized for home viewing (this process. Press HOME, then select Settings t Network t Standby for available channels and enable the Rovi...
... connect with the Initial Setup. Getting Started 7: Running initial setup 1 Complete your nearest power outlet. 2 Press "/1 on the TV for the first time, the TV requires some TVs. 3 Press F/f/G/g to the network automatically. There will be disabled. 5 Set up the Internet settings. Follow the instructions on ... Rovi On Screen Guide will be no picture and sound, and the timer indicator on the screen. ~ • Home mode sets the TV to settings optimized for home viewing (this process. Press HOME, then select Settings t Network t Standby for available channels and enable the Rovi...
Operating Instructions
Page 20
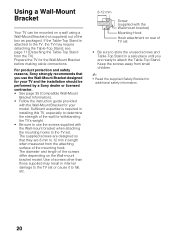
... to 12 mm in a safe place until you use the screws supplied with the Wall-Mount Bracket for your TV and the installation should be performed by a Sony dealer or licensed contractor. • See page 35 (Compatible Wall-Mount Bracket Information). • Follow the instruction guide... as packaged. The diameter and length of the mounting hook. Prepare the TV for additional safety information. 20 For product protection and safety reasons, Sony strongly recommends that they are ready to the TV set. Use of screws other than those supplied may require detaching the Table...
... to 12 mm in a safe place until you use the screws supplied with the Wall-Mount Bracket for your TV and the installation should be performed by a Sony dealer or licensed contractor. • See page 35 (Compatible Wall-Mount Bracket Information). • Follow the instruction guide... as packaged. The diameter and length of the mounting hook. Prepare the TV for additional safety information. 20 For product protection and safety reasons, Sony strongly recommends that they are ready to the TV set. Use of screws other than those supplied may require detaching the Table...

Operating Instructions
Page 21
...on the wall 4 inches (10 cm) 11 7/8 inches (30 cm) 4 inches (10 cm) 4 inches (10 cm) Leave at least this much space around the TV as follows: Air circulation is blocked. Installed with stand 4 inches (10 cm) 11 7/8 inches (30 cm) 4 inches (10 cm) 2 3/8 inches (6 cm) Leave... at least this much space around the set. Wall Wall ~ • Inadequate ventilation can lead to overheating of the TV and may cause damage to your TV has adequate ventilation. Allow enough space around the set as shown in the illustration. Never install the...
...on the wall 4 inches (10 cm) 11 7/8 inches (30 cm) 4 inches (10 cm) 4 inches (10 cm) Leave at least this much space around the TV as follows: Air circulation is blocked. Installed with stand 4 inches (10 cm) 11 7/8 inches (30 cm) 4 inches (10 cm) 2 3/8 inches (6 cm) Leave... at least this much space around the set. Wall Wall ~ • Inadequate ventilation can lead to overheating of the TV and may cause damage to your TV has adequate ventilation. Allow enough space around the set as shown in the illustration. Never install the...

Operating Instructions
Page 22
For example, to turn on the TV. Using Your BRAVIA TV Watching TV 1 1 Turn on the TV. 2 Select a TV channel or select an input. 1 2 or or x To select digital channels Use 0-9 and . Press "/1 on the TV or remote control to enter channel 2.1: Press , and , then press . 2 22
For example, to turn on the TV. Using Your BRAVIA TV Watching TV 1 1 Turn on the TV. 2 Select a TV channel or select an input. 1 2 or or x To select digital channels Use 0-9 and . Press "/1 on the TV or remote control to enter channel 2.1: Press , and , then press . 2 22


