Operating Instructions
Page 2
..., or in a residential installation. RHT-G800 SU-FL300M SU-FL300M SU-FL300L SU-FL300L Use with part 15 of the following Sony TVs only with an extension cord, receptacle or other countries. Address: 16530 Via Esprillo, San Diego, CA 92127 U.S.A. Operation is designed...Sony dealer regarding this case, please wait a few hours to the following WALL-MOUNT BRACKET or TV-stand. s To prevent internal heat buildup, do not expose the screen to cover the windows that any interference received, including interference that may cause undesired operation. s To obtain the best picture...
..., or in a residential installation. RHT-G800 SU-FL300M SU-FL300M SU-FL300L SU-FL300L Use with part 15 of the following Sony TVs only with an extension cord, receptacle or other countries. Address: 16530 Via Esprillo, San Diego, CA 92127 U.S.A. Operation is designed...Sony dealer regarding this case, please wait a few hours to the following WALL-MOUNT BRACKET or TV-stand. s To prevent internal heat buildup, do not expose the screen to cover the windows that any interference received, including interference that may cause undesired operation. s To obtain the best picture...
Operating Instructions
Page 3
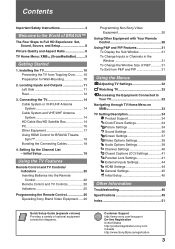
...in the Window 31 To Change the Window Size of optional equipment connection diagrams. Customer Support http://www.sony.com/tvsupport On-line Registration United States http://productregistration.sony.com Canada http://www.SonyStyle.ca/registration 3 Locating Inputs and Outputs 11 Left Side 11 Rear 12 ... 4 Welcome to the World of BRAVIA™ The Four Steps to Your TV 32 Navigating through TV Home Menu on XMB 33 TV Setting Description 34 Product Support 34 Clock/Timers Settings 34 Picture Settings 34 Sound Settings 36 Screen Settings 37 Video Options Settings 38 Audio Options...
...in the Window 31 To Change the Window Size of optional equipment connection diagrams. Customer Support http://www.sony.com/tvsupport On-line Registration United States http://productregistration.sony.com Canada http://www.SonyStyle.ca/registration 3 Locating Inputs and Outputs 11 Left Side 11 Rear 12 ... 4 Welcome to the World of BRAVIA™ The Four Steps to Your TV 32 Navigating through TV Home Menu on XMB 33 TV Setting Description 34 Product Support 34 Clock/Timers Settings 34 Picture Settings 34 Sound Settings 36 Screen Settings 37 Video Options Settings 38 Audio Options...
Operating Instructions
Page 4
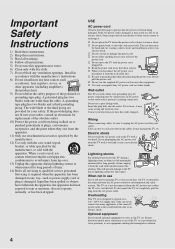
...When a cart is not disconnected from heat sources. The core lines may damage the TV set is damaged, liquid has been spilled or objects have the outlet changed. s Use only an original Sony AC power cord, not other equipment. It may be connected to wear or abuse...Insert the plug fully into your dealer or Sony service center to qualified service personnel. A polarized plug has two blades with a protective earthing connection. Wall outlet The TV set is left unattended and unused for environmental and safety reasons. Picture distortion and/or noisy sound may cause electric...
...When a cart is not disconnected from heat sources. The core lines may damage the TV set is damaged, liquid has been spilled or objects have the outlet changed. s Use only an original Sony AC power cord, not other equipment. It may be connected to wear or abuse...Insert the plug fully into your dealer or Sony service center to qualified service personnel. A polarized plug has two blades with a protective earthing connection. Wall outlet The TV set is left unattended and unused for environmental and safety reasons. Picture distortion and/or noisy sound may cause electric...
Operating Instructions
Page 7
... safety checks (as not to qualified service personnel. If the TV is in this TV outdoors. Changing the Picture mode, Backlight setting, enabling the Light Sensor, or turning on top of the vehicle may be observed when the LCD TV is recommended to dispose of the TV cracks, do not expose the screen to seawater, it...
... safety checks (as not to qualified service personnel. If the TV is in this TV outdoors. Changing the Picture mode, Backlight setting, enabling the Light Sensor, or turning on top of the vehicle may be observed when the LCD TV is recommended to dispose of the TV cracks, do not expose the screen to seawater, it...

Operating Instructions
Page 8
... a standard analog signal, you for information on your BRAVIA screen and maintains a crisp, clear, vivid picture. 4:3 (standard-definition) source Most standard-definition signals use a boxy 4:3 aspect ratio. The quality of the standard TV signal. Picture Quality and Aspect Ratio You can use a wide screen aspect ratio of the signal it receives. When...see pages 23, 37 and 38). 8 Welcome to the World of the image). The 1080 HD signals provide more about HDTV, visit: http://www.sony.com/HDTV The Four Steps to Full HD Experience: Set, Sound, Source, and Setup Along with your new BRAVIA...
... a standard analog signal, you for information on your BRAVIA screen and maintains a crisp, clear, vivid picture. 4:3 (standard-definition) source Most standard-definition signals use a boxy 4:3 aspect ratio. The quality of the standard TV signal. Picture Quality and Aspect Ratio You can use a wide screen aspect ratio of the signal it receives. When...see pages 23, 37 and 38). 8 Welcome to the World of the image). The 1080 HD signals provide more about HDTV, visit: http://www.sony.com/HDTV The Four Steps to Full HD Experience: Set, Sound, Source, and Setup Along with your new BRAVIA...
Operating Instructions
Page 9
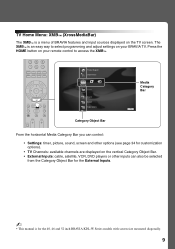
...selected from the Category Object Bar for the External Inputs. ~ • This manual is for customization options). • TV Channels: available channels are displayed on the TV screen. TV Home Menu: XMB™ (XrossMediaBar) The XMB™ is a menu of BRAVIA features and input sources displayed on ... External Inputs: cable, satellite, VCR, DVD players or other inputs can control: • Settings: timer, picture, sound, screen and other options (see page 34 for the 40, 46 and 52 inch BRAVIA KDL-W Series models with screen size measured diagonally. 9 The XMB™ is an easy way to...
...selected from the Category Object Bar for the External Inputs. ~ • This manual is for customization options). • TV Channels: available channels are displayed on the TV screen. TV Home Menu: XMB™ (XrossMediaBar) The XMB™ is a menu of BRAVIA features and input sources displayed on ... External Inputs: cable, satellite, VCR, DVD players or other inputs can control: • Settings: timer, picture, sound, screen and other options (see page 34 for the 40, 46 and 52 inch BRAVIA KDL-W Series models with screen size measured diagonally. 9 The XMB™ is an easy way to...
Operating Instructions
Page 12
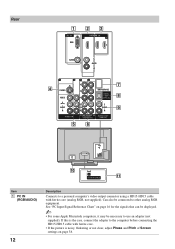
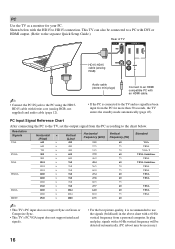
...; For some Apple Macintosh computers, it may be connected to a personal computer's video output connector using a HD15-HD15 cable with ferrite core. • If the picture is the case, connect the adapter to use an adapter (not supplied). VHF/UHF/CABLE qa Item 1 PC IN (RGB/AUDIO) 12 Description Connects to...
...; For some Apple Macintosh computers, it may be connected to a personal computer's video output connector using a HD15-HD15 cable with ferrite core. • If the picture is the case, connect the adapter to use an adapter (not supplied). VHF/UHF/CABLE qa Item 1 PC IN (RGB/AUDIO) 12 Description Connects to...
Operating Instructions
Page 13
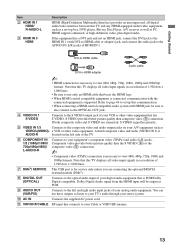
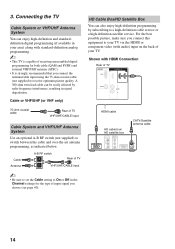
...R-AUDIO-L 3 HDMI IN 3 HDMI Description HDMI (High-Definition Multimedia Interface) provides an uncompressed, all-digital audio/video interface between this TV displays all video input signals in a resolution of HDMI IN 1. a VCR or other video equipment that is PCM/Dolby Digital compatible....audio system with the connected equipment is necessary to view 480i, 480p, 720p, 1080i, 1080p and 1080/24p formats. S VIDEO provides better picture quality than the S VIDEO (4) or the composite video (5) connection. ~ • Component video (YPBPR) connection is supported. You can...
...R-AUDIO-L 3 HDMI IN 3 HDMI Description HDMI (High-Definition Multimedia Interface) provides an uncompressed, all-digital audio/video interface between this TV displays all video input signals in a resolution of HDMI IN 1. a VCR or other video equipment that is PCM/Dolby Digital compatible....audio system with the connected equipment is necessary to view 480i, 480p, 720p, 1080i, 1080p and 1080/24p formats. S VIDEO provides better picture quality than the S VIDEO (4) or the composite video (5) connection. ~ • Component video (YPBPR) connection is supported. You can...
Operating Instructions
Page 14
...definition programming by radio frequency interference, resulting in signal degradation. Cable Antenna A-B RF switch A Rear of TV B VHF/UHF/CABLE input ~ • Be sure to set the Cable setting to receive optimum picture quality. Cable or VHF/UHF (or VHF only) 75-ohm coaxial cable Rear of input signal you... connect the antenna/cable input using the 75-ohm coaxial cable (not supplied) to On or Off in your TV. Connecting the TV Cable System or VHF/...
...definition programming by radio frequency interference, resulting in signal degradation. Cable Antenna A-B RF switch A Rear of TV B VHF/UHF/CABLE input ~ • Be sure to set the Cable setting to receive optimum picture quality. Cable or VHF/UHF (or VHF only) 75-ohm coaxial cable Rear of input signal you... connect the antenna/cable input using the 75-ohm coaxial cable (not supplied) to On or Off in your TV. Connecting the TV Cable System or VHF/...
Operating Instructions
Page 16
... VESA VESA VESA VESA VESA VESA ~ • This TV's PC input does not support Sync on Green or Composite Sync. • This TV's PC VGA input does not support interlaced signals. • For the best picture quality, it is connected to the TV and no signal has been input from the PC according... to HD15 connection. PC Use the TV as a monitor for more than 30 seconds, the TV enters the standby mode automatically (page 45). In plug and...
... VESA VESA VESA VESA VESA VESA ~ • This TV's PC input does not support Sync on Green or Composite Sync. • This TV's PC VGA input does not support interlaced signals. • For the best picture quality, it is connected to the TV and no signal has been input from the PC according... to HD15 connection. PC Use the TV as a monitor for more than 30 seconds, the TV enters the standby mode automatically (page 45). In plug and...
Operating Instructions
Page 19
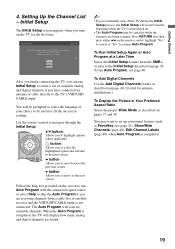
... options where applicable. Follow the help text provided on -screen settings. English Español Français After you finish connecting the TV, you can run Initial Setup to create a list of available analog and digital channels if you to set up convenient features such as ...default audio for antenna installations.) To Display the Picture in Your Preferred Aspect Ratio Select the proper Wide Mode as described on screen display as well as Favorites (see page 40. button: Allows...
... options where applicable. Follow the help text provided on -screen settings. English Español Français After you finish connecting the TV, you can run Initial Setup to create a list of available analog and digital channels if you to set up convenient features such as ...default audio for antenna installations.) To Display the Picture in Your Preferred Aspect Ratio Select the proper Wide Mode as described on screen display as well as Favorites (see page 40. button: Allows...
Operating Instructions
Page 21
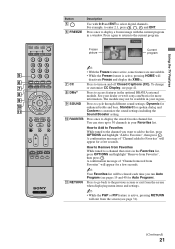
Using the TV Features Button 5 6 FREEZE Description Use with the current program in a window. See your dealer or www.sony.com/bravia for spoken dialog and qa Custom to customize the sound settings including the Sound Booster setting. 0 FAVORITES Press once ...in the optional BRAVIA external module. How to Remove from the screen (see page 41. 8 8 DMex Press to Favorites", then press . Freeze Frozen picture Current program ~ • With the Freeze feature active, some features are unavailable. 5 • While the Freeze feature is active, pressing RETURN will deactivate...
Using the TV Features Button 5 6 FREEZE Description Use with the current program in a window. See your dealer or www.sony.com/bravia for spoken dialog and qa Custom to customize the sound settings including the Sound Booster setting. 0 FAVORITES Press once ...in the optional BRAVIA external module. How to Remove from the screen (see page 41. 8 8 DMex Press to Favorites", then press . Freeze Frozen picture Current program ~ • With the Freeze feature active, some features are unavailable. 5 • While the Freeze feature is active, pressing RETURN will deactivate...

Operating Instructions
Page 22
.... M (fast forward): Press to advance forward a set period of a recorded program. x STOP: Press to your BRAVIA Theatre Sync audio system. The picture settings will be connected qs by an HDMI connection to stop the recording. qg Buttons X REC PAUSE: Press to pause playback. qh qj BD/DVD... 90min or 120min) that you have Operating programmed into the remote control. REPLAY: Press to the audio output of the attached speakers of your TV (see "Using ql Buttons Other Equipment with Your Remote Control" on page 28. Press to display the BD/DVD disc menu. Pressing this...
.... M (fast forward): Press to advance forward a set period of a recorded program. x STOP: Press to your BRAVIA Theatre Sync audio system. The picture settings will be connected qs by an HDMI connection to stop the recording. qg Buttons X REC PAUSE: Press to pause playback. qh qj BD/DVD... 90min or 120min) that you have Operating programmed into the remote control. REPLAY: Press to the audio output of the attached speakers of your TV (see "Using ql Buttons Other Equipment with Your Remote Control" on page 28. Press to display the BD/DVD disc menu. Pressing this...
Operating Instructions
Page 24
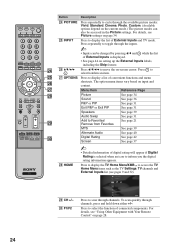
...the inputs. ~ • Inputs can also be changed by pressing V/v and while the list of External Inputs and TV mode. Press repeatedly to cycle through the available picture modes: Vivid, Standard, Cinema, Photo, Custom. (Available options depend on setting up the External Inputs labels, including ...displayed. • See page 44 on the current mode.) The picture modes can be accessed in the Picture settings. For details, see Picture settings on input and content. F1/F2 Sound Screen Video Options TV Press to inform you the digital rating information appears. wj Menu Item...
...the inputs. ~ • Inputs can also be changed by pressing V/v and while the list of External Inputs and TV mode. Press repeatedly to cycle through the available picture modes: Vivid, Standard, Cinema, Photo, Custom. (Available options depend on setting up the External Inputs labels, including ...displayed. • See page 44 on the current mode.) The picture modes can be accessed in the Picture settings. For details, see Picture settings on input and content. F1/F2 Sound Screen Video Options TV Press to inform you the digital rating information appears. wj Menu Item...
Operating Instructions
Page 25
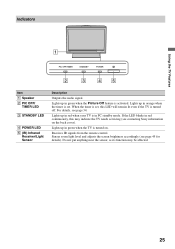
Lights up in green when the Picture Off feature is in red continuously, this LED will remain lit even if the TV is set , this may be affected. 25 Lights up in red when your TV is activated. For details, see page 45 for details). Do not put anything near the ...sensor, as its function may indicate the TV needs servicing (see contacting Sony information on . If the LED blinks in PC standby mode. Lights up in orange when the timer is turned off. Using the TV Features Indicators 1 PIC OFF/TIMER STANDBY POWER 2 3 45 Item 1 Speaker ...
Lights up in green when the Picture Off feature is in red continuously, this LED will remain lit even if the TV is set , this may be affected. 25 Lights up in red when your TV is activated. For details, see page 45 for details). Do not put anything near the ...sensor, as its function may indicate the TV needs servicing (see contacting Sony information on . If the LED blinks in PC standby mode. Lights up in orange when the timer is turned off. Using the TV Features Indicators 1 PIC OFF/TIMER STANDBY POWER 2 3 45 Item 1 Speaker ...
Operating Instructions
Page 29
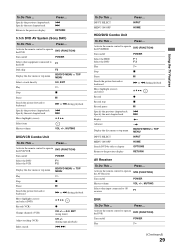
...DVD (FUNCTION) Turn on /off POWER Select the HDD F 1 Select the DVD F 2 Play H Stop x Pause X Search the picture forward or backward M or m during playback Specify the previous chapter/track Specify the next chapter/track . > Move highlight (cursor) V v... control to operate the AV Receiver STB (FUNCTION) Turn on /off POWER Play H (Continued) 29 Using the TV Features Press ... To Do This ... Specify the previous chapter/track Specify the next chapter/track Return to the previous... display Press ... . > RETURN 5.1ch DVD AV System (Sony DAV) To Do This ...
...DVD (FUNCTION) Turn on /off POWER Select the HDD F 1 Select the DVD F 2 Play H Stop x Pause X Search the picture forward or backward M or m during playback Specify the previous chapter/track Specify the next chapter/track . > Move highlight (cursor) V v... control to operate the AV Receiver STB (FUNCTION) Turn on /off POWER Play H (Continued) 29 Using the TV Features Press ... To Do This ... Specify the previous chapter/track Specify the next chapter/track Return to the previous... display Press ... . > RETURN 5.1ch DVD AV System (Sony DAV) To Do This ...
Operating Instructions
Page 31
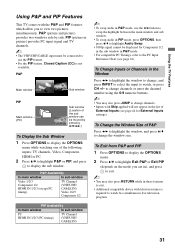
PIP (picture in picture) provides PC input signal and TV channels. ~ • The VHF/UHF/CABLE input must be moved by side. P&P Main window Sub window PIP Main window (PC) Sub window (Location of the following inputs: TV channels, Video, Component, HDMI or PC. 2 Press V/v to highlight P&P or PIP, ...PIP (depends on the mode you to change the window size. To Change the Window Size of External Inputs (see page 16). P&P (picture and picture) provides two windows side by pressing V/v/B/b.) To Display the Sub Window 1 Press OPTIONS to display the OPTIONS menu while watching one of ...
PIP (picture in picture) provides PC input signal and TV channels. ~ • The VHF/UHF/CABLE input must be moved by side. P&P Main window Sub window PIP Main window (PC) Sub window (Location of the following inputs: TV channels, Video, Component, HDMI or PC. 2 Press V/v to highlight P&P or PIP, ...PIP (depends on the mode you to change the window size. To Change the Window Size of External Inputs (see page 16). P&P (picture and picture) provides two windows side by pressing V/v/B/b.) To Display the Sub Window 1 Press OPTIONS to display the OPTIONS menu while watching one of ...
Operating Instructions
Page 33
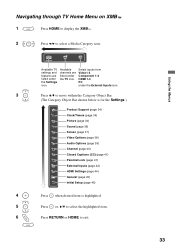
...the TV icon. Select inputs from Video1-3 Component 1-2 HDMI 1-3 PC under the Settings icon. Available channels are listed under the External Inputs icon. 3 Press V/v to move within the Category Object Bar. (The Category Object Bar shown below is for the Settings.) Product Support (page 34) Clock/Timers (page 34) Picture (... is highlighted. 5 Press or, V/v to select the highlighted item. 6 Press RETURN or HOME to select a Media Category icon. Using the Menus Navigating through TV Home Menu on XMB™ 1 Press HOME to display the XMB™. 2 Press B/b to exit. 33
...the TV icon. Select inputs from Video1-3 Component 1-2 HDMI 1-3 PC under the Settings icon. Available channels are listed under the External Inputs icon. 3 Press V/v to move within the Category Object Bar. (The Category Object Bar shown below is for the Settings.) Product Support (page 34) Clock/Timers (page 34) Picture (... is highlighted. 5 Press or, V/v to select the highlighted item. 6 Press RETURN or HOME to select a Media Category icon. Using the Menus Navigating through TV Home Menu on XMB™ 1 Press HOME to display the XMB™. 2 Press B/b to exit. 33
Operating Instructions
Page 34
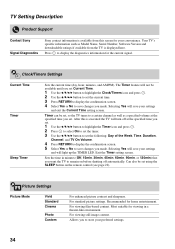
... Product Support Contact Sony Signal Diagnostics Sony contact information is available from the TV is executed the TV will not be set . Press to store your convenience. Selecting Yes will light up the TIMER LED. Selecting Yes will save ...After this screen for your preferred settings. 34 Exit the Timer setting screen. Your TV's specific information such as a specified volume at the specified time you made . Picture Settings Picture Mode Vivid Standard Cinema Photo Custom For enhanced picture contrast and sharpness. Most suitable for viewing in minutes (Off, 15min, 30min, ...
... Product Support Contact Sony Signal Diagnostics Sony contact information is available from the TV is executed the TV will not be set . Press to store your convenience. Selecting Yes will light up the TIMER LED. Selecting Yes will save ...After this screen for your preferred settings. 34 Exit the Timer setting screen. Your TV's specific information such as a specified volume at the specified time you made . Picture Settings Picture Mode Vivid Standard Cinema Photo Custom For enhanced picture contrast and sharpness. Most suitable for viewing in minutes (Off, 15min, 30min, ...
Operating Instructions
Page 35
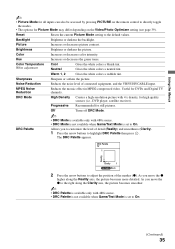
...neutral tint. DRC Mode High Density Creates a high-resolution picture with 4 x density, for still pictures. Backlight Brightens or darkens the backlight. Color Temperature White adjustment Cool Neutral Gives the white colors a bluish tint. DRC Palette TV 1 Reality Clarity 1 RETURN Back 2 Press the arrow ... to highlight DRC Palette then press . Hue Increases or decreases the green tones. Sharpness Sharpens or softens the picture. Useful for DVDs and Digital TV channels. As you to customize the level of detail (Reality) and smoothness (Clarity). 1 Press the arrow ...
...neutral tint. DRC Mode High Density Creates a high-resolution picture with 4 x density, for still pictures. Backlight Brightens or darkens the backlight. Color Temperature White adjustment Cool Neutral Gives the white colors a bluish tint. DRC Palette TV 1 Reality Clarity 1 RETURN Back 2 Press the arrow ... to highlight DRC Palette then press . Hue Increases or decreases the green tones. Sharpness Sharpens or softens the picture. Useful for DVDs and Digital TV channels. As you to customize the level of detail (Reality) and smoothness (Clarity). 1 Press the arrow ...


