Operating Instructions
Page 1
3-297-694-16(1) LCD Digital Color TV Operating Instructions KDL-32XBR6 KDL-40V4100 KDL-40W4100 KDL-37XBR6 KDL-42V4100 KDL-46W4100 KDL-40V4150 KDL-46V4100 KDL-52W4100 KDL-52V4100 KDL-46W4150 © 2008 Sony Corporation
3-297-694-16(1) LCD Digital Color TV Operating Instructions KDL-32XBR6 KDL-40V4100 KDL-40W4100 KDL-37XBR6 KDL-42V4100 KDL-46W4100 KDL-40V4150 KDL-46V4100 KDL-52W4100 KDL-52V4100 KDL-46W4150 © 2008 Sony Corporation
Operating Instructions
Page 2
... KDL-40V4100 KDL-40W4100 KDL-42V4100 KDL-46V4100 KDL-46W4100 KDL-46W4150 KDL-52V4100 KDL-52W4100 Sony Wall-Mount Bracket Model No. SU-WL500 Sony TV - NOTIFICATION This equipment has been tested and found to Part 15 of Apple Inc., registered in..."Dolby" and the double-D symbol are trademarks or registered trademarks of its subsidiaries. Sony TV Model No. However, there is a trademark of Dolby Laboratories. s Consult the dealer or an experienced radio/ TV technician for installing the specified TV. "BRAVIA" and , S-Force, Motionflow, BRAVIA Sync, , DMex and "x.v. ...
... KDL-40V4100 KDL-40W4100 KDL-42V4100 KDL-46V4100 KDL-46W4100 KDL-46W4150 KDL-52V4100 KDL-52W4100 Sony Wall-Mount Bracket Model No. SU-WL500 Sony TV - NOTIFICATION This equipment has been tested and found to Part 15 of Apple Inc., registered in..."Dolby" and the double-D symbol are trademarks or registered trademarks of its subsidiaries. Sony TV Model No. However, there is a trademark of Dolby Laboratories. s Consult the dealer or an experienced radio/ TV technician for installing the specified TV. "BRAVIA" and , S-Force, Motionflow, BRAVIA Sync, , DMex and "x.v. ...
Operating Instructions
Page 3
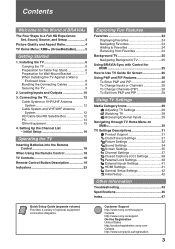
...equipment connection diagrams. Customer Support http://www.sony.com/tvsupport Canada http://www.sony.ca/support On-line Registration United States http://productregistration.sony.com Canada http://www.sonystyle.ca/registration 3 Installing the TV 6 Carrying the TV 6 Preparation for Table-Top Stand 6 ...Lock Settings 38 External Inputs Settings 41 HDMI Settings 41 General Setup Settings 42 Initial Setup 42 Other Information Troubleshooting 43 Specifications 46 Index 47 Quick Setup Guide (separate volume) Provides a variety of BRAVIA® The Four Steps to a Full HD Experience...
...equipment connection diagrams. Customer Support http://www.sony.com/tvsupport Canada http://www.sony.ca/support On-line Registration United States http://productregistration.sony.com Canada http://www.sonystyle.ca/registration 3 Installing the TV 6 Carrying the TV 6 Preparation for Table-Top Stand 6 ...Lock Settings 38 External Inputs Settings 41 HDMI Settings 41 General Setup Settings 42 Initial Setup 42 Other Information Troubleshooting 43 Specifications 46 Index 47 Quick Setup Guide (separate volume) Provides a variety of BRAVIA® The Four Steps to a Full HD Experience...

Operating Instructions
Page 4
... and Aspect Ratio You can use the Wide Mode function of the TV to adjust the 4:3 image to fit the entire screen (see black bars on the sides. The 16:9 fills your cable or satellite provider for purchasing this Sony BRAVIA® high-definition television. The picture quality may not be... as sharp as the quality of the signal it receives. Your BRAVIA TV can receive and display HD programming from 1080 HD signals. The Quick Setup ...
... and Aspect Ratio You can use the Wide Mode function of the TV to adjust the 4:3 image to fit the entire screen (see black bars on the sides. The 16:9 fills your cable or satellite provider for purchasing this Sony BRAVIA® high-definition television. The picture quality may not be... as sharp as the quality of the signal it receives. Your BRAVIA TV can receive and display HD programming from 1080 HD signals. The Quick Setup ...
Operating Instructions
Page 5
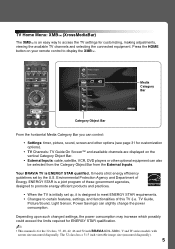
...promote energy efficient products and practices. • When the TV is initially set by the U.S. ENERGY STAR is a joint...TV Channels: TV Guide On Screen™ and available channels are displayed on your remote control to access the TV settings for customizing, making adjustments, viewing the available TV...BRAVIA TV is ENERGY STAR qualified. TV Home Menu: XMB™ (XrossMediaBar) The XMB™ is an easy way to display the XMB™. TV ... Category Bar TV From the horizontal Media Category Bar you ...Environmental Protection Agency and Department of this TV (i.e. Press the HOME button on ...
...promote energy efficient products and practices. • When the TV is initially set by the U.S. ENERGY STAR is a joint...TV Channels: TV Guide On Screen™ and available channels are displayed on your remote control to access the TV settings for customizing, making adjustments, viewing the available TV...BRAVIA TV is ENERGY STAR qualified. TV Home Menu: XMB™ (XrossMediaBar) The XMB™ is an easy way to display the XMB™. TV ... Category Bar TV From the horizontal Media Category Bar you ...Environmental Protection Agency and Department of this TV (i.e. Press the HOME button on ...
Operating Instructions
Page 6
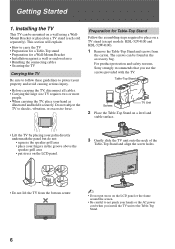
...not: • squeeze the speaker grill area • place your fingers in the accessory bag. Installing the TV This TV can be mounted on a wall using a WallMount Bracket or placed on the LCD panel or the frame around the screen. • Be careful to the Table-Top Stand. 6 The ... • How to carry the TV • Preparation for a Table-Top stand • Preparation for Table-Top Stand Follow the assembling steps required to shocks, vibration, or excessive force. For product protection and safety reasons, Sony strongly recommends that you install the TV unit to not pinch your hand ...
...not: • squeeze the speaker grill area • place your fingers in the accessory bag. Installing the TV This TV can be mounted on a wall using a WallMount Bracket or placed on the LCD panel or the frame around the screen. • Be careful to the Table-Top Stand. 6 The ... • How to carry the TV • Preparation for a Table-Top stand • Preparation for Table-Top Stand Follow the assembling steps required to shocks, vibration, or excessive force. For product protection and safety reasons, Sony strongly recommends that you install the TV unit to not pinch your hand ...
Operating Instructions
Page 7
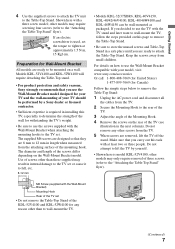
... at approximately 1.5 N·m, 15 Kgf·cm. Use of the Mounting Hook. 4 Remove the screws on a wall. Do not attempt to lift the TV by a Sony dealer or licensed contractor. • Sufficient expertise is required in installing this page to remove the Table-Top Stand. • Be sure to store the ...-52V4100 and KDL-52W4100 for Wall-Mount Bracket All models are removed, lift the TV off the stand. If you use the Wall-Mount Bracket model designed for your TV and the wall-mounting of your model, visit www.sony.com/accessories Or call 1-800-488-7669 (for United States) 1-877-899-7669...
... at approximately 1.5 N·m, 15 Kgf·cm. Use of the Mounting Hook. 4 Remove the screws on a wall. Do not attempt to lift the TV by a Sony dealer or licensed contractor. • Sufficient expertise is required in installing this page to remove the Table-Top Stand. • Be sure to store the ...-52V4100 and KDL-52W4100 for Wall-Mount Bracket All models are removed, lift the TV off the stand. If you use the Wall-Mount Bracket model designed for your TV and the wall-mounting of your model, visit www.sony.com/accessories Or call 1-800-488-7669 (for United States) 1-877-899-7669...
Operating Instructions
Page 8
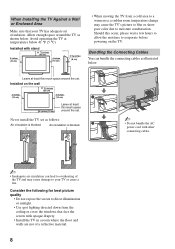
...inches (30 cm) 4 inches (10 cm) 4 inches (10 cm) 2 3/8 inches (6 cm) • When moving the TV from the ceiling or cover the windows that your TV or cause a fire. Bundling the Connecting Cables You can lead to overheating of a reflective material. 8 Leave at temperatures below . ...8226; Inadequate air circulation can bundle the connecting cables as shown below 41 °F (5 °C). Avoid operating the TV at least this much space around the TV as illustrated below. Consider the following for best picture quality • Do not expose the screen to evaporate before ...
...inches (30 cm) 4 inches (10 cm) 4 inches (10 cm) 2 3/8 inches (6 cm) • When moving the TV from the ceiling or cover the windows that your TV or cause a fire. Bundling the Connecting Cables You can lead to overheating of a reflective material. 8 Leave at temperatures below . ...8226; Inadequate air circulation can bundle the connecting cables as shown below 41 °F (5 °C). Avoid operating the TV at least this much space around the TV as illustrated below. Consider the following for best picture quality • Do not expose the screen to evaporate before ...
Operating Instructions
Page 9
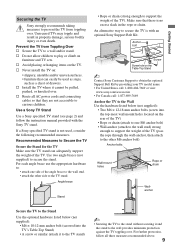
... follow all AC power cords and connecting cables so that can adequately support the weight of the TV). Getting Started Securing the TV Sony strongly recommends taking measures to prevent the TV from Toppling Over s Secure the TV to a wall and/or stand. s Do not allow children to secure the stand. s Route all three measures...
... follow all AC power cords and connecting cables so that can adequately support the weight of the TV). Getting Started Securing the TV Sony strongly recommends taking measures to prevent the TV from Toppling Over s Secure the TV to a wall and/or stand. s Do not allow children to secure the stand. s Route all three measures...
Operating Instructions
Page 10
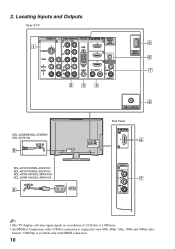
2. Locating Inputs and Outputs Rear of TV VIDEO IN 1 3 1 S VIDEO VIDEO L (MONO) AUDIO R COMPONENT IN PC IN 1 2 Y RGB PB IN DIGITAL 1 AUDIO OUT (OPTICAL) 3 PR L AUDIO R AUDIO (1080p/1080i/720p/480p/480i) 4 ...-46V4100/KDL-52V4100/ KDL-40W4100/KDL-46W4100/ KDL-52W4100/KDL-46W4150 9 AC IN CABLE / ANTENNA 8 Side Panel IN 4 2 VIDEO IN 2 VIDEO L (MONO) AUDIO R 1 ~ • This TV displays all video input signals in a resolution of 1,920 dots × 1,080 lines. • An HDMI or Component video (YPBPR) connection is required to view...
2. Locating Inputs and Outputs Rear of TV VIDEO IN 1 3 1 S VIDEO VIDEO L (MONO) AUDIO R COMPONENT IN PC IN 1 2 Y RGB PB IN DIGITAL 1 AUDIO OUT (OPTICAL) 3 PR L AUDIO R AUDIO (1080p/1080i/720p/480p/480i) 4 ...-46V4100/KDL-52V4100/ KDL-40W4100/KDL-46W4100/ KDL-52W4100/KDL-46W4150 9 AC IN CABLE / ANTENNA 8 Side Panel IN 4 2 VIDEO IN 2 VIDEO L (MONO) AUDIO R 1 ~ • This TV displays all video input signals in a resolution of 1,920 dots × 1,080 lines. • An HDMI or Component video (YPBPR) connection is required to view...
Operating Instructions
Page 11
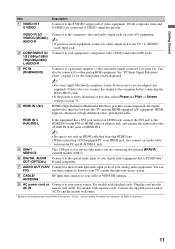
If this TV and any HDMI-equipped A/V equipment. HDMI IN 4 R-AUDIO-L If the equipment has a DVI jack and not an HDMI jack,...before connecting the HD15-HD15 cable. • If the picture is PCM/Dolby* OUT (OPTICAL) Digital compatible. 7 AUDIO OUT (VAR/ Connects to the TV's L (MONO) audio input jack. This USB port is for the signals that bears the HDMI logo. • When connecting a DVI-equipped PC ...8226; If you are connecting the optional BRAVIA external module (DMex). 6 DIGITAL AUDIO Connects to use these outputs to listen to your TV's audio through your analog audio equipment.
If this TV and any HDMI-equipped A/V equipment. HDMI IN 4 R-AUDIO-L If the equipment has a DVI jack and not an HDMI jack,...before connecting the HD15-HD15 cable. • If the picture is PCM/Dolby* OUT (OPTICAL) Digital compatible. 7 AUDIO OUT (VAR/ Connects to the TV's L (MONO) audio input jack. This USB port is for the signals that bears the HDMI logo. • When connecting a DVI-equipped PC ...8226; If you are connecting the optional BRAVIA external module (DMex). 6 DIGITAL AUDIO Connects to use these outputs to listen to your TV's audio through your analog audio equipment.
Operating Instructions
Page 12
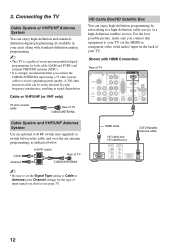
... be easily affected by subscribing to switch between the cable and over-the-air antenna programming, as indicated below. Connecting the TV Cable System or VHF/UHF Antenna System You can enjoy high-definition programming by radio frequency interference, resulting in your area)... along with standard-definition analog programming. ~ • This TV is strongly recommended that you connect this equipment to receive optimum picture quality. 3. Cable or VHF/UHF (or VHF only) 75-ohm...
... be easily affected by subscribing to switch between the cable and over-the-air antenna programming, as indicated below. Connecting the TV Cable System or VHF/UHF Antenna System You can enjoy high-definition programming by radio frequency interference, resulting in your area)... along with standard-definition analog programming. ~ • This TV is strongly recommended that you connect this equipment to receive optimum picture quality. 3. Cable or VHF/UHF (or VHF only) 75-ohm...
Operating Instructions
Page 13
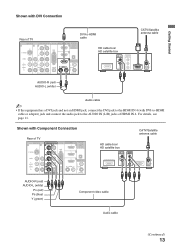
Shown with DVI-to-HDMI cable or adapter) jack and connect the audio jack to the AUDIO IN (L/R) jacks of TV VIDEO IN 1 3 S VIDEO VIDEO L (MONO) AUDIO R COMPONENT IN PC IN 1 2 Y RGB PB IN DIGITAL 1 AUDIO OUT (OPTICAL) 3 PR L AUDIO R AUDIO (1080p/1080i/...) Y (green) Component video cable CATV/Satellite antenna cable Audio cable (Continued) 13 For details, see page 11. Getting Started Shown with DVI Connection Rear of TV VIDEO IN 1 3 S VIDEO VIDEO L (MONO) AUDIO R DVI-to-HDMI cable COMPONENT IN PC IN 1 2 Y RGB PB IN DIGITAL 1 AUDIO OUT (OPTICAL) 3 PR L ...
Shown with DVI-to-HDMI cable or adapter) jack and connect the audio jack to the AUDIO IN (L/R) jacks of TV VIDEO IN 1 3 S VIDEO VIDEO L (MONO) AUDIO R COMPONENT IN PC IN 1 2 Y RGB PB IN DIGITAL 1 AUDIO OUT (OPTICAL) 3 PR L AUDIO R AUDIO (1080p/1080i/...) Y (green) Component video cable CATV/Satellite antenna cable Audio cable (Continued) 13 For details, see page 11. Getting Started Shown with DVI Connection Rear of TV VIDEO IN 1 3 S VIDEO VIDEO L (MONO) AUDIO R DVI-to-HDMI cable COMPONENT IN PC IN 1 2 Y RGB PB IN DIGITAL 1 AUDIO OUT (OPTICAL) 3 PR L ...
Operating Instructions
Page 14
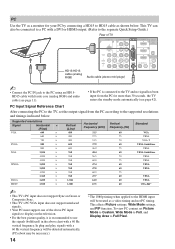
... PC for your PC by connecting a HD15 to Full Pixel. PC Use the TV as a monitor for more than 30 seconds, the TV enters the standby mode automatically (see page 11). • If the PC is...the supported resolutions and timings indicated below . PC Input Signal Reference Chart After connecting the PC to the TV, set Picture Mode to Custom, Wide Mode to Full, and Display Area to HD15 cable as a video...400 600 600 768 768 768 768 768 768 768 1,024 1,080 Horizontal frequency (kHz) 31.5 37.5 31.5 37.9 46.9 48.4 56.5 60.0 47.4 47.8 60.3 47.7 64.0 67.5 Vertical frequency (Hz) 60 75 70 60 75 ...
... PC for your PC by connecting a HD15 to Full Pixel. PC Use the TV as a monitor for more than 30 seconds, the TV enters the standby mode automatically (see page 11). • If the PC is...the supported resolutions and timings indicated below . PC Input Signal Reference Chart After connecting the PC to the TV, set Picture Mode to Custom, Wide Mode to Full, and Display Area to HD15 cable as a video...400 600 600 768 768 768 768 768 768 768 1,024 1,080 Horizontal frequency (kHz) 31.5 37.5 31.5 37.9 46.9 48.4 56.5 60.0 47.4 47.8 60.3 47.7 64.0 67.5 Vertical frequency (Hz) 60 75 70 60 75 ...

Operating Instructions
Page 15
Getting Started Other Equipment Personal computer Blu-ray Disc Player/ "PS3" Digital DVD satellite player receiver Digital cable box Audio system Rear of TV VIDEO IN 1 3 S VIDEO VIDEO L (MONO) AUDIO R COMPONENT IN PC IN 1 2 Y RGB PB IN DIGITAL 1 AUDIO OUT (OPTICAL) 3 PR L AUDIO R AUDIO (1080p/1080i/720p/480p/480i) 4 ... Digital recorder Analog Digital audio audio equipment equipment (A/V Receiver/Home Theater) ~ • Refer to the Quick Setup Guide (supplied) when connecting other equipment to your TV. Camcorder 15
Getting Started Other Equipment Personal computer Blu-ray Disc Player/ "PS3" Digital DVD satellite player receiver Digital cable box Audio system Rear of TV VIDEO IN 1 3 S VIDEO VIDEO L (MONO) AUDIO R COMPONENT IN PC IN 1 2 Y RGB PB IN DIGITAL 1 AUDIO OUT (OPTICAL) 3 PR L AUDIO R AUDIO (1080p/1080i/720p/480p/480i) 4 ... Digital recorder Analog Digital audio audio equipment equipment (A/V Receiver/Home Theater) ~ • Refer to the Quick Setup Guide (supplied) when connecting other equipment to your TV. Camcorder 15
Operating Instructions
Page 16
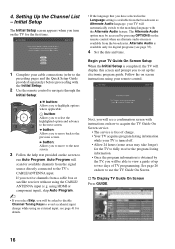
...the Language setting is complete. 4. Setting Up the Channel List - Highlight a choice and press to begin the TV Guide setup. If you to move back to the TV's CABLE/ANTENNA input. b button: Allows you receive channels from the signal source directly connected to the previous screen.... s To Display TV Guide On Screen Press GUIDE. 16 using an external input; This TV features an electronic program guide. Language settings will scan for the first time. The Alternate Audio option ...
...the Language setting is complete. 4. Setting Up the Channel List - Highlight a choice and press to begin the TV Guide setup. If you to move back to the TV's CABLE/ANTENNA input. b button: Allows you receive channels from the signal source directly connected to the previous screen.... s To Display TV Guide On Screen Press GUIDE. 16 using an external input; This TV features an electronic program guide. Language settings will scan for the first time. The Alternate Audio option ...
Operating Instructions
Page 17
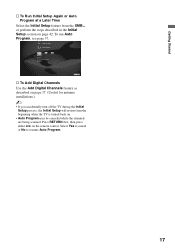
... canceled while the channels are being scanned. Select Yes to cancel or No to resume Auto Program. 17 HDMI Settings General Setup Settings Initial Setup TV s To Add Digital Channels Use the Add Digital Channels feature as described on page 37. (Useful for antenna installations.) ~ • If you ...accidentally turn off the TV during the Initial Setup process, the Initial Setup will restart from the XMB™ or perform the steps described in the Initial Setup section on...
... canceled while the channels are being scanned. Select Yes to cancel or No to resume Auto Program. 17 HDMI Settings General Setup Settings Initial Setup TV s To Add Digital Channels Use the Add Digital Channels feature as described on page 37. (Useful for antenna installations.) ~ • If you ...accidentally turn off the TV during the Initial Setup process, the Initial Setup will restart from the XMB™ or perform the steps described in the Initial Setup section on...

Operating Instructions
Page 18
...Push to open When Using the Remote Control Follow the guidelines below • Point your remote control directly at the IR sensor located on your TV. • Make sure that they are blocking the path between the remote control and the IR sensor on the batteries to the diagram inside ...the battery compartment of the TV operate the same as the corresponding buttons on the next page. 18 TV Controls The buttons located on the top of the remote control. Operating the TV Inserting Batteries into the Remote Control Insert two size AA batteries (...
...Push to open When Using the Remote Control Follow the guidelines below • Point your remote control directly at the IR sensor located on your TV. • Make sure that they are blocking the path between the remote control and the IR sensor on the batteries to the diagram inside ...the battery compartment of the TV operate the same as the corresponding buttons on the next page. 18 TV Controls The buttons located on the top of the remote control. Operating the TV Inserting Batteries into the Remote Control Insert two size AA batteries (...
Operating Instructions
Page 19
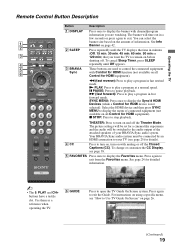
... HDMI equipment). Select the HDMI device and then press SYNC MENU to display the menu of connected equipment (not available on the amount of your TV (see page 38. 5 FAVORITES Press once to control the connected equipment 6 Sync with Control for HDMI function (not available on all Control for ... system must be connected by an HDMI connection to your BRAVIA Sync audio system. For instructions on using a specific menu, see "How to Use TV Guide On Screen" on with muting or off the Closed Captions (CC). SYNC MENU: Press once to exit the Guide. Press again to display ...
... HDMI equipment). Select the HDMI device and then press SYNC MENU to display the menu of connected equipment (not available on the amount of your TV (see page 38. 5 FAVORITES Press once to control the connected equipment 6 Sync with Control for HDMI function (not available on all Control for ... system must be connected by an HDMI connection to your BRAVIA Sync audio system. For instructions on using a specific menu, see "How to Use TV Guide On Screen" on with muting or off the Closed Captions (CC). SYNC MENU: Press once to exit the Guide. Press again to display ...

Operating Instructions
Page 20
.... For example, to mute the sound. qd MUTING Press to enter 2.1, press 2 , , 1 and ENT. 9 qs VOL +/- See your dealer or www.sony.com/bravia for more information. Button 7 RETURN 8 HOME qf Description Press to go back to adjust the volume. Press to the previous screen or exit...the screen with the frozen image. qj V/v/B/b Press V/v/B/b to move the small window showing qd current program to access the TV Home Menu items such as the TV Settings, TV channels and External Inputs list (see pages 5 and 29). Press to access features in all regions. Product Support Clock/...
.... For example, to mute the sound. qd MUTING Press to enter 2.1, press 2 , , 1 and ENT. 9 qs VOL +/- See your dealer or www.sony.com/bravia for more information. Button 7 RETURN 8 HOME qf Description Press to go back to adjust the volume. Press to the previous screen or exit...the screen with the frozen image. qj V/v/B/b Press V/v/B/b to move the small window showing qd current program to access the TV Home Menu items such as the TV Settings, TV channels and External Inputs list (see pages 5 and 29). Press to access features in all regions. Product Support Clock/...


