Operating Instructions
Page 3
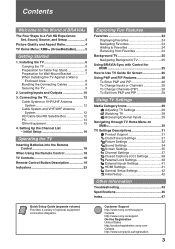
... 29 Navigating through TV Home Menu on XMB 30 TV Settings Descriptions 31 Product Support 31 Clock/Timers Settings 31 Picture Settings 32 Sound Settings 34 Screen Settings 35 Channel Settings 37 CC Closed Captions (CC) Settings 38 Parental Lock Settings 38 External Inputs Settings 41 HDMI Settings 41 General Setup Settings 42 Initial Setup 42 Other Information Troubleshooting 43 Specifications 46 Index 47...
... 29 Navigating through TV Home Menu on XMB 30 TV Settings Descriptions 31 Product Support 31 Clock/Timers Settings 31 Picture Settings 32 Sound Settings 34 Screen Settings 35 Channel Settings 37 CC Closed Captions (CC) Settings 38 Parental Lock Settings 38 External Inputs Settings 41 HDMI Settings 41 General Setup Settings 42 Initial Setup 42 Other Information Troubleshooting 43 Specifications 46 Index 47...

Operating Instructions
Page 4
...sony.com/HDTV Canada http://www.sonystyle.ca/hd The Four Steps to a Full HD Experience: Set, Sound, Source, and Setup Along with different aspect ratios (the width-to-height ratio of the image). The Quick Setup Guide, enclosed separately, illustrates how to connect other HD compatible external equipment Contact your BRAVIA TV... learn more about HDTV, visit: U.S.A. The 16:9 fills your new BRAVIA TV, you will notice a big difference. High-definition and standard-definition signals are transmitted with your BRAVIA TV set, a complete HD system requires an HD sound system, a source of HD...
...sony.com/HDTV Canada http://www.sonystyle.ca/hd The Four Steps to a Full HD Experience: Set, Sound, Source, and Setup Along with different aspect ratios (the width-to-height ratio of the image). The Quick Setup Guide, enclosed separately, illustrates how to connect other HD compatible external equipment Contact your BRAVIA TV... learn more about HDTV, visit: U.S.A. The 16:9 fills your new BRAVIA TV, you will notice a big difference. High-definition and standard-definition signals are transmitted with your BRAVIA TV set, a complete HD system requires an HD sound system, a source of HD...
Operating Instructions
Page 5
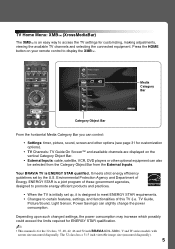
...designed to promote energy efficient products and practices. • When the TV is initially set by the U.S. TV Home Menu: XMB™ (XrossMediaBar) The XMB™ is an easy way to access the TV settings for the 32 class, 37, 40, 42, 46 and 52 inch BRAVIA KDL-XBR6, V and W series models with... screen size measured diagonally. It meets strict energy efficiency guidelines set up, it is designed to meet ENERGY STAR requirements. •...
...designed to promote energy efficient products and practices. • When the TV is initially set by the U.S. TV Home Menu: XMB™ (XrossMediaBar) The XMB™ is an easy way to access the TV settings for the 32 class, 37, 40, 42, 46 and 52 inch BRAVIA KDL-XBR6, V and W series models with... screen size measured diagonally. It meets strict energy efficiency guidelines set up, it is designed to meet ENERGY STAR requirements. •...
Operating Instructions
Page 7
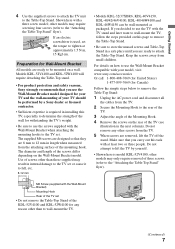
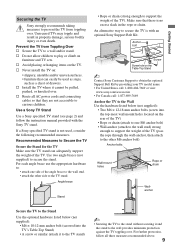
...; For product protection and safety reasons, Sony strongly recommends that they are 8 mm to 12 mm in installing this TV, especially to be wall-mounted as packaged. M6 Screw (supplied with the Wall-Mount Bracket when attaching the mounting hooks to the TV set • Do not remove the Table-... Be sure to tighten at least two or three people. Use of the TV set . The diameter and length of the mounting hook. Getting Started 4 Use the supplied screws to attach the TV unit to lift the TV by a Sony dealer or licensed contractor. • Sufficient expertise is required in length when ...
...; For product protection and safety reasons, Sony strongly recommends that they are 8 mm to 12 mm in installing this TV, especially to be wall-mounted as packaged. M6 Screw (supplied with the Wall-Mount Bracket when attaching the mounting hooks to the TV set • Do not remove the Table-... Be sure to tighten at least two or three people. Use of the TV set . The diameter and length of the mounting hook. Getting Started 4 Use the supplied screws to attach the TV unit to lift the TV by a Sony dealer or licensed contractor. • Sufficient expertise is required in length when ...
Operating Instructions
Page 8
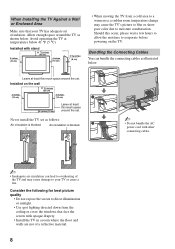
... air circulation can bundle the connecting cables as illustrated below . Allow enough space around the set as shown below . Never install the TV set . Consider the following for best picture quality • Do not expose the screen to your TV has adequate air circulation. Installed with stand 11 7/8 inches (30 cm) 4 inches (10 cm...
... air circulation can bundle the connecting cables as illustrated below . Allow enough space around the set as shown below . Never install the TV set . Consider the following for best picture quality • Do not expose the screen to your TV has adequate air circulation. Installed with stand 11 7/8 inches (30 cm) 4 inches (10 cm...
Operating Instructions
Page 9
...-7669 or visit: www.sony.com/accessories • For Canada call: 1-877-899-7669 Anchor the TV to the Wall Use the hardware listed below (not supplied): • M6 × 10-12 mm anchor bolt (screwed into the top-most wall-mount holes located on furniture and TV sets. s Do not allow ...children to play or climb on the rear of the TV) • Rope or chain (attach to one side of the TV). Use two angle braces (not supplied) to secure the TV is with the Sony TV stand. s Route all three measures recommended ...
...-7669 or visit: www.sony.com/accessories • For Canada call: 1-877-899-7669 Anchor the TV to the Wall Use the hardware listed below (not supplied): • M6 × 10-12 mm anchor bolt (screwed into the top-most wall-mount holes located on furniture and TV sets. s Do not allow ...children to play or climb on the rear of the TV) • Rope or chain (attach to one side of the TV). Use two angle braces (not supplied) to secure the TV is with the Sony TV stand. s Route all three measures recommended ...
Operating Instructions
Page 11
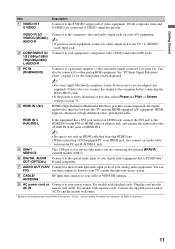
...• When connecting a DVI-equipped PC to an HDMI jack, also connect an Audio cable between this is the case, connect the adapter to the TV's L (MONO) audio input jack. Connects to your analog audio equipment. HDMI supports enhanced, or high-definition video, plus digital audio. HDMI (High-...into the AC IN nearest wall outlet. "Dolby" and the double-D symbol are trademarks of Screen settings on page 36. Can also be necessary to use these outputs to listen to your TV's audio through your power source. For models with separate cords: Connect the supplied power cord to...
...• When connecting a DVI-equipped PC to an HDMI jack, also connect an Audio cable between this is the case, connect the adapter to the TV's L (MONO) audio input jack. Connects to your analog audio equipment. HDMI supports enhanced, or high-definition video, plus digital audio. HDMI (High-...into the AC IN nearest wall outlet. "Dolby" and the double-D symbol are trademarks of Screen settings on page 36. Can also be necessary to use these outputs to listen to your TV's audio through your power source. For models with separate cords: Connect the supplied power cord to...
Operating Instructions
Page 12
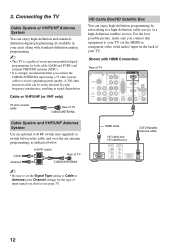
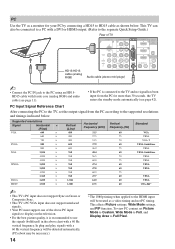
... over-the-air antenna programming, as indicated below. 3. Cable Antenna A-B RF switch A Rear of TV B CABLE/ANTENNA ~ • Be sure to set the Signal Type setting to Cable or Antenna in your TV. HDMI cable HD cable box/ HD satellite box CATV/Satellite antenna cable 12 For the best possible ... 300-ohm twin lead cable can enjoy high-definition and standarddefinition digital programming (if available in the Channel settings for the type of input signal you connect this equipment to your TV via the HDMI or component video (with audio) input on the back of your area) along with ...
... over-the-air antenna programming, as indicated below. 3. Cable Antenna A-B RF switch A Rear of TV B CABLE/ANTENNA ~ • Be sure to set the Signal Type setting to Cable or Antenna in your TV. HDMI cable HD cable box/ HD satellite box CATV/Satellite antenna cable 12 For the best possible ... 300-ohm twin lead cable can enjoy high-definition and standarddefinition digital programming (if available in the Channel settings for the type of input signal you connect this equipment to your TV via the HDMI or component video (with audio) input on the back of your area) along with ...
Operating Instructions
Page 14
... from the PC for your PC by connecting a HD15 to HD15 cable as a video timing and not PC timing. This affects Picture settings, Wide Mode settings, and PIP function. This TV can also be treated as shown below . Supported resolutions Signal VGA Horizontal × (Pixel) 640 × 640 × 720 × SVGA 800... 1,920 × Vertical (Line) 480 480 400 600 600 768 768 768 768 768 768 768 1,024 1,080 Horizontal frequency (kHz) 31.5 37.5 31.5 37.9 46.9 48.4 56.5 60.0 47.4 47.8 60.3 47.7 64.0 67.5 Vertical frequency (Hz) 60 75 70 60 75 60 70 75 60 60 75 60 60...
... from the PC for your PC by connecting a HD15 to HD15 cable as a video timing and not PC timing. This affects Picture settings, Wide Mode settings, and PIP function. This TV can also be treated as shown below . Supported resolutions Signal VGA Horizontal × (Pixel) 640 × 640 × 720 × SVGA 800... 1,920 × Vertical (Line) 480 480 400 600 600 768 768 768 768 768 768 768 1,024 1,080 Horizontal frequency (kHz) 31.5 37.5 31.5 37.9 46.9 48.4 56.5 60.0 47.4 47.8 60.3 47.7 64.0 67.5 Vertical frequency (Hz) 60 75 70 60 75 60 70 75 60 60 75 60 60...
Operating Instructions
Page 16
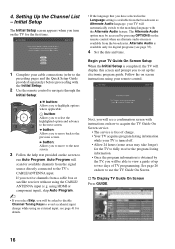
...is turned off. • Allow 24 hours (some areas may be accessed by the TV, you to view a guide of up the electronic program guide. Begin your remote control. Language settings will display this screen and prompt you receive channels from the broadcaster as default audio ... Auto Program. Follow the on the TV for digital channels. See page 26 on the screen to the TV's CABLE/ANTENNA input. b button: Allows you have selected in the Language setting is complete. 4. Initial Setup Step 1 of TV programming. see page 35). 4 Set the date and time. Select to ...
...is turned off. • Allow 24 hours (some areas may be accessed by the TV, you to view a guide of up the electronic program guide. Begin your remote control. Language settings will display this screen and prompt you receive channels from the broadcaster as default audio ... Auto Program. Follow the on the TV for digital channels. See page 26 on the screen to the TV's CABLE/ANTENNA input. b button: Allows you have selected in the Language setting is complete. 4. Initial Setup Step 1 of TV programming. see page 35). 4 Set the date and time. Select to ...
Operating Instructions
Page 17
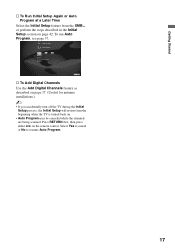
...resume Auto Program. 17 To run Auto Program, see page 37. Press RETURN first, then press either B/b on page 42. HDMI Settings General Setup Settings Initial Setup TV s To Add Digital Channels Use the Add Digital Channels feature as described on page 37. (Useful for antenna installations.) ~ •... If you accidentally turn off the TV during the Initial Setup process, the Initial Setup will restart from the XMB™ or ...
...resume Auto Program. 17 To run Auto Program, see page 37. Press RETURN first, then press either B/b on page 42. HDMI Settings General Setup Settings Initial Setup TV s To Add Digital Channels Use the Add Digital Channels feature as described on page 37. (Useful for antenna installations.) ~ •... If you accidentally turn off the TV during the Initial Setup process, the Initial Setup will restart from the XMB™ or ...
Operating Instructions
Page 19
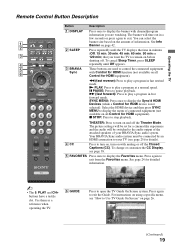
... as a reference when operating the TV. 6 GUIDE Press to exit from the Favorites menu. For instructions on using a specific menu, see "How to Use TV Guide On Screen" on with muting or off the Closed Captions (CC). The picture settings will be set for a cinema-like experience and the... audio will time out in fast forward mode. Operating the TV Remote Control Button Description Button Description 1 DISPLAY Press once to display the banner with ...
... as a reference when operating the TV. 6 GUIDE Press to exit from the Favorites menu. For instructions on using a specific menu, see "How to Use TV Guide On Screen" on with muting or off the Closed Captions (CC). The picture settings will be set for a cinema-like experience and the... audio will time out in fast forward mode. Operating the TV Remote Control Button Description Button Description 1 DISPLAY Press once to display the banner with ...

Operating Instructions
Page 20
See your dealer or www.sony.com/bravia for more information. Press ENT to change channels immediately. 8 qa Use with 0-9 and ENT to 0 restore the sound. Press again or press VOL + .... DMX-NV1). qd MUTING Press to display the list of External Inputs and TV mode. Press repeatedly to access the TV Home Menu items such as the TV Settings, TV channels and External Inputs list (see pages 5 and 29). Press to display the TV Home Menu/XMB™ to toggle through the inputs. ~ • See page...
See your dealer or www.sony.com/bravia for more information. Press ENT to change channels immediately. 8 qa Use with 0-9 and ENT to 0 restore the sound. Press again or press VOL + .... DMX-NV1). qd MUTING Press to display the list of External Inputs and TV mode. Press repeatedly to access the TV Home Menu items such as the TV Settings, TV channels and External Inputs list (see pages 5 and 29). Press to display the TV Home Menu/XMB™ to toggle through the inputs. ~ • See page...

Operating Instructions
Page 21
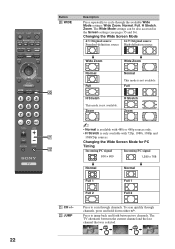
For details, see Picture settings on current input and content. Operating the TV Button Description qk OPTIONS Press to cycle through the available picture modes: Vivid, Standard, Cinema, Custom, PhotoVivid, Photo-Standard, Photo-Original, PhotoCustom, Video, Text. (... • The Digital Rating and Alternate Audio options will appear in Options only when digital ratings or alternate audio streams are available in the Picture settings. Press repeatedly to display a list of convenient functions and menu shortcuts. The OPTIONS menu items vary based on page 32. (Continued) 21
For details, see Picture settings on current input and content. Operating the TV Button Description qk OPTIONS Press to cycle through the available picture modes: Vivid, Standard, Cinema, Custom, PhotoVivid, Photo-Standard, Photo-Original, PhotoCustom, Video, Text. (... • The Digital Rating and Alternate Audio options will appear in Options only when digital ratings or alternate audio streams are available in the Picture settings. Press repeatedly to display a list of convenient functions and menu shortcuts. The OPTIONS menu items vary based on page 32. (Continued) 21
Operating Instructions
Page 22
...16:9 Original source Standard-definition source High-definition source m Wide Zoom m Wide Zoom Normal Normal This mode is not available. The TV alternates between two channels. Press to jump back and forth between the current channel and the last channel that was selected. JUMP ... +/- ws JUMP Press to cycle through the available Wide Mode settings: Wide Zoom, Normal, Full, H Stretch, Zoom. Full Full w; To scan quickly through channels. The Wide Mode settings can be also accessed in the Screen settings (see pages 35 and 36). Button w; WIDE Description Press ...
...16:9 Original source Standard-definition source High-definition source m Wide Zoom m Wide Zoom Normal Normal This mode is not available. The TV alternates between two channels. Press to jump back and forth between the current channel and the last channel that was selected. JUMP ... +/- ws JUMP Press to cycle through the available Wide Mode settings: Wide Zoom, Normal, Full, H Stretch, Zoom. Full Full w; To scan quickly through channels. The Wide Mode settings can be also accessed in the Screen settings (see pages 35 and 36). Button w; WIDE Description Press ...
Operating Instructions
Page 23
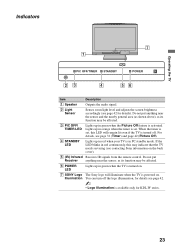
... (as shown above), as its function may indicate that the TV needs servicing (see contacting Sony information on . 7 SONY Logo Illumination The Sony logo will remain lit even if the TV is set , this may be affected. 6 POWER LED Lights up in red when your TV is available only for details). Do not put Receiver anything near...
... (as shown above), as its function may indicate that the TV needs servicing (see contacting Sony information on . 7 SONY Logo Illumination The Sony logo will remain lit even if the TV is set , this may be affected. 6 POWER LED Lights up in red when your TV is available only for details). Do not put Receiver anything near...
Operating Instructions
Page 24
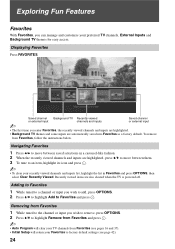
...are highlighted, press V/v to move between them. 3 To tune to factory default settings (see pages 16 and 37). • Initial Setup will clear your preferred TV channels, External Inputs and Background TV themes for easy access. Removing from Favorites 1 While tuned to the channel or ...42). 24 Exploring Fun Features Favorites With Favorites, you enter Favorites, the recently viewed channels and inputs are highlighted. • Background TV themes and some inputs are automatically saved into Favorites as a factory default. Navigating Favorites 1 Press B/b to move between saved selections ...
...are highlighted, press V/v to move between them. 3 To tune to factory default settings (see pages 16 and 37). • Initial Setup will clear your preferred TV channels, External Inputs and Background TV themes for easy access. Removing from Favorites 1 While tuned to the channel or ...42). 24 Exploring Fun Features Favorites With Favorites, you enter Favorites, the recently viewed channels and inputs are highlighted. • Background TV themes and some inputs are automatically saved into Favorites as a factory default. Navigating Favorites 1 Press B/b to move between saved selections ...
Operating Instructions
Page 25
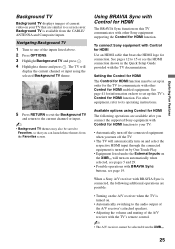
... Sync function on how to set up this TV communicates with other Sony equipment supporting the Control for HDMI enabled equipment. See page 41 for information on this TV's Control for HDMI function. For other Control for HDMI function. When a Sony A/V receiver with BRAVIA Sync is...the XMB™. 25 To connect Sony equipment with other equipment, refer to its operating instructions. Setting the Control for HDMI The Control for connection. Available options using the selected Background TV theme. 5 Press RETURN to exit the Background TV and return to the current channel or...
... Sync function on how to set up this TV communicates with other Sony equipment supporting the Control for HDMI enabled equipment. See page 41 for information on this TV's Control for HDMI function. For other Control for HDMI function. When a Sony A/V receiver with BRAVIA Sync is...the XMB™. 25 To connect Sony equipment with other equipment, refer to its operating instructions. Setting the Control for HDMI The Control for connection. Available options using the selected Background TV theme. 5 Press RETURN to exit the Background TV and return to the current channel or...
Operating Instructions
Page 27
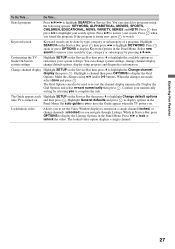
...for programs using V/v and/or 0-9 buttons. Lock/unlock video Allows you found the program. Press B/b to watch. Customizing the TV Guide On Screen system settings Highlight SETUP on and then press . The Guide appears each Highlight SETUP on the Service Bar then press v to highlight Change default... options time TV is airing now, press to lock or unlock the video. While in the Panel Menu. The locked video option...
...for programs using V/v and/or 0-9 buttons. Lock/unlock video Allows you found the program. Press B/b to watch. Customizing the TV Guide On Screen system settings Highlight SETUP on and then press . The Guide appears each Highlight SETUP on the Service Bar then press v to highlight Change default... options time TV is airing now, press to lock or unlock the video. While in the Panel Menu. The locked video option...
Operating Instructions
Page 29
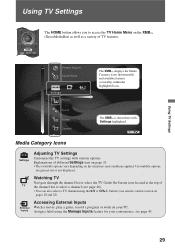
... situations and conditions applied. Inputs Assign a label using the 0-9 or CH+/- TV Media Category Icons Settings Adjusting TV Settings Customize the TV settings with Settings highlighted. Watching TV Navigate through the channel list or select the TV Guide On Screen icon located at the top of TV features. Using TV Settings The HOME button allows you to select a channel (see page 26...
... situations and conditions applied. Inputs Assign a label using the 0-9 or CH+/- TV Media Category Icons Settings Adjusting TV Settings Customize the TV settings with Settings highlighted. Watching TV Navigate through the channel list or select the TV Guide On Screen icon located at the top of TV features. Using TV Settings The HOME button allows you to select a channel (see page 26...


