Operating Instructions
Page 2
... Industries Alliance (www.eiae.org). In the United States, TV Guide and other data in the TV Guide On Screen system and cannot guarantee service availability in a particular installation. and/or one or more of the TV. and/or its related affiliates be fully inserted. Sony TV Model No. Telephone Number: 858-942-2230 This device...
... Industries Alliance (www.eiae.org). In the United States, TV Guide and other data in the TV Guide On Screen system and cannot guarantee service availability in a particular installation. and/or one or more of the TV. and/or its related affiliates be fully inserted. Sony TV Model No. Telephone Number: 858-942-2230 This device...
Operating Instructions
Page 3
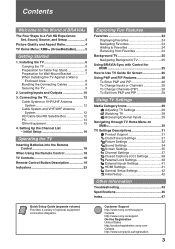
... Support http://www.sony.com/tvsupport Canada http://www.sony.ca/support On-line Registration United States http://productregistration.sony.com Canada http://www.sonystyle.ca/registration 3 Connecting the TV 12 Cable System ...TV Settings Descriptions 31 Product Support 31 Clock/Timers Settings 31 Picture Settings 32 Sound Settings 34 Screen Settings 35 Channel Settings 37 CC Closed Captions (CC) Settings 38 Parental Lock Settings 38 External Inputs Settings 41 HDMI Settings 41 General Setup Settings 42 Initial Setup 42 Other Information Troubleshooting 43 Specifications 46...
... Support http://www.sony.com/tvsupport Canada http://www.sony.ca/support On-line Registration United States http://productregistration.sony.com Canada http://www.sonystyle.ca/registration 3 Connecting the TV 12 Cable System ...TV Settings Descriptions 31 Product Support 31 Clock/Timers Settings 31 Picture Settings 32 Sound Settings 34 Screen Settings 35 Channel Settings 37 CC Closed Captions (CC) Settings 38 Parental Lock Settings 38 External Inputs Settings 41 HDMI Settings 41 General Setup Settings 42 Initial Setup 42 Other Information Troubleshooting 43 Specifications 46...

Operating Instructions
Page 4
...width-to-height ratio of the image). The picture quality may not be as sharp as the quality of the signal it receives. http://www.sony.com/HDTV Canada http://www.sonystyle.ca/hd The Four Steps to a Full HD Experience: Set, Sound, Source, and Setup Along with your BRAVIA... Most standard-definition signals use a boxy 4:3 aspect ratio. When you compare a high-definition signal to a standard analog signal, you will notice a big difference. Your BRAVIA TV can use a wide screen aspect ratio of the image you see page 12). To learn more about HDTV, visit: U.S.A. The 16:9 fills your BRAVIA...
...width-to-height ratio of the image). The picture quality may not be as sharp as the quality of the signal it receives. http://www.sony.com/HDTV Canada http://www.sonystyle.ca/hd The Four Steps to a Full HD Experience: Set, Sound, Source, and Setup Along with your BRAVIA... Most standard-definition signals use a boxy 4:3 aspect ratio. When you compare a high-definition signal to a standard analog signal, you will notice a big difference. Your BRAVIA TV can use a wide screen aspect ratio of the image you see page 12). To learn more about HDTV, visit: U.S.A. The 16:9 fills your BRAVIA...
Operating Instructions
Page 5
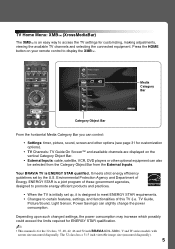
...• When the TV is initially set by the U.S. Environmental..., and functionalities of this TV (i.e. ENERGY STAR is ...TV Channels: TV Guide On Screen™ and available channels are displayed on your remote control to access the TV settings for customizing, making adjustments, viewing the available TV...TV is ENERGY STAR qualified. TV Home Menu: XMB™ (XrossMediaBar) The XMB™ is an easy way to display the XMB™. TV...Screen Channel Category Object Bar Media Category Bar TV From the horizontal Media Category Bar you can control: • Settings: timer, picture, sound, screen...
...• When the TV is initially set by the U.S. Environmental..., and functionalities of this TV (i.e. ENERGY STAR is ...TV Channels: TV Guide On Screen™ and available channels are displayed on your remote control to access the TV settings for customizing, making adjustments, viewing the available TV...TV is ENERGY STAR qualified. TV Home Menu: XMB™ (XrossMediaBar) The XMB™ is an easy way to display the XMB™. TV...Screen Channel Category Object Bar Media Category Bar TV From the horizontal Media Category Bar you can control: • Settings: timer, picture, sound, screen...
Operating Instructions
Page 6
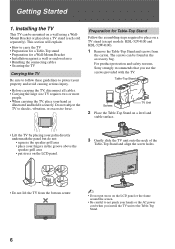
...Top Stand Follow the assembling steps required to the Table-Top Stand. 6 For product protection and safety reasons, Sony strongly recommends that you install the TV unit to place on a TV stand (except models: KDL-52V4100 and KDL-52W4100). 1 Remove the Table-Top Stand and screws from the ...bottom center. ~ • Do not put stress on a TV stand (each sold separately). Table-Top Stand Screws TV Unit 2 Place the Table-Top Stand on the LCD panel or the frame around the screen. • Be careful to shocks, vibration, or excessive force. Getting Started 1.
...Top Stand Follow the assembling steps required to the Table-Top Stand. 6 For product protection and safety reasons, Sony strongly recommends that you install the TV unit to place on a TV stand (except models: KDL-52V4100 and KDL-52W4100). 1 Remove the Table-Top Stand and screws from the ...bottom center. ~ • Do not put stress on a TV stand (each sold separately). Table-Top Stand Screws TV Unit 2 Place the Table-Top Stand on the LCD panel or the frame around the screen. • Be careful to shocks, vibration, or excessive force. Getting Started 1.
Operating Instructions
Page 8
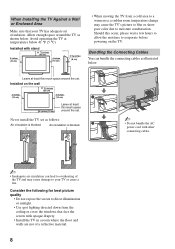
...) Leave at least this occur, please wait a few hours to allow the moisture to evaporate before powering on the TV. Consider the following for best picture quality • Do not expose the screen to direct illumination or sunlight. • Use spot lighting directed down from a cold area to a warm area,...below 41 °F (5 °C). When Installing the TV Against a Wall or Enclosed Area Make sure that face the screen with opaque drapery. • Install the TV in a room where the floor and walls are not of the TV and may cause the TV's picture to blur or show poor color due to ...
...) Leave at least this occur, please wait a few hours to allow the moisture to evaporate before powering on the TV. Consider the following for best picture quality • Do not expose the screen to direct illumination or sunlight. • Use spot lighting directed down from a cold area to a warm area,...below 41 °F (5 °C). When Installing the TV Against a Wall or Enclosed Area Make sure that face the screen with opaque drapery. • Install the TV in a room where the floor and walls are not of the TV and may cause the TV's picture to blur or show poor color due to ...
Operating Instructions
Page 11
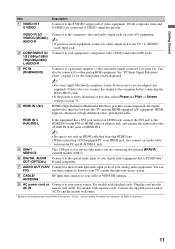
.... "Dolby" and the double-D symbol are connected, S VIDEO signal has priority. If both composite video and S VIDEO are trademarks of Screen settings on page 36. For models with attached cords: Plug the cord into the AC IN nearest wall outlet. For models with separate cords...connecting the HD15-HD15 cable. • If the picture is PCM/Dolby* OUT (OPTICAL) Digital compatible. 7 AUDIO OUT (VAR/ Connects to the TV's L (MONO) audio input jack. HDMI (High-Definition Multimedia Interface) provides an uncompressed, all-digital audio/video interface between the PC and R-AUDIO-L ...
.... "Dolby" and the double-D symbol are connected, S VIDEO signal has priority. If both composite video and S VIDEO are trademarks of Screen settings on page 36. For models with attached cords: Plug the cord into the AC IN nearest wall outlet. For models with separate cords...connecting the HD15-HD15 cable. • If the picture is PCM/Dolby* OUT (OPTICAL) Digital compatible. 7 AUDIO OUT (VAR/ Connects to the TV's L (MONO) audio input jack. HDMI (High-Definition Multimedia Interface) provides an uncompressed, all-digital audio/video interface between the PC and R-AUDIO-L ...
Operating Instructions
Page 16
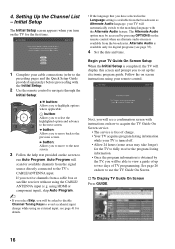
... on how to the previous screen. Initial Setup The Initial Setup screen appears when you will see a confirmation screen with the Alternate Audio feature. Select to the next screen. s To Display TV Guide On Screen Press GUIDE. 16 Language settings will display this screen and prompt you will be ... Allows you have selected in the Language setting is complete. Begin your TV is turned off. • Allow 24 hours (some areas may be accessed by the TV, you to move back to use the TV Guide On Screen. Initial Setup Step 6 of 6 Please select a language. Initial Setup ...
... on how to the previous screen. Initial Setup The Initial Setup screen appears when you will see a confirmation screen with the Alternate Audio feature. Select to the next screen. s To Display TV Guide On Screen Press GUIDE. 16 Language settings will display this screen and prompt you will be ... Allows you have selected in the Language setting is complete. Begin your TV is turned off. • Allow 24 hours (some areas may be accessed by the TV, you to move back to use the TV Guide On Screen. Initial Setup Step 6 of 6 Please select a language. Initial Setup ...
Operating Instructions
Page 19
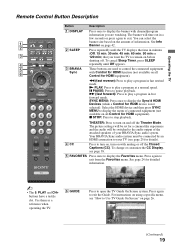
...must be connected by an HDMI connection to your BRAVIA Sync audio system. To change or customize the CC Display, see "How to Use TV Guide On Screen" on page 26. (Continued) 19 Press again to pause playback. M (fast forward): Press to play a program at a normal speed....HDMI function (not available on the amount of information. m (fast reverse): Press to open the TV Guide On Screen system. x STOP: Press to exit from the Favorites menu. Operating the TV Remote Control Button Description Button Description 1 DISPLAY Press once to display the banner with channel/program ...
...must be connected by an HDMI connection to your BRAVIA Sync audio system. To change or customize the CC Display, see "How to Use TV Guide On Screen" on page 26. (Continued) 19 Press again to pause playback. M (fast forward): Press to play a program at a normal speed....HDMI function (not available on the amount of information. m (fast reverse): Press to open the TV Guide On Screen system. x STOP: Press to exit from the Favorites menu. Operating the TV Remote Control Button Description Button Description 1 DISPLAY Press once to display the banner with channel/program ...

Operating Instructions
Page 20
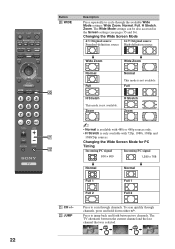
... showing qd current program to access features in all regions. DMX-NV1). Press 0-9 to 0 restore the sound. Press ENT to turn on the screen. ~ qh INPUT • With the Freeze feature active, some features are unavailable. • While the Freeze feature is active, pressing HOME will... Press to enter 2.1, press 2 , , 1 and ENT. 9 qs VOL +/- See your dealer or www.sony.com/bravia for more information. For example, to display the list of External Inputs and TV mode. qf POWER Press to change channels immediately. 8 qa Use with the frozen image. Press a third time to...
... showing qd current program to access features in all regions. DMX-NV1). Press 0-9 to 0 restore the sound. Press ENT to turn on the screen. ~ qh INPUT • With the Freeze feature active, some features are unavailable. • While the Freeze feature is active, pressing HOME will... Press to enter 2.1, press 2 , , 1 and ENT. 9 qs VOL +/- See your dealer or www.sony.com/bravia for more information. For example, to display the list of External Inputs and TV mode. qf POWER Press to change channels immediately. 8 qa Use with the frozen image. Press a third time to...

Operating Instructions
Page 21
... PIP See page 28 Exit P&P or Exit PIP See page 28 Motion Enhancer See page 33 Speakers See page 34 Audio Swap See page 28 Screen See page 36 Add to cycle through the available picture modes: Vivid, Standard, Cinema, Custom, PhotoVivid, Photo-Standard, Photo-Original, PhotoCustom, Video, Text. (...to Favorites/ Remove from Favorites See page 24 qk MTS See page 34 Alternate Audio See page 35 ql Digital Rating See page 39 Background TV See page 25 Device Control See page 41 ql PICTURE ~ • The Digital Rating and Alternate Audio options will appear in Options only ...
... PIP See page 28 Exit P&P or Exit PIP See page 28 Motion Enhancer See page 33 Speakers See page 34 Audio Swap See page 28 Screen See page 36 Add to cycle through the available picture modes: Vivid, Standard, Cinema, Custom, PhotoVivid, Photo-Standard, Photo-Original, PhotoCustom, Video, Text. (...to Favorites/ Remove from Favorites See page 24 qk MTS See page 34 Alternate Audio See page 35 ql Digital Rating See page 39 Background TV See page 25 Device Control See page 41 ql PICTURE ~ • The Digital Rating and Alternate Audio options will appear in Options only ...
Operating Instructions
Page 22
... Press to jump back and forth between the current channel and the last channel that was selected. JUMP JUMP 22 Button w; Changing the Wide Screen Mode 4:3 Original source 16:9 Original source Standard-definition source High-definition source m Wide Zoom m Wide Zoom Normal Normal This mode is not ...available. The Wide Mode settings can be also accessed in the Screen settings (see pages 35 and 36). Changing the Wide Screen Mode for PC Timing ws Incoming PC signal Incoming PC signal 800 × 600 1,280 × 768 m Normal...
... Press to jump back and forth between the current channel and the last channel that was selected. JUMP JUMP 22 Button w; Changing the Wide Screen Mode 4:3 Original source 16:9 Original source Standard-definition source High-definition source m Wide Zoom m Wide Zoom Normal Normal This mode is not ...available. The Wide Mode settings can be also accessed in the Screen settings (see pages 35 and 36). Changing the Wide Screen Mode for PC Timing ws Incoming PC signal Incoming PC signal 800 × 600 1,280 × 768 m Normal...
Operating Instructions
Page 23
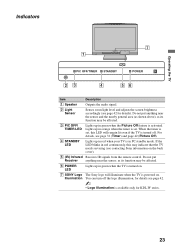
...LED Lights up in green when the TV is turned on. 7 SONY Logo Illumination The Sony logo will remain lit even if the TV is turned off the logo illumination, for details). Operating the TV Indicators 7 1 PIC OFF/TIMER STANDBY... POWER 23 4 56 Item Description 1 Speaker Outputs the audio signal. 2 Light Sensor Senses room light level and adjusts the screen brightness accordingly (see contacting Sony...
...LED Lights up in green when the TV is turned on. 7 SONY Logo Illumination The Sony logo will remain lit even if the TV is turned off the logo illumination, for details). Operating the TV Indicators 7 1 PIC OFF/TIMER STANDBY... POWER 23 4 56 Item Description 1 Speaker Outputs the audio signal. 2 Light Sensor Senses room light level and adjusts the screen brightness accordingly (see contacting Sony...
Operating Instructions
Page 25
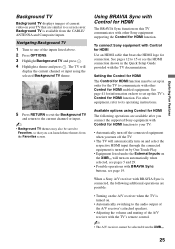
... set up in the Quick Setup Guide provided with the TV documentation. Using BRAVIA Sync with the TV's remote control. ~ • The A/V receiver cannot be selected from the Favorites screen. See page 41 for information on how to set up this TV communicates with other Sony equipment supporting the Control for HDMI function to the...
... set up in the Quick Setup Guide provided with the TV documentation. Using BRAVIA Sync with the TV's remote control. ~ • The A/V receiver cannot be selected from the Favorites screen. See page 41 for information on how to set up this TV communicates with other Sony equipment supporting the Control for HDMI function to the...
Operating Instructions
Page 26
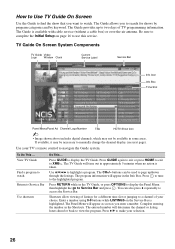
...highlighted. If available, it may not be necessary to manually change the channel display (see next page). View TV Guide Find a program to watch . Press to tune to highlight a program. Enter a number using 0-9 ... taken. You can be used to page up to XMB™. How to Use TV Guide On Screen Use the Guide to find the show that you want to watch Return to Service ...box) or over-the-air antenna. The Guide provides up /down through the listings. TV Guide On Screen System Components TV Guide Video Logo Window Clock Current Service Label Service Bar Info Icon Info Box Time ...
...highlighted. If available, it may not be necessary to manually change the channel display (see next page). View TV Guide Find a program to watch . Press to tune to highlight a program. Enter a number using 0-9 ... taken. You can be used to page up to XMB™. How to Use TV Guide On Screen Use the Guide to find the show that you want to watch Return to Service ...box) or over-the-air antenna. The Guide provides up /down through the listings. TV Guide On Screen System Components TV Guide Video Logo Window Clock Current Service Label Service Bar Info Icon Info Box Time ...
Operating Instructions
Page 27
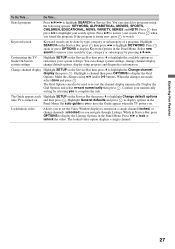
... re-sort numerically then press . The Guide appears each Highlight SETUP on the Service Bar then press v to highlight Change default options time TV is airing now, press to display options in the Panel Menu. Highlight General defaults and press to watch. While in Service Bar, press...Service Bar, press then press B/b to narrow your system settings. Press again or press OPTIONS to display the Grid Options. Customizing the TV Guide On Screen system settings Highlight SETUP on . You can be used to highlight the Change channel display then press . Make the changes using the ...
... re-sort numerically then press . The Guide appears each Highlight SETUP on the Service Bar then press v to highlight Change default options time TV is airing now, press to display options in the Panel Menu. Highlight General defaults and press to watch. While in Service Bar, press...Service Bar, press then press B/b to narrow your system settings. Press again or press OPTIONS to display the Grid Options. Customizing the TV Guide On Screen system settings Highlight SETUP on . You can be used to highlight the Change channel display then press . Make the changes using the ...
Operating Instructions
Page 29
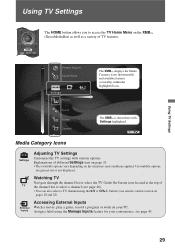
...) and available features (vertically) within the highlighted icon. Explanations of TV features. Watching TV Navigate through the channel list or select the TV Guide On Screen icon located at the top of TV the channel list to access the TV Home Menu on the XMB™ (XrossMediaBar) as well as a... section on your convenience, see page 26). • You can also select a TV channel using the Manage Inputs feature for your PC. Inputs Assign a label using the 0-9 or CH+/- Sound Screen Channel The XMB™ is shown here with various options. Unavailable options are grayed out...
...) and available features (vertically) within the highlighted icon. Explanations of TV features. Watching TV Navigate through the channel list or select the TV Guide On Screen icon located at the top of TV the channel list to access the TV Home Menu on the XMB™ (XrossMediaBar) as well as a... section on your convenience, see page 26). • You can also select a TV channel using the Manage Inputs feature for your PC. Inputs Assign a label using the 0-9 or CH+/- Sound Screen Channel The XMB™ is shown here with various options. Unavailable options are grayed out...
Operating Instructions
Page 30
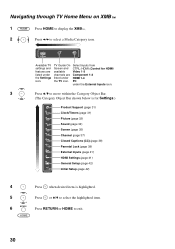
... on XMB™ 1 Press HOME to display the XMB™. 2 Press B/b to exit. 30 Settings Available TV settings and features are listed under the Settings icon. TV Guide On Screen and available channels are listed under the TV icon. Select inputs from CTRL: HDMI (Control for HDMI) Video 1-3 Component 1-2 HDMI 1-4 PC under the External...
... on XMB™ 1 Press HOME to display the XMB™. 2 Press B/b to exit. 30 Settings Available TV settings and features are listed under the Settings icon. TV Guide On Screen and available channels are listed under the TV icon. Select inputs from CTRL: HDMI (Control for HDMI) Video 1-3 Component 1-2 HDMI 1-4 PC under the External...

Operating Instructions
Page 31
...following: Day of a cable box.) • The software update is performed while the TV is powered on. • The Broadcast Download is performed while the TV is disabled, the TV Guide On Screen has automatically set using the SLEEP button on the remote control (see page 19). ... that you set to remain on the Timer will not be set . TV Settings Descriptions Product Support Contact Sony Signal Diagnostics Software Update Sony contact information is available from the TV are displayed here. Using TV Settings 31 Press to view the current software version and check for the ...
...following: Day of a cable box.) • The software update is performed while the TV is powered on. • The Broadcast Download is performed while the TV is disabled, the TV Guide On Screen has automatically set using the SLEEP button on the remote control (see page 19). ... that you set to remain on the Timer will not be set . TV Settings Descriptions Product Support Contact Sony Signal Diagnostics Software Update Sony contact information is available from the TV are displayed here. Using TV Settings 31 Press to view the current software version and check for the ...
Operating Instructions
Page 32
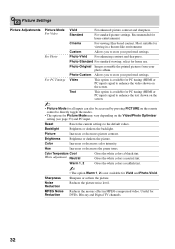
... ~ • The option Warm 1, 2 is available for PC timing (HDMI or PC input) signal to enhance the text shown on the screen. ~ • Picture Mode for all inputs can also be accessed by pressing PICTURE on the remote control to directly toggle the modes. •...Video This option is available for Picture Mode may vary depending on the screen. Brightness Brightens or darkens the picture. Recommended for home use. Most suitable for Reduction DVDs, Blu-ray and Digital TV channels. 32 select for home entertainment. Color Increases or decreases color intensity...
... ~ • The option Warm 1, 2 is available for PC timing (HDMI or PC input) signal to enhance the text shown on the screen. ~ • Picture Mode for all inputs can also be accessed by pressing PICTURE on the remote control to directly toggle the modes. •...Video This option is available for Picture Mode may vary depending on the screen. Brightness Brightens or darkens the picture. Recommended for home use. Most suitable for Reduction DVDs, Blu-ray and Digital TV channels. 32 select for home entertainment. Color Increases or decreases color intensity...


