Operating Instructions
Page 2
... and "PS3" is a trademark of the FCC rules. SU-WL500 Sony TV - This equipment generates, uses and can radiate radio frequency energy and, if not installed and used under license from Dolby Laboratories. The TV Guide On Screen system is no event shall Gemstar-TV Guide International, Inc. "XrossMediaBar" is connected. For Customers in the...
... and "PS3" is a trademark of the FCC rules. SU-WL500 Sony TV - This equipment generates, uses and can radiate radio frequency energy and, if not installed and used under license from Dolby Laboratories. The TV Guide On Screen system is no event shall Gemstar-TV Guide International, Inc. "XrossMediaBar" is connected. For Customers in the...
Operating Instructions
Page 3
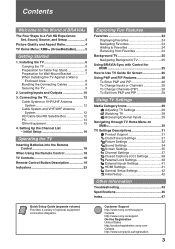
... TV Settings Descriptions 31 Product Support 31 Clock/Timers Settings 31 Picture Settings 32 Sound Settings 34 Screen Settings 35 Channel Settings 37 CC Closed Captions (CC) Settings 38 Parental Lock Settings 38 External Inputs Settings 41 HDMI Settings 41 General Setup Settings 42 Initial Setup 42 Other Information Troubleshooting 43 Specifications 46...
... TV Settings Descriptions 31 Product Support 31 Clock/Timers Settings 31 Picture Settings 32 Sound Settings 34 Screen Settings 35 Channel Settings 37 CC Closed Captions (CC) Settings 38 Parental Lock Settings 38 External Inputs Settings 41 HDMI Settings 41 General Setup Settings 42 Initial Setup 42 Other Information Troubleshooting 43 Specifications 46...

Operating Instructions
Page 4
...how to connect other HD compatible external equipment Contact your BRAVIA TV is displayed on an HDTV, you will notice a big difference. The picture quality may not be as sharp as the quality of the signal it receives. http://www.sony.com/HDTV Canada http://www.sonystyle.ca/hd The Four ... 16:9. To learn more about HDTV, visit: U.S.A. Picture Quality and Aspect Ratio You can use the Wide Mode function of the TV to adjust the 4:3 image to fit the entire screen (see pages 22, 35 and 36). 4 The quality of the image you need access to HD programming. When you compare a ...
...how to connect other HD compatible external equipment Contact your BRAVIA TV is displayed on an HDTV, you will notice a big difference. The picture quality may not be as sharp as the quality of the signal it receives. http://www.sony.com/HDTV Canada http://www.sonystyle.ca/hd The Four ... 16:9. To learn more about HDTV, visit: U.S.A. Picture Quality and Aspect Ratio You can use the Wide Mode function of the TV to adjust the 4:3 image to fit the entire screen (see pages 22, 35 and 36). 4 The quality of the image you need access to HD programming. When you compare a ...
Operating Instructions
Page 5
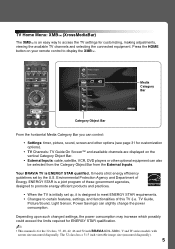
...™ is an easy way to access the TV settings for the 32 class, 37, 40, 42, 46 and 52 inch BRAVIA KDL-XBR6, V and W series models with screen size measured diagonally. Product Support Clock/Timers Settings Sound Screen Channel Category Object Bar Media Category Bar TV From the horizontal Media Category Bar you can...
...™ is an easy way to access the TV settings for the 32 class, 37, 40, 42, 46 and 52 inch BRAVIA KDL-XBR6, V and W series models with screen size measured diagonally. Product Support Clock/Timers Settings Sound Screen Channel Category Object Bar Media Category Bar TV From the horizontal Media Category Bar you can...
Operating Instructions
Page 6
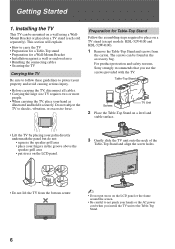
... protection and safety reasons, Sony strongly recommends that you install the TV unit to shocks, vibration, or excessive force. Preparation for a Wall-Mount Bracket • Installation against a wall or enclosed area • Bundling the connecting cables • Securing the TV Carrying the TV Be sure to follow these... using a WallMount Bracket or placed on a TV stand (except models: KDL-52V4100 and KDL-52W4100). 1 Remove the Table-Top Stand and screws from the bottom center. ~ • Do not put stress on the LCD panel or the frame around the screen. • Be careful to not pinch your...
... protection and safety reasons, Sony strongly recommends that you install the TV unit to shocks, vibration, or excessive force. Preparation for a Wall-Mount Bracket • Installation against a wall or enclosed area • Bundling the connecting cables • Securing the TV Carrying the TV Be sure to follow these... using a WallMount Bracket or placed on a TV stand (except models: KDL-52V4100 and KDL-52W4100). 1 Remove the Table-Top Stand and screws from the bottom center. ~ • Do not put stress on the LCD panel or the frame around the screen. • Be careful to not pinch your...
Operating Instructions
Page 8
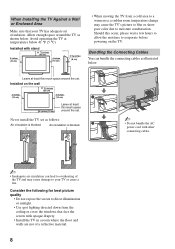
...Leave at temperatures below 41 °F (5 °C). Air circulation is blocked. Consider the following for best picture quality • Do not expose the screen to evaporate before powering on the wall 4 inches (10 cm) 11 7/8 inches (30 cm) 4 inches (10 cm) 4 inches (10 cm... color due to your TV has adequate air circulation. Avoid operating the TV at least this much space around the set as follows: Air circulation is blocked. Installed on the TV. When Installing the TV Against a Wall or Enclosed Area Make sure that face the screen with other connecting cables....
...Leave at temperatures below 41 °F (5 °C). Air circulation is blocked. Consider the following for best picture quality • Do not expose the screen to evaporate before powering on the wall 4 inches (10 cm) 11 7/8 inches (30 cm) 4 inches (10 cm) 4 inches (10 cm... color due to your TV has adequate air circulation. Avoid operating the TV at least this much space around the set as follows: Air circulation is blocked. Installed on the TV. When Installing the TV Against a Wall or Enclosed Area Make sure that face the screen with other connecting cables....
Operating Instructions
Page 11
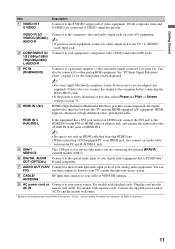
... 2 COMPONENT IN 1/2 (1080p/1080i/ 720p/480p/480i)/ L-AUDIO-R 3 PC IN (RGB/AUDIO) 4 HDMI IN 1/2/3 Connects to the TV's L (MONO) audio input jack. Can also be necessary to use only an HDMI cable that bears the HDMI logo. • When ...(YPBPR) and audio (L/R) jacks. "Dolby" and the double-D symbol are connected, S VIDEO signal has priority. If this TV and any HDMI-equipped A/V equipment. If both composite video and S VIDEO are trademarks of Dolby Laboratories. 11 This USB port... equipment that is noisy, flickering or not clear, adjust Phase and Pitch of Screen settings on page 36.
... 2 COMPONENT IN 1/2 (1080p/1080i/ 720p/480p/480i)/ L-AUDIO-R 3 PC IN (RGB/AUDIO) 4 HDMI IN 1/2/3 Connects to the TV's L (MONO) audio input jack. Can also be necessary to use only an HDMI cable that bears the HDMI logo. • When ...(YPBPR) and audio (L/R) jacks. "Dolby" and the double-D symbol are connected, S VIDEO signal has priority. If this TV and any HDMI-equipped A/V equipment. If both composite video and S VIDEO are trademarks of Dolby Laboratories. 11 This USB port... equipment that is noisy, flickering or not clear, adjust Phase and Pitch of Screen settings on page 36.
Operating Instructions
Page 16
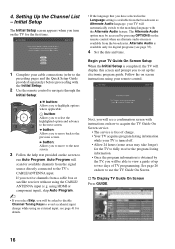
...input (e.g. see page 35). 4 Set the date and time. s To Display TV Guide On Screen Press GUIDE. 16 Auto Program will apply to the previous screen. If you will display this screen and prompt you have selected in the Language setting is available only for digital programs...: Allows you turn on screen display as well as Alternate Audio language, your TV will automatically switch to the matching language with instructions on the screen to use the TV Guide On Screen. See page 26 on screen instructions using an external input; This TV features an electronic program guide...
...input (e.g. see page 35). 4 Set the date and time. s To Display TV Guide On Screen Press GUIDE. 16 Auto Program will apply to the previous screen. If you will display this screen and prompt you have selected in the Language setting is available only for digital programs...: Allows you turn on screen display as well as Alternate Audio language, your TV will automatically switch to the matching language with instructions on the screen to use the TV Guide On Screen. See page 26 on screen instructions using an external input; This TV features an electronic program guide...
Operating Instructions
Page 19
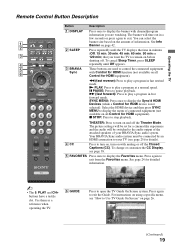
...HDMI device and then press SYNC MENU to display the menu of connected equipment (not available on the amount of your TV (see "How to Use TV Guide On Screen" on with Control for HDMI function (not available on all Control for a cinema-like experience and the audio will ... page 42. 2 2 SLEEP Press repeatedly until Off appears. 5 3 BRAVIA These buttons are watching. Press again to open the TV Guide On Screen system. Use them as a reference when operating the TV. 6 GUIDE Press to exit from the Favorites menu. m (fast reverse): Press to play a program in a few seconds or...
...HDMI device and then press SYNC MENU to display the menu of connected equipment (not available on the amount of your TV (see "How to Use TV Guide On Screen" on with Control for HDMI function (not available on all Control for a cinema-like experience and the audio will ... page 42. 2 2 SLEEP Press repeatedly until Off appears. 5 3 BRAVIA These buttons are watching. Press again to open the TV Guide On Screen system. Use them as a reference when operating the TV. 6 GUIDE Press to exit from the Favorites menu. m (fast reverse): Press to play a program in a few seconds or...

Operating Instructions
Page 20
... to return to select/ confirm an item. 20 Press repeatedly to turn on setting up the External Inputs labels. See your dealer or www.sony.com/bravia for more information. qf POWER Press to toggle through the inputs. ~ • See page 41 on and off the... and External Inputs list (see pages 5 and 29). Press to display the TV Home Menu/XMB™ to the previous screen or exit from the screen when displaying menu items and settings. Product Support Clock/Timers Settings Sound Screen qg Channel TV qh 9 DMex Press to select a channel; DMX-NV1). Press 0-9 to access features ...
... to return to select/ confirm an item. 20 Press repeatedly to turn on setting up the External Inputs labels. See your dealer or www.sony.com/bravia for more information. qf POWER Press to toggle through the inputs. ~ • See page 41 on and off the... and External Inputs list (see pages 5 and 29). Press to display the TV Home Menu/XMB™ to the previous screen or exit from the screen when displaying menu items and settings. Product Support Clock/Timers Settings Sound Screen qg Channel TV qh 9 DMex Press to select a channel; DMX-NV1). Press 0-9 to access features ...

Operating Instructions
Page 21
... the currently tuned digital program. For details, see Picture settings on current input and content. Operating the TV Button Description qk OPTIONS Press to Favorites/ Remove from Favorites See page 24 qk MTS See page 34 ...Alternate Audio See page 35 ql Digital Rating See page 39 Background TV See page 25 Device Control See page 41 ql PICTURE ~ • The Digital Rating and Alternate Audio... page 33 Speakers See page 34 Audio Swap See page 28 Screen See page 36 Add to display a list of convenient functions and menu shortcuts.
... the currently tuned digital program. For details, see Picture settings on current input and content. Operating the TV Button Description qk OPTIONS Press to Favorites/ Remove from Favorites See page 24 qk MTS See page 34 ...Alternate Audio See page 35 ql Digital Rating See page 39 Background TV See page 25 Device Control See page 41 ql PICTURE ~ • The Digital Rating and Alternate Audio... page 33 Speakers See page 34 Audio Swap See page 28 Screen See page 36 Add to display a list of convenient functions and menu shortcuts.
Operating Instructions
Page 22
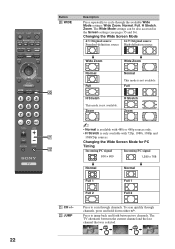
...repeatedly to cycle through channels. Press to scan through the available Wide Mode settings: Wide Zoom, Normal, Full, H Stretch, Zoom. The TV alternates between two channels. Full Full w; H Stretch H Stretch This mode is only available with 480i or 480p sources only. • ...source 16:9 Original source Standard-definition source High-definition source m Wide Zoom m Wide Zoom Normal Normal This mode is not available. Changing the Wide Screen Mode for PC Timing ws Incoming PC signal Incoming PC signal 800 × 600 1,280 × 768 m Normal m Normal Full 1 Full...
...repeatedly to cycle through channels. Press to scan through the available Wide Mode settings: Wide Zoom, Normal, Full, H Stretch, Zoom. The TV alternates between two channels. Full Full w; H Stretch H Stretch This mode is only available with 480i or 480p sources only. • ...source 16:9 Original source Standard-definition source High-definition source m Wide Zoom m Wide Zoom Normal Normal This mode is not available. Changing the Wide Screen Mode for PC Timing ws Incoming PC signal Incoming PC signal 800 × 600 1,280 × 768 m Normal m Normal Full 1 Full...
Operating Instructions
Page 23
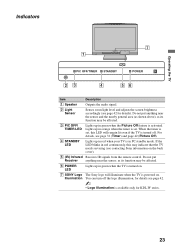
.... Do not put anything near the sensor and the nearby general area (as shown above), as its function may indicate that the TV needs servicing (see contacting Sony information on . If the LED blinks in orange when the timer is turned off the logo illumination, for details see page 42....2 Light Sensor Senses room light level and adjusts the screen brightness accordingly (see page 42 for KDL-W series. 23 When the timer is set, this may be affected. 6 POWER LED Lights up in green when the TV is turned on. 7 SONY Logo Illumination The Sony logo will remain lit even if the...
.... Do not put anything near the sensor and the nearby general area (as shown above), as its function may indicate that the TV needs servicing (see contacting Sony information on . If the LED blinks in orange when the timer is turned off the logo illumination, for details see page 42....2 Light Sensor Senses room light level and adjusts the screen brightness accordingly (see page 42 for KDL-W series. 23 When the timer is set, this may be affected. 6 POWER LED Lights up in green when the TV is turned on. 7 SONY Logo Illumination The Sony logo will remain lit even if the...
Operating Instructions
Page 25
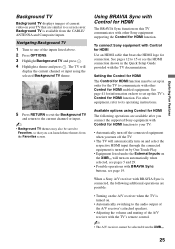
...operations are available after you connect the supported Sony equipment with the TV's remote control. ~ • The A/V receiver cannot be saved to a screen saver. Exploring Fun Features Background TV Background TV displays images of current video on your TV: • Automatically turn on automatically when selected.../ ANTENNA and Composite inputs. The TV will turn off the TV. • The TV will automatically turn on and select the respective HDMI input through the connected equipment is available from the Favorites screen. When a Sony A/V receiver with BRAVIA Sync is turned...
...operations are available after you connect the supported Sony equipment with the TV's remote control. ~ • The A/V receiver cannot be saved to a screen saver. Exploring Fun Features Background TV Background TV displays images of current video on your TV: • Automatically turn on automatically when selected.../ ANTENNA and Composite inputs. The TV will turn off the TV. • The TV will automatically turn on and select the respective HDMI input through the connected equipment is available from the Favorites screen. When a Sony A/V receiver with BRAVIA Sync is turned...
Operating Instructions
Page 26
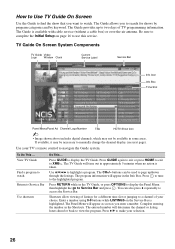
...You can be necessary to manually change the channel display (see next page). Complete entering the number in the Info Box. TV Guide On Screen System Components TV Guide Video Logo Window Clock Current Service Label Service Bar Info Icon Info Box Time Slot Panel Menu/Panel Ad Channel Logo/...shows by program categories and by keyword. Shortcuts allow viewing of TV programming information. The Panel Menu will determine the channel or listing hours ahead or back to view the program. How to Use TV Guide On Screen Use the Guide to find the show that you want to watch...
...You can be necessary to manually change the channel display (see next page). Complete entering the number in the Info Box. TV Guide On Screen System Components TV Guide Video Logo Window Clock Current Service Label Service Bar Info Icon Info Box Time Slot Panel Menu/Panel Ad Channel Logo/...shows by program categories and by keyword. Shortcuts allow viewing of TV programming information. The Panel Menu will determine the channel or listing hours ahead or back to view the program. How to Use TV Guide On Screen Use the Guide to find the show that you want to watch...
Operating Instructions
Page 27
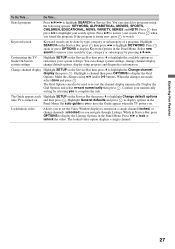
... then press . Press V/v to narrow your search by type, category or subcategory by pressing V/v/B/b. Select new search to narrow your system settings. Customizing the TV Guide On Screen system settings Highlight SETUP on . Highlight General defaults and press to customize your search. While in the Panel Menu. Press B/b to display the Listings...
... then press . Press V/v to narrow your search by type, category or subcategory by pressing V/v/B/b. Select new search to narrow your system settings. Customizing the TV Guide On Screen system settings Highlight SETUP on . Highlight General defaults and press to customize your search. While in the Panel Menu. Press B/b to display the Listings...
Operating Instructions
Page 29
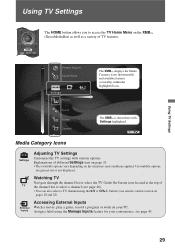
... the XMB™ (XrossMediaBar) as well as a variety of TV the channel list to access the TV Home Menu on pages 20 and 22). Watching TV Navigate through the channel list or select the TV Guide On Screen icon located at the top of TV features. Using TV Settings The HOME button allows you to select a channel...
... the XMB™ (XrossMediaBar) as well as a variety of TV the channel list to access the TV Home Menu on pages 20 and 22). Watching TV Navigate through the channel list or select the TV Guide On Screen icon located at the top of TV features. Using TV Settings The HOME button allows you to select a channel...
Operating Instructions
Page 30
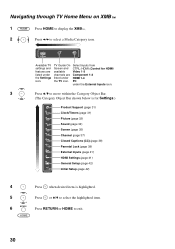
... Menu on XMB™ 1 Press HOME to display the XMB™. 2 Press B/b to exit. 30 TV Guide On Screen and available channels are listed under the External Inputs icon. 3 Press V/v to move within the Category Object Bar. (The Category Object Bar shown below is ...for Settings.) Product Support (page 31) Clock/Timers (page 31) Picture (page 32) Sound (page 34) Screen (page 35) Channel (page 37) CC Closed Captions (CC) (page 38) Parental Lock (page 38) External Inputs (page 41) HDMI Settings (page 41) General Setup...
... Menu on XMB™ 1 Press HOME to display the XMB™. 2 Press B/b to exit. 30 TV Guide On Screen and available channels are listed under the External Inputs icon. 3 Press V/v to move within the Category Object Bar. (The Category Object Bar shown below is ...for Settings.) Product Support (page 31) Clock/Timers (page 31) Picture (page 32) Sound (page 34) Screen (page 35) Channel (page 37) CC Closed Captions (CC) (page 38) Parental Lock (page 38) External Inputs (page 41) HDMI Settings (page 41) General Setup...

Operating Instructions
Page 31
...this screen for the current signal. Timer can also be set to display the diagnostics information for your convenience. Press to have digital TV programming. (Not available with the use of the Week, Time, Duration, Input, Channel, and TV On Volume. TV Settings Descriptions Product Support Contact Sony ...: Day of a cable box.) • The software update is performed while the TV is powered on. • The Broadcast Download is performed while the TV is disabled, the TV Guide On Screen has automatically set using the SLEEP button on the remote control (see page 19). otherwise...
...this screen for the current signal. Timer can also be set to display the diagnostics information for your convenience. Press to have digital TV programming. (Not available with the use of the Week, Time, Duration, Input, Channel, and TV On Volume. TV Settings Descriptions Product Support Contact Sony ...: Day of a cable box.) • The software update is performed while the TV is powered on. • The Broadcast Download is performed while the TV is disabled, the TV Guide On Screen has automatically set using the SLEEP button on the remote control (see page 19). otherwise...
Operating Instructions
Page 32
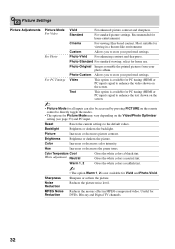
... a reddish tint. ~ • The option Warm 1, 2 is available for PC timing (HDMI or PC input) signal to enhance the text shown on the screen. ~ • Picture Mode for all inputs can also be accessed by pressing PICTURE on the remote control to store your preferred settings. For standard picture... contrast and sharpness. Cinema For viewing film-based content. Photo-Standard For standard viewing; select for Picture Mode may vary depending on the screen. Photo-Custom Allows you to the default values. Text This option is not available for Reduction DVDs, Blu-ray and Digital...
... a reddish tint. ~ • The option Warm 1, 2 is available for PC timing (HDMI or PC input) signal to enhance the text shown on the screen. ~ • Picture Mode for all inputs can also be accessed by pressing PICTURE on the remote control to store your preferred settings. For standard picture... contrast and sharpness. Cinema For viewing film-based content. Photo-Standard For standard viewing; select for Picture Mode may vary depending on the screen. Photo-Custom Allows you to the default values. Text This option is not available for Reduction DVDs, Blu-ray and Digital...


