
Operating Instructions
Page 1
LCD TV Operating Instructions 4-418-730-11(1) Introducing Your New BRAVIA® Getting Started Operating the TV Using Features Using the Menus Other Information KDL-55EX640/46EX640/40EX640 Sony Customer Support U.S.A.: http://www.sony.com/tvsupport Canada: http://www.sony.ca/support United States 1.800.222.SONY Canada 1.877.899.SONY Please Do Not Return the Product to the Store
LCD TV Operating Instructions 4-418-730-11(1) Introducing Your New BRAVIA® Getting Started Operating the TV Using Features Using the Menus Other Information KDL-55EX640/46EX640/40EX640 Sony Customer Support U.S.A.: http://www.sony.com/tvsupport Canada: http://www.sony.ca/support United States 1.800.222.SONY Canada 1.877.899.SONY Please Do Not Return the Product to the Store
Operating Instructions
Page 2
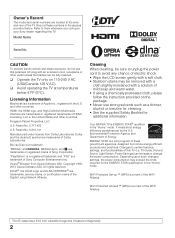
...registered trademarks of the Wi-Fi Alliance. ENERGY STAR is a joint program of the Digital Living Network Alliance. Depending upon your Sony dealer regarding this polarized AC plug with an extension cord, receptacle or other countries. Owner's Record The model and serial numbers... Patent No. 6,816,141 Manufactured under license from Opera Software ASA. Patent No. 5,717,422 U.S. Environmental Protection Agency and Department of the TV. TV Guide, Picture/ Sound, Light Sensor, Power Savings) can be removed with a cloth slightly moistened with a soft cloth. • Stubborn stains...
...registered trademarks of the Wi-Fi Alliance. ENERGY STAR is a joint program of the Digital Living Network Alliance. Depending upon your Sony dealer regarding this polarized AC plug with an extension cord, receptacle or other countries. Owner's Record The model and serial numbers... Patent No. 6,816,141 Manufactured under license from Opera Software ASA. Patent No. 5,717,422 U.S. Environmental Protection Agency and Department of the TV. TV Guide, Picture/ Sound, Light Sensor, Power Savings) can be removed with a cloth slightly moistened with a soft cloth. • Stubborn stains...
Operating Instructions
Page 3
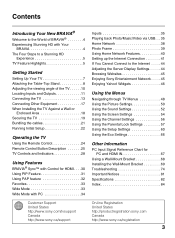
... cables 21 Running Initial Setup 22 Operating the TV Using the Remote Control 24 Remote Control Button Description 25 TV Controls and Indicators 28 Using Features BRAVIA® Sync™ with PC 34 Customer Support United States http://www.sony.com/tvsupport Canada http://www.sony.ca/support Inputs 35 Playing back Photo/Music...
... cables 21 Running Initial Setup 22 Operating the TV Using the Remote Control 24 Remote Control Button Description 25 TV Controls and Indicators 28 Using Features BRAVIA® Sync™ with PC 34 Customer Support United States http://www.sony.com/tvsupport Canada http://www.sony.ca/support Inputs 35 Playing back Photo/Music...
Operating Instructions
Page 4
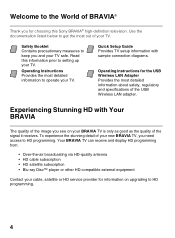
...the most out of your TV. To experience the stunning detail of your new BRAVIA TV, you and your BRAVIA TV is only as good as the quality of the signal it receives. Read this Sony BRAVIA® high-definition television. Quick Setup Guide Provides TV setup information with Your ...BRAVIA The quality of the image you for choosing this information prior to setting up your TV. Safety Booklet Contains precautionary measures to keep ...
...the most out of your TV. To experience the stunning detail of your new BRAVIA TV, you and your BRAVIA TV is only as good as the quality of the signal it receives. Read this Sony BRAVIA® high-definition television. Quick Setup Guide Provides TV setup information with Your ...BRAVIA The quality of the image you for choosing this information prior to setting up your TV. Safety Booklet Contains precautionary measures to keep ...
Operating Instructions
Page 5
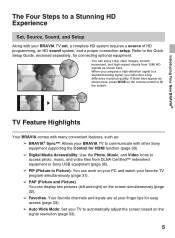
...images, smooth movement, and high-impact visuals from 1080 HD signals as : ➢ BRAVIA® Sync™: Allows your BRAVIA TV to communicate with other Sony equipment supporting the Control for HDMI function (page 30). ➢ Digital Media Accessibility: Use the Photo, Music, and Video icons ...access photo, music, and video files from DLNA Certified™ networked equipment or Sony USB equipment (page 35). ➢ PIP (Picture in picture quality. TV Feature Highlights Your BRAVIA comes with your TV to automatically adjust the screen based on the remote control to the Quick Setup ...
...images, smooth movement, and high-impact visuals from 1080 HD signals as : ➢ BRAVIA® Sync™: Allows your BRAVIA TV to communicate with other Sony equipment supporting the Control for HDMI function (page 30). ➢ Digital Media Accessibility: Use the Photo, Music, and Video icons ...access photo, music, and video files from DLNA Certified™ networked equipment or Sony USB equipment (page 35). ➢ PIP (Picture in picture quality. TV Feature Highlights Your BRAVIA comes with your TV to automatically adjust the screen based on the remote control to the Quick Setup ...
Operating Instructions
Page 6
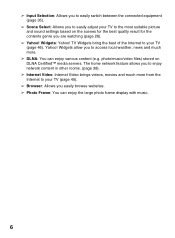
...movies and much more. ➢ DLNA: You can enjoy the large photo frame display with music. 6 The home network feature allows you to your TV (page 46). ➢ Input Selection: Allows you to easily switch between the connected equipment (page 35). ➢ Scene Select: Allows you to ...easily adjust your TV to your TV (page 45). ➢ Browser: Allows you easily browse websites. ➢ Photo Frame: You can enjoy various content (e.g. Widgets: Yahoo! TV Widgets bring the best of the Internet to the most suitable picture and sound...
...movies and much more. ➢ DLNA: You can enjoy the large photo frame display with music. 6 The home network feature allows you to your TV (page 46). ➢ Input Selection: Allows you to easily switch between the connected equipment (page 35). ➢ Scene Select: Allows you to ...easily adjust your TV to your TV (page 45). ➢ Browser: Allows you easily browse websites. ➢ Photo Frame: You can enjoy various content (e.g. Widgets: Yahoo! TV Widgets bring the best of the Internet to the most suitable picture and sound...
Operating Instructions
Page 7
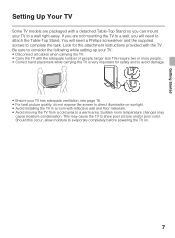
... attachment instructions provided with reflective wall and floor materials. • Avoid moving the TV from a cold area to a warm area. Getting Started Getting Started Setting Up Your TV Some TV models are not mounting the TV to a wall, you will need to attach the Table-Top Stand. Be sure...task. You will need a Phillips screwdriver and the supplied screws to consider the following while setting up your TV: • Disconnect all cables when carrying the TV. • Carry the TV with a detached Table-Top Stand so you are packaged with the adequate number of people; Sudden room ...
... attachment instructions provided with reflective wall and floor materials. • Avoid moving the TV from a cold area to a warm area. Getting Started Getting Started Setting Up Your TV Some TV models are not mounting the TV to a wall, you will need to attach the Table-Top Stand. Be sure...task. You will need a Phillips screwdriver and the supplied screws to consider the following while setting up your TV: • Disconnect all cables when carrying the TV. • Carry the TV with a detached Table-Top Stand so you are packaged with the adequate number of people; Sudden room ...
Operating Instructions
Page 8
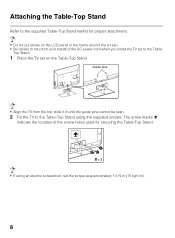
... for securing the Table-Top Stand. • If using the supplied screws. Guide pins • Align the TV from the top, slide it in until the guide pins cannot be seen. 2 Fix the TV to the Table- The arrow marks indicate the location of the screw holes used for proper attachment. •...; Do not put stress on the Table-Top Stand. Top Stand. 1 Place the TV set on the LCD panel or the frame around the screen. • Be careful to not pinch your hands or the AC power cord when...
... for securing the Table-Top Stand. • If using the supplied screws. Guide pins • Align the TV from the top, slide it in until the guide pins cannot be seen. 2 Fix the TV to the Table- The arrow marks indicate the location of the screw holes used for proper attachment. •...; Do not put stress on the Table-Top Stand. Top Stand. 1 Place the TV set on the LCD panel or the frame around the screen. • Be careful to not pinch your hands or the AC power cord when...
Operating Instructions
Page 9
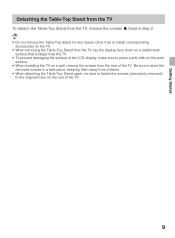
... Table-Top Stand for any reason other than to install corresponding accessories on the TV. • When removing the Table-Top Stand from the TV, lay the display face down on a stable work surface that is larger than the TV. • To prevent damaging the surface of the LCD display, make sure to... (previously removed) to place a soft cloth on the work surface. • When installing the TV on the rear of the TV. Getting Started Detaching the Table-Top Stand from the TV To detach the Table-Top Stand from the TV, remove the screws fixed in a safe place, keeping them away from the rear of...
... Table-Top Stand for any reason other than to install corresponding accessories on the TV. • When removing the Table-Top Stand from the TV, lay the display face down on a stable work surface that is larger than the TV. • To prevent damaging the surface of the LCD display, make sure to... (previously removed) to place a soft cloth on the work surface. • When installing the TV on the rear of the TV. Getting Started Detaching the Table-Top Stand from the TV To detach the Table-Top Stand from the TV, remove the screws fixed in a safe place, keeping them away from the rear of...
Operating Instructions
Page 10
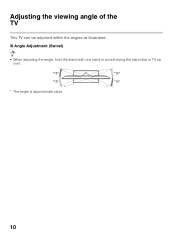
x Angle Adjustment (Swivel) • When adjusting the angle, hold the stand with one hand to avoid having the stand slip or TV tip over. *15° *15° *15° *15° * The angle is approximate value. 10 Adjusting the viewing angle of the TV This TV can be adjusted within the angles as illustrated.
x Angle Adjustment (Swivel) • When adjusting the angle, hold the stand with one hand to avoid having the stand slip or TV tip over. *15° *15° *15° *15° * The angle is approximate value. 10 Adjusting the viewing angle of the TV This TV can be adjusted within the angles as illustrated.
Operating Instructions
Page 11
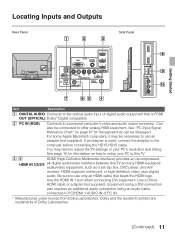
... connected to PC/HDMI 1 AUDIO IN of Dolby Laboratories. (Continued) 11 For some Apple Macintosh computers, it may need to adjust the TV settings or your PC to this TV. 3, 9 HDMI (High-Definition Multimedia Interface) provides an uncompressed, HDMI IN 1/2/3/4 all-digital audio/video interface between this... TV and any HDMI-equipped audio/video equipment, such as a set-top box, DVD player, and A/V receiver. Use a DVI-to setup your PC's resolution...
... connected to PC/HDMI 1 AUDIO IN of Dolby Laboratories. (Continued) 11 For some Apple Macintosh computers, it may need to adjust the TV settings or your PC to this TV. 3, 9 HDMI (High-Definition Multimedia Interface) provides an uncompressed, HDMI IN 1/2/3/4 all-digital audio/video interface between this... TV and any HDMI-equipped audio/video equipment, such as a set-top box, DVD player, and A/V receiver. Use a DVI-to setup your PC's resolution...
Operating Instructions
Page 12
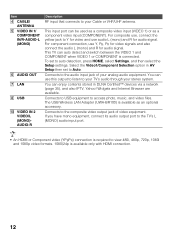
...when VIDEO 1 or COMPONENT is required to access photo, music, and video files. If you have mono equipment, connect its audio output port to the TV's L (MONO) audio input port. • An HDMI or Component video (YPBPR) connection is connected. For component connection, use this output to listen ...to your TV's audio through your stereo system. This input port can use Y, PB, PR for video signals and also connect the audio L (mono) and R for audio...
...when VIDEO 1 or COMPONENT is required to access photo, music, and video files. If you have mono equipment, connect its audio output port to the TV's L (MONO) audio input port. • An HDMI or Component video (YPBPR) connection is connected. For component connection, use this output to listen ...to your TV's audio through your stereo system. This input port can use Y, PB, PR for video signals and also connect the audio L (mono) and R for audio...

Operating Instructions
Page 13
... supplied) to Cable or Antenna found under the Channel settings for both cable (QAM and 8VSB) and external VHF/UHF antenna (ATSC). This TV is strongly recommended that you connect the CABLE/ANTENNA input using a 75-ohm coaxial cable to receive optimum picture quality. A 300-ohm twin lead...to set the Signal Type setting to switch between the cable and over-theair antenna programming, as indicated below. Getting Started Connecting the TV Cable System or VHF/UHF Antenna System You can easily be affected by radio frequency interference, resulting in your input signal (page 56). 13...
... supplied) to Cable or Antenna found under the Channel settings for both cable (QAM and 8VSB) and external VHF/UHF antenna (ATSC). This TV is strongly recommended that you connect the CABLE/ANTENNA input using a 75-ohm coaxial cable to receive optimum picture quality. A 300-ohm twin lead...to set the Signal Type setting to switch between the cable and over-theair antenna programming, as indicated below. Getting Started Connecting the TV Cable System or VHF/UHF Antenna System You can easily be affected by radio frequency interference, resulting in your input signal (page 56). 13...

Operating Instructions
Page 14
... antenna cable Audio cable (stereo mini plugs) 14 x Shown with HDMI Connection Rear of TV CATV/Satellite antenna cable HD cable box/ HD satellite box HDMI cable x Shown with DVI Connection Rear of TV DVI-to your TV via the HDMI or component video (with audio) input located on the back of your... TV. HD Cable Box/HD Satellite Box You can enjoy high-definition programming by subscribing to a high...
... antenna cable Audio cable (stereo mini plugs) 14 x Shown with HDMI Connection Rear of TV CATV/Satellite antenna cable HD cable box/ HD satellite box HDMI cable x Shown with DVI Connection Rear of TV DVI-to your TV via the HDMI or component video (with audio) input located on the back of your... TV. HD Cable Box/HD Satellite Box You can enjoy high-definition programming by subscribing to a high...
Operating Instructions
Page 15
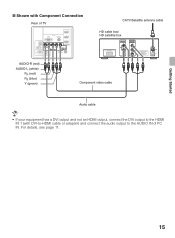
For details, see page 11. 15 Getting Started x Shown with Component Connection Rear of TV CATV/Satellite antenna cable HD cable box/ HD satellite box AUDIO-R (red) AUDIO-L (white) PR (red) PB (blue) Y (green) Component video cable Audio cable • If your equipment has a DVI output and not an HDMI output, connect the DVI output to the HDMI IN 1 (with DVI-to-HDMI cable or adapter) and connect the audio output to the AUDIO IN of PC IN.
For details, see page 11. 15 Getting Started x Shown with Component Connection Rear of TV CATV/Satellite antenna cable HD cable box/ HD satellite box AUDIO-R (red) AUDIO-L (white) PR (red) PB (blue) Y (green) Component video cable Audio cable • If your equipment has a DVI output and not an HDMI output, connect the DVI output to the HDMI IN 1 (with DVI-to-HDMI cable or adapter) and connect the audio output to the AUDIO IN of PC IN.

Operating Instructions
Page 16
This TV can also be connected to a PC with a DVI or HDMI output. (Refer to the separate Quick Setup Guide.) Rear of TV HD15-HD15 cable (analog RGB) Audio cable (stereo mini plugs) • Connect the PC IN jack to the PC using an HD15-HD15 cable with ferrite core (analog RGB) and audio cable (page 11). 16 PC Use the TV as a monitor for your PC by connecting an HD15-HD15 cable connection as shown below.
This TV can also be connected to a PC with a DVI or HDMI output. (Refer to the separate Quick Setup Guide.) Rear of TV HD15-HD15 cable (analog RGB) Audio cable (stereo mini plugs) • Connect the PC IN jack to the PC using an HD15-HD15 cable with ferrite core (analog RGB) and audio cable (page 11). 16 PC Use the TV as a monitor for your PC by connecting an HD15-HD15 cable connection as shown below.

Operating Instructions
Page 17
Connecting Other Equipment Blu-ray Disc Player/"PS3" DVD player Digital satellite Digital receiver cable box Audio system Digital audio equipment (A/V Receiver/ Home Theater) Personal computer USB Getting Started Router/ Modem Analog audio Digital equipment recorder (A/V Receiver/ HomeTheater) CABLE/ ANTENNA VCR/Game system/ Camcorder • Refer to the Quick Setup Guide (supplied) when connecting other equipment to your TV. 17
Connecting Other Equipment Blu-ray Disc Player/"PS3" DVD player Digital satellite Digital receiver cable box Audio system Digital audio equipment (A/V Receiver/ Home Theater) Personal computer USB Getting Started Router/ Modem Analog audio Digital equipment recorder (A/V Receiver/ HomeTheater) CABLE/ ANTENNA VCR/Game system/ Camcorder • Refer to the Quick Setup Guide (supplied) when connecting other equipment to your TV. 17

Operating Instructions
Page 18
... ventilation. Installed with stand 4 inches (10 cm) 11 7/8 inches (30 cm) 4 inches (10 cm) 2 3/8 inches (6 cm) Leave at least this much space around the TV as follows: Air circulation is blocked. Never install the TV set . Allow enough space around the set as shown below 41 °F (5 °C). Avoid operating the... TV at least this much space around the set. Air circulation is blocked. Installed on the wall 4 inches (10 cm) 11 7/8 inches (30 cm) 4 inches (...
... ventilation. Installed with stand 4 inches (10 cm) 11 7/8 inches (30 cm) 4 inches (10 cm) 2 3/8 inches (6 cm) Leave at least this much space around the TV as follows: Air circulation is blocked. Never install the TV set . Allow enough space around the set as shown below 41 °F (5 °C). Avoid operating the... TV at least this much space around the set. Air circulation is blocked. Installed on the wall 4 inches (10 cm) 11 7/8 inches (30 cm) 4 inches (...
Operating Instructions
Page 19
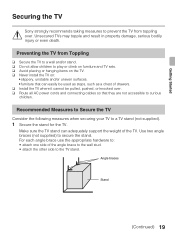
Getting Started Securing the TV Sony strongly recommends taking measures to a TV stand (not supplied). 1 Secure the stand for the TV. For each angle brace use the appropriate hardware to: • attach one side of drawers. ❑ Install the TV where it cannot be used as steps, such as a chest of the angle ...brace to the wall stud. • attach the other side to secure the stand. Angle braces Stand (Continued) 19 Preventing the TV from toppling over . ❑ Route all AC power cords and connecting cables so that can adequately support the weight of the...
Getting Started Securing the TV Sony strongly recommends taking measures to a TV stand (not supplied). 1 Secure the stand for the TV. For each angle brace use the appropriate hardware to: • attach one side of drawers. ❑ Install the TV where it cannot be used as steps, such as a chest of the angle ...brace to the wall stud. • attach the other side to secure the stand. Angle braces Stand (Continued) 19 Preventing the TV from toppling over . ❑ Route all AC power cords and connecting cables so that can adequately support the weight of the...
Operating Instructions
Page 20
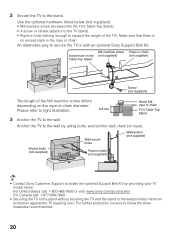
... rope). For United States call: 1-800-488-7669 or visit: www.sony.com/accessories For Canada call: 1-877-899-7669 • Securing the TV to the stand without securing the TV and the stand to secure the TV is no excess slack in the rope or chain. Screw hole on the...not supplied) Anchor bolts (not supplied) Rope or chain (not supplied) • Contact Sony Customer Support to the wall by providing your TV model name. For further protection, be sure to the stand. 2 Secure the TV to follow the three measures recommended. 20 Use the optional hardware listed below (not supplied...
... rope). For United States call: 1-800-488-7669 or visit: www.sony.com/accessories For Canada call: 1-877-899-7669 • Securing the TV to the stand without securing the TV and the stand to secure the TV is no excess slack in the rope or chain. Screw hole on the...not supplied) Anchor bolts (not supplied) Rope or chain (not supplied) • Contact Sony Customer Support to the wall by providing your TV model name. For further protection, be sure to the stand. 2 Secure the TV to follow the three measures recommended. 20 Use the optional hardware listed below (not supplied...


