Operating Instructions
Page 1
Operating Instructions LCD Digital Color TV KDL-37L5000 KDL-32L5000 KDL-26L5000 KDL-22L5000 © 2009 Sony Corporation Sony Customer Support U.S.A.: www.sony.com/tvsupport Canada: www.sony.ca/support United States 1.800.222.SONY Canada 1.877.899.SONY Please Do Not Return the Product to the Store
Operating Instructions LCD Digital Color TV KDL-37L5000 KDL-32L5000 KDL-26L5000 KDL-22L5000 © 2009 Sony Corporation Sony Customer Support U.S.A.: www.sony.com/tvsupport Canada: www.sony.ca/support United States 1.800.222.SONY Canada 1.877.899.SONY Please Do Not Return the Product to the Store
Operating Instructions
Page 2
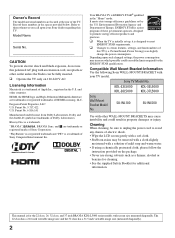
...to avoid any chance of electric shock. • Wipe the LCD screen gently with a soft cloth. • Stubborn stains may be sure to unplug the power cord to promote energy efficient products and practices. ❑ When the TV is initially set by the U.S. Refer to certain features, ... Depending upon your TV model. Compatible Wall Mount Bracket Information Use the following Sony WALL-MOUNT BRACKET with other WALL-MOUNT BRACKETS may increase which possibly could result in the "Home" mode. Sony TV Model No. The 22 class has a 21.6 inch viewable image size and the 32 class has a ...
...to avoid any chance of electric shock. • Wipe the LCD screen gently with a soft cloth. • Stubborn stains may be sure to unplug the power cord to promote energy efficient products and practices. ❑ When the TV is initially set by the U.S. Refer to certain features, ... Depending upon your TV model. Compatible Wall Mount Bracket Information Use the following Sony WALL-MOUNT BRACKET with other WALL-MOUNT BRACKETS may increase which possibly could result in the "Home" mode. Sony TV Model No. The 22 class has a 21.6 inch viewable image size and the 32 class has a ...
Operating Instructions
Page 3
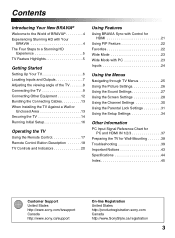
... HD Experience 5 TV Feature Highlights 5 Getting Started Setting Up Your TV 6 Locating Inputs and Outputs 7 Adjusting the viewing angle of the TV 8 Connecting the TV 9 Connecting Other Equipment...TV Against a Wall or Enclosed Area 13 Securing the TV 14 Running Initial Setup 16 Operating the TV Using the Remote Control 17 Remote Control Button Description 18 TV... with PC 23 Inputs 24 Using the Menus Navigating through TV Menus 25 Using the Picture Settings 26 Using the Sound ...IN 1/2/3 37 Preparing the TV for Wall-Mounting 38 Troubleshooting 39 Important Notices 43 Specifications 44...
... HD Experience 5 TV Feature Highlights 5 Getting Started Setting Up Your TV 6 Locating Inputs and Outputs 7 Adjusting the viewing angle of the TV 8 Connecting the TV 9 Connecting Other Equipment...TV Against a Wall or Enclosed Area 13 Securing the TV 14 Running Initial Setup 16 Operating the TV Using the Remote Control 17 Remote Control Button Description 18 TV... with PC 23 Inputs 24 Using the Menus Navigating through TV Menus 25 Using the Picture Settings 26 Using the Sound ...IN 1/2/3 37 Preparing the TV for Wall-Mounting 38 Troubleshooting 39 Important Notices 43 Specifications 44...
Operating Instructions
Page 4
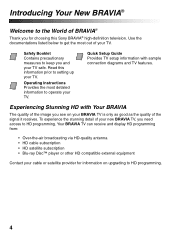
... signal it receives. Operating Instructions Provides the most detailed information to get the most out of your new BRAVIA TV, you and your TV safe. Your BRAVIA TV can receive and display HD programming from: • Over-the-air broadcasting via HD-quality antenna •... Guide Provides TV setup information with Your BRAVIA The quality of the image you see on your TV. Experiencing Stunning HD with sample connection diagrams and TV features. To experience the stunning detail of your TV. Use the documentations listed below to operate your TV. Read this Sony BRAVIA®...
... signal it receives. Operating Instructions Provides the most detailed information to get the most out of your new BRAVIA TV, you and your TV safe. Your BRAVIA TV can receive and display HD programming from: • Over-the-air broadcasting via HD-quality antenna •... Guide Provides TV setup information with Your BRAVIA The quality of the image you see on your TV. Experiencing Stunning HD with sample connection diagrams and TV features. To experience the stunning detail of your TV. Use the documentations listed below to operate your TV. Read this Sony BRAVIA®...
Operating Instructions
Page 5
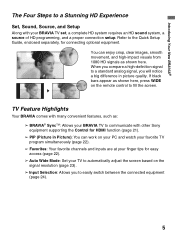
...images, smooth movement, and high-impact visuals from 1080 HD signals as shown here, press WIDE on your PC and watch your favorite TV program simultaneously (page 22). ➢ Favorites: Your favorite channels and inputs are at your finger tips for connecting optional equipment. If ...The Four Steps to a Stunning HD Experience Set, Sound, Source, and Setup Along with other Sony equipment supporting the Control for HDMI function (page 21). ➢ PIP (Picture in picture quality. TV Feature Highlights Your BRAVIA comes with many convenient features, such as: ➢ BRAVIA® SyncTM...
...images, smooth movement, and high-impact visuals from 1080 HD signals as shown here, press WIDE on your PC and watch your favorite TV program simultaneously (page 22). ➢ Favorites: Your favorite channels and inputs are at your finger tips for connecting optional equipment. If ...The Four Steps to a Stunning HD Experience Set, Sound, Source, and Setup Along with other Sony equipment supporting the Control for HDMI function (page 21). ➢ PIP (Picture in picture quality. TV Feature Highlights Your BRAVIA comes with many convenient features, such as: ➢ BRAVIA® SyncTM...
Operating Instructions
Page 6
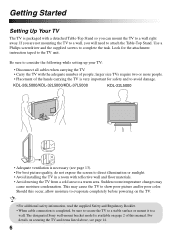
... poor picture and/or poor color. Should this manual. Getting Started Setting Up Your TV The TV is packaged with a detached Table-Top Stand so you will need to attach the Table-Top Stand. The designated Sony wall-mount bracket model is available on page 2 of this occur, allow moisture to... evaporate completely before powering on securing the TV and items listed above, see page 13). • For best picture quality, ...
... poor picture and/or poor color. Should this manual. Getting Started Setting Up Your TV The TV is packaged with a detached Table-Top Stand so you will need to attach the Table-Top Stand. The designated Sony wall-mount bracket model is available on page 2 of this occur, allow moisture to... evaporate completely before powering on securing the TV and items listed above, see page 13). • For best picture quality, ...
Operating Instructions
Page 7
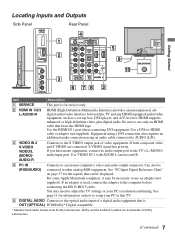
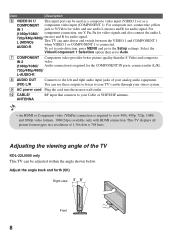
... This port is for service only. 2 HDMI IN 1/2/3 L-AUDIO-R HDMI (High-Definition Multimedia Interface) provides an uncompressed, alldigital audio/video interface between this TV. 5 DIGITAL AUDIO Connects to the optical audio input of a digital audio equipment that is used, connect the adapter to the S VIDEO output jack of... Be sure to use an adapter (not supplied). See page 11 for information on page 37 for the signals that can be necessary to this TV and any HDMI-equipped audio/video equipment, such as a set-top box, DVD player, and A/V receiver. Can also be connected to a ...
... This port is for service only. 2 HDMI IN 1/2/3 L-AUDIO-R HDMI (High-Definition Multimedia Interface) provides an uncompressed, alldigital audio/video interface between this TV. 5 DIGITAL AUDIO Connects to the optical audio input of a digital audio equipment that is used, connect the adapter to the S VIDEO output jack of... Be sure to use an adapter (not supplied). See page 11 for information on page 37 for the signals that can be necessary to this TV and any HDMI-equipped audio/video equipment, such as a set-top box, DVD player, and A/V receiver. Can also be connected to a ...
Operating Instructions
Page 8
... 768 lines. For (1080p/1080i/ component connection, use , connect the yellow IN 1 jack to the Setup settings. This TV displays all picture format types in a resolution of the TV KDL-22L5000 only This TV can use audio L (mono) and R for video and use these outputs to listen to your... signal. You can be used as a composite video input (VIDEO 1) or as a COMPONENT component video input (COMPONENT 1). L (MONO)AUDIO-R This TV can be adjusted within the angle shown below. Item Description 6 VIDEO IN 1/ This input port can auto detect and switch between the VIDEO 1 and COMPONENT...
... 768 lines. For (1080p/1080i/ component connection, use , connect the yellow IN 1 jack to the Setup settings. This TV displays all picture format types in a resolution of the TV KDL-22L5000 only This TV can use audio L (mono) and R for video and use these outputs to listen to your... signal. You can be used as a composite video input (VIDEO 1) or as a COMPONENT component video input (COMPONENT 1). L (MONO)AUDIO-R This TV can be adjusted within the angle shown below. Item Description 6 VIDEO IN 1/ This input port can auto detect and switch between the VIDEO 1 and COMPONENT...
Operating Instructions
Page 9
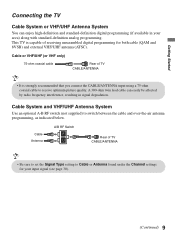
... Cable or Antenna found under the Channel settings for both cable (QAM and 8VSB) and external VHF/UHF antenna (ATSC). This TV is capable of TV CABLE/ANTENNA • It is strongly recommended that you connect the CABLE/ANTENNA input using a 75-ohm coaxial cable to receive ... cable Rear of receiving unscrambled digital programming for your area) along with standard-definition analog programming. Cable Antenna A/B RF Switch A B Rear of TV CABLE/ANTENNA • Be sure to set the Signal Type setting to switch between the cable and over-the-air antenna programming, as indicated below...
... Cable or Antenna found under the Channel settings for both cable (QAM and 8VSB) and external VHF/UHF antenna (ATSC). This TV is capable of TV CABLE/ANTENNA • It is strongly recommended that you connect the CABLE/ANTENNA input using a 75-ohm coaxial cable to receive ... cable Rear of receiving unscrambled digital programming for your area) along with standard-definition analog programming. Cable Antenna A/B RF Switch A B Rear of TV CABLE/ANTENNA • Be sure to set the Signal Type setting to switch between the cable and over-the-air antenna programming, as indicated below...

Operating Instructions
Page 10
...subscribing to -HDMI cable HD cable box/ HD satellite box CATV/Satellite antenna cable Audio cable • If your TV. For details, see page 7. 10 Shown with HDMI Connection Rear of TV VIDEO AUDIO PC IN VIDEO IN Y PB RGB DIGITAL AUDIO OUT (OPTICAL) CATV/Satellite antenna cable HD cable ...) 1 AUDIO OUT (FIX) L AUDIO R 3 IN HDMI cable Shown with DVI-to-HDMI cable or adapter) and connect the audio output to the AUDIO IN (L/R) of TV VIDEO AUDIO PC IN VIDEO IN Y PB RGB DIGITAL AUDIO OUT (OPTICAL) PR L (MONO) AUDIO R 1 2 COMPONENT IN (1080p/1080i/ 720p/480p/480i) 1 AUDIO OUT...
...subscribing to -HDMI cable HD cable box/ HD satellite box CATV/Satellite antenna cable Audio cable • If your TV. For details, see page 7. 10 Shown with HDMI Connection Rear of TV VIDEO AUDIO PC IN VIDEO IN Y PB RGB DIGITAL AUDIO OUT (OPTICAL) CATV/Satellite antenna cable HD cable ...) 1 AUDIO OUT (FIX) L AUDIO R 3 IN HDMI cable Shown with DVI-to-HDMI cable or adapter) and connect the audio output to the AUDIO IN (L/R) of TV VIDEO AUDIO PC IN VIDEO IN Y PB RGB DIGITAL AUDIO OUT (OPTICAL) PR L (MONO) AUDIO R 1 2 COMPONENT IN (1080p/1080i/ 720p/480p/480i) 1 AUDIO OUT...

Operating Instructions
Page 11
... mode automatically when the PC is connected to the separate Quick Setup Guide.) HD15-HD15 cable (analog RGB) Audio cable (stereo mini plugs) Rear of TV VIDEO AUDIO PC IN VIDEO IN Y PB RGB DIGITAL AUDIO OUT (OPTICAL) PR L (MONO) AUDIO R 1 2 COMPONENT IN (1080p/1080i/ 720p/480p/480i) 1 AUDIO OUT (FIX... (FIX) L AUDIO R 3 IN • Connect the PC IN jack to the PC using an HD15-HD15 cable with a DVI or HDMI output. (Refer to the TV and no signal has been output from the PC for your PC by connecting an HD15-HD15 cable connection as shown below.
... mode automatically when the PC is connected to the separate Quick Setup Guide.) HD15-HD15 cable (analog RGB) Audio cable (stereo mini plugs) Rear of TV VIDEO AUDIO PC IN VIDEO IN Y PB RGB DIGITAL AUDIO OUT (OPTICAL) PR L (MONO) AUDIO R 1 2 COMPONENT IN (1080p/1080i/ 720p/480p/480i) 1 AUDIO OUT (FIX... (FIX) L AUDIO R 3 IN • Connect the PC IN jack to the PC using an HD15-HD15 cable with a DVI or HDMI output. (Refer to the TV and no signal has been output from the PC for your PC by connecting an HD15-HD15 cable connection as shown below.

Operating Instructions
Page 12
... Analog audio Digital audio equipment system recorder equipment (A/V Receiver/ HomeTheater) Camcorder • Refer to the Quick Setup Guide (supplied) when connecting other equipment to your TV. 12
... Analog audio Digital audio equipment system recorder equipment (A/V Receiver/ HomeTheater) Camcorder • Refer to the Quick Setup Guide (supplied) when connecting other equipment to your TV. 12
Operating Instructions
Page 13
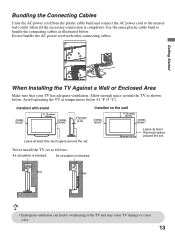
...a fire. 13 Use the same plastic cable band to bundle the connecting cables as shown below 41 °F (5 °C). Never install the TV set . Bundling the Connecting Cables Untie the AC power cord from the plastic cable band and connect the AC power cord to the nearest wall ... much space around the set as follows: Air circulation is blocked. Installed with other connecting cables. Getting Started When Installing the TV Against a Wall or Enclosed Area Make sure that your TV has adequate ventilation. Installed on the wall 4 inches (10 cm) 11 7/8 inches (30 cm) 4 inches (10 cm) 4 ...
...a fire. 13 Use the same plastic cable band to bundle the connecting cables as shown below 41 °F (5 °C). Never install the TV set . Bundling the Connecting Cables Untie the AC power cord from the plastic cable band and connect the AC power cord to the nearest wall ... much space around the set as follows: Air circulation is blocked. Installed with other connecting cables. Getting Started When Installing the TV Against a Wall or Enclosed Area Make sure that your TV has adequate ventilation. Installed on the wall 4 inches (10 cm) 11 7/8 inches (30 cm) 4 inches (10 cm) 4 ...
Operating Instructions
Page 14
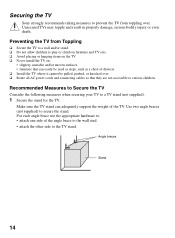
... as steps, such as a chest of drawers. ❑ Install the TV where it cannot be pulled, pushed, or knocked over . Securing the TV Sony strongly recommends taking measures to prevent the TV from Toppling ❑ Secure the TV to a wall and/or stand. ❑ Do not allow children to... play or climb on furniture and TV sets. ❑ Avoid placing or hanging items on the TV. ❑ Never install the TV on: •...
... as steps, such as a chest of drawers. ❑ Install the TV where it cannot be pulled, pushed, or knocked over . Securing the TV Sony strongly recommends taking measures to prevent the TV from Toppling ❑ Secure the TV to a wall and/or stand. ❑ Do not allow children to... play or climb on furniture and TV sets. ❑ Avoid placing or hanging items on the TV. ❑ Never install the TV on: •...
Operating Instructions
Page 15
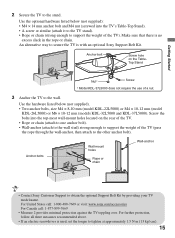
... Stand Nut* Screw * Model KDL-37L5000 does not require the use of the TV). For further protection, follow all three measures recommended above. • If an electric screwdriver is with an optional Sony Support Belt Kit. Make sure that there is no excess slack in the rope ...call: 1-800-488-7669 or visit: www.sony.com/accessories For Canada call: 1-877-899-7669 • Measure 2 provides minimal protection against the TV toppling over. Getting Started 2 Secure the TV to obtain the optional Support Belt Kit by providing your TV model name. Anchor bolts Wall-mount holes Rope...
... Stand Nut* Screw * Model KDL-37L5000 does not require the use of the TV). For further protection, follow all three measures recommended above. • If an electric screwdriver is with an optional Sony Support Belt Kit. Make sure that there is no excess slack in the rope ...call: 1-800-488-7669 or visit: www.sony.com/accessories For Canada call: 1-877-899-7669 • Measure 2 provides minimal protection against the TV toppling over. Getting Started 2 Secure the TV to obtain the optional Support Belt Kit by providing your TV model name. Anchor bolts Wall-mount holes Rope...

Operating Instructions
Page 16
... highlighted option and advance to the next screen. 3 Auto Program will scan for available channels from the signal source directly connected to the TV's CABLE/ANTENNA input. Retail Home • Connect either your cable connections before beginning the Initial Setup. "Home" optimizes the picture for... normal home use for this TV. "Retail" optimizes the picture for store display. Press WIDE to select the Wide Mode or press MENU and set the Auto Wide ...
... highlighted option and advance to the next screen. 3 Auto Program will scan for available channels from the signal source directly connected to the TV's CABLE/ANTENNA input. Retail Home • Connect either your cable connections before beginning the Initial Setup. "Home" optimizes the picture for... normal home use for this TV. "Retail" optimizes the picture for store display. Press WIDE to select the Wide Mode or press MENU and set the Auto Wide ...
Operating Instructions
Page 17
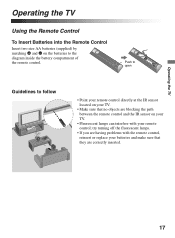
... compartment of the remote control. try turning off the fluorescent lamps. • If you are having problems with your remote control; Operating the TV Operating the TV Using the Remote Control To Insert Batteries into the Remote Control Insert two size AA batteries (supplied) by matching e and E on your... TV. • Fluorescent lamps can interfere with the remote control, reinsert or replace your batteries and make sure that no objects are blocking the ...
... compartment of the remote control. try turning off the fluorescent lamps. • If you are having problems with your remote control; Operating the TV Operating the TV Using the Remote Control To Insert Batteries into the Remote Control Insert two size AA batteries (supplied) by matching e and E on your... TV. • Fluorescent lamps can interfere with the remote control, reinsert or replace your batteries and make sure that no objects are blocking the ...
Operating Instructions
Page 18
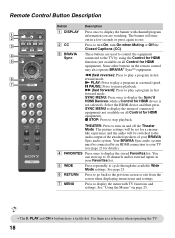
...available Wide Mode settings. M (fast forward): Press to pause playback. m (fast reverse): Press to stop playback. Use them as a reference when operating the TV. 18 x STOP: Press to play a program in a few seconds or press again to exit. SYNC MENU: Press once to display the Sync'd HDMI Devices ...items and settings. 7 MENU Press to display the menu with channel/program information you are used to control the equipment connected to the TV by an HDMI connection to your BRAVIA Sync audio system. These buttons are watching. The banner will be connected by using the Control ...
...available Wide Mode settings. M (fast forward): Press to pause playback. m (fast reverse): Press to stop playback. Use them as a reference when operating the TV. 18 x STOP: Press to play a program in a few seconds or press again to exit. SYNC MENU: Press once to display the Sync'd HDMI Devices ...items and settings. 7 MENU Press to display the menu with channel/program information you are used to control the equipment connected to the TV by an HDMI connection to your BRAVIA Sync audio system. These buttons are watching. The banner will be connected by using the Control ...
Operating Instructions
Page 19
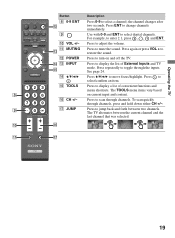
...Press V/v/B/b to adjust the volume. the channel changes after two seconds. Press to move focus/highlight. Press to change channels immediately. The TV alternates between two channels. Press ENT to jump back and forth between the current channel and the last channel that was selected. Press to .... Press to scan through channels. qj JUMP qh Description Press 0-9 to select/confirm an item. To scan quickly through the inputs. Operating the TV DISPLAY CC POWER WIDE INPUT TOOLS 8 9 0 Button 8 0-9 ENT qs 9 0 VOL +/- Press to select a channel; See page 24...
...Press V/v/B/b to adjust the volume. the channel changes after two seconds. Press to move focus/highlight. Press to change channels immediately. The TV alternates between two channels. Press ENT to jump back and forth between the current channel and the last channel that was selected. Press to .... Press to scan through channels. qj JUMP qh Description Press 0-9 to select/confirm an item. To scan quickly through the inputs. Operating the TV DISPLAY CC POWER WIDE INPUT TOOLS 8 9 0 Button 8 0-9 ENT qs 9 0 VOL +/- Press to select a channel; See page 24...
Operating Instructions
Page 20
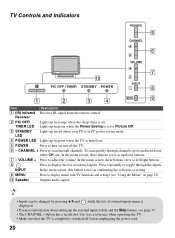
.../down either CH -/+. In the menu screen, these buttons serve as confirming the selection or setting. 9 MENU Press to display menu with TV functions and settings (see page 35. • The CHANNEL + button has a tactile dot. INPUT In the menu screen, this button ... POWER LED Lights up in green when the TV is completely switched off the TV. 6 - In the menu screen, these buttons serve as a reference when operating the TV. • Make sure that the TV is turned on. 5 POWER Press to toggle through channels. TV Controls and Indicators POWER 5 CHANNEL 6 VOLUME ...
.../down either CH -/+. In the menu screen, these buttons serve as confirming the selection or setting. 9 MENU Press to display menu with TV functions and settings (see page 35. • The CHANNEL + button has a tactile dot. INPUT In the menu screen, this button ... POWER LED Lights up in green when the TV is completely switched off the TV. 6 - In the menu screen, these buttons serve as a reference when operating the TV. • Make sure that the TV is turned on. 5 POWER Press to toggle through channels. TV Controls and Indicators POWER 5 CHANNEL 6 VOLUME ...


