Operating Instructions
Page 4
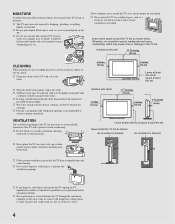
...Installed on a bed, sofa, rug or other materials. s Wipe the LCD screen gently with a solution of the ventilation openings is provided. s If using a chemically pretreated cloth, please follow the instruction provided on the TV. s Never use a power line operated TV set . s Do not block or cover the ventilation openings with stand 4... a dry soft cloth. 4 inches (10 cm) 4 inches (10 cm) 4 inches (10 cm) Leave at least this much space around the set. s Never place the TV on the wall 11 7/8 inches (30 cm) CLEANING When cleaning, be sure to unplug the power cord to fall into the...
...Installed on a bed, sofa, rug or other materials. s Wipe the LCD screen gently with a solution of the ventilation openings is provided. s If using a chemically pretreated cloth, please follow the instruction provided on the TV. s Never use a power line operated TV set . s Do not block or cover the ventilation openings with stand 4... a dry soft cloth. 4 inches (10 cm) 4 inches (10 cm) 4 inches (10 cm) Leave at least this much space around the set. s Never place the TV on the wall 11 7/8 inches (30 cm) CLEANING When cleaning, be sure to unplug the power cord to fall into the...

Operating Instructions
Page 5
...possible fire or electric shock. Prevent the TV from toppling over Take measures to prevent the TV from the speaker. s Secure the TV to climb on furniture that can cause deformation of the TV. s Do not install the TV on or play with furniture and TV sets. s Care should be installed near a... Keep any place you carry the TV, place your TV. s Electro-magnetic radiation emitted from the bottom. s When carrying the TV, do not subject it may protrude, such as on the LCD panel. s To prevent fire keep flammable objects or open flame (e.g. The TV should be taken to route all ...
...possible fire or electric shock. Prevent the TV from toppling over Take measures to prevent the TV from the speaker. s Secure the TV to climb on furniture that can cause deformation of the TV. s Do not install the TV on or play with furniture and TV sets. s Care should be installed near a... Keep any place you carry the TV, place your TV. s Electro-magnetic radiation emitted from the bottom. s When carrying the TV, do not subject it may protrude, such as on the LCD panel. s To prevent fire keep flammable objects or open flame (e.g. The TV should be taken to route all ...
Operating Instructions
Page 6
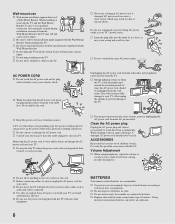
...Do not use a damaged or poorly fitting AC power outlet as audio and video) connected. A TV set with a protective earthing connection. s Consult your electrician to have the outlet changed to suit your TV. Volume Adjustment s When using headphones, adjust the volume to avoid excessive audio levels from the ... conservation and safety reasons, practice unplugging the AC power cord from the Wall-Mount Bracket, the TV may cause arcing and result in a fire or electric shock. s Use only an original Sony AC power cord with the AC power cord (or other equipment. s Do not use AC power...
...Do not use a damaged or poorly fitting AC power outlet as audio and video) connected. A TV set with a protective earthing connection. s Consult your electrician to have the outlet changed to suit your TV. Volume Adjustment s When using headphones, adjust the volume to avoid excessive audio levels from the ... conservation and safety reasons, practice unplugging the AC power cord from the Wall-Mount Bracket, the TV may cause arcing and result in a fire or electric shock. s Use only an original Sony AC power cord with the AC power cord (or other equipment. s Do not use AC power...
Operating Instructions
Page 7
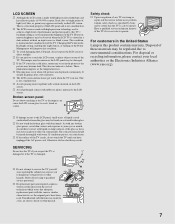
...the Power Management will improve this condition. This condition is not safe to the LCD panel, small traces of these may be found on some people. These phenomena improve as specified by Sony and to operate. It should be damaged. As with the same or similar ... avoid skin contact and exposure to the LCD screen. However, uneven brightness may expose you suspect the TV is damaged or if the TV is set to environmental considerations. Safety check s Upon completion of the TV. s The LCD screen and enclosure get warm when the TV is used . s Do not touch the...
...the Power Management will improve this condition. This condition is not safe to the LCD panel, small traces of these may be found on some people. These phenomena improve as specified by Sony and to operate. It should be damaged. As with the same or similar ... avoid skin contact and exposure to the LCD screen. However, uneven brightness may expose you suspect the TV is damaged or if the TV is set to environmental considerations. Safety check s Upon completion of the TV. s The LCD screen and enclosure get warm when the TV is used . s Do not touch the...

Operating Instructions
Page 9
... Optional Equipment 15 Securing the TV...17 Preventing the TV from Toppling 17 Use a Sony TV Stand 17 Recommended Measures to the World of MENU ...25 Using the Picture Settings 25 Using the Sound Settings 26 Using the Screen Settings 27 Using the PC Settings 28 Using the Channel Settings 29 Using the Parental Lock Settings 30 Using the Setup...
... Optional Equipment 15 Securing the TV...17 Preventing the TV from Toppling 17 Use a Sony TV Stand 17 Recommended Measures to the World of MENU ...25 Using the Picture Settings 25 Using the Sound Settings 26 Using the Screen Settings 27 Using the PC Settings 28 Using the Channel Settings 29 Using the Parental Lock Settings 30 Using the Setup...
Operating Instructions
Page 11
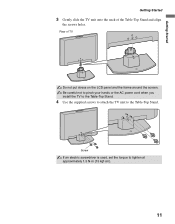
Screw If an electric screwdriver is used, set the torque to the Table-Top Stand. Getting Started Getting Started 3 Gently slide the TV unit onto the neck of TV Do not put stress on the LCD panel and the frame around the screen. Be careful not to pinch your hands or the AC power cord when you install the TV to the Table-Top Stand. 4 Use the supplied screws to attach the TV unit to tighten at approximately 1.5 N·m {15 kgf·cm}. 11 Rear of the Table-Top Stand and align the screws holes.
Screw If an electric screwdriver is used, set the torque to the Table-Top Stand. Getting Started Getting Started 3 Gently slide the TV unit onto the neck of TV Do not put stress on the LCD panel and the frame around the screen. Be careful not to pinch your hands or the AC power cord when you install the TV to the Table-Top Stand. 4 Use the supplied screws to attach the TV unit to tighten at approximately 1.5 N·m {15 kgf·cm}. 11 Rear of the Table-Top Stand and align the screws holes.
Operating Instructions
Page 12
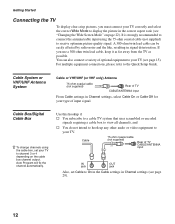
... a cable box to view all channels, and s You do not intend to hook up any other audio or video equipment to your TV to On in the Cable settings in signal deterioration. A 300-ohm twin lead cable can also connect a variety of optional equipment to receive optimum picture quality signal. You... System Cable or VHF/UHF (or VHF only) Antenna 75-ohm coaxial cable (not supplied) Rear of TV CABLE/ANTENNA input IN OUT jack jack Also, set your TV. If you must connect your TV correctly and select the correct Wide Mode to the Quick Setup Guide. Auto Program will fix the channel...
... a cable box to view all channels, and s You do not intend to hook up any other audio or video equipment to your TV to On in the Cable settings in signal deterioration. A 300-ohm twin lead cable can also connect a variety of optional equipment to receive optimum picture quality signal. You... System Cable or VHF/UHF (or VHF only) Antenna 75-ohm coaxial cable (not supplied) Rear of TV CABLE/ANTENNA input IN OUT jack jack Also, set your TV. If you must connect your TV correctly and select the correct Wide Mode to the Quick Setup Guide. Auto Program will fix the channel...
Operating Instructions
Page 13
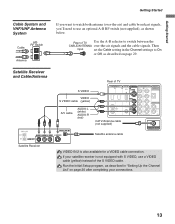
... page 29. Run the Initial Setup program, as described in the Channel settings to On or Off, as shown below. Getting Started Getting Started Cable...Antenna If you want to watch both antenna (over -the-air signals and the cable signals. Rear of TV Use the A-B selector to switch between the CABLE/ANTENNA over -the-air) and cable broadcast signals, ...you'll need to use a VIDEO cable (yellow) instead of TV IN PC IN VIDEO IN COMPONENT IN DIGITAL 1 2 1 1 2 AUDIO OUT RGB S VIDEO (OPTICAL) Y L AUDIO R VIDEO...
... page 29. Run the Initial Setup program, as described in the Channel settings to On or Off, as shown below. Getting Started Getting Started Cable...Antenna If you want to watch both antenna (over -the-air signals and the cable signals. Rear of TV Use the A-B selector to switch between the CABLE/ANTENNA over -the-air) and cable broadcast signals, ...you'll need to use a VIDEO cable (yellow) instead of TV IN PC IN VIDEO IN COMPONENT IN DIGITAL 1 2 1 1 2 AUDIO OUT RGB S VIDEO (OPTICAL) Y L AUDIO R VIDEO...
Operating Instructions
Page 14
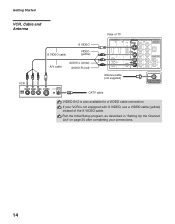
... program, as described in "Setting Up the Channel List" on page 20 after completing your VCR is also available for a VIDEO cable connection. If your connections. 14 Getting Started VCR, Cable and Antenna S VIDEO cable S VIDEO VIDEO (yellow) A/V cable AUDIO-L (white) AUDIO-R (red) VCR Rear of TV IN PC IN VIDEO IN...
... program, as described in "Setting Up the Channel List" on page 20 after completing your VCR is also available for a VIDEO cable connection. If your connections. 14 Getting Started VCR, Cable and Antenna S VIDEO cable S VIDEO VIDEO (yellow) A/V cable AUDIO-L (white) AUDIO-R (red) VCR Rear of TV IN PC IN VIDEO IN...
Operating Instructions
Page 15
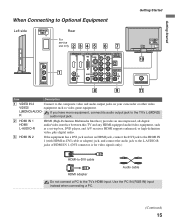
...) audio input jack. 2 HDMI IN 1 HDMI/ L-AUDIO-R HDMI (High-Definition Multimedia Interface) provides an uncompressed, all-digital audio/video interface between this TV and any HDMI-equipped audio/video equipment, such as video game equipment. Getting Started When Connecting to Optional Equipment Getting Started Left side SERVICE ONLY .../ANTENNA qa Item Description 1 VIDEO IN 2 Connect to the composite video and audio output jacks on your camcorder or other video VIDEO/ equipment such as a set-top box, DVD player, and A/V receiver.
...) audio input jack. 2 HDMI IN 1 HDMI/ L-AUDIO-R HDMI (High-Definition Multimedia Interface) provides an uncompressed, all-digital audio/video interface between this TV and any HDMI-equipped audio/video equipment, such as video game equipment. Getting Started When Connecting to Optional Equipment Getting Started Left side SERVICE ONLY .../ANTENNA qa Item Description 1 VIDEO IN 2 Connect to the composite video and audio output jacks on your camcorder or other video VIDEO/ equipment such as a set-top box, DVD player, and A/V receiver.
Operating Instructions
Page 16
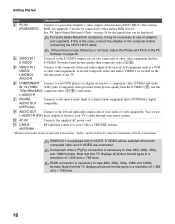
.../UHF antenna. * Manufactured under license from Dolby Laboratories. L-AUDIO-R 7 DIGITAL AUDIO OUT (OPTICAL) Connects to the optical audio input of the TV. 6 COMPONENT Connect to the composite video and audio output jacks on the left and right audio input jacks of 1,366 dots × 768 ... equipment that connects to view 480i, 480p, 720p, 1080i and 1080p formats. Component video (YPBPR) connection is necessary to your DVD player's or digital set-top box's component video (YPBPR) and audio IN 1/2 (1080i/ (L/R) jacks. See "PC Input Signal Reference Chart" on your stereo system. 0 ...
.../UHF antenna. * Manufactured under license from Dolby Laboratories. L-AUDIO-R 7 DIGITAL AUDIO OUT (OPTICAL) Connects to the optical audio input of the TV. 6 COMPONENT Connect to the composite video and audio output jacks on the left and right audio input jacks of 1,366 dots × 768 ... equipment that connects to view 480i, 480p, 720p, 1080i and 1080p formats. Component video (YPBPR) connection is necessary to your DVD player's or digital set-top box's component video (YPBPR) and audio IN 1/2 (1080i/ (L/R) jacks. See "PC Input Signal Reference Chart" on your stereo system. 0 ...
Operating Instructions
Page 17
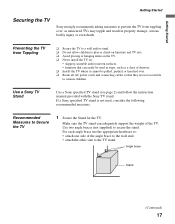
...each angle brace use the appropriate hardware to Secure the TV 1 Secure the Stand for the TV. Use a Sony TV Stand Use a Sony specified TV stand (see page 2) and follow the instruction manual provided with the Sony TV stand. Make sure the TV stand can easily be used , consider the following recommended ...Started Securing the TV Sony strongly recommends taking measures to secure the stand. Use two angle braces (not supplied) to prevent the TV from Toppling ❑ Secure the TV to a wall and/or stand. ❑ Do not allow children to play or climb on furniture and TV sets. ❑ ...
...each angle brace use the appropriate hardware to Secure the TV 1 Secure the Stand for the TV. Use a Sony TV Stand Use a Sony specified TV stand (see page 2) and follow the instruction manual provided with the Sony TV stand. Make sure the TV stand can easily be used , consider the following recommended ...Started Securing the TV Sony strongly recommends taking measures to secure the stand. Use two angle braces (not supplied) to prevent the TV from Toppling ❑ Secure the TV to a wall and/or stand. ❑ Do not allow children to play or climb on furniture and TV sets. ❑ ...
Operating Instructions
Page 18
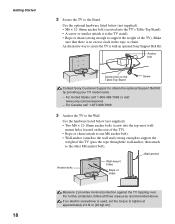
... enough to support the weight of the TV (pass the rope through the wall-anchor, then attach to the Wall. For Canada call : 1-800-488-7669 or visit: www.sony.com/accessories - mount holes located on the Table-Top Stand Screw Contact Sony Customer Support to tighten at approximately 2.0 ...three measures recommended above. Getting Started 18 2 Secure the TV to secure the TV is with an optional Sony Support Belt Kit. Make sure that there is used, set the torque to obtain the optional Support Belt Kit by providing your TV model name. - If an electric screwdriver is no excess...
... enough to support the weight of the TV (pass the rope through the wall-anchor, then attach to the Wall. For Canada call : 1-800-488-7669 or visit: www.sony.com/accessories - mount holes located on the Table-Top Stand Screw Contact Sony Customer Support to tighten at approximately 2.0 ...three measures recommended above. Getting Started 18 2 Secure the TV to secure the TV is with an optional Sony Support Belt Kit. Make sure that there is used, set the torque to obtain the optional Support Belt Kit by providing your TV model name. - If an electric screwdriver is no excess...
Operating Instructions
Page 20
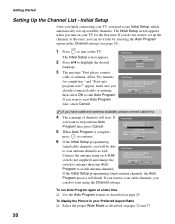
...: 0 Searching... If you do it later by selecting the Auto Program option in your TV for the first time. OK Cancel Program to set up available channels. To run Initial Setup, which automatically sets up the channels at a later time ❑ Use the Auto Program feature as described ...on your Preferred Aspect Ratio ❑ Select the proper Wide Mode as described on the TV. If the Initial Setup...
...: 0 Searching... If you do it later by selecting the Auto Program option in your TV for the first time. OK Cancel Program to set up available channels. To run Initial Setup, which automatically sets up the channels at a later time ❑ Use the Auto Program feature as described ...on your Preferred Aspect Ratio ❑ Select the proper Wide Mode as described on the TV. If the Initial Setup...
Operating Instructions
Page 21
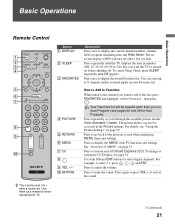
... off . Press to the previous screen when displaying MENU items and settings. Use them as a reference when operating the TV. (Continued) 21 To change or customize CC Display, see page 34. Use with TV functions and settings. Press again or press VOL + to select digital channels. Press ...once to display the current channel number, channel label, program remaining time and Wide Mode. To cancel Sleep Timer, press SLEEP repeatedly until the TV displays the time in minutes...
... off . Press to the previous screen when displaying MENU items and settings. Use them as a reference when operating the TV. (Continued) 21 To change or customize CC Display, see page 34. Use with TV functions and settings. Press again or press VOL + to select digital channels. Press ...once to display the current channel number, channel label, program remaining time and Wide Mode. To cancel Sleep Timer, press SLEEP repeatedly until the TV displays the time in minutes...
Operating Instructions
Page 22
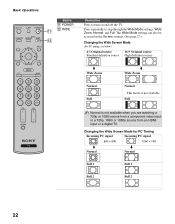
Press repeatedly to turn on and off the TV. Basic Operations Button qa POWER qa qs WIDE qs Description Press to step through the Wide Mode settings: Wide Zoom, Normal, and Full. Changing the Wide Screen Mode for PC Timing Incoming PC signal Incoming PC signal 800 × 600 ...1280 × 768 m Normal m Normal Full 1 Full 1 Full 2 Full 2 22 The Wide Mode settings can also be accessed in the Screen settings. (See page 27.) Changing the Wide Screen Mode (For PC timing, see below) 4:3 Original source 16:9 Original source Standard definition source...
Press repeatedly to turn on and off the TV. Basic Operations Button qa POWER qa qs WIDE qs Description Press to step through the Wide Mode settings: Wide Zoom, Normal, and Full. Changing the Wide Screen Mode for PC Timing Incoming PC signal Incoming PC signal 800 × 600 ...1280 × 768 m Normal m Normal Full 1 Full 1 Full 2 Full 2 22 The Wide Mode settings can also be accessed in the Screen settings. (See page 27.) Changing the Wide Screen Mode (For PC timing, see below) 4:3 Original source 16:9 Original source Standard definition source...
Operating Instructions
Page 23
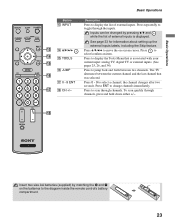
... TV or external inputs. (See pages 25, 26, and 34) Press to toggle through the inputs. the channel changes after two seconds. Basic Operations Description Press to the diagram inside the remote control's battery compartment. 23 See page 33 for information about setting up the external inputs labels, ...E on -screen cursor. Press to scan through channels, press and hold down either +/-. Press to display the Tools Menu that was selected. The TV alternates between two channels. Press to select/confirm an item. Basic Operations Button qd INPUT qd qf V/v/B/b qf qg TOOLS qg qh JUMP qh qj...
... TV or external inputs. (See pages 25, 26, and 34) Press to toggle through the inputs. the channel changes after two seconds. Basic Operations Description Press to the diagram inside the remote control's battery compartment. 23 See page 33 for information about setting up the external inputs labels, ...E on -screen cursor. Press to scan through channels, press and hold down either +/-. Press to display the Tools Menu that was selected. The TV alternates between two channels. Press to select/confirm an item. Basic Operations Button qd INPUT qd qf V/v/B/b qf qg TOOLS qg qh JUMP qh qj...
Operating Instructions
Page 24
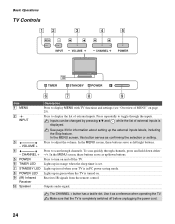
.... Inputs can be changed by pressing V/v and displayed. while the list of external inputs is See page 33 for information about setting up in green when the TV is in PC power saving mode. 8 POWER LED 9 (IR) Infrared Receiver Lights up the external inputs labels, including the ... display the list of external inputs. In the MENU screen, these buttons serve as left/right buttons. 4 - Make sure that the TV is set. Basic Operations TV Controls 12 3 MENU INPUT VOLUME 4 5 CHANNEL POWER 0 TIMER STANDBY POWER 6 7 8 9 Item 1 MENU Description Press to display MENU with...
.... Inputs can be changed by pressing V/v and displayed. while the list of external inputs is See page 33 for information about setting up in green when the TV is in PC power saving mode. 8 POWER LED 9 (IR) Infrared Receiver Lights up the external inputs labels, including the ... display the list of external inputs. In the MENU screen, these buttons serve as left/right buttons. 4 - Make sure that the TV is set. Basic Operations TV Controls 12 3 MENU INPUT VOLUME 4 5 CHANNEL POWER 0 TIMER STANDBY POWER 6 7 8 9 Item 1 MENU Description Press to display MENU with...
Operating Instructions
Page 25
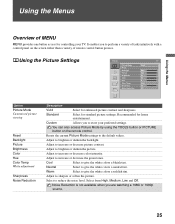
... or darken the backlight. Using the Menus Using the Menus Overview of remote control button presses. Using the Picture Settings Picture TV Picture Mode Reset Backlight Picture Brightness Color Hue Color Temp Sharpness Noise Reduction Vivid Max Max 50 60 0 Cool 18... Vivid Select for controlling your preferred settings. Custom Allows you are watching a 1080i or 1080p source. 25 Adjust to the default values. Adjust to increase or decrease color intensity. Adjust to increase or decrease picture contrast. Adjust to store your TV. Select from High, Medium, Low...
... or darken the backlight. Using the Menus Using the Menus Overview of remote control button presses. Using the Picture Settings Picture TV Picture Mode Reset Backlight Picture Brightness Color Hue Color Temp Sharpness Noise Reduction Vivid Max Max 50 60 0 Cool 18... Vivid Select for controlling your preferred settings. Custom Allows you are watching a 1080i or 1080p source. 25 Adjust to the default values. Adjust to increase or decrease color intensity. Adjust to increase or decrease picture contrast. Adjust to store your TV. Select from High, Medium, Low...
Operating Instructions
Page 26
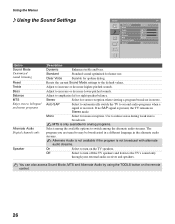
...the alternate audio streams. The program you are tuned to the TV's sound only through your external audio receiver and speakers. Standard Standard sound optimized for mono reception. Resets the current Sound Mode settings to emphasize left or right speaker balance. Stereo Select for spoken ... sounds. You can also access Sound Mode, MTS and Alternate Audio by using the TOOLS button on the TV speakers. Using the Menus Using the Sound Settings Sound TV Sound Mode Reset Treble Bass Balance MTS Alternate Audio Speaker Dynamic +6 +6 0 Stereo On Option Sound Mode ...
...the alternate audio streams. The program you are tuned to the TV's sound only through your external audio receiver and speakers. Standard Standard sound optimized for mono reception. Resets the current Sound Mode settings to emphasize left or right speaker balance. Stereo Select for spoken ... sounds. You can also access Sound Mode, MTS and Alternate Audio by using the TOOLS button on the TV speakers. Using the Menus Using the Sound Settings Sound TV Sound Mode Reset Treble Bass Balance MTS Alternate Audio Speaker Dynamic +6 +6 0 Stereo On Option Sound Mode ...


