Operating Instructions
Page 2
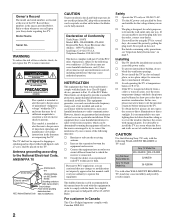
... equipment and receiver. s To prevent internal heat buildup, do not use this equipment does cause harmful interference to excessive dust or mechanical vibration. s Avoid operating the TV at the rear of FCC Rules. Owner's Record The model and serial numbers are located at temperatures below . Record these numbers in a room where the floor and walls are not of the following WALL-MOUNT BRACKET or TV-stand. These...
... equipment and receiver. s To prevent internal heat buildup, do not use this equipment does cause harmful interference to excessive dust or mechanical vibration. s Avoid operating the TV at the rear of FCC Rules. Owner's Record The model and serial numbers are located at temperatures below . Record these numbers in a room where the floor and walls are not of the following WALL-MOUNT BRACKET or TV-stand. These...

Operating Instructions
Page 3
... all instructions. 5) Do not use this apparatus during the installation. Note This television includes a QAM demodulator which should allow you to receive unscrambled digital cable television programming via subscription service to rain or moisture, does not operate normally, or has been dropped. (Continued) 3 A polarized plug has two blades with the manufacturer's instructions. 8) Do not install near water. 6) Clean only with the cart, stand, tripod, bracket, or table...
... all instructions. 5) Do not use this apparatus during the installation. Note This television includes a QAM demodulator which should allow you to receive unscrambled digital cable television programming via subscription service to rain or moisture, does not operate normally, or has been dropped. (Continued) 3 A polarized plug has two blades with the manufacturer's instructions. 8) Do not install near water. 6) Clean only with the cart, stand, tripod, bracket, or table...

Operating Instructions
Page 5
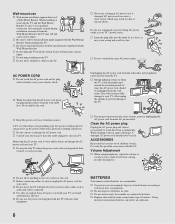
...: s Before carrying the TV, disconnect all AC power cords and connecting cables so that generates a magnetic field. s Carrying the large size TV requires two or more people. candles) away from toppling over , or knocked down or on unstable and/or uneven surfaces. s Care should not be sure to route all cables. Outdoor use Do not install this TV in a place where...
...: s Before carrying the TV, disconnect all AC power cords and connecting cables so that generates a magnetic field. s Carrying the large size TV requires two or more people. candles) away from toppling over , or knocked down or on unstable and/or uneven surfaces. s Care should not be sure to route all cables. Outdoor use Do not install this TV in a place where...
Operating Instructions
Page 6
... convert or damage the AC power cord. s Use only an original Sony AC power cord with your TV. s Do not dispose of damage. s Replace only with this TV. When installing or removing the TV and the Wall-Mount Bracket, be used batteries according to an explosion. 6 6 Unplugging the AC power cord from the wall outlet. s Consult your electrician to have the outlet changed to your TV. s Before connecting cables, be unplugged from the...
... convert or damage the AC power cord. s Use only an original Sony AC power cord with your TV. s Do not dispose of damage. s Replace only with this TV. When installing or removing the TV and the Wall-Mount Bracket, be used batteries according to an explosion. 6 6 Unplugging the AC power cord from the wall outlet. s Consult your electrician to have the outlet changed to your TV. s Before connecting cables, be unplugged from the...
Operating Instructions
Page 7
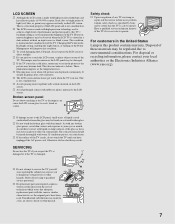
... when the LCD TV is viewed in this condition. Changing the Picture mode, Backlight setting, enabling the Light Sensor, or turning on some people. s Ghosting may appear constantly on the LCD screen. It should be rinsed thoroughly with volatile material on the LCD screen. This is safe to qualified service personnel. s Avoid spraying insect repellent with water. Safety check s Upon completion of light (red, blue, or green) may...
... when the LCD TV is viewed in this condition. Changing the Picture mode, Backlight setting, enabling the Light Sensor, or turning on some people. s Ghosting may appear constantly on the LCD screen. It should be rinsed thoroughly with volatile material on the LCD screen. This is safe to qualified service personnel. s Avoid spraying insect repellent with water. Safety check s Upon completion of light (red, blue, or green) may...

Operating Instructions
Page 9
... Cable/Antenna 13 VCR, Cable and Antenna 14 When Connecting to Optional Equipment 15 Securing the TV...17 Preventing the TV from Toppling 17 Use a Sony TV Stand 17 Recommended Measures to the World of MENU ...25 Using the Picture Settings 25 Using the Sound Settings 26 Using the Screen Settings 27 Using the PC Settings 28 Using the Channel Settings 29 Using the Parental Lock Settings 30 Using the Setup Settings 33 Other Information Troubleshooting...35 Preparation for Wall Mounting 37 PC Input Signal Reference Chart 38 Specifications...
... Cable/Antenna 13 VCR, Cable and Antenna 14 When Connecting to Optional Equipment 15 Securing the TV...17 Preventing the TV from Toppling 17 Use a Sony TV Stand 17 Recommended Measures to the World of MENU ...25 Using the Picture Settings 25 Using the Sound Settings 26 Using the Screen Settings 27 Using the PC Settings 28 Using the Channel Settings 29 Using the Parental Lock Settings 30 Using the Setup Settings 33 Other Information Troubleshooting...35 Preparation for Wall Mounting 37 PC Input Signal Reference Chart 38 Specifications...
Operating Instructions
Page 12
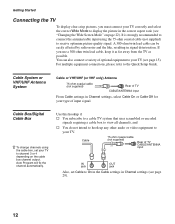
... select the correct Wide Mode to channel 3 or 4 depending on page 22). Cable 75-ohm coaxial cable (not supplied) Rear of TV CABLE/ANTENNA input From Cable settings in signal deterioration. Getting Started Connecting the TV To display clear crisp pictures, you use a 300-ohm twin lead cable, keep it as far away from the TV as possible. It is strongly recommended to connect the antenna/cable input using the cable box, set Cable to the Quick Setup Guide. Auto Program will fix the channel automatically.
... select the correct Wide Mode to channel 3 or 4 depending on page 22). Cable 75-ohm coaxial cable (not supplied) Rear of TV CABLE/ANTENNA input From Cable settings in signal deterioration. Getting Started Connecting the TV To display clear crisp pictures, you use a 300-ohm twin lead cable, keep it as far away from the TV as possible. It is strongly recommended to connect the antenna/cable input using the cable box, set Cable to the Quick Setup Guide. Auto Program will fix the channel automatically.
Operating Instructions
Page 13
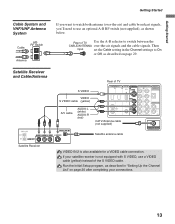
... a VIDEO cable connection. Run the Initial Setup program, as shown below. Then input set the Cable setting in "Setting Up the Channel List" on page 29. Satellite Receiver and Cable/Antenna S VIDEO VIDEO S VIDEO cable (yellow) A/V cable AUDIO-L (white) AUDIO-R (red) Rear of TV Use the A-B selector to switch between the CABLE/ANTENNA over -the-air) and cable broadcast signals, you want to watch both antenna (over -the-air signals and the cable signals. Rear of TV IN PC IN VIDEO IN COMPONENT IN DIGITAL 1 2 1 1 2 AUDIO OUT RGB S VIDEO (OPTICAL) Y L AUDIO R VIDEO L AUDIO...
... a VIDEO cable connection. Run the Initial Setup program, as shown below. Then input set the Cable setting in "Setting Up the Channel List" on page 29. Satellite Receiver and Cable/Antenna S VIDEO VIDEO S VIDEO cable (yellow) A/V cable AUDIO-L (white) AUDIO-R (red) Rear of TV Use the A-B selector to switch between the CABLE/ANTENNA over -the-air) and cable broadcast signals, you want to watch both antenna (over -the-air signals and the cable signals. Rear of TV IN PC IN VIDEO IN COMPONENT IN DIGITAL 1 2 1 1 2 AUDIO OUT RGB S VIDEO (OPTICAL) Y L AUDIO R VIDEO L AUDIO...
Operating Instructions
Page 16
... video and audio output jacks on your camcorder or other video equipment that can use an adapter (not supplied). HDMI connection is equipped with S VIDEO. If this TV displays all picture format types in a resolution of the TV. 6 COMPONENT Connect to the computer before connecting the HD15-HD15 cable. A second composite video and audio (VIDEO 2) is located on page 38 for the signals that has S VIDEO. L-AUDIO-R 7 DIGITAL AUDIO OUT (OPTICAL) Connects to the optical audio input of a digital audio equipment that this is PCM/Dolby digital compatible. 9 AUDIO OUT Connect...
... video and audio output jacks on your camcorder or other video equipment that can use an adapter (not supplied). HDMI connection is equipped with S VIDEO. If this TV displays all picture format types in a resolution of the TV. 6 COMPONENT Connect to the computer before connecting the HD15-HD15 cable. A second composite video and audio (VIDEO 2) is located on page 38 for the signals that has S VIDEO. L-AUDIO-R 7 DIGITAL AUDIO OUT (OPTICAL) Connects to the optical audio input of a digital audio equipment that this is PCM/Dolby digital compatible. 9 AUDIO OUT Connect...
Operating Instructions
Page 20
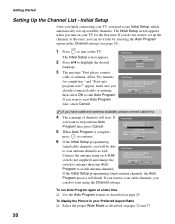
... ❑ Select the proper Wide Mode as described on the TV. To display the Picture in the Channel settings (see page 29). POWER 1 Press to search antenna channels. and "Start auto program now?" Cancel found antenna channels, the Auto Program process will finish. Initial Setup After you can do it later using an A-B RF switch (not supplied) and change the switch to antenna then start Auto Program. The Initial Setup screen appears when you do not...
... ❑ Select the proper Wide Mode as described on the TV. To display the Picture in the Channel settings (see page 29). POWER 1 Press to search antenna channels. and "Start auto program now?" Cancel found antenna channels, the Auto Program process will finish. Initial Setup After you can do it later using an A-B RF switch (not supplied) and change the switch to antenna then start Auto Program. The Initial Setup screen appears when you do not...
Operating Instructions
Page 21
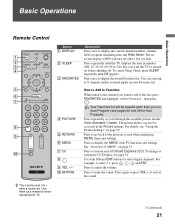
... volume. Press again or press VOL + to display the current channel number, channel label, program remaining time and Wide Mode. Basic Operations Basic Operations Remote Control 1 2 3 4 5 6 7 8 9 0 Button 1 DISPLAY 2 SLEEP 3 FAVORITES Description Press once to restore the sound. Press to remain on page 25. Press repeatedly until Off appears. Your Favorites list will turn on page 25. For details, see page 34. Press to the previous screen when displaying MENU items and settings. Use...
... volume. Press again or press VOL + to display the current channel number, channel label, program remaining time and Wide Mode. Basic Operations Basic Operations Remote Control 1 2 3 4 5 6 7 8 9 0 Button 1 DISPLAY 2 SLEEP 3 FAVORITES Description Press once to restore the sound. Press to remain on page 25. Press repeatedly until Off appears. Your Favorites list will turn on page 25. For details, see page 34. Press to the previous screen when displaying MENU items and settings. Use...
Operating Instructions
Page 24
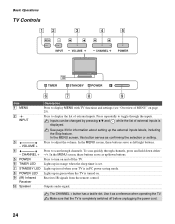
... unplugging the power cord. 24 Lights up in red when your TV is in PC power saving mode. 8 POWER LED 9 (IR) Infrared Receiver Lights up in orange when the sleep timer is See page 33 for information about setting up /down either -/+. The CHANNEL + button has a tactile dot. Basic Operations TV Controls 12 3 MENU INPUT VOLUME 4 5 CHANNEL POWER 0 TIMER STANDBY POWER 6 7 8 9 Item 1 MENU Description Press to display MENU with TV functions and settings (see "Overview of MENU" on . In the MENU screen, this button serves as...
... unplugging the power cord. 24 Lights up in red when your TV is in PC power saving mode. 8 POWER LED 9 (IR) Infrared Receiver Lights up in orange when the sleep timer is See page 33 for information about setting up /down either -/+. The CHANNEL + button has a tactile dot. Basic Operations TV Controls 12 3 MENU INPUT VOLUME 4 5 CHANNEL POWER 0 TIMER STANDBY POWER 6 7 8 9 Item 1 MENU Description Press to display MENU with TV functions and settings (see "Overview of MENU" on . In the MENU screen, this button serves as...
Operating Instructions
Page 27
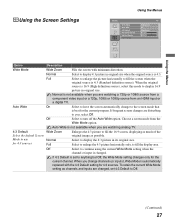
... channel or input is set 4:3 Default to fill the display area. Off Select to display 4:3 picture in its original size. Full Select to enlarge the picture horizontally to you change to display the 4:3 picture in original size when the original source is 4:3 (Standard definition source). If frequent screen changes are watching a 720p or 1080i source from a component video input or a 720p, 1080i or 1080p source from the Wide Mode option. Auto Wide is automatically replaced...
... channel or input is set 4:3 Default to fill the display area. Off Select to display 4:3 picture in its original size. Full Select to enlarge the picture horizontally to you change to display the 4:3 picture in original size when the original source is 4:3 (Standard definition source). If frequent screen changes are watching a 720p or 1080i source from a component video input or a 720p, 1080i or 1080p source from the Wide Mode option. Auto Wide is automatically replaced...
Operating Instructions
Page 28
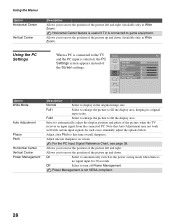
... automatically switch to turn off Power Management. Allows you to move the position of the picture up and down . Select to automatically adjust the display position and phase of the Screen settings. Off Select to the power saving mode when there is selected, the PC PC Settings Settings screen appears instead of the picture when the TV receives an input signal from the connected PC. For the PC Input Signal Reference...
... automatically switch to turn off Power Management. Allows you to move the position of the picture up and down . Select to automatically adjust the display position and phase of the Screen settings. Off Select to the power saving mode when there is selected, the PC PC Settings Settings screen appears instead of the picture when the TV receives an input signal from the connected PC. For the PC Input Signal Reference...
Operating Instructions
Page 33
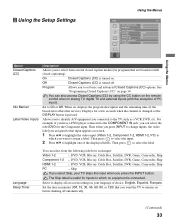
... Setup TV Closed Captions (CC) Info Banner Label Video Inputs Language Sleep Timer Power Saving Product Information CineMotion Off On English Off Off Off Using the Menus Option Closed Captions (CC) Info Banner Label Video Inputs Description Allows you to select from the following labels for the Component input. See "Programming Closed Captions (CC)" on the remote control when in analog TV, digital TV and external inputs (with closed caption modes (for a few seconds when the channel is changed or the DISPLAY button is turned...
... Setup TV Closed Captions (CC) Info Banner Label Video Inputs Language Sleep Timer Power Saving Product Information CineMotion Off On English Off Off Off Using the Menus Option Closed Captions (CC) Info Banner Label Video Inputs Description Allows you to select from the following labels for the Component input. See "Programming Closed Captions (CC)" on the remote control when in analog TV, digital TV and external inputs (with closed caption modes (for a few seconds when the channel is changed or the DISPLAY button is turned...
Operating Instructions
Page 35
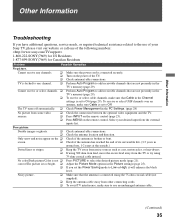
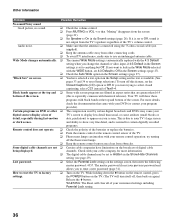
... video equipment and the TV. ❑ Press INPUT on the remote control (page 23). ❑ Press MENU on the ❑ Check if the antenna is connected using 75 ohm coaxial cable instead. To receive or select UHF channels over an antenna, make sure to use of your desired input from the external inputs list. Poor picture. The TV turns off automatically. ❑ Check Power Management in the Channel settings is set to Off. No color/Dark picture/Color...
... video equipment and the TV. ❑ Press INPUT on the remote control (page 23). ❑ Press MENU on the ❑ Check if the antenna is connected using 75 ohm coaxial cable instead. To receive or select UHF channels over an antenna, make sure to use of your desired input from the external inputs list. Poor picture. The TV turns off automatically. ❑ Check Power Management in the Channel settings is set to Off. No color/Dark picture/Color...
Operating Instructions
Page 36
... not output from the TV's speakers regardless of the screen. (this feature, set to Off. "Black box" on your TV's large screen or dark scenes. Your TV will clear all of your digital sources display a loss of TV's screen to display less detail than 16:9 bottom of the TV's volume control. For more information. ❑ The digital cable channel may cause your customized settings including Parental Lock setting. 36 Certain programs on DVD or other connecting cords. ❑ To avoid TV...
... not output from the TV's speakers regardless of the screen. (this feature, set to Off. "Black box" on your TV's large screen or dark scenes. Your TV will clear all of your digital sources display a loss of TV's screen to display less detail than 16:9 bottom of the TV's volume control. For more information. ❑ The digital cable channel may cause your customized settings including Parental Lock setting. 36 Certain programs on DVD or other connecting cords. ❑ To avoid TV...

Operating Instructions
Page 37
... TV's weight. Keep the screws away from the TV. 2 Secure the Mounting Hook to determine the strength of the Mounting Hook. 4 Start removing the screws behind the TV (See illustration below to wallmount the TV. Sony Wall-Mount Bracket Model SU-WL500 Follow the simple steps below ). Do not remove any reason other screws from the TV. Make sure that you use the Wall-Mount Bracket model designed for any other than to remove the Table-Top Stand...
... TV's weight. Keep the screws away from the TV. 2 Secure the Mounting Hook to determine the strength of the Mounting Hook. 4 Start removing the screws behind the TV (See illustration below to wallmount the TV. Sony Wall-Mount Bracket Model SU-WL500 Follow the simple steps below ). Do not remove any reason other screws from the TV. Make sure that you use the Wall-Mount Bracket model designed for any other than to remove the Table-Top Stand...
Operating Instructions
Page 39
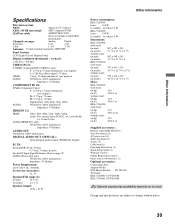
... lb 12 oz without notice. 39 Design and specifications are subject to change without stand: (in kg) 18.2 (in lb.) 40 lb 2 oz Supplied accessories: Remote control RM-YD025 (1) Size AA batteries (2) AC power cord (1) Table-Top Stand (1) Screws (3) Cable band (1) Operating Instructions (1) Quick Setup Guide (1) Warranty Card (1) Online Registration Card (1) Open-source software flyer (1) Optional accessories: Connecting cables Support belt kit Wall-Mount Bracket: SU-WL500 TV-Stand: KDL-32L4000: SU-FL300M KDL-37L4000: SU-FL300M Optional accessories availability depends on...
... lb 12 oz without notice. 39 Design and specifications are subject to change without stand: (in kg) 18.2 (in lb.) 40 lb 2 oz Supplied accessories: Remote control RM-YD025 (1) Size AA batteries (2) AC power cord (1) Table-Top Stand (1) Screws (3) Cable band (1) Operating Instructions (1) Quick Setup Guide (1) Warranty Card (1) Online Registration Card (1) Open-source software flyer (1) Optional accessories: Connecting cables Support belt kit Wall-Mount Bracket: SU-WL500 TV-Stand: KDL-32L4000: SU-FL300M KDL-37L4000: SU-FL300M Optional accessories availability depends on...
Operating Instructions
Page 40
... Select Country 31 Settings Channel 29 Parental Lock 30 PC Settings 28 Picture 25 Screen 27 Setup 33 Sound 26 Sharpness 25 Show/Hide Channels 29 SLEEP button 21 Sleep Timer 33 Sound Mode 26 Speaker 26 STANDBY LED 24 40 T TIMER LED 24 TOOLS button 23 Treble 26 Troubleshooting 35, 36 TV Rating 31 U U.S.A. button 21, 24 W WIDE button 22 Wide Mode 27, 28 Rating 32 Unrated 30 V Vertical Center 28 VIDEO/AUDIO (L/R) jacks, described 15, 16 Viewing Blocked Programs 32 VOL+/-
... Select Country 31 Settings Channel 29 Parental Lock 30 PC Settings 28 Picture 25 Screen 27 Setup 33 Sound 26 Sharpness 25 Show/Hide Channels 29 SLEEP button 21 Sleep Timer 33 Sound Mode 26 Speaker 26 STANDBY LED 24 40 T TIMER LED 24 TOOLS button 23 Treble 26 Troubleshooting 35, 36 TV Rating 31 U U.S.A. button 21, 24 W WIDE button 22 Wide Mode 27, 28 Rating 32 Unrated 30 V Vertical Center 28 VIDEO/AUDIO (L/R) jacks, described 15, 16 Viewing Blocked Programs 32 VOL+/-


