Operating Instructions
Page 3
...of Dolby Laboratories. and other . "Dolby" and the double-D symbol are provided for installing the specified TV. The wide blade or the third prong are trademarks of Apple Inc., registered in any way, such as...the manufacturer's instructions. 8) Do not install near any ventilation openings. When a cart is a trademark. "BRAVIA", and Sony Corporation. A grounding type plug has two blades and a third grounding prong. HDMI, the HDMI logo and High-Definition... Do not block any heat sources such as power-supply cord or plug is required when the apparatus has been damaged in the U.S.
...of Dolby Laboratories. and other . "Dolby" and the double-D symbol are provided for installing the specified TV. The wide blade or the third prong are trademarks of Apple Inc., registered in any way, such as...the manufacturer's instructions. 8) Do not install near any ventilation openings. When a cart is a trademark. "BRAVIA", and Sony Corporation. A grounding type plug has two blades and a third grounding prong. HDMI, the HDMI logo and High-Definition... Do not block any heat sources such as power-supply cord or plug is required when the apparatus has been damaged in the U.S.
Operating Instructions
Page 6
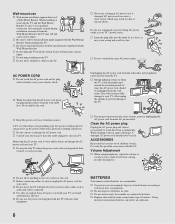
...injury. s Do not convert or damage the AC power cord. Clean the AC power plug Unplug the AC power plug and clean it occasionally to follow the installation guide supplied with a protective earthing connection. s Use only an original Sony AC power cord with the Wall-Mount Bracket. s Be ...on or roll over the cord. s Before connecting cables, be connected to your TV's power source. Subjecting the AC power cord to unplug the AC power cord for your feet. When installing or removing the TV and the Wall-Mount Bracket, be easily pinched, bent, twisted, or catch your...
...injury. s Do not convert or damage the AC power cord. Clean the AC power plug Unplug the AC power plug and clean it occasionally to follow the installation guide supplied with a protective earthing connection. s Use only an original Sony AC power cord with the Wall-Mount Bracket. s Be ...on or roll over the cord. s Before connecting cables, be connected to your TV's power source. Subjecting the AC power cord to unplug the AC power cord for your feet. When installing or removing the TV and the Wall-Mount Bracket, be easily pinched, bent, twisted, or catch your...
Operating Instructions
Page 11
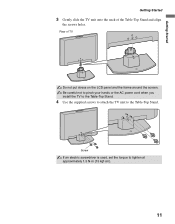
Rear of the Table-Top Stand and align the screws holes. Screw If an electric screwdriver is used, set the torque to the Table-Top Stand. Be careful not to pinch your hands or the AC power cord when you install the TV to the Table-Top Stand. 4 Use the supplied screws to attach the TV unit to tighten at approximately 1.5 N·m {15 kgf·cm}. 11 Getting Started Getting Started 3 Gently slide the TV unit onto the neck of TV Do not put stress on the LCD panel and the frame around the screen.
Rear of the Table-Top Stand and align the screws holes. Screw If an electric screwdriver is used, set the torque to the Table-Top Stand. Be careful not to pinch your hands or the AC power cord when you install the TV to the Table-Top Stand. 4 Use the supplied screws to attach the TV unit to tighten at approximately 1.5 N·m {15 kgf·cm}. 11 Getting Started Getting Started 3 Gently slide the TV unit onto the neck of TV Do not put stress on the LCD panel and the frame around the screen.
Operating Instructions
Page 16
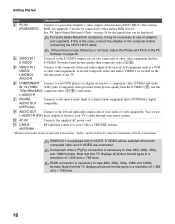
Connect to your stereo system. 0 AC IN Connects the supplied AC power cord. A second composite video and audio (VIDEO 2) is the case, connect the adapter to your TV's audio through your DVD player's or digital set-top box's component video (YPBPR) and audio IN 1/2 (1080i/ (L/R) jacks. S VIDEO will be displayed. For some Apple ...
Connect to your stereo system. 0 AC IN Connects the supplied AC power cord. A second composite video and audio (VIDEO 2) is the case, connect the adapter to your TV's audio through your DVD player's or digital set-top box's component video (YPBPR) and audio IN 1/2 (1080i/ (L/R) jacks. S VIDEO will be displayed. For some Apple ...
Operating Instructions
Page 17
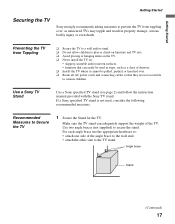
... side of drawers. ❑ Install the TV where it cannot be used , consider the following recommended measures. Angle brace Stand (Continued) 17 Use two angle braces (not supplied) to the TV stand. Use a Sony TV Stand Use a Sony specified TV stand (see page 2) and follow the ...instruction manual provided with the Sony TV stand. Recommended Measures to Secure the TV 1 Secure the Stand for the TV. Preventing the TV from toppling over . ❑ Route all AC power cords...
... side of drawers. ❑ Install the TV where it cannot be used , consider the following recommended measures. Angle brace Stand (Continued) 17 Use two angle braces (not supplied) to the TV stand. Use a Sony TV Stand Use a Sony specified TV stand (see page 2) and follow the ...instruction manual provided with the Sony TV stand. Recommended Measures to Secure the TV 1 Secure the Stand for the TV. Preventing the TV from toppling over . ❑ Route all AC power cords...
Operating Instructions
Page 19
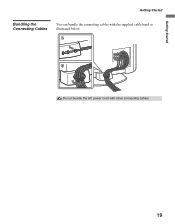
Do not bundle the AC power cord with the supplied cable band as illustrated below. Getting Started Getting Started Bundling the Connecting Cables You can bundle the connecting cables with other connecting cables. 19
Do not bundle the AC power cord with the supplied cable band as illustrated below. Getting Started Getting Started Bundling the Connecting Cables You can bundle the connecting cables with other connecting cables. 19
Operating Instructions
Page 20
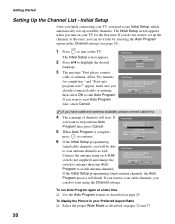
POWER 1 Press to start Auto Program later, select Cancel. and "Start auto program now?" Allow 50+ ... you want to set up available channels. OK Cancel If you can do it later using an A-B RF switch (not supplied) and change the switch to antenna then start Auto Initial Setup If you already connected cable or antenna, then select OK to... channels will finish. The Initial Setup screen appears when you can do it later by selecting the Auto Program option in your TV, you want to scan cable channels, you turn on pages 22 and 27. 20 The Initial Setup screen appears. 2 Press...
POWER 1 Press to start Auto Program later, select Cancel. and "Start auto program now?" Allow 50+ ... you want to set up available channels. OK Cancel If you can do it later using an A-B RF switch (not supplied) and change the switch to antenna then start Auto Initial Setup If you already connected cable or antenna, then select OK to... channels will finish. The Initial Setup screen appears when you can do it later by selecting the Auto Program option in your TV, you want to scan cable channels, you turn on pages 22 and 27. 20 The Initial Setup screen appears. 2 Press...
Operating Instructions
Page 35
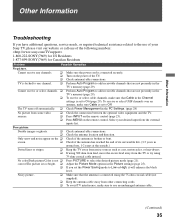
... picture is connected securely. ❑ Turn on the power of the TV. ❑ Check antenna/cable connections. Other Information Other Information Troubleshooting If you set the Power Saving mode to Low or High, it will enhance the black level. Select your Sony TV, please visit our website or call one channel. ... ❑ Press MENU on the ❑ Check if the antenna is connected using the 75-ohm coaxial cable (not supplied). ❑ Keep the antenna cable away from the TV or try using 300 ohm twin lead, move the excess lead away from other connecting cords. ❑ To avoid...
... picture is connected securely. ❑ Turn on the power of the TV. ❑ Check antenna/cable connections. Other Information Other Information Troubleshooting If you set the Power Saving mode to Low or High, it will enhance the black level. Select your Sony TV, please visit our website or call one channel. ... ❑ Press MENU on the ❑ Check if the antenna is connected using the 75-ohm coaxial cable (not supplied). ❑ Keep the antenna cable away from the TV or try using 300 ohm twin lead, move the excess lead away from other connecting cords. ❑ To avoid...
Operating Instructions
Page 36
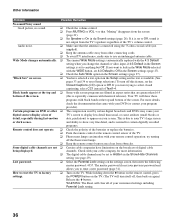
... enter the following master password: 4357. While holding down the V button on the remote control, press the POWER button on DVD or other connecting cords. ❑ To avoid TV interference, make sure to display less detail than 16:9 bottom of digital cable being displayed. If you to your... aspect ratios that the antenna is due to enter a new password (page 31). This is connected using the 75-ohm coaxial cable (not supplied). ❑ Keep the antenna cable away from the screen (page 21). ❑ Set Speaker to anything but Off. The master password clears...
... enter the following master password: 4357. While holding down the V button on the remote control, press the POWER button on DVD or other connecting cords. ❑ To avoid TV interference, make sure to display less detail than 16:9 bottom of digital cable being displayed. If you to your... aspect ratios that the antenna is due to enter a new password (page 31). This is connected using the 75-ohm coaxial cable (not supplied). ❑ Keep the antenna cable away from the screen (page 21). ❑ Set Speaker to anything but Off. The master password clears...
Operating Instructions
Page 39
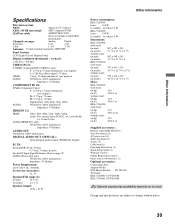
...TV standard ATSC compliant 8VSB ANSI/SCTE 07 2000 (Does not include CableCARD functionality) Channel coverage: Analog Digital Terrestrial 2-69 2-69 Cable 1-135 1-135 Antenna: 75-ohm external terminal for VHF/UHF Panel System: LCD...HDMI IN 1/2: HDMI: Video: 480i, 480p, 720p, 1080i, 1080p Audio: Two channel linear PCM 32, 44.1 and 48 kHz, 16, 20 and 24 bits AUDIO (HDMI IN 1 only): 500 ...: (in kg) 18.2 (in lb.) 40 lb 2 oz Supplied accessories: Remote control RM-YD025 (1) Size AA batteries (2) AC power cord (1) Table-Top Stand (1) Screws (3) Cable band (1) Operating ...
...TV standard ATSC compliant 8VSB ANSI/SCTE 07 2000 (Does not include CableCARD functionality) Channel coverage: Analog Digital Terrestrial 2-69 2-69 Cable 1-135 1-135 Antenna: 75-ohm external terminal for VHF/UHF Panel System: LCD...HDMI IN 1/2: HDMI: Video: 480i, 480p, 720p, 1080i, 1080p Audio: Two channel linear PCM 32, 44.1 and 48 kHz, 16, 20 and 24 bits AUDIO (HDMI IN 1 only): 500 ...: (in kg) 18.2 (in lb.) 40 lb 2 oz Supplied accessories: Remote control RM-YD025 (1) Size AA batteries (2) AC power cord (1) Table-Top Stand (1) Screws (3) Cable band (1) Operating ...


