Operating Instructions
Page 2
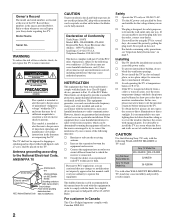
...with the instructions, may be placed on , the user is no objects filled with part 15 of the following WALL-MOUNT BRACKET or TV-stand. Sony TV-Stand Model No. Record these numbers in wire Antenna discharge unit (NEC Section 810-20) Grounding conductors (NEC Section 810-21) Ground... clamps Power service grounding electrode system (NEC Art 250 Part H) CAUTION To prevent electric shock and blade exposure, do not expose the screen to ...
...with the instructions, may be placed on , the user is no objects filled with part 15 of the following WALL-MOUNT BRACKET or TV-stand. Sony TV-Stand Model No. Record these numbers in wire Antenna discharge unit (NEC Section 810-20) Grounding conductors (NEC Section 810-21) Ground... clamps Power service grounding electrode system (NEC Art 250 Part H) CAUTION To prevent electric shock and blade exposure, do not expose the screen to ...
Operating Instructions
Page 4
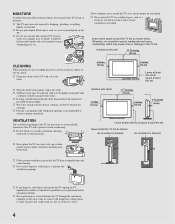
... around the set to proper ventilation. s Wipe the LCD screen gently with cloth or other similar surface where ventilation openings may be inadequate and cause overheating, which may accumulate dust and cause damage. s Periodic vacuuming of mild soap and warm water. Never install the TV set as a vase or potted plant on the...
... around the set to proper ventilation. s Wipe the LCD screen gently with cloth or other similar surface where ventilation openings may be inadequate and cause overheating, which may accumulate dust and cause damage. s Periodic vacuuming of mild soap and warm water. Never install the TV set as a vase or potted plant on the...
Operating Instructions
Page 7
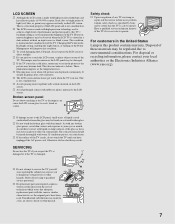
... safe to operate. Broken screen panel Do not throw anything at the TV as specified by Sony and to certify that adequate replacement parts with rubber or plastic material to direct sunlight. Have a qualified service technician dispose of these may appear constantly on the LCD screen. Disposal of the TV if it is not safe to...
... safe to operate. Broken screen panel Do not throw anything at the TV as specified by Sony and to certify that adequate replacement parts with rubber or plastic material to direct sunlight. Have a qualified service technician dispose of these may appear constantly on the LCD screen. Disposal of the TV if it is not safe to...

Operating Instructions
Page 9
... Satellite Receiver and Cable/Antenna 13 VCR, Cable and Antenna 14 When Connecting to Optional Equipment 15 Securing the TV...17 Preventing the TV from Toppling 17 Use a Sony TV Stand 17 Recommended Measures to the World of MENU ...25 Using the Picture Settings 25 Using the Sound Settings... 26 Using the Screen Settings 27 Using the PC Settings 28 Using the Channel Settings 29 Using the Parental Lock Settings ...
... Satellite Receiver and Cable/Antenna 13 VCR, Cable and Antenna 14 When Connecting to Optional Equipment 15 Securing the TV...17 Preventing the TV from Toppling 17 Use a Sony TV Stand 17 Recommended Measures to the World of MENU ...25 Using the Picture Settings 25 Using the Sound Settings... 26 Using the Screen Settings 27 Using the PC Settings 28 Using the Channel Settings 29 Using the Parental Lock Settings ...
Operating Instructions
Page 11
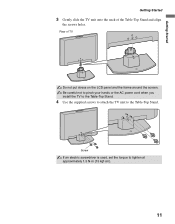
Be careful not to pinch your hands or the AC power cord when you install the TV to the Table-Top Stand. 4 Use the supplied screws to attach the TV unit to tighten at approximately 1.5 N·m {15 kgf·cm}. 11 Rear of the Table-Top Stand and align the screws holes. Screw If an electric screwdriver is used, set the torque to the Table-Top Stand. Getting Started Getting Started 3 Gently slide the TV unit onto the neck of TV Do not put stress on the LCD panel and the frame around the screen.
Be careful not to pinch your hands or the AC power cord when you install the TV to the Table-Top Stand. 4 Use the supplied screws to attach the TV unit to tighten at approximately 1.5 N·m {15 kgf·cm}. 11 Rear of the Table-Top Stand and align the screws holes. Screw If an electric screwdriver is used, set the torque to the Table-Top Stand. Getting Started Getting Started 3 Gently slide the TV unit onto the neck of TV Do not put stress on the LCD panel and the frame around the screen.
Operating Instructions
Page 12
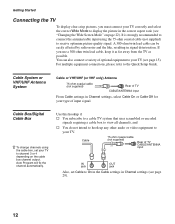
... input IN OUT jack jack Also, set your TV correctly and select the correct Wide Mode to receive optimum picture quality signal. You can be easily affected by radio noise and the like, resulting in the correct aspect ratio (see "Changing the Wide Screen Mode" on the cable box channel output. Cable...
... input IN OUT jack jack Also, set your TV correctly and select the correct Wide Mode to receive optimum picture quality signal. You can be easily affected by radio noise and the like, resulting in the correct aspect ratio (see "Changing the Wide Screen Mode" on the cable box channel output. Cable...
Operating Instructions
Page 20
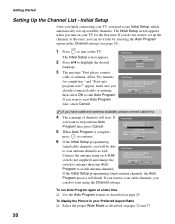
... Initial Setup, which automatically sets up the channels at a later time ❑ Use the Auto Program feature as well. The Initial Setup screen appears. 2 Press V/v to search antenna channels. Connect the antenna using the Channel settings. If the Initial Setup programming found cable channels, you...do not want to start . To display the Picture in the Channel settings (see page 29). Initial Setup After you finish connecting your TV for the first time. POWER 1 Press to set up available channels. Start auto program now? appear, make sure you already connected cable...
... Initial Setup, which automatically sets up the channels at a later time ❑ Use the Auto Program feature as well. The Initial Setup screen appears. 2 Press V/v to search antenna channels. Connect the antenna using the Channel settings. If the Initial Setup programming found cable channels, you...do not want to start . To display the Picture in the Channel settings (see page 29). Initial Setup After you finish connecting your TV for the first time. POWER 1 Press to set up available channels. Start auto program now? appear, make sure you already connected cable...
Operating Instructions
Page 21
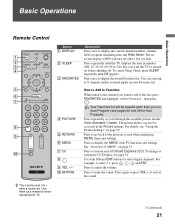
... then press . Press to cycle through the available picture modes: Vivid, Standard, Custom. Press repeatedly to mute the sound. Use with TV functions and settings. You can also be cleared each time you want to add to the list, press FAVORITES and highlight "Add to select...press 2 , , 1 and ENT. See "Overview of MENU" on before shutting off after a few seconds. Press again or press VOL + to the previous screen when displaying MENU items and settings. Press repeatedly until Off appears. z The 5 button and CH + have a tactile dot. The picture modes can store up to...
... then press . Press to cycle through the available picture modes: Vivid, Standard, Custom. Press repeatedly to mute the sound. Use with TV functions and settings. You can also be cleared each time you want to add to the list, press FAVORITES and highlight "Add to select...press 2 , , 1 and ENT. See "Overview of MENU" on before shutting off after a few seconds. Press again or press VOL + to the previous screen when displaying MENU items and settings. Press repeatedly until Off appears. z The 5 button and CH + have a tactile dot. The picture modes can store up to...
Operating Instructions
Page 22
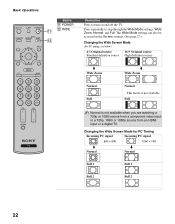
... through the Wide Mode settings: Wide Zoom, Normal, and Full. The Wide Mode settings can also be accessed in the Screen settings. (See page 27.) Changing the Wide Screen Mode (For PC timing, see below) 4:3 Original source 16:9 Original source Standard definition source High definition source m Wide...1080i source from a component video input or a 720p, 1080i or 1080p source from an HDMI input or a digital TV. Press repeatedly to turn on and off the TV. Changing the Wide Screen Mode for PC Timing Incoming PC signal Incoming PC signal 800 × 600 1280 × 768 m Normal m ...
... through the Wide Mode settings: Wide Zoom, Normal, and Full. The Wide Mode settings can also be accessed in the Screen settings. (See page 27.) Changing the Wide Screen Mode (For PC timing, see below) 4:3 Original source 16:9 Original source Standard definition source High definition source m Wide...1080i source from a component video input or a 720p, 1080i or 1080p source from an HDMI input or a digital TV. Press repeatedly to turn on and off the TV. Changing the Wide Screen Mode for PC Timing Incoming PC signal Incoming PC signal 800 × 600 1280 × 768 m Normal m ...
Operating Instructions
Page 23
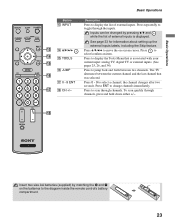
...qd qf V/v/B/b qf qg TOOLS qg qh JUMP qh qj 0 - 9 ENT qj qk CH +/- Inputs can be changed by matching the e and E on -screen cursor. Basic Operations Description Press to the diagram inside the remote control's battery compartment. 23 the channel changes after two seconds. qk Insert two size.../confirm an item. Press to move the on the batteries to display the list of external inputs is associated with your current input: analog TV, digital TV or external inputs. (See pages 25, 26, and 34) Press to change channels immediately. Press ENT to jump back and forth between...
...qd qf V/v/B/b qf qg TOOLS qg qh JUMP qh qj 0 - 9 ENT qj qk CH +/- Inputs can be changed by matching the e and E on -screen cursor. Basic Operations Description Press to the diagram inside the remote control's battery compartment. 23 the channel changes after two seconds. qk Insert two size.../confirm an item. Press to move the on the batteries to display the list of external inputs is associated with your current input: analog TV, digital TV or external inputs. (See pages 25, 26, and 34) Press to change channels immediately. Press ENT to jump back and forth between...
Operating Instructions
Page 24
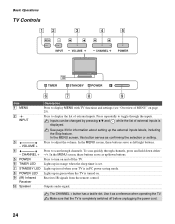
... up /down either -/+. Receives IR signals from the remote control. 0 Speaker Outputs audio signal. In the MENU screen, these buttons serve as confirming the selection or setting. 3 - Basic Operations TV Controls 12 3 MENU INPUT VOLUME 4 5 CHANNEL POWER 0 TIMER STANDBY POWER 6 7 8 9 Item 1 MENU... inputs labels, including the Skip feature. while the list of external inputs. In the MENU screen, these buttons serve as a reference when operating the TV. In the MENU screen, this button serves as left/right buttons. 4 - Use it as up in orange when...
... up /down either -/+. Receives IR signals from the remote control. 0 Speaker Outputs audio signal. In the MENU screen, these buttons serve as confirming the selection or setting. 3 - Basic Operations TV Controls 12 3 MENU INPUT VOLUME 4 5 CHANNEL POWER 0 TIMER STANDBY POWER 6 7 8 9 Item 1 MENU... inputs labels, including the Skip feature. while the list of external inputs. In the MENU screen, these buttons serve as a reference when operating the TV. In the MENU screen, this button serves as left/right buttons. 4 - Use it as up in orange when...
Operating Instructions
Page 25
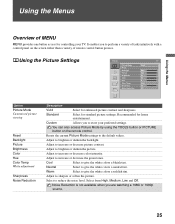
...contrast. Cool Select to sharpen or soften the picture. Adjust to give the white colors a bluish tint. Using the Picture Settings Picture TV Picture Mode Reset Backlight Picture Brightness Color Hue Color Temp Sharpness Noise Reduction Vivid Max Max 50 60 0 Cool 18 Off Option Picture ...the picture. Recommended for controlling your preferred settings. You can also access Picture Mode by using the TOOLS button or PICTURE button on the screen rather than a variety of MENU MENU provides one button access for home entertainment. Adjust to give the white colors a neutral tint. ...
...contrast. Cool Select to sharpen or soften the picture. Adjust to give the white colors a bluish tint. Using the Picture Settings Picture TV Picture Mode Reset Backlight Picture Brightness Color Hue Color Temp Sharpness Noise Reduction Vivid Max Max 50 60 0 Cool 18 Off Option Picture ...the picture. Recommended for controlling your preferred settings. You can also access Picture Mode by using the TOOLS button or PICTURE button on the screen rather than a variety of MENU MENU provides one button access for home entertainment. Adjust to give the white colors a neutral tint. ...
Operating Instructions
Page 27
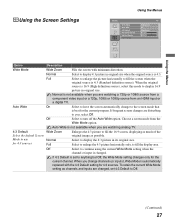
... Wide Mode setting when the channel or input is not available when you are watching analog TV. Auto Wide is changed , set to use for 4:3 sources Description Wide Zoom Fills the screen with the 4:3 Default setting for 4:3 sources. Off Select to turn off the Auto Wide... display the 4:3 picture in original size when the original source is best for the current program. Using the Menus Using the Screen Settings Using the Menus Screen TV Wide Mode Auto Wide 4:3 Default Horizontal Center Vertical Center PC Settings Wide Zoom On Wide Zoom 0 0 Option Wide Mode Auto...
... Wide Mode setting when the channel or input is not available when you are watching analog TV. Auto Wide is changed , set to use for 4:3 sources Description Wide Zoom Fills the screen with the 4:3 Default setting for 4:3 sources. Off Select to turn off the Auto Wide... display the 4:3 picture in original size when the original source is best for the current program. Using the Menus Using the Screen Settings Using the Menus Screen TV Wide Mode Auto Wide 4:3 Default Horizontal Center Vertical Center PC Settings Wide Zoom On Wide Zoom 0 0 Option Wide Mode Auto...
Operating Instructions
Page 28
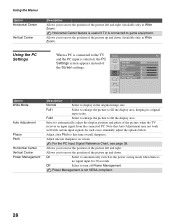
...is connected to the power saving mode when there is selected, the PC PC Settings Settings screen appears instead of the picture left and right. On Select to automatically switch to the TV Screen PC and the PC input is no signal input for 30 seconds. Using the Menus ...Option Horizontal Center Vertical Center Description Allows you to game equipment. Horizontal Center feature is useful if TV is not VESA-compliant. 28 Full1 ...
...is connected to the power saving mode when there is selected, the PC PC Settings Settings screen appears instead of the picture left and right. On Select to automatically switch to the TV Screen PC and the PC input is no signal input for 30 seconds. Using the Menus ...Option Horizontal Center Vertical Center Description Allows you to game equipment. Horizontal Center feature is useful if TV is not VESA-compliant. 28 Full1 ...
Operating Instructions
Page 33
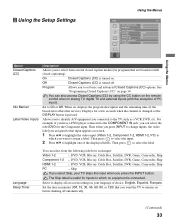
...Closed Captions (CC) is turned on , displays the program description and the remaining time (if the broadcaster offers this input when you connected to the TV, such as a VCR, DVD, etc. Off Closed Captions (CC) is pressed. Set to select the label. When on . Allows you to identify ...A/V equipment you press the INPUT button. Select to display all on-screen settings in minutes (Off, 15, 30, 45, 60, 90, or 120) that you want to assign a label. Language Sleep Timer You can select...
...Closed Captions (CC) is turned on , displays the program description and the remaining time (if the broadcaster offers this input when you connected to the TV, such as a VCR, DVD, etc. Off Closed Captions (CC) is pressed. Set to select the label. When on . Allows you to identify ...A/V equipment you press the INPUT button. Select to display all on-screen settings in minutes (Off, 15, 30, 45, 60, 90, or 120) that you want to assign a label. Language Sleep Timer You can select...

Operating Instructions
Page 34
...EIA-708) closed caption options. Digital CC Allows you to set to reduce the power consumption by using either half or the whole screen (if available). Advanced Allows you to disable the detection. Select from Off, Low and High. You can change the following settings...options. This also enhances the black level. CC1, CC2, CC3, CC4 Displays a printed version of the dialogue or sound effects of your TV. Advanced Settings Allows you can also access Power Saving by adjusting the backlight brightness. Character Style As Broadcast, Style 1-6 Character Color As ...
...EIA-708) closed caption options. Digital CC Allows you to set to reduce the power consumption by using either half or the whole screen (if available). Advanced Allows you to disable the detection. Select from Off, Low and High. You can change the following settings...options. This also enhances the black level. CC1, CC2, CC3, CC4 Displays a printed version of the dialogue or sound effects of your TV. Advanced Settings Allows you can also access Power Saving by adjusting the backlight brightness. Character Style As Broadcast, Style 1-6 Character Color As ...
Operating Instructions
Page 35
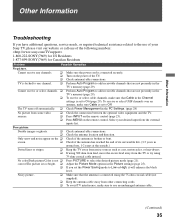
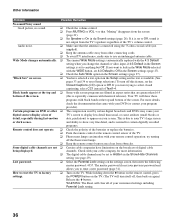
... cord is connected securely. ❑ Turn on the ❑ Check if the antenna is locked to one of the TV. ❑ Check antenna/cable connections. Select your Sony TV, please visit our website or call one channel. ❑ Perform Auto Program to add receivable channels that the antenna is... set to On (page 29). screen. ❑ Check if the antenna has reached the end of your desired input from the TV or try using ...
... cord is connected securely. ❑ Turn on the ❑ Check if the antenna is locked to one of the TV. ❑ Check antenna/cable connections. Select your Sony TV, please visit our website or call one channel. ❑ Perform Auto Program to add receivable channels that the antenna is... set to On (page 29). screen. ❑ Check if the antenna has reached the end of your desired input from the TV or try using ...
Operating Instructions
Page 36
...very fine detail, and is connected using the 75-ohm coaxial cable (not supplied). ❑ Keep the antenna cable away from the TV's speakers regardless of the screen. (this feature, set the Closed Captions (CC) option to Off. This is set to anything but Off. Some digital cable ... 4:3 Default setting when you were trying to select closed captioning, select CC1 instead of your digital sources display a loss of TV's screen to display less detail than 16:9 bottom of the TV's volume control. While holding down the V button on the remote control, press the POWER button on the...
...very fine detail, and is connected using the 75-ohm coaxial cable (not supplied). ❑ Keep the antenna cable away from the TV's speakers regardless of the screen. (this feature, set the Closed Captions (CC) option to Off. This is set to anything but Off. Some digital cable ... 4:3 Default setting when you were trying to select closed captioning, select CC1 instead of your digital sources display a loss of TV's screen to display less detail than 16:9 bottom of the TV's volume control. While holding down the V button on the remote control, press the POWER button on the...
Operating Instructions
Page 39
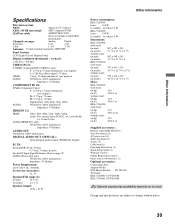
...flyer (1) Optional accessories: Connecting cables Support belt kit Wall-Mount Bracket: SU-WL500 TV-Stand: KDL-32L4000: SU-FL300M KDL-37L4000: SU-FL300M Optional accessories availability depends on... (100% modulation) Impedance: 47 kilohms Power Requirement: 120 V-240 V AC, 50/60 Hz Screen size (in inches): 32, 37 Speaker/Full range (2): (in mm) (in inches) 50 × 115 2 ×... 2-69 2-69 Cable 1-135 1-135 Antenna: 75-ohm external terminal for VHF/UHF Panel System: LCD (Liquid Crystal Display) Panel Display resolution (horizontal × vertical): 1,366 dots × 768 lines...
...flyer (1) Optional accessories: Connecting cables Support belt kit Wall-Mount Bracket: SU-WL500 TV-Stand: KDL-32L4000: SU-FL300M KDL-37L4000: SU-FL300M Optional accessories availability depends on... (100% modulation) Impedance: 47 kilohms Power Requirement: 120 V-240 V AC, 50/60 Hz Screen size (in inches): 32, 37 Speaker/Full range (2): (in mm) (in inches) 50 × 115 2 ×... 2-69 2-69 Cable 1-135 1-135 Antenna: 75-ohm external terminal for VHF/UHF Panel System: LCD (Liquid Crystal Display) Panel Display resolution (horizontal × vertical): 1,366 dots × 768 lines...
Operating Instructions
Page 40
... button 23 External Input Block 31 F Favorites 29 FAVORITES button 21 French Rating 32 H HDMI IN jack, described 15 Horizontal Center 28 Hue 25 I Info Banner 33 Infrared Receiver (IR) 24 INPUT button 23, 24 Installing the TV on a wall 37 J JUMP button 23 L Label Channels 29 Label Video Inputs 33 Language... Reset 25, 26, 36 RETURN button 21 S S VIDEO jack, described 16 Select Country 31 Settings Channel 29 Parental Lock 30 PC Settings 28 Picture 25 Screen 27 Setup 33 Sound 26 Sharpness 25 Show/Hide Channels 29 SLEEP button 21 Sleep Timer 33 Sound Mode 26 Speaker 26 STANDBY LED 24...
... button 23 External Input Block 31 F Favorites 29 FAVORITES button 21 French Rating 32 H HDMI IN jack, described 15 Horizontal Center 28 Hue 25 I Info Banner 33 Infrared Receiver (IR) 24 INPUT button 23, 24 Installing the TV on a wall 37 J JUMP button 23 L Label Channels 29 Label Video Inputs 33 Language... Reset 25, 26, 36 RETURN button 21 S S VIDEO jack, described 16 Select Country 31 Settings Channel 29 Parental Lock 30 PC Settings 28 Picture 25 Screen 27 Setup 33 Sound 26 Sharpness 25 Show/Hide Channels 29 SLEEP button 21 Sleep Timer 33 Sound Mode 26 Speaker 26 STANDBY LED 24...


