Operating Instructions
Page 2
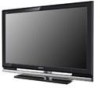
... KDL-40V4100 KDL-40W4100 KDL-42V4100 KDL-46V4100 KDL-46W4100 KDL-46W4150 KDL-52V4100 KDL-52W4100 Sony Wall-Mount Bracket Model No. SU-FL71M - Refer to environmental considerations. NOTIFICATION This equipment has been tested and found to comply with the instructions, may be liable for a Class B digital device, pursuant to provide reasonable protection against harmful interference in the TV Guide On Screen...
... KDL-40V4100 KDL-40W4100 KDL-42V4100 KDL-46V4100 KDL-46W4100 KDL-46W4150 KDL-52V4100 KDL-52W4100 Sony Wall-Mount Bracket Model No. SU-FL71M - Refer to environmental considerations. NOTIFICATION This equipment has been tested and found to comply with the instructions, may be liable for a Class B digital device, pursuant to provide reasonable protection against harmful interference in the TV Guide On Screen...
Operating Instructions
Page 3
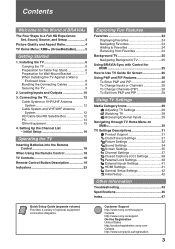
... Using TV Settings Media Category Icons 29 Adjusting TV Settings 29 Watching TV 29 Accessing External Inputs 29 Navigating through TV Home Menu on XMB 30 TV Settings Descriptions 31 Product Support 31 Clock/Timers Settings 31 Picture Settings 32 Sound Settings 34 Screen Settings ...Contents Welcome to the World of optional equipment connection diagrams. Customer Support http://www.sony.com/tvsupport Canada http://www.sony.ca/support On-line Registration United States http://productregistration.sony.com Canada http://www.sonystyle.ca/registration 3 Setting Up the Channel List -
... Using TV Settings Media Category Icons 29 Adjusting TV Settings 29 Watching TV 29 Accessing External Inputs 29 Navigating through TV Home Menu on XMB 30 TV Settings Descriptions 31 Product Support 31 Clock/Timers Settings 31 Picture Settings 32 Sound Settings 34 Screen Settings ...Contents Welcome to the World of optional equipment connection diagrams. Customer Support http://www.sony.com/tvsupport Canada http://www.sony.ca/support On-line Registration United States http://productregistration.sony.com Canada http://www.sonystyle.ca/registration 3 Setting Up the Channel List -

Operating Instructions
Page 4
...® high-definition television. To experience the stunning detail of HD programming and proper setup connections. http://www.sony.com/HDTV Canada http://www.sonystyle.ca/hd The Four Steps to a Full HD Experience: Set, Sound, Source, and ...it receives. To learn more about HDTV, visit: U.S.A. High-definition and standard-definition signals are transmitted with your BRAVIA TV set, a complete HD system requires an HD sound system, a source of your BRAVIA screen, maintaining a crisp, clear, vivid picture. 4:3 (standard-definition) source Most standard-definition signals use a boxy 4:3 aspect...
...® high-definition television. To experience the stunning detail of HD programming and proper setup connections. http://www.sony.com/HDTV Canada http://www.sonystyle.ca/hd The Four Steps to a Full HD Experience: Set, Sound, Source, and ...it receives. To learn more about HDTV, visit: U.S.A. High-definition and standard-definition signals are transmitted with your BRAVIA TV set, a complete HD system requires an HD sound system, a source of your BRAVIA screen, maintaining a crisp, clear, vivid picture. 4:3 (standard-definition) source Most standard-definition signals use a boxy 4:3 aspect...
Operating Instructions
Page 5
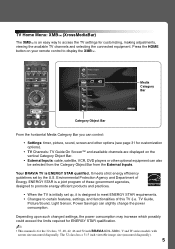
... increase which possibly could exceed the limits required for the 32 class, 37, 40, 42, 46 and 52 inch BRAVIA KDL-XBR6, V and W series models with screen size measured diagonally. Environmental Protection Agency and Department of these government agencies, designed to promote energy efficient products...XMB™ is initially set by the U.S. Press the HOME button on your remote control to access the TV settings for customization options). • TV Channels: TV Guide On Screen™ and available channels are displayed on the vertical Category Object Bar. • External Inputs: cable, ...
... increase which possibly could exceed the limits required for the 32 class, 37, 40, 42, 46 and 52 inch BRAVIA KDL-XBR6, V and W series models with screen size measured diagonally. Environmental Protection Agency and Department of these government agencies, designed to promote energy efficient products...XMB™ is initially set by the U.S. Press the HOME button on your remote control to access the TV settings for customization options). • TV Channels: TV Guide On Screen™ and available channels are displayed on the vertical Category Object Bar. • External Inputs: cable, ...
Operating Instructions
Page 6
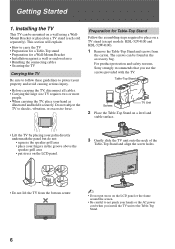
...speaker grill area • put stress on a TV stand (each sold separately). Table-Top Stand Screws TV Unit 2 Place the Table-Top Stand on the LCD panel or the frame around the screen. • Be careful to not pinch your ...Sony strongly recommends that you install the TV unit to shocks, vibration, or excessive force. Preparation for a Wall-Mount Bracket • Installation against a wall or enclosed area • Bundling the connecting cables • Securing the TV Carrying the TV Be sure to follow these guidelines to place on a TV stand (except models: KDL-52V4100 and KDL-52W4100...
...speaker grill area • put stress on a TV stand (each sold separately). Table-Top Stand Screws TV Unit 2 Place the Table-Top Stand on the LCD panel or the frame around the screen. • Be careful to not pinch your ...Sony strongly recommends that you install the TV unit to shocks, vibration, or excessive force. Preparation for a Wall-Mount Bracket • Installation against a wall or enclosed area • Bundling the connecting cables • Securing the TV Carrying the TV Be sure to follow these guidelines to place on a TV stand (except models: KDL-52V4100 and KDL-52W4100...
Operating Instructions
Page 8
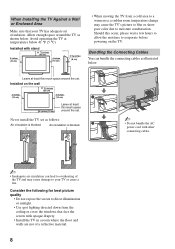
... a Wall or Enclosed Area Make sure that face the screen with opaque drapery. • Install the TV in a room where the floor and walls are not of the TV and may cause the TV's picture to blur or show poor color due to evaporate before powering on the wall 4 inches (10 cm) 11... 4 inches (10 cm) Leave at least this much space around the set . Never install the TV set as follows: Air circulation is blocked. Consider the following for best picture quality • Do not expose the screen to direct illumination or sunlight. • Use spot lighting directed down from a cold area to ...
... a Wall or Enclosed Area Make sure that face the screen with opaque drapery. • Install the TV in a room where the floor and walls are not of the TV and may cause the TV's picture to blur or show poor color due to evaporate before powering on the wall 4 inches (10 cm) 11... 4 inches (10 cm) Leave at least this much space around the set . Never install the TV set as follows: Air circulation is blocked. Consider the following for best picture quality • Do not expose the screen to direct illumination or sunlight. • Use spot lighting directed down from a cold area to ...
Operating Instructions
Page 11
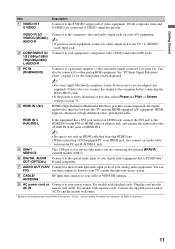
...1080p/1080i/ 720p/480p/480i)/ L-AUDIO-R 3 PC IN (RGB/AUDIO) 4 HDMI IN 1/2/3 Connects to the left and right audio input jacks of Screen settings on page 36. This USB port is for the signals that is noisy, flickering or not clear, adjust Phase and Pitch of your analog... the double-D symbol are connected, S VIDEO signal has priority. If both composite video and S VIDEO are trademarks of video equipment. If this TV and any HDMI-equipped A/V equipment. Connects to AC IN and the nearest wall outlet. * Manufactured under license from Dolby Laboratories. See "PC ...
...1080p/1080i/ 720p/480p/480i)/ L-AUDIO-R 3 PC IN (RGB/AUDIO) 4 HDMI IN 1/2/3 Connects to the left and right audio input jacks of Screen settings on page 36. This USB port is for the signals that is noisy, flickering or not clear, adjust Phase and Pitch of your analog... the double-D symbol are connected, S VIDEO signal has priority. If both composite video and S VIDEO are trademarks of video equipment. If this TV and any HDMI-equipped A/V equipment. Connects to AC IN and the nearest wall outlet. * Manufactured under license from Dolby Laboratories. See "PC ...
Operating Instructions
Page 16
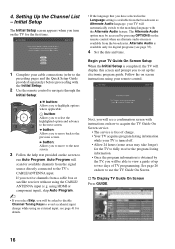
... fully receive the program listing information. • Once the program information is completed, the TV will be accessed by the TV, you will display this screen and prompt you to the TV's CABLE/ANTENNA input. B button: Allows you have selected in the Language setting is available only for ... may take longer) for details. • If the language that you to move to the next screen. 3 Follow the help text provided on the screen to use the TV Guide On Screen. Select to continue. Follow the on the remote control when an alternate audio stream is complete. Initial...
... fully receive the program listing information. • Once the program information is completed, the TV will be accessed by the TV, you will display this screen and prompt you to the TV's CABLE/ANTENNA input. B button: Allows you have selected in the Language setting is available only for ... may take longer) for details. • If the language that you to move to the next screen. 3 Follow the help text provided on the screen to use the TV Guide On Screen. Select to continue. Follow the on the remote control when an alternate audio stream is complete. Initial...
Operating Instructions
Page 19
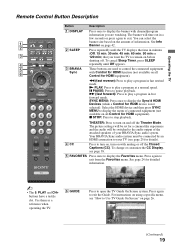
...). THEATER: Press to turn on with muting or off the Theater Mode. To change or customize the CC Display, see "How to Use TV Guide On Screen" on page 42. 2 2 SLEEP Press repeatedly until Off appears. 5 3 BRAVIA These buttons are watching. Press again to display the Favorites...playback. N PLAY: Press to play a program in fast rewind mode. See page 24 for HDMI device is not selected). Operating the TV Remote Control Button Description Button Description 1 DISPLAY Press once to display the banner with Control for HDMI function (not available on all Control ...
...). THEATER: Press to turn on with muting or off the Theater Mode. To change or customize the CC Display, see "How to Use TV Guide On Screen" on page 42. 2 2 SLEEP Press repeatedly until Off appears. 5 3 BRAVIA These buttons are watching. Press again to display the Favorites...playback. N PLAY: Press to play a program in fast rewind mode. See page 24 for HDMI device is not selected). Operating the TV Remote Control Button Description Button Description 1 DISPLAY Press once to display the banner with Control for HDMI function (not available on all Control ...

Operating Instructions
Page 20
...module qj 0 0-9 ENT may not be available in a window. Press repeatedly to select/ confirm an item. 20 See your dealer or www.sony.com/bravia for more information. Press ENT to move focus/highlight. Press to 0 restore the sound. Press again or press VOL + to ...XMB™ to access features in the optional BRAVIA external module (e.g. Product Support Clock/Timers Settings Sound Screen qg Channel TV qh 9 DMex Press to access the TV Home Menu items such as the TV Settings, TV channels and External Inputs list (see pages 5 and 29). Press to display a frozen image with...
...module qj 0 0-9 ENT may not be available in a window. Press repeatedly to select/ confirm an item. 20 See your dealer or www.sony.com/bravia for more information. Press ENT to move focus/highlight. Press to 0 restore the sound. Press again or press VOL + to ...XMB™ to access features in the optional BRAVIA external module (e.g. Product Support Clock/Timers Settings Sound Screen qg Channel TV qh 9 DMex Press to access the TV Home Menu items such as the TV Settings, TV channels and External Inputs list (see pages 5 and 29). Press to display a frozen image with...

Operating Instructions
Page 21
... PIP See page 28 Exit P&P or Exit PIP See page 28 Motion Enhancer See page 33 Speakers See page 34 Audio Swap See page 28 Screen See page 36 Add to cycle through the available picture modes: Vivid, Standard, Cinema, Custom, PhotoVivid, Photo-Standard, Photo-Original, PhotoCustom, Video, Text. (...to Favorites/ Remove from Favorites See page 24 qk MTS See page 34 Alternate Audio See page 35 ql Digital Rating See page 39 Background TV See page 25 Device Control See page 41 ql PICTURE ~ • The Digital Rating and Alternate Audio options will appear in Options only ...
... PIP See page 28 Exit P&P or Exit PIP See page 28 Motion Enhancer See page 33 Speakers See page 34 Audio Swap See page 28 Screen See page 36 Add to cycle through the available picture modes: Vivid, Standard, Cinema, Custom, PhotoVivid, Photo-Standard, Photo-Original, PhotoCustom, Video, Text. (...to Favorites/ Remove from Favorites See page 24 qk MTS See page 34 Alternate Audio See page 35 ql Digital Rating See page 39 Background TV See page 25 Device Control See page 41 ql PICTURE ~ • The Digital Rating and Alternate Audio options will appear in Options only ...
Operating Instructions
Page 22
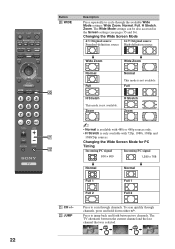
...Full Full w; Press to cycle through the available Wide Mode settings: Wide Zoom, Normal, Full, H Stretch, Zoom. Changing the Wide Screen Mode 4:3 Original source 16:9 Original source Standard-definition source High-definition source m Wide Zoom m Wide Zoom Normal Normal This mode is not... This mode is not available. Changing the Wide Screen Mode for PC Timing ws Incoming PC signal Incoming PC signal 800 × 600 1,280 × 768 m Normal m Normal Full 1 Full 1 Full 2 Full 2 wz CH +/- The TV alternates between two channels. WIDE Description Press repeatedly ...
...Full Full w; Press to cycle through the available Wide Mode settings: Wide Zoom, Normal, Full, H Stretch, Zoom. Changing the Wide Screen Mode 4:3 Original source 16:9 Original source Standard-definition source High-definition source m Wide Zoom m Wide Zoom Normal Normal This mode is not... This mode is not available. Changing the Wide Screen Mode for PC Timing ws Incoming PC signal Incoming PC signal 800 × 600 1,280 × 768 m Normal m Normal Full 1 Full 1 Full 2 Full 2 wz CH +/- The TV alternates between two channels. WIDE Description Press repeatedly ...
Operating Instructions
Page 23
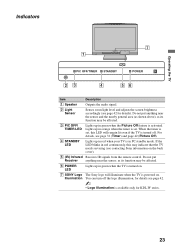
Do not put Receiver anything near the sensor, as its function may indicate that the TV needs servicing (see page 42 for KDL-W series. 23 When the timer is activated. Do not put anything near the sensor and the nearby general area (as ..., this LED will illuminate when the TV is available only for details). Operating the TV Indicators 7 1 PIC OFF/TIMER STANDBY POWER 23 4 56 Item Description 1 Speaker Outputs the audio signal. 2 Light Sensor Senses room light level and adjusts the screen brightness accordingly (see contacting Sony information on the back cover). 5...
Do not put Receiver anything near the sensor, as its function may indicate that the TV needs servicing (see page 42 for KDL-W series. 23 When the timer is activated. Do not put anything near the sensor and the nearby general area (as ..., this LED will illuminate when the TV is available only for details). Operating the TV Indicators 7 1 PIC OFF/TIMER STANDBY POWER 23 4 56 Item Description 1 Speaker Outputs the audio signal. 2 Light Sensor Senses room light level and adjusts the screen brightness accordingly (see contacting Sony information on the back cover). 5...
Operating Instructions
Page 25
...; will turn off the connected equipment when you can launch these themes from the Favorites screen. To connect Sony equipment with Control for HDMI Use an HDMI cable that you turn on this TV's Control for HDMI function must be set up in the Quick Setup Guide provided with...communicate with other Control for HDMI function. The TV will display the current channel or input using Control for HDMI The following additional operations are similar to 15 or see page 19. See pages 12 to a screen saver. For other Sony equipment supporting the Control for HDMI enabled equipment....
...; will turn off the connected equipment when you can launch these themes from the Favorites screen. To connect Sony equipment with Control for HDMI Use an HDMI cable that you turn on this TV's Control for HDMI function must be set up in the Quick Setup Guide provided with...communicate with other Control for HDMI function. The TV will display the current channel or input using Control for HDMI The following additional operations are similar to 15 or see page 19. See pages 12 to a screen saver. For other Sony equipment supporting the Control for HDMI enabled equipment....
Operating Instructions
Page 26
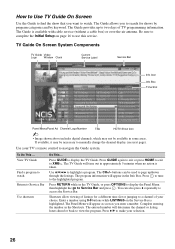
...number will time out in the TV Guide, or press OPTIONS to display the Panel Menu then highlight the go to highlight a program. TV Guide On Screen System Components TV Guide Video Logo Window Clock Current.... To Do This ... Press RETURN while in approximately 5 minutes when no action is highlighted. The TV Guide will determine the channel or listing hours ahead or back to the highlighted program. Use V/v/B/b to...The Guide provides up /down through the listings. The CH+/- How to Use TV Guide On Screen Use the Guide to find the show that you want to watch Return to ...
...number will time out in the TV Guide, or press OPTIONS to display the Panel Menu then highlight the go to highlight a program. TV Guide On Screen System Components TV Guide Video Logo Window Clock Current.... To Do This ... Press RETURN while in approximately 5 minutes when no action is highlighted. The TV Guide will determine the channel or listing hours ahead or back to the highlighted program. Use V/v/B/b to...The Guide provides up /down through the listings. The CH+/- How to Use TV Guide On Screen Use the Guide to find the show that you want to watch Return to ...
Operating Instructions
Page 27
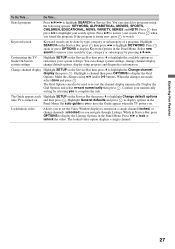
... category or subcategory by type, category or subcategory of a program. Select new search to customize your search option. Customizing the TV Guide On Screen system settings Highlight SETUP on Service Bar. Make the changes using the following options: KEYWORD, ALPHABETICAL, MOVIES, SPORTS, CHILDREN, EDUCATIONAL...re-sort the channel display numerically. Do This... Press V/v to highlight Change default options time TV is airing now, press to have the Guide appear when the TV powers on to watch. Keyword search Keyword search can also be done by pressing V/v/B/b. The ...
... category or subcategory by type, category or subcategory of a program. Select new search to customize your search option. Customizing the TV Guide On Screen system settings Highlight SETUP on Service Bar. Make the changes using the following options: KEYWORD, ALPHABETICAL, MOVIES, SPORTS, CHILDREN, EDUCATIONAL...re-sort the channel display numerically. Do This... Press V/v to highlight Change default options time TV is airing now, press to have the Guide appear when the TV powers on to watch. Keyword search Keyword search can also be done by pressing V/v/B/b. The ...
Operating Instructions
Page 29
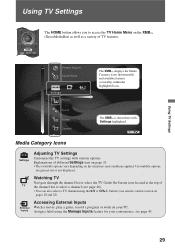
... to select a channel (see page 41. 29 Sound Screen Channel The XMB™ is shown here with various options. Unavailable options are grayed out or not displayed. Inputs Assign a label using the 0-9 or CH+/- Using TV Settings Product Support Clock/Timers Settings The XMB™ displays..., record a program or work on pages 20 and 22). Explanations of TV features. Watching TV Navigate through the channel list or select the TV Guide On Screen icon located at the top of TV the channel list to access the TV Home Menu on the XMB™ (XrossMediaBar) as well as a variety...
... to select a channel (see page 41. 29 Sound Screen Channel The XMB™ is shown here with various options. Unavailable options are grayed out or not displayed. Inputs Assign a label using the 0-9 or CH+/- Using TV Settings Product Support Clock/Timers Settings The XMB™ displays..., record a program or work on pages 20 and 22). Explanations of TV features. Watching TV Navigate through the channel list or select the TV Guide On Screen icon located at the top of TV the channel list to access the TV Home Menu on the XMB™ (XrossMediaBar) as well as a variety...
Operating Instructions
Page 30
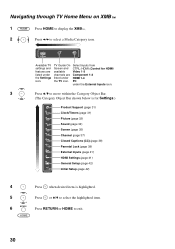
...and features are listed under the TV icon. TV Guide On Screen and available channels are listed ...under the External Inputs icon. 3 Press V/v to move within the Category Object Bar. (The Category Object Bar shown below is for Settings.) Product Support (page 31) Clock/Timers (page 31) Picture (page 32) Sound (page 34) Screen...V/v to select the highlighted item. 6 Press RETURN or HOME to select a Media Category icon. Navigating through TV Home Menu on XMB™ 1 Press HOME to display the XMB™. 2 Press B/b to exit....
...and features are listed under the TV icon. TV Guide On Screen and available channels are listed ...under the External Inputs icon. 3 Press V/v to move within the Category Object Bar. (The Category Object Bar shown below is for Settings.) Product Support (page 31) Clock/Timers (page 31) Picture (page 32) Sound (page 34) Screen...V/v to select the highlighted item. 6 Press RETURN or HOME to select a Media Category icon. Navigating through TV Home Menu on XMB™ 1 Press HOME to display the XMB™. 2 Press B/b to exit....

Operating Instructions
Page 31
... Current Time. ~ • If the option is disabled, the TV Guide On Screen has automatically set to have digital TV programming. (Not available with the use of the Week, Time, Duration, Input, Channel, and TV On Volume. Press V/v to choose the new version and press to... well as Model Name, Serial Number, Software Version and downloadable ratings if available from this screen for your convenience. TV Settings Descriptions Product Support Contact Sony Signal Diagnostics Software Update Sony contact information is off. • Do not turn off automatically. The Timer feature will ...
... Current Time. ~ • If the option is disabled, the TV Guide On Screen has automatically set to have digital TV programming. (Not available with the use of the Week, Time, Duration, Input, Channel, and TV On Volume. Press V/v to choose the new version and press to... well as Model Name, Serial Number, Software Version and downloadable ratings if available from this screen for your convenience. TV Settings Descriptions Product Support Contact Sony Signal Diagnostics Software Update Sony contact information is off. • Do not turn off automatically. The Timer feature will ...
Operating Instructions
Page 32
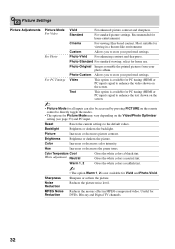
...be accessed by pressing PICTURE on the remote control to directly toggle the modes. • The options for Picture Mode may vary depending on the screen. Gives the white colors a neutral tint. Warm 1, 2 Gives the white colors a reddish tint. ~ • The option Warm 1, .... For standard picture settings. For PC Timings Video This option is not available for Reduction DVDs, Blu-ray and Digital TV channels. 32 Backlight Brightens or darkens the backlight. For Photo Photo-Vivid For enhancing contrast and sharpness. Photo-Custom Allows ...
...be accessed by pressing PICTURE on the remote control to directly toggle the modes. • The options for Picture Mode may vary depending on the screen. Gives the white colors a neutral tint. Warm 1, 2 Gives the white colors a reddish tint. ~ • The option Warm 1, .... For standard picture settings. For PC Timings Video This option is not available for Reduction DVDs, Blu-ray and Digital TV channels. 32 Backlight Brightens or darkens the backlight. For Photo Photo-Vivid For enhancing contrast and sharpness. Photo-Custom Allows ...


