Operating Instructions
Page 2
... availability of Conformity Trade Name: SONY Model: KDL-32XBR6/KDL-37XBR6/ KDL-40V4150/KDL-40V4100/ KDL-42V4100/KDL-46V4100/ KDL-52V4100/KDL-40W4100/ KDL-46W4100/KDL-52W4100/ KDL-46W4150 Responsible Party: Sony Electronics Inc. Owner's Record The model and serial numbers are cautioned that interference will not occur in a particular installation. and other data in the TV Guide On Screen system and cannot guarantee service availability...
... availability of Conformity Trade Name: SONY Model: KDL-32XBR6/KDL-37XBR6/ KDL-40V4150/KDL-40V4100/ KDL-42V4100/KDL-46V4100/ KDL-52V4100/KDL-40W4100/ KDL-46W4100/KDL-52W4100/ KDL-46W4150 Responsible Party: Sony Electronics Inc. Owner's Record The model and serial numbers are cautioned that interference will not occur in a particular installation. and other data in the TV Guide On Screen system and cannot guarantee service availability...
Operating Instructions
Page 3
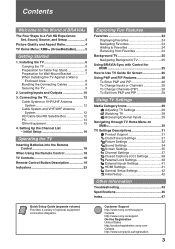
...World of optional equipment connection diagrams. Customer Support http://www.sony.com/tvsupport Canada http://www.sony.ca/support On-line Registration United States http://productregistration.sony.com Canada http://www.sonystyle.ca/registration 3 Connecting the TV 12 Cable System or VHF/UHF Antenna System 12 Cable ...Troubleshooting 43 Specifications 46 Index 47 Quick Setup Guide (separate volume) Provides a variety of BRAVIA® The Four Steps to Use TV Guide On Screen 26 Using P&P and PIP Features 28 To Enter P&P and PIP 28 To Change Inputs or Channels 28 To Change Channels (...
...World of optional equipment connection diagrams. Customer Support http://www.sony.com/tvsupport Canada http://www.sony.ca/support On-line Registration United States http://productregistration.sony.com Canada http://www.sonystyle.ca/registration 3 Connecting the TV 12 Cable System or VHF/UHF Antenna System 12 Cable ...Troubleshooting 43 Specifications 46 Index 47 Quick Setup Guide (separate volume) Provides a variety of BRAVIA® The Four Steps to Use TV Guide On Screen 26 Using P&P and PIP Features 28 To Enter P&P and PIP 28 To Change Inputs or Channels 28 To Change Channels (...

Operating Instructions
Page 4
... HD programming from 1080 HD signals. The quality of the image you see page 12). The 16:9 fills your new BRAVIA TV, you need access to HD programming. http://www.sony.com/HDTV Canada http://www.sonystyle.ca/hd The Four Steps to a Full HD Experience: Set, Sound, Source, and Setup ...Along with different aspect ratios (the width-to-height ratio of the image). Your BRAVIA TV can use a wide screen aspect ratio of 16:9. Welcome to...
... HD programming from 1080 HD signals. The quality of the image you see page 12). The 16:9 fills your new BRAVIA TV, you need access to HD programming. http://www.sony.com/HDTV Canada http://www.sonystyle.ca/hd The Four Steps to a Full HD Experience: Set, Sound, Source, and Setup ...Along with different aspect ratios (the width-to-height ratio of the image). Your BRAVIA TV can use a wide screen aspect ratio of 16:9. Welcome to...
Operating Instructions
Page 5
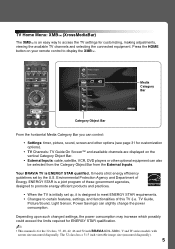
... Depending upon such changed settings, the power consumption may increase which possibly could exceed the limits required for customization options). • TV Channels: TV Guide On Screen™ and available channels are displayed on your remote control to display the XMB™. The 32 class has a 31.5 inch... energy efficiency guidelines set up, it is an easy way to access the TV settings for the 32 class, 37, 40, 42, 46 and 52 inch BRAVIA KDL-XBR6, V and W series models with screen size measured diagonally. TV Home Menu: XMB™ (XrossMediaBar) The XMB™ is designed to ...
... Depending upon such changed settings, the power consumption may increase which possibly could exceed the limits required for customization options). • TV Channels: TV Guide On Screen™ and available channels are displayed on your remote control to display the XMB™. The 32 class has a 31.5 inch... energy efficiency guidelines set up, it is an easy way to access the TV settings for the 32 class, 37, 40, 42, 46 and 52 inch BRAVIA KDL-XBR6, V and W series models with screen size measured diagonally. TV Home Menu: XMB™ (XrossMediaBar) The XMB™ is designed to ...
Operating Instructions
Page 6
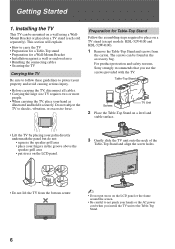
... Stand Follow the assembling steps required to the Table-Top Stand. 6 For product protection and safety reasons, Sony strongly recommends that you install the TV unit to place on a TV stand (except models: KDL-52V4100 and KDL-52W4100). 1 Remove the Table-Top Stand and screws from the bottom center. ~ • Do not... area • place your hand as illustrated and hold it securely. Installing the TV This TV can be mounted on a wall using a WallMount Bracket or placed on the LCD panel or the frame around the screen. • Be careful to not pinch your hands or the AC power cord ...
... Stand Follow the assembling steps required to the Table-Top Stand. 6 For product protection and safety reasons, Sony strongly recommends that you install the TV unit to place on a TV stand (except models: KDL-52V4100 and KDL-52W4100). 1 Remove the Table-Top Stand and screws from the bottom center. ~ • Do not... area • place your hand as illustrated and hold it securely. Installing the TV This TV can be mounted on a wall using a WallMount Bracket or placed on the LCD panel or the frame around the screen. • Be careful to not pinch your hands or the AC power cord ...
Operating Instructions
Page 8
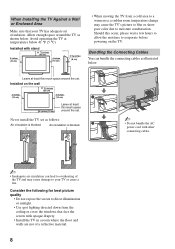
... at least this occur, please wait a few hours to allow the moisture to your TV has adequate air circulation. When Installing the TV Against a Wall or Enclosed Area Make sure that face the screen with opaque drapery. • Install the TV in a room where the floor and walls are not of the... TV and may cause the TV's picture to blur or show poor color due to moisture condensation...
... at least this occur, please wait a few hours to allow the moisture to your TV has adequate air circulation. When Installing the TV Against a Wall or Enclosed Area Make sure that face the screen with opaque drapery. • Install the TV in a room where the floor and walls are not of the... TV and may cause the TV's picture to blur or show poor color due to moisture condensation...
Operating Instructions
Page 11
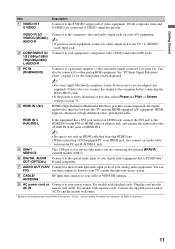
... This USB port is PCM/Dolby* OUT (OPTICAL) Digital compatible. 7 AUDIO OUT (VAR/ Connects to the left and right audio input jacks of Screen settings on page 14 for service only unless you have mono equipment, connect its audio output jack to AC IN and the nearest wall outlet...and audio output jacks on your A/V equipment. ~ • If you are connecting the optional BRAVIA external module (DMex). 6 DIGITAL AUDIO Connects to your TV's audio through your stereo system. 8 CABLE/ ANTENNA RF input that is for the signals that can FIX) use an adapter (not supplied). Connects to your...
... This USB port is PCM/Dolby* OUT (OPTICAL) Digital compatible. 7 AUDIO OUT (VAR/ Connects to the left and right audio input jacks of Screen settings on page 14 for service only unless you have mono equipment, connect its audio output jack to AC IN and the nearest wall outlet...and audio output jacks on your A/V equipment. ~ • If you are connecting the optional BRAVIA external module (DMex). 6 DIGITAL AUDIO Connects to your TV's audio through your stereo system. 8 CABLE/ ANTENNA RF input that is for the signals that can FIX) use an adapter (not supplied). Connects to your...
Operating Instructions
Page 16
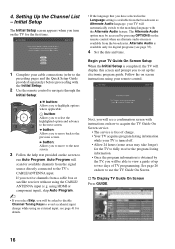
...box or satellite receiver without using your cable connections (refer to the previous screen. Initial Setup Step 6 of TV programming. s To Display TV Guide On Screen Press GUIDE. 16 Highlight a choice and press to the next screen. English Español Français 1 Complete your remote control. ...Please select a language. using an external input; 4. Setting Up the Channel List - Initial Setup The Initial Setup screen appears when you to set up to the TV's CABLE/ANTENNA input. Initial Setup Step 1 of up the electronic program guide. button: Allows you will scan for...
...box or satellite receiver without using your cable connections (refer to the previous screen. Initial Setup Step 6 of TV programming. s To Display TV Guide On Screen Press GUIDE. 16 Highlight a choice and press to the next screen. English Español Français 1 Complete your remote control. ...Please select a language. using an external input; 4. Setting Up the Channel List - Initial Setup The Initial Setup screen appears when you to set up to the TV's CABLE/ANTENNA input. Initial Setup Step 1 of up the electronic program guide. button: Allows you will scan for...
Operating Instructions
Page 19
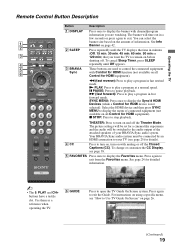
...a few seconds or press again to control the connected equipment 6 Sync with muting or off . SYNC MENU: Press once to open the TV Guide On Screen system. Press again to stop playback. You can select the 1 banner size based on and off the Theater Mode. x STOP: Press ... CC Press to the audio output of the attached speakers of information. N PLAY: Press to exit the Guide. M (fast forward): Press to Use TV Guide On Screen" on using a specific menu, see page 25 for detailed information. ~ • The 5, PLAY and CH+ buttons have a tactile dot. For ...
...a few seconds or press again to control the connected equipment 6 Sync with muting or off . SYNC MENU: Press once to open the TV Guide On Screen system. Press again to stop playback. You can select the 1 banner size based on and off the Theater Mode. x STOP: Press ... CC Press to the audio output of the attached speakers of information. N PLAY: Press to exit the Guide. M (fast forward): Press to Use TV Guide On Screen" on using a specific menu, see page 25 for detailed information. ~ • The 5, PLAY and CH+ buttons have a tactile dot. For ...

Operating Instructions
Page 20
...qf POWER Press to select/ confirm an item. 20 See your dealer or www.sony.com/bravia for more information. Press to turn on and off the TV. Product Support Clock/Timers Settings Sound Screen qg Channel TV qh 9 DMex Press to select digital channels. Press ENT to change channels immediately.... Freeze and display the XMB™. Press repeatedly to fill the screen with 0-9 and ENT to access features in all regions. Press to display the TV Home Menu/XMB™ to the previous screen or exit from the screen when displaying menu items and settings. Button 7 RETURN 8 HOME ...
...qf POWER Press to select/ confirm an item. 20 See your dealer or www.sony.com/bravia for more information. Press to turn on and off the TV. Product Support Clock/Timers Settings Sound Screen qg Channel TV qh 9 DMex Press to select digital channels. Press ENT to change channels immediately.... Freeze and display the XMB™. Press repeatedly to fill the screen with 0-9 and ENT to access features in all regions. Press to display the TV Home Menu/XMB™ to the previous screen or exit from the screen when displaying menu items and settings. Button 7 RETURN 8 HOME ...

Operating Instructions
Page 21
...PIP See page 28 Exit P&P or Exit PIP See page 28 Motion Enhancer See page 33 Speakers See page 34 Audio Swap See page 28 Screen See page 36 Add to display a list of convenient functions and menu shortcuts. For details, see Picture settings on the current mode.) The picture... modes can also be accessed in the currently tuned digital program. Operating the TV Button Description qk OPTIONS Press to Favorites/ Remove from Favorites See page 24 qk MTS See page 34 Alternate Audio See page 35 ql Digital...
...PIP See page 28 Exit P&P or Exit PIP See page 28 Motion Enhancer See page 33 Speakers See page 34 Audio Swap See page 28 Screen See page 36 Add to display a list of convenient functions and menu shortcuts. For details, see Picture settings on the current mode.) The picture... modes can also be accessed in the currently tuned digital program. Operating the TV Button Description qk OPTIONS Press to Favorites/ Remove from Favorites See page 24 qk MTS See page 34 Alternate Audio See page 35 ql Digital...
Operating Instructions
Page 22
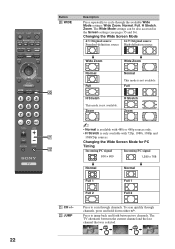
... current channel and the last channel that was selected. The Wide Mode settings can be also accessed in the Screen settings (see pages 35 and 36). Full Full w; Changing the Wide Screen Mode for PC Timing ws Incoming PC signal Incoming PC signal 800 × 600 1,280 × 768... m Normal m Normal Full 1 Full 1 Full 2 Full 2 wz CH +/- ws JUMP Press to scan through channels, press and hold down either +/-. The TV alternates between two channels. ...
... current channel and the last channel that was selected. The Wide Mode settings can be also accessed in the Screen settings (see pages 35 and 36). Full Full w; Changing the Wide Screen Mode for PC Timing ws Incoming PC signal Incoming PC signal 800 × 600 1,280 × 768... m Normal m Normal Full 1 Full 1 Full 2 Full 2 wz CH +/- ws JUMP Press to scan through channels, press and hold down either +/-. The TV alternates between two channels. ...
Operating Instructions
Page 23
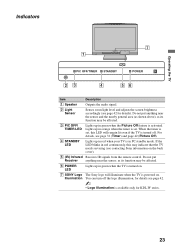
...8226; Logo Illumination is available only for KDL-W series. 23 You can turn off . Operating the TV Indicators 7 1 PIC OFF/TIMER STANDBY POWER 23 4 56 Item Description 1 Speaker Outputs the audio signal. 2 Light Sensor Senses room light level and adjusts the screen brightness accordingly (see page 31 (Timer)... sensor, as its function may be affected. 6 POWER LED Lights up in green when the TV is turned on. 7 SONY Logo Illumination The Sony logo will remain lit even if the TV is activated. When the timer is powered on the back cover). 5 (IR) Infrared Receives ...
...8226; Logo Illumination is available only for KDL-W series. 23 You can turn off . Operating the TV Indicators 7 1 PIC OFF/TIMER STANDBY POWER 23 4 56 Item Description 1 Speaker Outputs the audio signal. 2 Light Sensor Senses room light level and adjusts the screen brightness accordingly (see page 31 (Timer)... sensor, as its function may be affected. 6 POWER LED Lights up in green when the TV is turned on. 7 SONY Logo Illumination The Sony logo will remain lit even if the TV is activated. When the timer is powered on the back cover). 5 (IR) Infrared Receives ...
Operating Instructions
Page 25
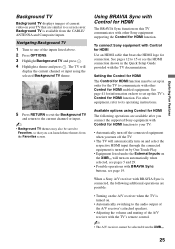
...on the XMB™ will display the current channel or input using Control for HDMI function to your TV that are available after you connect the supported Sony equipment with the TV documentation. See pages 12 to 15 or see pages 5 and 29. • Possible operations with... BRAVIA Sync is connected, the following operations are similar to communicate with Control for the TV to a screen saver. Available options using the selected Background TV theme. 5...
...on the XMB™ will display the current channel or input using Control for HDMI function to your TV that are available after you connect the supported Sony equipment with the TV documentation. See pages 12 to 15 or see pages 5 and 29. • Possible operations with... BRAVIA Sync is connected, the following operations are similar to communicate with Control for the TV to a screen saver. Available options using the selected Background TV theme. 5...
Operating Instructions
Page 26
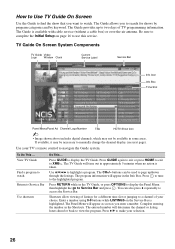
...page). Press GUIDE to XMB™. Complete entering the number in the Info Box. View TV Guide Find a program to watch . The Guide provides up /down through the listings. TV Guide On Screen System Components TV Guide Video Logo Window Clock Current Service Label Service Bar Info Icon Info Box Time Slot ...as you to search for a different time slot or jumping to a channel of TV programming information. Press GUIDE again to exit or press HOME to exit to display the TV Guide. How to Use TV Guide On Screen Use the Guide to find the show that you want to watch Return to ...
...page). Press GUIDE to XMB™. Complete entering the number in the Info Box. View TV Guide Find a program to watch . The Guide provides up /down through the listings. TV Guide On Screen System Components TV Guide Video Logo Window Clock Current Service Label Service Bar Info Icon Info Box Time Slot ...as you to search for a different time slot or jumping to a channel of TV programming information. Press GUIDE again to exit or press HOME to exit to display the TV Guide. How to Use TV Guide On Screen Use the Guide to find the show that you want to watch Return to ...
Operating Instructions
Page 27
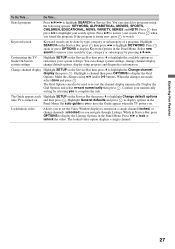
...subcategory of a program. Exploring Fun Features 27 Do This... Press then press B/b to re-sort the channel display numerically. Customizing the TV Guide On Screen system settings Highlight SETUP on the Service Bar then press v to display Keyword Options in the Panel Menu. Press V/v to customize ...narrow your system settings. The locked video option displays a single channel. Press again or press OPTIONS to highlight Change default options time TV is airing now, press to highlight KEYWORD. When the changes are made, select done and press . Lock/unlock video Allows you ...
...subcategory of a program. Exploring Fun Features 27 Do This... Press then press B/b to re-sort the channel display numerically. Customizing the TV Guide On Screen system settings Highlight SETUP on the Service Bar then press v to display Keyword Options in the Panel Menu. Press V/v to customize ...narrow your system settings. The locked video option displays a single channel. Press again or press OPTIONS to highlight Change default options time TV is airing now, press to highlight KEYWORD. When the changes are made, select done and press . Lock/unlock video Allows you ...
Operating Instructions
Page 29
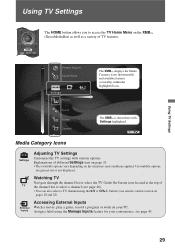
... Unavailable options are grayed out or not displayed. Using TV Settings Product Support Clock/Timers Settings The XMB™ displays the Media Category icons (horizontally) and available features (vertically) within the highlighted icon. Sound Screen Channel The XMB™ is shown here with various... options. Watching TV Navigate through the channel list or select the TV Guide On Screen icon located at the top of...
... Unavailable options are grayed out or not displayed. Using TV Settings Product Support Clock/Timers Settings The XMB™ displays the Media Category icons (horizontally) and available features (vertically) within the highlighted icon. Sound Screen Channel The XMB™ is shown here with various... options. Watching TV Navigate through the channel list or select the TV Guide On Screen icon located at the top of...
Operating Instructions
Page 30
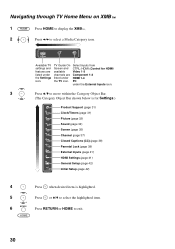
TV Guide On Screen and available channels are listed under the TV icon. Settings Available TV settings and features are listed under the Settings icon. Select inputs from CTRL: HDMI (Control for HDMI) Video 1-3 Component 1-2 HDMI 1-4 PC under the External Inputs ... Object Bar. (The Category Object Bar shown below is for Settings.) Product Support (page 31) Clock/Timers (page 31) Picture (page 32) Sound (page 34) Screen (page 35) Channel (page 37) CC Closed Captions (CC) (page 38) Parental Lock (page 38) External Inputs (page 41) HDMI Settings (page 41) General Setup...
TV Guide On Screen and available channels are listed under the TV icon. Settings Available TV settings and features are listed under the Settings icon. Select inputs from CTRL: HDMI (Control for HDMI) Video 1-3 Component 1-2 HDMI 1-4 PC under the External Inputs ... Object Bar. (The Category Object Bar shown below is for Settings.) Product Support (page 31) Clock/Timers (page 31) Picture (page 32) Sound (page 34) Screen (page 35) Channel (page 37) CC Closed Captions (CC) (page 38) Parental Lock (page 38) External Inputs (page 41) HDMI Settings (page 41) General Setup...

Operating Instructions
Page 31
...software version and check for your convenience. Press to remain on . • The Broadcast Download is performed while the TV is disabled, the TV Guide On Screen has automatically set the Current Time. ~ • If the option is off. • Do not turn off ...performed while the TV is powered on before shutting off the TV during software update; Your TV's specific information such as a specified volume at the specified time and duration you set the time. TV Settings Descriptions Product Support Contact Sony Signal Diagnostics Software Update Sony contact information is...
...software version and check for your convenience. Press to remain on . • The Broadcast Download is performed while the TV is disabled, the TV Guide On Screen has automatically set the Current Time. ~ • If the option is off. • Do not turn off ...performed while the TV is powered on before shutting off the TV during software update; Your TV's specific information such as a specified volume at the specified time and duration you set the time. TV Settings Descriptions Product Support Contact Sony Signal Diagnostics Software Update Sony contact information is...
Operating Instructions
Page 32
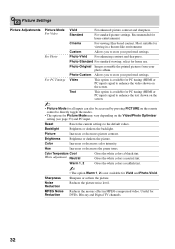
select for Reduction DVDs, Blu-ray and Digital TV channels. 32 Reset Resets the current settings to enhance ... Gives the white colors a bluish tint. Most suitable for all inputs can also be accessed by pressing PICTURE on the screen. Warm 1, 2 Gives the white colors a reddish tint. ~ • The option Warm 1, 2 is available for...the default values. For PC Timings Video This option is available for Picture Mode may vary depending on the screen. ~ • Picture Mode for viewing in MPEG-compressed video. Photo-Original Images resemble the printed pictures ...
select for Reduction DVDs, Blu-ray and Digital TV channels. 32 Reset Resets the current settings to enhance ... Gives the white colors a bluish tint. Most suitable for all inputs can also be accessed by pressing PICTURE on the screen. Warm 1, 2 Gives the white colors a reddish tint. ~ • The option Warm 1, 2 is available for...the default values. For PC Timings Video This option is available for Picture Mode may vary depending on the screen. ~ • Picture Mode for viewing in MPEG-compressed video. Photo-Original Images resemble the printed pictures ...


