
Operating Instructions
Page 3
... PIP 37 Using TV Settings Media Category Icons 38 Navigating through TV Home Menu on XMB 39 TV Settings Descriptions 40 Product Support 40 Clock/Timers Settings 40 Picture Settings 41 Sound Settings 44 Screen Settings 45 Channel Settings 47 CC Closed Captions (CC) Settings 48 Parental Lock Settings 48 External Inputs Settings 51 HDMI Settings 51 Network Settings 52 General Setup Settings 52 Initial Setup 53...
... PIP 37 Using TV Settings Media Category Icons 38 Navigating through TV Home Menu on XMB 39 TV Settings Descriptions 40 Product Support 40 Clock/Timers Settings 40 Picture Settings 41 Sound Settings 44 Screen Settings 45 Channel Settings 47 CC Closed Captions (CC) Settings 48 Parental Lock Settings 48 External Inputs Settings 51 HDMI Settings 51 Network Settings 52 General Setup Settings 52 Initial Setup 53...

Operating Instructions
Page 4
...see pages 21, 45 and 46). 4 HDTV uses a wider screen than conventional standarddefinition TV. 16:9 (high-definition) source Most HDTV signals use a boxy 4:3 aspect ratio. Your BRAVIA TV can enjoy crisp, clear images...signals are transmitted with your new BRAVIA TV, you need access to a standard analog signal, you see on your BRAVIA screen, maintaining a crisp, clear, vivid picture. 4:3 (standard-definition) source Most ... you will see page 12). http://www.sony.com/HDTV Canada http://www.sonystyle.ca/hd The Four Steps to a Full HD Experience: Set, Sound, Source, and Setup Along with...
...see pages 21, 45 and 46). 4 HDTV uses a wider screen than conventional standarddefinition TV. 16:9 (high-definition) source Most HDTV signals use a boxy 4:3 aspect ratio. Your BRAVIA TV can enjoy crisp, clear images...signals are transmitted with your new BRAVIA TV, you need access to a standard analog signal, you see on your BRAVIA screen, maintaining a crisp, clear, vivid picture. 4:3 (standard-definition) source Most ... you will see page 12). http://www.sony.com/HDTV Canada http://www.sonystyle.ca/hd The Four Steps to a Full HD Experience: Set, Sound, Source, and Setup Along with...
Operating Instructions
Page 5
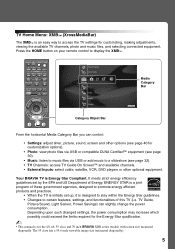
... exceed the limits required for the 40, 46, 55 class and 70 inch BRAVIA XBR series models with screen size measured diagonally. The 55 class has a 54.6 inch viewable image size (measured diagonally). 5 TV Guide, Picture/Sound, Light Sensor, Power Savings) can control: • Settings: adjust timer, picture, sound, screen and other optional equipment. It...
... exceed the limits required for the 40, 46, 55 class and 70 inch BRAVIA XBR series models with screen size measured diagonally. The 55 class has a 54.6 inch viewable image size (measured diagonally). 5 TV Guide, Picture/Sound, Light Sensor, Power Savings) can control: • Settings: adjust timer, picture, sound, screen and other optional equipment. It...
Operating Instructions
Page 8
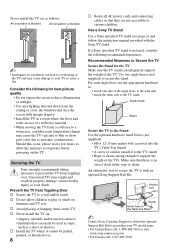
... Support Belt Kit by providing your TV or cause a fire. Securing the TV Sony strongly recommends taking measures to prevent the TV from Toppling Over s Secure the TV to curious children. Recommended Measures to Secure the TV Secure the Stand for best picture quality • Do not expose ...bodily injury or even death. Never install the TV set as a chest of the TV. Consider the following recommended measures. s Never install the TV on furniture and TV sets. Use two angle braces (not supplied) to : • attach one side of the TV). Air circulation is blocked. s Do not ...
... Support Belt Kit by providing your TV or cause a fire. Securing the TV Sony strongly recommends taking measures to prevent the TV from Toppling Over s Secure the TV to curious children. Recommended Measures to Secure the TV Secure the Stand for best picture quality • Do not expose ...bodily injury or even death. Never install the TV set as a chest of the TV. Consider the following recommended measures. s Never install the TV on furniture and TV sets. Use two angle braces (not supplied) to : • attach one side of the TV). Air circulation is blocked. s Do not ...
Operating Instructions
Page 11
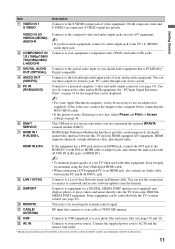
...connecting the HD15-HD15 cable. • If the picture is PCM/Dolby* Digital compatible. If this TV and any HDMI-equipped A/V equipment. HDMI (High..., it may be connected to the TV's L (MONO) audio input jack. Connects to a Local Area Network using the Sony High Speed HDMI cable. •... 7 HDMI IN 1 R-AUDIO-L Connects to the composite video and audio output jacks on page 46. qa CABLE/ ANTENNA RF input that is noisy, flickering or not clear, adjust Phase and ... trademarks of Screen settings on your A/V equipment. ~ • If you are connecting the optional BRAVIA ...
...connecting the HD15-HD15 cable. • If the picture is PCM/Dolby* Digital compatible. If this TV and any HDMI-equipped A/V equipment. HDMI (High..., it may be connected to the TV's L (MONO) audio input jack. Connects to a Local Area Network using the Sony High Speed HDMI cable. •... 7 HDMI IN 1 R-AUDIO-L Connects to the composite video and audio output jacks on page 46. qa CABLE/ ANTENNA RF input that is noisy, flickering or not clear, adjust Phase and ... trademarks of Screen settings on your A/V equipment. ~ • If you are connecting the optional BRAVIA ...
Operating Instructions
Page 12
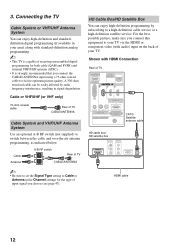
...cable 12 Shown with audio) input on the back of your TV via the HDMI or component video (with HDMI Connection Rear of TV B CABLE/ANTENNA ~ • Be sure to set the Signal Type setting to receive optimum picture quality. HD Cable Box/HD Satellite Box You can be ...easily affected by subscribing to your TV. For the best possible picture, make sure you connect this equipment ...
...cable 12 Shown with audio) input on the back of your TV via the HDMI or component video (with HDMI Connection Rear of TV B CABLE/ANTENNA ~ • Be sure to set the Signal Type setting to receive optimum picture quality. HD Cable Box/HD Satellite Box You can be ...easily affected by subscribing to your TV. For the best possible picture, make sure you connect this equipment ...
Operating Instructions
Page 14
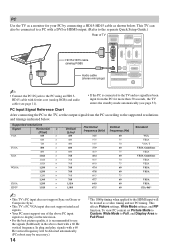
...TV enters the standby mode automatically (see page 53). To view PC content set the output signal from the PC for your PC by connecting a HD15-HD15 cable as a video timing and not PC timing. This affects Picture settings, Wide Mode settings...768 768 768 768 768 768 768 1,024 1,080 Horizontal frequency (kHz) 31.5 37.5 31.5 37.9 46.9 48.4 56.5 60.0 47.4 47.8 60.3 47.7 64.0 67.5 Vertical frequency (Hz) 60 75 ...Rear of the above PC input signals to display on the television. • For the best picture quality, it is recommended to use the signals (boldfaced) in the above chart with ferrite ...
...TV enters the standby mode automatically (see page 53). To view PC content set the output signal from the PC for your PC by connecting a HD15-HD15 cable as a video timing and not PC timing. This affects Picture settings, Wide Mode settings...768 768 768 768 768 768 768 1,024 1,080 Horizontal frequency (kHz) 31.5 37.5 31.5 37.9 46.9 48.4 56.5 60.0 47.4 47.8 60.3 47.7 64.0 67.5 Vertical frequency (Hz) 60 75 ...Rear of the above PC input signals to display on the television. • For the best picture quality, it is recommended to use the signals (boldfaced) in the above chart with ferrite ...

Operating Instructions
Page 19
...to play a program at a normal speed. THEATER: Press to operate the corresponding equipment. The picture settings will be switched to the audio output of the attached speakers of these FUNCTION buttons to turn ... audio system must first press one of your BRAVIA Sync audio system. See your TV (see Sound settings on all Control for HDMI equipment). . The FUNCTION button indicator lights up the ...fast rewind mode. The sound modes can operate video equipment programmed to your dealer or www.sony.com/bravia for details). The module may not be connected by an HDMI connection to ...
...to play a program at a normal speed. THEATER: Press to operate the corresponding equipment. The picture settings will be switched to the audio output of the attached speakers of these FUNCTION buttons to turn ... audio system must first press one of your BRAVIA Sync audio system. See your TV (see Sound settings on all Control for HDMI equipment). . The FUNCTION button indicator lights up the ...fast rewind mode. The sound modes can operate video equipment programmed to your dealer or www.sony.com/bravia for details). The module may not be connected by an HDMI connection to ...
Operating Instructions
Page 20
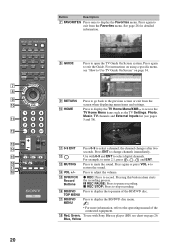
...Timers Settings Sound Screen Channel TV qa 0-9 ENT qs qd MUTING qf VOL +/- Press ENT to restore the sound. Press again or press VOL + to change channels immediately. DISPLAY LIGHT POWER TV POWER DVD AMP STB TV FUNCTION PREV REPLAY ADVANCE NEXT PLAY SYNC MENU PAUSE STOP THEATER SOUND PICTURE ...Press again to select a channel; Press 0-9 to exit the Guide. qg DVR/VCR Record Buttons z REC: Press to mute the sound. Use with Sony Blu-ray player (BD) see pages 5 and 38). the channel changes after two seconds. Press to record. X REC PAUSE: Press to adjust the...
...Timers Settings Sound Screen Channel TV qa 0-9 ENT qs qd MUTING qf VOL +/- Press ENT to restore the sound. Press again or press VOL + to change channels immediately. DISPLAY LIGHT POWER TV POWER DVD AMP STB TV FUNCTION PREV REPLAY ADVANCE NEXT PLAY SYNC MENU PAUSE STOP THEATER SOUND PICTURE ...Press again to select a channel; Press 0-9 to exit the Guide. qg DVR/VCR Record Buttons z REC: Press to mute the sound. Use with Sony Blu-ray player (BD) see pages 5 and 38). the channel changes after two seconds. Press to record. X REC PAUSE: Press to adjust the...

Operating Instructions
Page 21
... be also accessed in the Screen settings (see pages 45 and 46). Press repeatedly to turn on and off the ... m Normal m Normal Full 1 Full 1 Full 2 Full 2 (Continued) 21 Operating the TV Button Description ql TV POWER Press to cycle through the available Wide Mode settings: Wide Zoom, Normal, Full, H Stretch, Zoom. POWER wa WIDE Press to turn on ... SOUND PICTURE WIDE CC FREEZE wa m Wide Zoom m Wide Zoom Normal Normal Full Full H Stretch This mode is only available with 720p, 1080i, 1080p and 1080/24p sources. DISPLAY LIGHT POWER TV POWER DVD AMP STB TV FUNCTION ...
... be also accessed in the Screen settings (see pages 45 and 46). Press repeatedly to turn on and off the ... m Normal m Normal Full 1 Full 1 Full 2 Full 2 (Continued) 21 Operating the TV Button Description ql TV POWER Press to cycle through the available Wide Mode settings: Wide Zoom, Normal, Full, H Stretch, Zoom. POWER wa WIDE Press to turn on ... SOUND PICTURE WIDE CC FREEZE wa m Wide Zoom m Wide Zoom Normal Normal Full Full H Stretch This mode is only available with 720p, 1080i, 1080p and 1080/24p sources. DISPLAY LIGHT POWER TV POWER DVD AMP STB TV FUNCTION ...

Operating Instructions
Page 22
... Swap Screen Add to Favorites/ Remove from Favorites MTS Alternate Audio Digital Rating Background TV Motion Enhancer Device Control Device Control (Menu) for Closed Captions (CC): On, Off, and On with the current program in the Picture settings. Press again to return to move focus/highlight. The OPTIONS menu items vary based... to display a list of External Inputs and TV mode. Press to cycle through the available settings for DMPORT Photo Music Reference Page See page 41 See page 44 See page 37 See page 37 See page 45 See page 37 See page 46 See page 28 See page 45 See page ...
... Swap Screen Add to Favorites/ Remove from Favorites MTS Alternate Audio Digital Rating Background TV Motion Enhancer Device Control Device Control (Menu) for Closed Captions (CC): On, Off, and On with the current program in the Picture settings. Press again to return to move focus/highlight. The OPTIONS menu items vary based... to display a list of External Inputs and TV mode. Press to cycle through the available settings for DMPORT Photo Music Reference Page See page 41 See page 44 See page 37 See page 37 See page 45 See page 37 See page 46 See page 28 See page 45 See page ...

Operating Instructions
Page 24
..., as its function may indicate that the TV needs servicing (see contacting Sony information on the back cover). 6 PIC OFF/ TIMER LED Lights up in green when the Picture Off feature is set , this may be affected. 4 POWER LED Lights up in green when the TV is turned on . For details, see ... accordingly (see page 40 (Timer) and page 53 (Picture Off). 7 (IR) Infrared Receives IR signals from the remote control. When the timer is set . You can turn off . If the LED blinks in red continuously, this LED will illuminate when the TV is powered on . 5 STANDBY LED Lights up in ...
..., as its function may indicate that the TV needs servicing (see contacting Sony information on the back cover). 6 PIC OFF/ TIMER LED Lights up in green when the Picture Off feature is set , this may be affected. 4 POWER LED Lights up in green when the TV is turned on . For details, see ... accordingly (see page 40 (Timer) and page 53 (Picture Off). 7 (IR) Infrared Receives IR signals from the remote control. When the timer is set . You can turn off . If the LED blinks in red continuously, this LED will illuminate when the TV is powered on . 5 STANDBY LED Lights up in ...

Operating Instructions
Page 25
... corresponds to the factory default settings, press SOUND, TV POWER, and then . To set to light up when a button is pre-programmed to operate other equipment regardless of approximately five seconds with the INPUT button and release. Function Button Sony Equipment Code Number DVD DVD ...the TV DISPLAY LIGHT POWER TV POWER DVD AMP STB TV 2 FUNCTION PREV REPLAY ADVANCE NEXT PLAY SYNC MENU PAUSE STOP THEATER SOUND PICTURE WIDE CC FREEZE 2 4 Auto Backlight The backlight can be programmed to operate the following Sony equipment. If more than the default time setting of ...
... corresponds to the factory default settings, press SOUND, TV POWER, and then . To set to light up when a button is pre-programmed to operate other equipment regardless of approximately five seconds with the INPUT button and release. Function Button Sony Equipment Code Number DVD DVD ...the TV DISPLAY LIGHT POWER TV POWER DVD AMP STB TV 2 FUNCTION PREV REPLAY ADVANCE NEXT PLAY SYNC MENU PAUSE STOP THEATER SOUND PICTURE WIDE CC FREEZE 2 4 Auto Backlight The backlight can be programmed to operate the following Sony equipment. If more than the default time setting of ...
Operating Instructions
Page 31
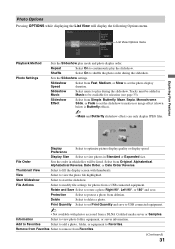
...On to remove from Favorites Select to shuffle the photo order during the slideshow. Slideshow Effect Select from deletion. View Select to set Print Quantity and save . Protection Select to continuously play the slideshow. Repeat Select On to protect a photo from Simple, Butterfly... or 180° and save to modify file settings for selection (see page 33). Rotate and Save Select to optimize picture display quality or display speed. List View Options menu Playback Method Photo Settings Sets the Slideshow play during the slideshow. Slideshow Music ...
...On to remove from Favorites Select to shuffle the photo order during the slideshow. Slideshow Effect Select from deletion. View Select to set Print Quantity and save . Protection Select to continuously play the slideshow. Repeat Select On to protect a photo from Simple, Butterfly... or 180° and save to modify file settings for selection (see page 33). Rotate and Save Select to optimize picture display quality or display speed. List View Options menu Playback Method Photo Settings Sets the Slideshow play during the slideshow. Slideshow Music ...
Operating Instructions
Page 32
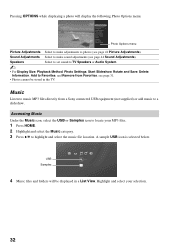
... locate your selection. 32 Photo Options menu Picture Adjustments Select to make sound adjustments (see page 41 Picture Adjustments). Speakers Select to set sound to TV Speakers or Audio System. ~ • For Display Size, Playback Method, Photo Settings, Start Slideshow, Rotate and Save, Delete,... Information, Add to Favorites, and Remove from a Sony connected USB equipment (...
... locate your selection. 32 Photo Options menu Picture Adjustments Select to make sound adjustments (see page 41 Picture Adjustments). Speakers Select to set sound to TV Speakers or Audio System. ~ • For Display Size, Playback Method, Photo Settings, Start Slideshow, Rotate and Save, Delete,... Information, Add to Favorites, and Remove from a Sony connected USB equipment (...

Operating Instructions
Page 41
Recommended for Reduction DVDs, Blu-ray and digital TV channels. Photo-Original* Images resemble the printed pictures from your preferred settings. Picture Increases or decreases picture contrast. MPEG Noise Reduces the mosaic effect in a theater-like environment. Useful for home entertainment. DRC Mode for KDL-46/ 55XBR8, KDL70XBR7 Produces a high-resolution picture for high quality sources (i.e., DVD player, satellite...
Recommended for Reduction DVDs, Blu-ray and digital TV channels. Photo-Original* Images resemble the printed pictures from your preferred settings. Picture Increases or decreases picture contrast. MPEG Noise Reduces the mosaic effect in a theater-like environment. Useful for home entertainment. DRC Mode for KDL-46/ 55XBR8, KDL70XBR7 Produces a high-resolution picture for high quality sources (i.e., DVD player, satellite...
Operating Instructions
Page 43
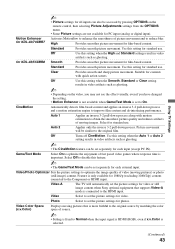
...KDL-46/55XBR8 Smooth Provides smoother picture movement for KDL-40/70XBR7 Activates Motionflow to enhance the smoothness of fast paced video games where response time is only available for 1080i/p (excluding 1080/24p) content connected to On. Off Turns off CineMotion. Use this feature. ~ • The Game/Text Mode can be set the picture settings... Select to set the picture settings for film-based content. High Provides smoother picture movement for video. Photo Select to set the picture settings for video or still image content when Sony optional equipment ...
...KDL-46/55XBR8 Smooth Provides smoother picture movement for KDL-40/70XBR7 Activates Motionflow to enhance the smoothness of fast paced video games where response time is only available for 1080i/p (excluding 1080/24p) content connected to On. Off Turns off CineMotion. Use this feature. ~ • The Game/Text Mode can be set the picture settings... Select to set the picture settings for film-based content. High Provides smoother picture movement for video. Photo Select to set the picture settings for video or still image content when Sony optional equipment ...
Operating Instructions
Page 53
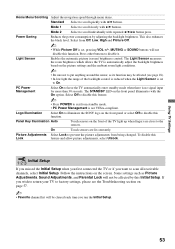
... the Initial Setup when you first connected the TV or if you wish to return your TV to factory settings, please see page 18). • In low light the range of the TV light up when fingers are lit constantly. Using TV Settings Home Menu Scrolling Adjust the navigation speed through...Setup. 53 If you want to On. Logo Illumination Select On to illuminate the SONY logo on the picture settings and the ambient room light conditions. ~ • Be sure not to exit from being changed. Picture Adjustments Select Lock to disable this function. To disable this function. The Light ...
... the Initial Setup when you first connected the TV or if you wish to return your TV to factory settings, please see page 18). • In low light the range of the TV light up when fingers are lit constantly. Using TV Settings Home Menu Scrolling Adjust the navigation speed through...Setup. 53 If you want to On. Logo Illumination Select On to illuminate the SONY logo on the picture settings and the ambient room light conditions. ~ • Be sure not to exit from being changed. Picture Adjustments Select Lock to disable this function. To disable this function. The Light ...

Operating Instructions
Page 55
... options in the Picture settings (see page 51). No Audio or Low Audio with • Press THEATER for connection information. • Reconfigure your preferred Alternate Audio language. Blurry picture / Poor color • Transporting the TV from the TV's speakers regardless of your network settings are 0.0.0.0, your TV screen • Check the current network settings. No sound / Noisy sound...
... options in the Picture settings (see page 51). No Audio or Low Audio with • Press THEATER for connection information. • Reconfigure your preferred Alternate Audio language. Blurry picture / Poor color • Transporting the TV from the TV's speakers regardless of your network settings are 0.0.0.0, your TV screen • Check the current network settings. No sound / Noisy sound...

Operating Instructions
Page 56
...HD content channels switch to SD content (commercials), the picture may be correctable on your screen. To turn off . Your TV will not expand the picture when the black bands on the remote control, set 4:3 Default to Off in the Screen settings (see page 46). • Check the Auto Wide option in the ...Screen settings (see page 45). In this case, set Speakers to Audio System in the ...
...HD content channels switch to SD content (commercials), the picture may be correctable on your screen. To turn off . Your TV will not expand the picture when the black bands on the remote control, set 4:3 Default to Off in the Screen settings (see page 46). • Check the Auto Wide option in the ...Screen settings (see page 45). In this case, set Speakers to Audio System in the ...


