Operating Instructions
Page 23
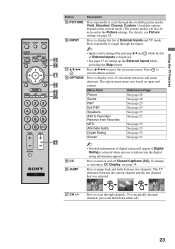
...through channels, press and hold down either +/-. 23 qj V/v/B/b Press V/v/B/b to display the list of External Inputs and TV mode. The option menu items vary based on setting up the External Inputs labels, qh including the Skip feature. To change or customize CC Display, see Picture... settings on page 28. Using the TV Features Button Description qg PICTURE Press repeatedly to cycle through the available picture modes: ...
...through channels, press and hold down either +/-. 23 qj V/v/B/b Press V/v/B/b to display the list of External Inputs and TV mode. The option menu items vary based on setting up the External Inputs labels, qh including the Skip feature. To change or customize CC Display, see Picture... settings on page 28. Using the TV Features Button Description qg PICTURE Press repeatedly to cycle through the available picture modes: ...
Operating Instructions
Page 28
Selecting Yes will save your convenience. Cinema For viewing film-based content. Custom Allows you want the TV to directly toggle the modes. 28 Clock/Timers Settings Current Time Timer Sleep Timer Sets the current time (day, hour,...Yes will light up the TIMER LED. Most suitable for home entertainment. Standard For standard picture settings. TV Setting Description Product Support Contact Sony Signal Diagnostics Sony contact information is displayed here. Your TV's specific information such as a specified volume at the specified time you set Current Time. 1 Use ...
Selecting Yes will save your convenience. Cinema For viewing film-based content. Custom Allows you want the TV to directly toggle the modes. 28 Clock/Timers Settings Current Time Timer Sleep Timer Sets the current time (day, hour,...Yes will light up the TIMER LED. Most suitable for home entertainment. Standard For standard picture settings. TV Setting Description Product Support Contact Sony Signal Diagnostics Sony contact information is displayed here. Your TV's specific information such as a specified volume at the specified time you set Current Time. 1 Use ...
Operating Instructions
Page 31
Volume Offset Adjusts the volume level of the current input (TV or video input) relative to other input modes (see ...image as possible. Normal Displays the 4:3 picture in its original size. On Automatically changes Wide Mode setting based upon content. Normal Displays the recommended picture area. -1/-2 Enlarges the picture to fill the 16:9 screen...4:3 sources. Zoom Enlarges the picture horizontally and vertically to use for 1080i or 1080p sources in its original aspect ratio. Full Enlarges the 4:3 picture horizontally only, to display the 16:9 picture in its ...
Volume Offset Adjusts the volume level of the current input (TV or video input) relative to other input modes (see ...image as possible. Normal Displays the 4:3 picture in its original size. On Automatically changes Wide Mode setting based upon content. Normal Displays the recommended picture area. -1/-2 Enlarges the picture to fill the 16:9 screen...4:3 sources. Zoom Enlarges the picture horizontally and vertically to use for 1080i or 1080p sources in its original aspect ratio. Full Enlarges the 4:3 picture horizontally only, to display the 16:9 picture in its ...
Operating Instructions
Page 32
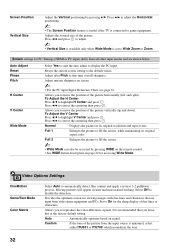
... equipment and PCs. Screen settings for the sharp display of the picture horizontally (left and right). Full 1 Enlarges the picture to the default values. Auto Automatically optimize based on screen. ~ • For the PC input Signal Reference Chart, see page 16. Provides... the optimum screen for accessing Wide Mode. Press B/b to adjust the Horizontal positioning. ~ • The Screen Position feature is useful if the TV is set to...
... equipment and PCs. Screen settings for the sharp display of the picture horizontally (left and right). Full 1 Enlarges the picture to the default values. Auto Automatically optimize based on screen. ~ • For the PC input Signal Reference Chart, see page 16. Provides... the optimum screen for accessing Wide Mode. Press B/b to adjust the Horizontal positioning. ~ • The Screen Position feature is useful if the TV is set to...
Operating Instructions
Page 34
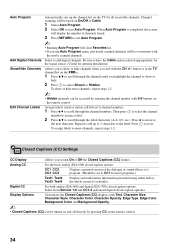
... Automatically sets up to 7 characters to the label. Select from Service 1-6 and CC1-4 (advanced digital closed caption options. button or in the TV channel list on the XMB™. 1 Press V/v to scroll through the channels until you to turn On or Off the Closed Captions (CC)...press to select the channel number to assign a label. 2 Press V/v to more channels, repeat steps 1-2. ~ • Hidden channels can be based on the TV for all receivable channels. To assign labels to scroll through the channel numbers. When Auto Program is completed, the screen will display the number...
... Automatically sets up to 7 characters to the label. Select from Service 1-6 and CC1-4 (advanced digital closed caption options. button or in the TV channel list on the XMB™. 1 Press V/v to scroll through the channels until you to turn On or Off the Closed Captions (CC)...press to select the channel number to assign a label. 2 Press V/v to more channels, repeat steps 1-2. ~ • Hidden channels can be based on the TV for all receivable channels. To assign labels to scroll through the channel numbers. When Auto Program is completed, the screen will display the number...
Operating Instructions
Page 35
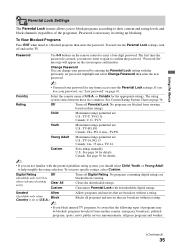
...news, public service announcements, religious programs and weather. (Continued) 35 No programs containing digital ratings are blocked from viewing based on the remote control to confirm the password. Digital Rating (Available only in setting up blocking. Clears the downloaded ratings... to block programs according to their ratings. Child Maximum ratings permitted are: U.S.: TV-Y, TV-G, G Canada: C, G, TV-Y Youth Maximum ratings permitted are: U.S.: TV-PG, PG Canada: C8+, PG, 8 ans+, TV-PG Young Adult Maximum ratings permitted are broadcast without a rating. Canada: See ...
...news, public service announcements, religious programs and weather. (Continued) 35 No programs containing digital ratings are blocked from viewing based on the remote control to confirm the password. Digital Rating (Available only in setting up blocking. Clears the downloaded ratings... to block programs according to their ratings. Child Maximum ratings permitted are: U.S.: TV-Y, TV-G, G Canada: C, G, TV-Y Youth Maximum ratings permitted are: U.S.: TV-PG, PG Canada: C8+, PG, 8 ans+, TV-PG Young Adult Maximum ratings permitted are broadcast without a rating. Canada: See ...
Operating Instructions
Page 36
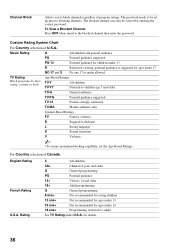
... programming 8 ans+ Not recommended for young children 13 ans+ Not recommended for ages under 13 R Restricted viewing, parental guidance is suggested TV-14 Parents strongly cautioned TV-MA Mature audience only Content-Based Ratings FV Fantasy violence D Suggestive dialogue L Strong language S Sexual situations V Violence ~ • To ensure maximum blocking capability, set up prior...
... programming 8 ans+ Not recommended for young children 13 ans+ Not recommended for ages under 13 R Restricted viewing, parental guidance is suggested TV-14 Parents strongly cautioned TV-MA Mature audience only Content-Based Ratings FV Fantasy violence D Suggestive dialogue L Strong language S Sexual situations V Violence ~ • To ensure maximum blocking capability, set up prior...
Operating Instructions
Page 38
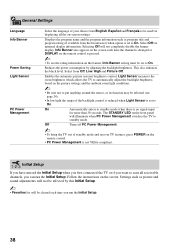
... Setup. ~ • Favorites list will not completely disable the banner display. Light Sensor measures the room brightness which allows the TV to automatically adjust the backlight brightness based on the picture settings and the ambient room light conditions. ~ • Be sure not to put anything around the sensor, ...adjustments will not be affected by adjusting the backlight brightness. Initial Setup If you have missed the Initial Setup when you first connected the TV or if you want to scan all the on the remote control. • PC Power Management is set to On. Info Banner ...
... Setup. ~ • Favorites list will not completely disable the banner display. Light Sensor measures the room brightness which allows the TV to automatically adjust the backlight brightness based on the picture settings and the ambient room light conditions. ~ • Be sure not to put anything around the sensor, ...adjustments will not be affected by adjusting the backlight brightness. Initial Setup If you have missed the Initial Setup when you first connected the TV or if you want to scan all the on the remote control. • PC Power Management is set to On. Info Banner ...

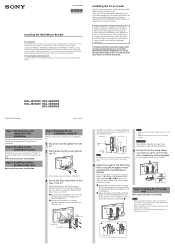
Instructions (SU-WL500 Wall-Mount Bracket)
Page 5
... operating instructions, or the supplied leaflet. Do not allow the AC power cord or the connecting cable to be sure to refer to install the TV on page 2, be pinched. Be careful not to shock, it may become exposed and cause a short circuit or an electrical break. Use the... installation of the wall. 2 Unpack the carton and check to install a TV that is not specified on a wall that all the following items are not supplied. If people or objects get tangled with cables, this may fall or break apart. Base Bracket (2) Mounting Hook (2) Screw (+PSW6 × 16) (4) Screw (+BVST4 ×...
... operating instructions, or the supplied leaflet. Do not allow the AC power cord or the connecting cable to be sure to refer to install the TV on page 2, be pinched. Be careful not to shock, it may become exposed and cause a short circuit or an electrical break. Use the... installation of the wall. 2 Unpack the carton and check to install a TV that is not specified on a wall that all the following items are not supplied. If people or objects get tangled with cables, this may fall or break apart. Base Bracket (2) Mounting Hook (2) Screw (+PSW6 × 16) (4) Screw (+BVST4 ×...

Instructions (SU-WL500 Wall-Mount Bracket)
Page 6
... intend to route the cables in the wall, make a hole in the wall to your TV's instructions for its weight.). Allow for installing the Base Bracket. 1 Referring to the TV installation dimensions table on page 12, decide on the installation location. Reinforce the wall sufficiently,... if necessary. (11 7/8) 300 100 100 (4) (4) (4) 100 Never install the TV set as shown below : Air ...
... intend to route the cables in the wall, make a hole in the wall to your TV's instructions for its weight.). Allow for installing the Base Bracket. 1 Referring to the TV installation dimensions table on page 12, decide on the installation location. Reinforce the wall sufficiently,... if necessary. (11 7/8) 300 100 100 (4) (4) (4) 100 Never install the TV set as shown below : Air ...
Instructions (SU-WL500 Wall-Mount Bracket)
Page 8
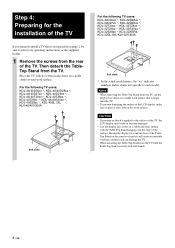
... surface of the LCD display, make sure to each model. Place the TV with both hands. 8 (GB) For the following TV users: KDL-46/40D30xx *, KDL-46/40D28xx *, KDL-46/40D27xx *, KDL-40D26xx *, KDL-46/40T30xx *, KDL-40T28xx *, KDL-40T26xx *, KDL-46/40S30xx *, KDL-40S28xx *, KDL-40SL130, KLV-46/40V300A Soft cloth For the following TV users: KDL-32D30xx *, KDL-32D28xx *, KDL-32D27xx *, KDL-32D26xx *, KDL-32T30xx *, KDL-32T28xx *, KDL-32T26xx *, KDL-32S30xx *, KDL-32S28xx *, KDL-32XBR4, KDL-32SL130, KLV-32V300A...
... surface of the LCD display, make sure to each model. Place the TV with both hands. 8 (GB) For the following TV users: KDL-46/40D30xx *, KDL-46/40D28xx *, KDL-46/40D27xx *, KDL-40D26xx *, KDL-46/40T30xx *, KDL-40T28xx *, KDL-40T26xx *, KDL-46/40S30xx *, KDL-40S28xx *, KDL-40SL130, KLV-46/40V300A Soft cloth For the following TV users: KDL-32D30xx *, KDL-32D28xx *, KDL-32D27xx *, KDL-32D26xx *, KDL-32T30xx *, KDL-32T28xx *, KDL-32T26xx *, KDL-32S30xx *, KDL-32S28xx *, KDL-32XBR4, KDL-32SL130, KLV-32V300A...

Instructions (SU-WL500 Wall-Mount Bracket)
Page 9
...screwdriver, set the torque setting to the same angle. • Make sure that the two arm bases are screwed in securely. When installing the TV parallel to the rear of the arms when installing TV models other than the supplied ones (+PSW6 × 16) when securing the Mounting Hook. Tab .... 1 Remove the two screws from the arm base X of the Mounting Hook angle (procedures 1 and 2 below . Make sure that both screws are secured. CAUTION Be careful not to the desired angle (5, 10, 15 or 20 degrees). 2 Adjust the angles of the TV as in the previous procedure 1. Notes •...
...screwdriver, set the torque setting to the same angle. • Make sure that the two arm bases are screwed in securely. When installing the TV parallel to the rear of the arms when installing TV models other than the supplied ones (+PSW6 × 16) when securing the Mounting Hook. Tab .... 1 Remove the two screws from the arm base X of the Mounting Hook angle (procedures 1 and 2 below . Make sure that both screws are secured. CAUTION Be careful not to the desired angle (5, 10, 15 or 20 degrees). 2 Adjust the angles of the TV as in the previous procedure 1. Notes •...
Instructions (SU-WL500 Wall-Mount Bracket)
Page 10
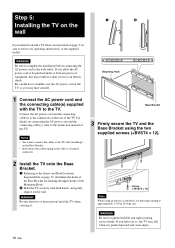
...Be sure that is pushed upward and cause injury. 10 (GB) Step 5: Installing the TV on the wall 1 2 If you intend to install a TV that two or more persons hold the TV when carrying it on the Base Bracket. • Subcontract the cable routing in a short circuit or an electric shock. ...power cord and the connecting cable(s) supplied with both left and right securing screws firmly. Base Bracket 3 Firmly secure the TV and the Base Bracket using an electric screwdriver, set the torque setting to do so, the TV may hurt yourself. If you fail to approximately 1.5 N·m {15 kgf·cm...
...Be sure that is pushed upward and cause injury. 10 (GB) Step 5: Installing the TV on the wall 1 2 If you intend to install a TV that two or more persons hold the TV when carrying it on the Base Bracket. • Subcontract the cable routing in a short circuit or an electric shock. ...power cord and the connecting cable(s) supplied with both left and right securing screws firmly. Base Bracket 3 Firmly secure the TV and the Base Bracket using an electric screwdriver, set the torque setting to do so, the TV may hurt yourself. If you fail to approximately 1.5 N·m {15 kgf·cm...

Instructions (SU-WL500 Wall-Mount Bracket)
Page 11
...product to fall and result in the holes of the Base Bracket. • The cord and the cable are not twisted or pinched. • The two screws that two or more persons hold the TV and slide it . When removing the TV To Sony Dealers 1 Unplug the AC power cord from the wall...(GB) Specifications Unit: mm (inches) Weight: 4.7 kg (10 lb 6 oz) 525 (20 3/4) 60 (2 3/8) 73 (2 7/8) 445 (17 5/8) 2 Remove the two screws which secure the TV and the Base Bracket. (Refer to 3 of Step 5 on the wall and be sure to install completely. Confirming the completion of the installation 3 Be sure to hold...
...product to fall and result in the holes of the Base Bracket. • The cord and the cable are not twisted or pinched. • The two screws that two or more persons hold the TV and slide it . When removing the TV To Sony Dealers 1 Unplug the AC power cord from the wall...(GB) Specifications Unit: mm (inches) Weight: 4.7 kg (10 lb 6 oz) 525 (20 3/4) 60 (2 3/8) 73 (2 7/8) 445 (17 5/8) 2 Remove the two screws which secure the TV and the Base Bracket. (Refer to 3 of Step 5 on the wall and be sure to install completely. Confirming the completion of the installation 3 Be sure to hold...
Instructions (SU-WL500 Wall-Mount Bracket)
Page 13
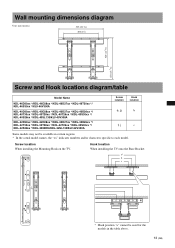
...KDL-46D30xx */KDL-46D28xx */KDL-46D27xx */KDL-46T30xx */ KDL-46S30xx */KLV-46V300A KDL-40D30xx */KDL-40D28xx */KDL-40D27xx */KDL-40D26xx */ KDL-40T30xx */KDL-40T28xx */KDL-40T26xx */KDL-40S30xx */ KDL-40S28xx */KDL-40SL130/KLV-40V300A KDL-32D30xx */KDL-32D28xx */KDL-32D27xx */KDL-32D26xx */ KDL-32T30xx */KDL-32T28xx */KDL-32T26xx */KDL-32S30xx */ KDL-32S28xx */KDL-32XBR4/KDL... specific to each model. Screw location When installing the Mounting Hook on the TV. Hook location When installing the TV onto the Base Bracket. a* d b c e d d e e f f f g g h h g j ...
...KDL-46D30xx */KDL-46D28xx */KDL-46D27xx */KDL-46T30xx */ KDL-46S30xx */KLV-46V300A KDL-40D30xx */KDL-40D28xx */KDL-40D27xx */KDL-40D26xx */ KDL-40T30xx */KDL-40T28xx */KDL-40T26xx */KDL-40S30xx */ KDL-40S28xx */KDL-40SL130/KLV-40V300A KDL-32D30xx */KDL-32D28xx */KDL-32D27xx */KDL-32D26xx */ KDL-32T30xx */KDL-32T28xx */KDL-32T26xx */KDL-32S30xx */ KDL-32S28xx */KDL-32XBR4/KDL... specific to each model. Screw location When installing the Mounting Hook on the TV. Hook location When installing the TV onto the Base Bracket. a* d b c e d d e e f f f g g h h g j ...
Installing the Wall-mount Bracket
Page 1
...reasons, Sony strongly recommends that wall-mounting of your TV be performed by mishandling or improper installation. KDL-40V3000 KDL-40W3000 KDL-46V3000 KDL-46W3000 KDL-52W3000 © 2007 Sony Corporation Printed in securely. 1 Remove the two screws from the arm base X of the TV. ...TV is not liable for your TV's model number and be wallmounted using the two screws removed in the illustration below. Your KDL-40V3000/KDL-46V3000/KDL-40W3000/KDL-46W3000/KDL-52W3000 can be installed on the wall Refer to the instructions for SU-WL500. To Sony Dealers and Contractors Provide full...
...reasons, Sony strongly recommends that wall-mounting of your TV be performed by mishandling or improper installation. KDL-40V3000 KDL-40W3000 KDL-46V3000 KDL-46W3000 KDL-52W3000 © 2007 Sony Corporation Printed in securely. 1 Remove the two screws from the arm base X of the TV. ...TV is not liable for your TV's model number and be wallmounted using the two screws removed in the illustration below. Your KDL-40V3000/KDL-46V3000/KDL-40W3000/KDL-46W3000/KDL-52W3000 can be installed on the wall Refer to the instructions for SU-WL500. To Sony Dealers and Contractors Provide full...
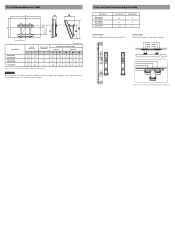
Installing the Wall-mount Bracket
Page 2
...b c* * Hook position "c" cannot be installed on the TV. Unit: mm (inches) Length for each mounting angle Angle...TV will be used for its weight. Refer to your TV's instructions for the models in the above . TV installation dimensions table 320 (12 5/8) Screen center point Model Name Display dimensions Screen center dimensions A B C KDL-40V3000 KDL-40W3000 KDL-46V3000 KDL-46W3000 KDL...depending on the installation. Screw and Hook locations diagram/table Model Name KDL-40V3000 KDL-40W3000 KDL-46V3000 KDL-46W3000 KDL-52W3000 Screw location e, g e, g d, g Hook location b b ...
...b c* * Hook position "c" cannot be installed on the TV. Unit: mm (inches) Length for each mounting angle Angle...TV will be used for its weight. Refer to your TV's instructions for the models in the above . TV installation dimensions table 320 (12 5/8) Screen center point Model Name Display dimensions Screen center dimensions A B C KDL-40V3000 KDL-40W3000 KDL-46V3000 KDL-46W3000 KDL...depending on the installation. Screw and Hook locations diagram/table Model Name KDL-40V3000 KDL-40W3000 KDL-46V3000 KDL-46W3000 KDL-52W3000 Screw location e, g e, g d, g Hook location b b ...
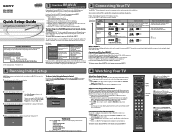
Quick Setup Guide
Page 1
...and begin viewing your BRAVIA™ TV set top box, it is necessary.) Audio L/R 1080/24p, 1080p, 1080i, 720p, 480p, 480i, PC (Compatible with HD or SD content) 1080p, 1080i, 720p, 480p, 480i (Compatible with focus on your remote control. The Four Steps to a Full HD Experience: Set, Sound... quality 16:9 Content aspect ratio Digital Content Good picture quality aspect ratio based on your remote control to watch an old classic movie in U.S.A. 1 BRAVIA Your New ™ Flat-panel LCD HDTV Congratulations! Language settings will apply to choose the correct input using an ...
...and begin viewing your BRAVIA™ TV set top box, it is necessary.) Audio L/R 1080/24p, 1080p, 1080i, 720p, 480p, 480i, PC (Compatible with HD or SD content) 1080p, 1080i, 720p, 480p, 480i (Compatible with focus on your remote control. The Four Steps to a Full HD Experience: Set, Sound... quality 16:9 Content aspect ratio Digital Content Good picture quality aspect ratio based on your remote control to watch an old classic movie in U.S.A. 1 BRAVIA Your New ™ Flat-panel LCD HDTV Congratulations! Language settings will apply to choose the correct input using an ...
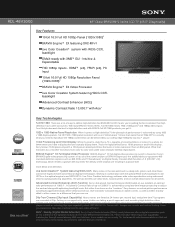
Marketing Specifications
Page 1
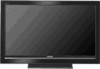
...Sony's BRAVIA Engine video processing system. The benefit- Once you need to 13,000:12 is achieved by our cutting edge 1080p Blu-ray disc™ player. 10-bit Processing and 10-bit Display While it's great to offer consumers. KDL-46V3000 46" Class BRAVIA® V Series LCD TV (45.5" Diagonally) Key Features 10-bit 16:9 Full HD 1080p Panel (1920x1080)8 BRAVIA... at 24p. Sony follows 10-bit processing with XMB™ GUI - DMex - With Sony BRAVIA V Series HDTVs, Full HD 1080 means 1920 x 1080 pixels5 and 1080p video inputs. But rather than focus on the "numbers", Sony focuses on our...
...Sony's BRAVIA Engine video processing system. The benefit- Once you need to 13,000:12 is achieved by our cutting edge 1080p Blu-ray disc™ player. 10-bit Processing and 10-bit Display While it's great to offer consumers. KDL-46V3000 46" Class BRAVIA® V Series LCD TV (45.5" Diagonally) Key Features 10-bit 16:9 Full HD 1080p Panel (1920x1080)8 BRAVIA... at 24p. Sony follows 10-bit processing with XMB™ GUI - DMex - With Sony BRAVIA V Series HDTVs, Full HD 1080 means 1920 x 1080 pixels5 and 1080p video inputs. But rather than focus on the "numbers", Sony focuses on our...


