Operating Instructions
Page 1
3-196-472-17(1) LCD Digital Color TV Operating Instructions KDL-26S3000 KDL-32SL130 KDL-32S3000 KDL-40SL130 KDL-40S3000 KDL-46S3000 © 2007 Sony Corporation
3-196-472-17(1) LCD Digital Color TV Operating Instructions KDL-26S3000 KDL-32SL130 KDL-32S3000 KDL-40SL130 KDL-40S3000 KDL-46S3000 © 2007 Sony Corporation
Operating Instructions
Page 2
... are designed to direct illumination or direct sunlight. SU-FL300L Use with part 15 of Conformity Trade Name: SONY Model: KDL-26S3000/KDL-32S3000/ KDL-40S3000/KDL-46S3000/ KDL-32SL130/KDL-40SL130 Responsible Party: Sony Electronics Inc. Sony TV-Stand Model No. Installing s The TV should allow you will not occur in a residential installation. CAUTION To prevent electric shock, do not expose...
... are designed to direct illumination or direct sunlight. SU-FL300L Use with part 15 of Conformity Trade Name: SONY Model: KDL-26S3000/KDL-32S3000/ KDL-40S3000/KDL-46S3000/ KDL-32SL130/KDL-40SL130 Responsible Party: Sony Electronics Inc. Sony TV-Stand Model No. Installing s The TV should allow you will not occur in a residential installation. CAUTION To prevent electric shock, do not expose...
Operating Instructions
Page 3
... of optional equipment connection diagrams. Customer Support http://www.sony.com/tvsupport On-line Registration United States http://productregistration.sony.com Canada http://www.SonyStyle.ca/registration 3 Installing the TV 11 Preventing the TV from P&P and PIP 27 Using TV Features Adjust TV Settings 28 Watching TV 28 Access the equipment connected to Stunning HD Experience: Set...
... of optional equipment connection diagrams. Customer Support http://www.sony.com/tvsupport On-line Registration United States http://productregistration.sony.com Canada http://www.SonyStyle.ca/registration 3 Installing the TV 11 Preventing the TV from P&P and PIP 27 Using TV Features Adjust TV Settings 28 Watching TV 28 Access the equipment connected to Stunning HD Experience: Set...
Operating Instructions
Page 4
... 3) Heed all warnings. 4) Follow all servicing to qualified service personnel. The wide blade or the third prong are provided for your dealer or Sony service center to exchange it from the wall outlet first. When a cart is left unattended and unused for long periods of time, unplug it ...lightning storm, or when it is damaged, liquid has been spilled or objects have the outlet changed. s Use only an original Sony AC power cord, not other . Wall outlet The TV set with dry cloth. 7) Do not block any heat sources such as radiators, heat registers, stoves, or other apparatus (...
... 3) Heed all warnings. 4) Follow all servicing to qualified service personnel. The wide blade or the third prong are provided for your dealer or Sony service center to exchange it from the wall outlet first. When a cart is left unattended and unused for long periods of time, unplug it ...lightning storm, or when it is damaged, liquid has been spilled or objects have the outlet changed. s Use only an original Sony AC power cord, not other . Wall outlet The TV set with dry cloth. 7) Do not block any heat sources such as radiators, heat registers, stoves, or other apparatus (...
Operating Instructions
Page 5
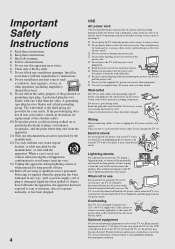
...Keep any items susceptible to the National Electrical Code, ANSI/NFPA 70 MAGNETIC INFLUENCE This TV contains a strong magnet in a fire. KDL-26S3000 KDL-32S3000/KDL-40S3000/ KDL-46S3000/KDL-32SL130/ KDL-40SL130 Ground clamps Antenna lead-in wire Electric service equipment NEC: National Electrical Code Antenna...chemically pretreated cloth, please follow the instruction provided on the LCD panel. For proper ventilation, observe the following: s Do not install the TV face up static charges. It is operating, unplug the TV and consult your hand as illustrated and hold it can ...
...Keep any items susceptible to the National Electrical Code, ANSI/NFPA 70 MAGNETIC INFLUENCE This TV contains a strong magnet in a fire. KDL-26S3000 KDL-32S3000/KDL-40S3000/ KDL-46S3000/KDL-32SL130/ KDL-40SL130 Ground clamps Antenna lead-in wire Electric service equipment NEC: National Electrical Code Antenna...chemically pretreated cloth, please follow the instruction provided on the LCD panel. For proper ventilation, observe the following: s Do not install the TV face up static charges. It is operating, unplug the TV and consult your hand as illustrated and hold it can ...

Operating Instructions
Page 6
...of any objects on the wall 11 7/8 inches (30 cm) 4 inches (10 cm) 4 inches (10 cm) 4 inches (10 cm) Leave at least this TV get wet. If the TV is provided. Installed with stand 11 7/8 inches (30 cm) 4 inches (10 cm) 4 inches (10 cm) 2 3/8 inches (6 cm) Leave at least ...easily accessible AC power outlet. Do not allow children to attach the brackets supplied with the wall-mount bracket. s Do not hang the TV from the TV. If not properly secured during installation or removal from the stand or wall mount, causing damage or serious injury. s Never cover the ...
...of any objects on the wall 11 7/8 inches (30 cm) 4 inches (10 cm) 4 inches (10 cm) 4 inches (10 cm) Leave at least this TV get wet. If the TV is provided. Installed with stand 11 7/8 inches (30 cm) 4 inches (10 cm) 4 inches (10 cm) 2 3/8 inches (6 cm) Leave at least ...easily accessible AC power outlet. Do not allow children to attach the brackets supplied with the wall-mount bracket. s Do not hang the TV from the TV. If not properly secured during installation or removal from the stand or wall mount, causing damage or serious injury. s Never cover the ...

Operating Instructions
Page 7
... with bare hands as the original parts. This condition is not a malfunction. The image may be uneven or the LCD panel may be observed when the LCD TV is set to direct illumination or direct sunlight. s The screen and cabinet get into your neighbors. Should either contact ... skin irritation may occur. Placement for too long or in moderate brightness. Medical institutions Do not place this TV in use . s Do not push or scratch the LCD screen, or place objects on the Power management will improve this product contains mercury. Do not touch broken glass...
... with bare hands as the original parts. This condition is not a malfunction. The image may be uneven or the LCD panel may be observed when the LCD TV is set to direct illumination or direct sunlight. s The screen and cabinet get into your neighbors. Should either contact ... skin irritation may occur. Placement for too long or in moderate brightness. Medical institutions Do not place this TV in use . s Do not push or scratch the LCD screen, or place objects on the Power management will improve this product contains mercury. Do not touch broken glass...
Operating Instructions
Page 8
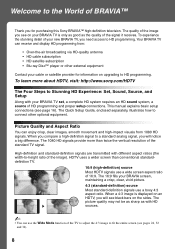
...sources. ~ • You can use a boxy 4:3 aspect ratio. The picture quality may not be as sharp as the quality of the standard TV signal. HDTV uses a wider screen than twice the vertical resolution of the signal it receives. The 16:9 fills your cable or satellite provider for ...purchasing this Sony BRAVIA™ high-definition television. Welcome to the World of 16:9. Your BRAVIA TV can enjoy crisp, clear images, smooth movement and high-impact visuals from : • Over-the-...
...sources. ~ • You can use a boxy 4:3 aspect ratio. The picture quality may not be as sharp as the quality of the standard TV signal. HDTV uses a wider screen than twice the vertical resolution of the signal it receives. The 16:9 fills your cable or satellite provider for ...purchasing this Sony BRAVIA™ high-definition television. Welcome to the World of 16:9. Your BRAVIA TV can enjoy crisp, clear images, smooth movement and high-impact visuals from : • Over-the-...
Operating Instructions
Page 9
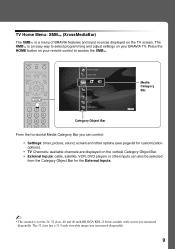
... select programming and adjust settings on your BRAVIA TV. The XMB™ is for the 26, 32 class, 40 and 46 inch BRAVIA KDL-S Series models with screen size measured diagonally. The 32 class has a 31.5 inch viewable image size (measured diagonally). 9 TV Home Menu: XMB™ (XrossMediaBar) The XMB...is an easy way to access the XMB™. HOME Product Support Clock/Timers Settings Sound Screen Video Options Category Object Bar Media Category Bar TV From the horizontal Media Category Bar you can control: • Settings: timer, picture, sound, screen and other options (see page 30 ...
... select programming and adjust settings on your BRAVIA TV. The XMB™ is for the 26, 32 class, 40 and 46 inch BRAVIA KDL-S Series models with screen size measured diagonally. The 32 class has a 31.5 inch viewable image size (measured diagonally). 9 TV Home Menu: XMB™ (XrossMediaBar) The XMB...is an easy way to access the XMB™. HOME Product Support Clock/Timers Settings Sound Screen Video Options Category Object Bar Media Category Bar TV From the horizontal Media Category Bar you can control: • Settings: timer, picture, sound, screen and other options (see page 30 ...
Operating Instructions
Page 11
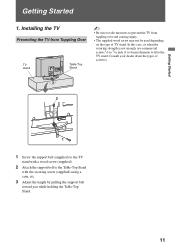
...In this case, or when the securing strength is not enough, use commercial screws 1/8 to 3/16 inch (3 to 4 mm) diameter to fit to prevent the TV from toppling over and causing injury. • The supplied wood screw may not be used depending on the type of screw(s). 2 3 1 1 Screw the support... belt (supplied) to the TV stand with a wood screw (supplied). 2 Attach the support belt to the Table-Top Stand with the securing screw (supplied) using a coin, etc. 3 Adjust the ...
...In this case, or when the securing strength is not enough, use commercial screws 1/8 to 3/16 inch (3 to 4 mm) diameter to fit to prevent the TV from toppling over and causing injury. • The supplied wood screw may not be used depending on the type of screw(s). 2 3 1 1 Screw the support... belt (supplied) to the TV stand with a wood screw (supplied). 2 Attach the support belt to the Table-Top Stand with the securing screw (supplied) using a coin, etc. 3 Adjust the ...
Operating Instructions
Page 12
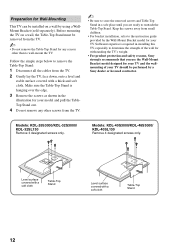
...instruction guide provided by using a WallMount Bracket (sold separately). Models: KDL-40S3000/KDL-46S3000/ KDL-40SL130 Remove 4 designated screws only. Before mounting the TV on a wall by the Wall-Mount Bracket model for your TV. Level surface covered with a soft cloth Table-Top Stand Level ...: KDL-26S3000/KDL-32S3000/ KDL-32SL130 Remove 3 designated screws only. Make sure the Table-Top Stand is required in installing this TV, especially to determine the strength of the wall for withstanding the TV's weight. • For product protection and safety reasons, Sony strongly...
...instruction guide provided by using a WallMount Bracket (sold separately). Models: KDL-40S3000/KDL-46S3000/ KDL-40SL130 Remove 4 designated screws only. Before mounting the TV on a wall by the Wall-Mount Bracket model for your TV. Level surface covered with a soft cloth Table-Top Stand Level ...: KDL-26S3000/KDL-32S3000/ KDL-32SL130 Remove 3 designated screws only. Make sure the Table-Top Stand is required in installing this TV, especially to determine the strength of the wall for withstanding the TV's weight. • For product protection and safety reasons, Sony strongly...

Operating Instructions
Page 13
..., connect its audio output jack to your headphones do not match the jack, use a suitable plug adapter (not supplied). ~ • While headphones are connected, the TV speakers are muted. If your headphones. Locating Inputs and Outputs Left side 1 2 3 R-AUDIO-L (MONO) VIDEO S VIDEO 2 VIDEO IN Item 1 Headphone jack 2 VIDEO IN 2 S VIDEO 3 VIDEO...
..., connect its audio output jack to your headphones do not match the jack, use a suitable plug adapter (not supplied). ~ • While headphones are connected, the TV speakers are muted. If your headphones. Locating Inputs and Outputs Left side 1 2 3 R-AUDIO-L (MONO) VIDEO S VIDEO 2 VIDEO IN Item 1 Headphone jack 2 VIDEO IN 2 S VIDEO 3 VIDEO...
Operating Instructions
Page 15
... Cable or VHF/UHF antenna. 15 A third composite video and audio (VIDEO 2 IN) is located on the left and right audio input jacks of the TV. Connects to your stereo system. You can be displayed. ~ • For some Apple Macintosh computers, it may be connected to view 480i, 480p, 720p... a set-top box, DVD player, Blu-ray Disc player, A/V receiver as well as a VCR or other analog RGB equipment. Connects to your TV's audio through your TV's component video (YPBPR) and audio (L/R) jacks. See "PC Input Signal Reference Chart" on page 18 for service only unless you are connecting the ...
... Cable or VHF/UHF antenna. 15 A third composite video and audio (VIDEO 2 IN) is located on the left and right audio input jacks of the TV. Connects to your stereo system. You can be displayed. ~ • For some Apple Macintosh computers, it may be connected to view 480i, 480p, 720p... a set-top box, DVD player, Blu-ray Disc player, A/V receiver as well as a VCR or other analog RGB equipment. Connects to your TV's audio through your TV's component video (YPBPR) and audio (L/R) jacks. See "PC Input Signal Reference Chart" on page 18 for service only unless you are connecting the ...

Operating Instructions
Page 16
... best possible picture, make sure you connect the antenna/cable input using a 75-ohm coaxial cable to On or Off in your TV. Cable Antenna A-B RF switch A Rear of TV 1 RGB S VIDEO Y PB 2 VIDEO PR DIGITAL OUT (OPTICAL) R AUDIO L AUDIO L (MONO) AUDIO R 1 3 IN PC IN VIDEO IN L AUDIO ... box CATV/Satellite antenna cable 16 3. Shown with standard-definition analog programming. ~ • This TV is capable of receiving unscrambled digital programming for the type of TV VHF/UHF/CABLE input HD Cable Box/HD Satellite Box You can be easily affected by subscribing to...
... best possible picture, make sure you connect the antenna/cable input using a 75-ohm coaxial cable to On or Off in your TV. Cable Antenna A-B RF switch A Rear of TV 1 RGB S VIDEO Y PB 2 VIDEO PR DIGITAL OUT (OPTICAL) R AUDIO L AUDIO L (MONO) AUDIO R 1 3 IN PC IN VIDEO IN L AUDIO ... box CATV/Satellite antenna cable 16 3. Shown with standard-definition analog programming. ~ • This TV is capable of receiving unscrambled digital programming for the type of TV VHF/UHF/CABLE input HD Cable Box/HD Satellite Box You can be easily affected by subscribing to...

Operating Instructions
Page 17
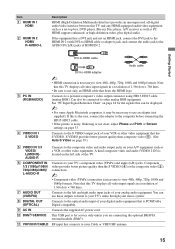
...) jack and connect the audio jack to the HDMI IN 2 (with Component Connection Rear of HDMI IN 2. Getting Started Shown with DVI Connection Rear of TV 1 RGB S VIDEO Y PB 2 VIDEO PR DIGITAL OUT (OPTICAL) DVI-to-HDMI cable R AUDIO L AUDIO L (MONO) AUDIO R AUDIO-R (red) AUDIO-L (white) 1 3... cable Audio cable ~ • If the equipment has a DVI jack and not an HDMI jack, connect the DVI jack to the AUDIO IN (L/R) jacks of TV 1 RGB S VIDEO Y PB 2 VIDEO PR DIGITAL OUT (OPTICAL) R AUDIO L AUDIO L (MONO) AUDIO R 1 3 IN PC IN VIDEO IN L AUDIO R 1 2 (VAR/FIX) ...
...) jack and connect the audio jack to the HDMI IN 2 (with Component Connection Rear of HDMI IN 2. Getting Started Shown with DVI Connection Rear of TV 1 RGB S VIDEO Y PB 2 VIDEO PR DIGITAL OUT (OPTICAL) DVI-to-HDMI cable R AUDIO L AUDIO L (MONO) AUDIO R AUDIO-R (red) AUDIO-L (white) 1 3... cable Audio cable ~ • If the equipment has a DVI jack and not an HDMI jack, connect the DVI jack to the AUDIO IN (L/R) jacks of TV 1 RGB S VIDEO Y PB 2 VIDEO PR DIGITAL OUT (OPTICAL) R AUDIO L AUDIO L (MONO) AUDIO R 1 3 IN PC IN VIDEO IN L AUDIO R 1 2 (VAR/FIX) ...

Operating Instructions
Page 18
... × 1280 × 1360 × Vertical (Line) 480 480 400 600 600 768 768 768 768 768 768 Horizontal frequency (kHz) 31.5 37.5 31.5 37.9 46.9 48.4 56.5 60.0 47.4 47.8 47.7 Vertical frequency (Hz) 60 75 70 60 75 60 70 75 60 60 60 Standard VGA VESA VGA-T VESA... will be detected automatically. (PC reboot may be connected to a PC with DVI or HDMI output. (Refer to the separate Quick Setup Guide.) Rear of TV 1 RGB S VIDEO Y PB 2 VIDEO PR DIGITAL OUT (OPTICAL) R AUDIO L AUDIO L (MONO) AUDIO R 1 3 IN PC IN VIDEO IN L AUDIO R 1 2 (VAR/FIX) COMPONENT IN AUDIO (1080p/1080i...
... × 1280 × 1360 × Vertical (Line) 480 480 400 600 600 768 768 768 768 768 768 Horizontal frequency (kHz) 31.5 37.5 31.5 37.9 46.9 48.4 56.5 60.0 47.4 47.8 47.7 Vertical frequency (Hz) 60 75 70 60 75 60 70 75 60 60 60 Standard VGA VESA VGA-T VESA... will be detected automatically. (PC reboot may be connected to a PC with DVI or HDMI output. (Refer to the separate Quick Setup Guide.) Rear of TV 1 RGB S VIDEO Y PB 2 VIDEO PR DIGITAL OUT (OPTICAL) R AUDIO L AUDIO L (MONO) AUDIO R 1 3 IN PC IN VIDEO IN L AUDIO R 1 2 (VAR/FIX) COMPONENT IN AUDIO (1080p/1080i...
Operating Instructions
Page 19
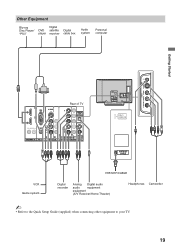
.../ "PS3" Digital DVD satellite player receiver Digital cable box Audio system Personal computer Getting Started R-AUDIO-L (MONO) VIDEO S VIDEO 2 VIDEO 1 RGB S VIDEO 2 VIDEO Rear of TV Y DIGITAL OUT PB (OPTICAL) PR R AUDIO L AUDIO L (MONO) AUDIO R 1 3 IN PC IN VIDEO IN L AUDIO R 1 2 (VAR/FIX) COMPONENT IN AUDIO (1080p/1080i/720p/480p/480i... Analog Digital audio audio equipment equipment (A/V Receiver/Home Theater) Headphones Camcorder ~ • Refer to the Quick Setup Guide (supplied) when connecting other equipment to your TV. 19
.../ "PS3" Digital DVD satellite player receiver Digital cable box Audio system Personal computer Getting Started R-AUDIO-L (MONO) VIDEO S VIDEO 2 VIDEO 1 RGB S VIDEO 2 VIDEO Rear of TV Y DIGITAL OUT PB (OPTICAL) PR R AUDIO L AUDIO L (MONO) AUDIO R 1 3 IN PC IN VIDEO IN L AUDIO R 1 2 (VAR/FIX) COMPONENT IN AUDIO (1080p/1080i/720p/480p/480i... Analog Digital audio audio equipment equipment (A/V Receiver/Home Theater) Headphones Camcorder ~ • Refer to the Quick Setup Guide (supplied) when connecting other equipment to your TV. 19
Operating Instructions
Page 20
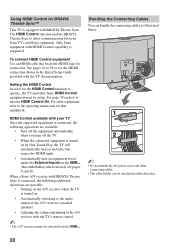
...off the equipment automatically when you turn the HDMI Control On. HDMI Control available with the TV's remote control. ~ • The A/V receiver cannot be selected from the XMB™. When a Sony A/V receiver with BRAVIA Theatre Sync is connected, the following operations are possible: • Turning...see the HDMI connection shown in the Quick Setup Guide provided with other Sony HDMI Control equipment must be attached in either direction. 20 See pages 16 to allow communication between Sony TV's and Sony equipment. Bundling the Connecting Cables You can be setup. The HDMI ...
...off the equipment automatically when you turn the HDMI Control On. HDMI Control available with the TV's remote control. ~ • The A/V receiver cannot be selected from the XMB™. When a Sony A/V receiver with BRAVIA Theatre Sync is connected, the following operations are possible: • Turning...see the HDMI connection shown in the Quick Setup Guide provided with other Sony HDMI Control equipment must be attached in either direction. 20 See pages 16 to allow communication between Sony TV's and Sony equipment. Bundling the Connecting Cables You can be setup. The HDMI ...

Operating Instructions
Page 21
... for digital channels. button: Allows you have connected an antenna or cable directly to the next screen. b button: Allows you turn off the TV during the Initial Setup process, the Initial Setup will restart from the XMB™ (XrossMediaBar) or refer to highlight options where applicable. s To...on page 40. s To Run Initial Setup Again or Auto Program at a Later Time Select the Initial Setup feature from the beginning when the TV is not connected. HOME B button: Allows you to the Initial Setup described on pages 24 and 32. You may be used for antenna installations...
... for digital channels. button: Allows you have connected an antenna or cable directly to the next screen. b button: Allows you turn off the TV during the Initial Setup process, the Initial Setup will restart from the XMB™ (XrossMediaBar) or refer to highlight options where applicable. s To...on page 40. s To Run Initial Setup Again or Auto Program at a Later Time Select the Initial Setup feature from the beginning when the TV is not connected. HOME B button: Allows you to the Initial Setup described on pages 24 and 32. You may be used for antenna installations...

Operating Instructions
Page 22
... Press once to display the information pertaining to show minimal information. The OSD (On Screen Display) will operate the same as a reference when operating the TV. • This remote control cannot be programmed to remain on the remote control. 1 HOME 2 ~ • The 5 button and CH + have a tactile dot....22 You can also set the display to the channel and/or program when available. To cancel Sleep Timer, press SLEEP repeatedly until the TV displays the time in a few seconds or press again to open Remote Control Buttons located at the top of the remote control. Push to...
... Press once to display the information pertaining to show minimal information. The OSD (On Screen Display) will operate the same as a reference when operating the TV. • This remote control cannot be programmed to remain on the remote control. 1 HOME 2 ~ • The 5 button and CH + have a tactile dot....22 You can also set the display to the channel and/or program when available. To cancel Sleep Timer, press SLEEP repeatedly until the TV displays the time in a few seconds or press again to open Remote Control Buttons located at the top of the remote control. Push to...


