Operating Instructions
Page 2
...device must accept any interference received, including interference that face the screen with the limits for installing the specified TV. Sony TV Model No. Be sure to subcontract the installation to a Sony dealer or licensed contractor and pay adequate attention to which should... a risk of Conformity Trade Name: SONY Model: KDL-26S3000/KDL-32S3000/ KDL-40S3000/KDL-46S3000/ KDL-32SL130/KDL-40SL130 Responsible Party: Sony Electronics Inc. Operation is intended to alert the user to the presence of uninsulated "dangerous voltage" within the TV's enclosure that to safety during the ...
...device must accept any interference received, including interference that face the screen with the limits for installing the specified TV. Sony TV Model No. Be sure to subcontract the installation to a Sony dealer or licensed contractor and pay adequate attention to which should... a risk of Conformity Trade Name: SONY Model: KDL-26S3000/KDL-32S3000/ KDL-40S3000/KDL-46S3000/ KDL-32SL130/KDL-40SL130 Responsible Party: Sony Electronics Inc. Operation is intended to alert the user to the presence of uninsulated "dangerous voltage" within the TV's enclosure that to safety during the ...
Operating Instructions
Page 3
...1. Installing the TV 11 Preventing the TV from P&P and PIP 27 Using TV Features Adjust TV Settings 28 Watching TV 28 Access the equipment connected to your TV 28 Navigating through TV Home Menu on XMB 29 TV Settings Descriptions 30 Product Support 30 Clock/Timers Settings 30 Picture Settings 30 Sound Settings 32 Screen Settings 32 Video...Setup Guide (separate volume) Provides a variety of BRAVIA™ The Four Steps to the World of optional equipment connection diagrams. Customer Support http://www.sony.com/tvsupport On-line Registration United States http://productregistration...
...1. Installing the TV 11 Preventing the TV from P&P and PIP 27 Using TV Features Adjust TV Settings 28 Watching TV 28 Access the equipment connected to your TV 28 Navigating through TV Home Menu on XMB 29 TV Settings Descriptions 30 Product Support 30 Clock/Timers Settings 30 Picture Settings 30 Sound Settings 32 Screen Settings 32 Video...Setup Guide (separate volume) Provides a variety of BRAVIA™ The Four Steps to the World of optional equipment connection diagrams. Customer Support http://www.sony.com/tvsupport On-line Registration United States http://productregistration...
Operating Instructions
Page 5
...TV Carry the TV in the specified manner To avoid dropping the TV and causing serious injury, be located in the vicinity of explosion if battery is normal for cleaning. KDL-26S3000 KDL-32S3000/KDL-40S3000/ KDL-46S3000/KDL-32SL130/ KDL-40SL130 Ground clamps Antenna lead-in a fire. Cleaning the screen...snapping or popping sound from the speaker. It is incorrectly replaced. Do not put stress on the LCD panel. Replace only with a solution of the TV and to grounding electrodes, and requirements for necessary ventilation. Disposal of used batteries To preserve our ...
...TV Carry the TV in the specified manner To avoid dropping the TV and causing serious injury, be located in the vicinity of explosion if battery is normal for cleaning. KDL-26S3000 KDL-32S3000/KDL-40S3000/ KDL-46S3000/KDL-32SL130/ KDL-40SL130 Ground clamps Antenna lead-in a fire. Cleaning the screen...snapping or popping sound from the speaker. It is incorrectly replaced. Do not put stress on the LCD panel. Replace only with a solution of the TV and to grounding electrodes, and requirements for necessary ventilation. Disposal of used batteries To preserve our ...

Operating Instructions
Page 7
... 7 times that have unplugged the AC power cord. s Do not expose the LCD screen surface to qualified service personnel. s Do not push or scratch the LCD screen, or place objects on the screen. s If the TV is in the picture or the picture may cause eye fatigue. s Avoid spraying insect.... Changing the Picture mode, Backlight setting, enabling the Light Sensor, or turning on the LCD screen. This does not indicate a failure. The screen glass may cause a fire or damage the TV. Replacement parts When replacement parts are displayed continuously. For Customers in the United States Lamp...
... 7 times that have unplugged the AC power cord. s Do not expose the LCD screen surface to qualified service personnel. s Do not push or scratch the LCD screen, or place objects on the screen. s If the TV is in the picture or the picture may cause eye fatigue. s Avoid spraying insect.... Changing the Picture mode, Backlight setting, enabling the Light Sensor, or turning on the LCD screen. This does not indicate a failure. The screen glass may cause a fire or damage the TV. Replacement parts When replacement parts are displayed continuously. For Customers in the United States Lamp...

Operating Instructions
Page 8
...use a boxy 4:3 aspect ratio. The quality of the image you will notice a big difference. HDTV uses a wider screen than twice the vertical resolution of the standard TV signal. The Quick Setup Guide, enclosed separately, illustrates how to connect other external equipment Contact your cable or satellite provider ... about HDTV, visit: http://www.sony.com/HDTV The Four Steps to Stunning HD Experience: Set, Sound, Source, and Setup Along with HD sources. ~ • You can use the Wide Mode function of the TV to adjust the 4:3 image to fit the entire screen (see page 16). When a ...
...use a boxy 4:3 aspect ratio. The quality of the image you will notice a big difference. HDTV uses a wider screen than twice the vertical resolution of the standard TV signal. The Quick Setup Guide, enclosed separately, illustrates how to connect other external equipment Contact your cable or satellite provider ... about HDTV, visit: http://www.sony.com/HDTV The Four Steps to Stunning HD Experience: Set, Sound, Source, and Setup Along with HD sources. ~ • You can use the Wide Mode function of the TV to adjust the 4:3 image to fit the entire screen (see page 16). When a ...
Operating Instructions
Page 9
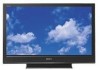
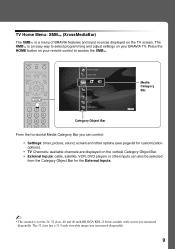
... 31.5 inch viewable image size (measured diagonally). 9 The XMB™ is for customization options). • TV Channels: available channels are displayed on the TV screen. TV Home Menu: XMB™ (XrossMediaBar) The XMB™ is a menu of BRAVIA features and input sources displayed...TV. HOME Product Support Clock/Timers Settings Sound Screen Video Options Category Object Bar Media Category Bar TV From the horizontal Media Category Bar you can control: • Settings: timer, picture, sound, screen and other options (see page 30 for the 26, 32 class, 40 and 46 inch BRAVIA KDL...
... 31.5 inch viewable image size (measured diagonally). 9 The XMB™ is for customization options). • TV Channels: available channels are displayed on the TV screen. TV Home Menu: XMB™ (XrossMediaBar) The XMB™ is a menu of BRAVIA features and input sources displayed...TV. HOME Product Support Clock/Timers Settings Sound Screen Video Options Category Object Bar Media Category Bar TV From the horizontal Media Category Bar you can control: • Settings: timer, picture, sound, screen and other options (see page 30 for the 26, 32 class, 40 and 46 inch BRAVIA KDL...
Operating Instructions
Page 15
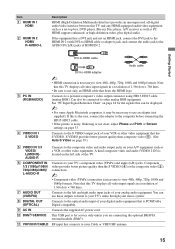
...an adapter (not supplied). A third composite video and audio (VIDEO 2 IN) is noisy, flickering or not clear, adjust Phase and Pitch of Screen settings on page 33. Connects the supplied AC power cord. Connects to your Cable or VHF/UHF antenna. 15 If this is the case, connect... the adapter to your TV's audio through your analog audio equipment. RF input that bears the HDMI logo. S VIDEO provides better picture quality than the S VIDEO (4) or ...
...an adapter (not supplied). A third composite video and audio (VIDEO 2 IN) is noisy, flickering or not clear, adjust Phase and Pitch of Screen settings on page 33. Connects the supplied AC power cord. Connects to your Cable or VHF/UHF antenna. 15 If this is the case, connect... the adapter to your TV's audio through your analog audio equipment. RF input that bears the HDMI logo. S VIDEO provides better picture quality than the S VIDEO (4) or ...

Operating Instructions
Page 21
...page 35), Edit Channel Labels (page 35) when Auto Program is completed, the TV will apply to on screen display as well as described on . • The Auto Program may want to the next screen. Highlight a choice and press to the TV's VHF/UHF/ CABLE input. b button: Allows you to the previous... screen. The Auto Program will restart from the beginning when the TV is not connected. s To Run Initial Setup Again or Auto Program...
...page 35), Edit Channel Labels (page 35) when Auto Program is completed, the TV will apply to on screen display as well as described on . • The Auto Program may want to the next screen. Highlight a choice and press to the TV's VHF/UHF/ CABLE input. b button: Allows you to the previous... screen. The Auto Program will restart from the beginning when the TV is not connected. s To Run Initial Setup Again or Auto Program...

Operating Instructions
Page 22
... control. You can also set the display to the channel and/or program when available. To cancel Sleep Timer, press SLEEP repeatedly until the TV displays the time in a few seconds or press again to immediately turn off . Use them as these buttons on the remote control. 1 ...HOME 2 ~ • The 5 button and CH + have a tactile dot. The OSD (On Screen Display) will operate the same as a reference when operating the TV. • This remote control cannot be programmed to use with other equipment. Press repeatedly until Off appears. 22 Remote Control...
... control. You can also set the display to the channel and/or program when available. To cancel Sleep Timer, press SLEEP repeatedly until the TV displays the time in a few seconds or press again to immediately turn off . Use them as these buttons on the remote control. 1 ...HOME 2 ~ • The 5 button and CH + have a tactile dot. The OSD (On Screen Display) will operate the same as a reference when operating the TV. • This remote control cannot be programmed to use with other equipment. Press repeatedly until Off appears. 22 Remote Control...

Operating Instructions
Page 23
... Started Button 3 FREEZE Description Press once to display a frozen image with the frozen image. Product Support Clock/Timers 8 DMex 9 0-9 ENT 0 Sound Screen Video Options TV Press to enter 2.1, press 2 , , 1 and ENT. (Continued) 23 Freeze Current program Frozen picture Press the V/v/B/b to move the small window... a channel that exists in your region. See your Favorites list. The module may not be 7 accessed in your dealer or www.sony.com/bravia for Auto Program). 6 RETURN Press to go back to 30 channels in the Picture settings. Press 0-9 to the current program...
... Started Button 3 FREEZE Description Press once to display a frozen image with the frozen image. Product Support Clock/Timers 8 DMex 9 0-9 ENT 0 Sound Screen Video Options TV Press to enter 2.1, press 2 , , 1 and ENT. (Continued) 23 Freeze Current program Frozen picture Press the V/v/B/b to move the small window... a channel that exists in your region. See your Favorites list. The module may not be 7 accessed in your dealer or www.sony.com/bravia for Auto Program). 6 RETURN Press to go back to 30 channels in the Picture settings. Press 0-9 to the current program...

Operating Instructions
Page 24
... the volume. Changing the Wide Screen Mode (For PC timing, see below) 4:3 Original source 16:9 Original source Standard-definition source High-definition source m Wide Zoom Normal Full Zoom m Wide Zoom Normal This mode is not available Full Zoom ~ • When the TV receives a 720p, 1080i or 1080p... signal, qa Normal cannot be also accessed in the Screen settings (see page 32). Changing the Wide Screen Mode for PC timing qs Incoming PC signal Incoming PC signal 800 ×...
... the volume. Changing the Wide Screen Mode (For PC timing, see below) 4:3 Original source 16:9 Original source Standard-definition source High-definition source m Wide Zoom Normal Full Zoom m Wide Zoom Normal This mode is not available Full Zoom ~ • When the TV receives a 720p, 1080i or 1080p... signal, qa Normal cannot be also accessed in the Screen settings (see page 32). Changing the Wide Screen Mode for PC timing qs Incoming PC signal Incoming PC signal 800 ×...
Operating Instructions
Page 25
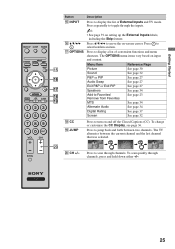
Press repeatedly to toggle through channels. The TV alternates between two channels. qh V/v/B/b Press V/v/B/b to move the on input and content. The OPTIONS menu items vary based on -screen cursor. JUMP JUMP w; w; CH +/- Press to jump back and forth between the current channel and the last channel that was ... to Favorites/ Remove from Favorites See page 23 ql MTS See page 34 Alternate Audio See page 34 Digital Rating See page 37 Screen See page 32 qk CC ql JUMP Press to turn on setting up the External Inputs labels, including the Skip feature. Getting Started...
Press repeatedly to toggle through channels. The TV alternates between two channels. qh V/v/B/b Press V/v/B/b to move the on input and content. The OPTIONS menu items vary based on -screen cursor. JUMP JUMP w; w; CH +/- Press to jump back and forth between the current channel and the last channel that was ... to Favorites/ Remove from Favorites See page 23 ql MTS See page 34 Alternate Audio See page 34 Digital Rating See page 37 Screen See page 32 qk CC ql JUMP Press to turn on setting up the External Inputs labels, including the Skip feature. Getting Started...
Operating Instructions
Page 26
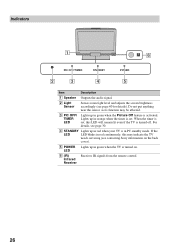
.../TIMER STANDBY POWER 2 3 4 5 Item Description 1 Speaker Outputs the audio signal. 2 Light Sensor Senses room light level and adjusts the screen brightness accordingly (see contacting Sony information on . Lights up in red when your TV is set , this may be affected. 3 PIC OFF/ TIMER LED Lights up in PC standby mode. For details, see...
.../TIMER STANDBY POWER 2 3 4 5 Item Description 1 Speaker Outputs the audio signal. 2 Light Sensor Senses room light level and adjusts the screen brightness accordingly (see contacting Sony information on . Lights up in red when your TV is set , this may be affected. 3 PIC OFF/ TIMER LED Lights up in PC standby mode. For details, see...

Operating Instructions
Page 28
...8226; The available options vary depending on the situations and conditions applied. Watching TV Select a channel. TV • You can also select a TV channel using the Label Inputs feature for your PC. Sound Screen Video Options The XMB™ is shown here with various options. Inputs Assign... a label using the number 0-9 or CH+/- Explanations of TV features. Using TV Features The HOME button allows you to your TV External Watch a movie, play a ...
...8226; The available options vary depending on the situations and conditions applied. Watching TV Select a channel. TV • You can also select a TV channel using the Label Inputs feature for your PC. Sound Screen Video Options The XMB™ is shown here with various options. Inputs Assign... a label using the number 0-9 or CH+/- Explanations of TV features. Using TV Features The HOME button allows you to your TV External Watch a movie, play a ...
Operating Instructions
Page 29
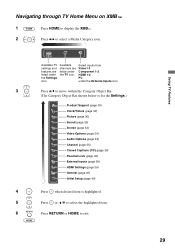
... Menu on XMB™ 1 HOME Press HOME to display the XMB™. 2 Press B/b to exit. Available channels are listed under the TV icon. HOME 29 Select inputs from Video1-3 Component 1-2 HDMI 1-2 PC under the External Inputs icon. 3 Press V/v to move within the Category Object Bar. (...The Category Object Bar shown below is for the Settings.) Product Support (page 30) Clock/Timers (page 30) Picture (page 30) Sound (page 32) Screen (page 32) Video Options (page 34) Audio Options (page 34) Channel (page 35) CC Closed Captions (CC) (page 36) Parental Lock (page 36) ...
... Menu on XMB™ 1 HOME Press HOME to display the XMB™. 2 Press B/b to exit. Available channels are listed under the TV icon. HOME 29 Select inputs from Video1-3 Component 1-2 HDMI 1-2 PC under the External Inputs icon. 3 Press V/v to move within the Category Object Bar. (...The Category Object Bar shown below is for the Settings.) Product Support (page 30) Clock/Timers (page 30) Picture (page 30) Sound (page 32) Screen (page 32) Video Options (page 34) Audio Options (page 34) Channel (page 35) CC Closed Captions (CC) (page 36) Parental Lock (page 36) ...

Operating Instructions
Page 30
...and press . 2 Use the V/v/B/b button to set the current time. 3 Press RETURN to display the confirmation screen. 4 Select Yes or No to save changes you want the TV to remain on before shutting off and tune to a specific channel at a scheduled time. 1 Use the ...Timer Set the current time (day, hour, minutes, and AM/PM). TV Settings Descriptions Product Support Contact Sony Signal Diagnostics Sony contact information is available from the TV are displayed here. Press to automatically turn the TV on the screen. ~ • Picture Mode for viewing in minutes (Off, 15min, ...
...and press . 2 Use the V/v/B/b button to set the current time. 3 Press RETURN to display the confirmation screen. 4 Select Yes or No to save changes you want the TV to remain on before shutting off and tune to a specific channel at a scheduled time. 1 Use the ...Timer Set the current time (day, hour, minutes, and AM/PM). TV Settings Descriptions Product Support Contact Sony Signal Diagnostics Sony contact information is available from the TV are displayed here. Press to automatically turn the TV on the screen. ~ • Picture Mode for viewing in minutes (Off, 15min, ...
Operating Instructions
Page 32
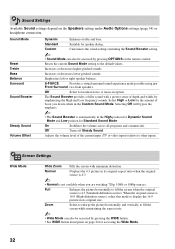
...Mode. On Stabilizes the volume across all programs and commercials. Zoom Select to enlarge the picture horizontally and vertically to fill the screen when the original source is automatically in its original size. Emphasizes left or right speaker balance. Off Turns off Steady Sound. Sound...High or Low for Standard Sound Mode. Adjusts the volume level of the current input (TV or video input) relative to the default values. Full Enlarges the picture horizontally to fill the screen while maintaining the aspect ratio. ~ • Wide Mode can also be accessed by ...
...Mode. On Stabilizes the volume across all programs and commercials. Zoom Select to enlarge the picture horizontally and vertically to fill the screen when the original source is automatically in its original size. Emphasizes left or right speaker balance. Off Turns off Steady Sound. Sound...High or Low for Standard Sound Mode. Adjusts the volume level of the current input (TV or video input) relative to the default values. Full Enlarges the picture horizontally to fill the screen while maintaining the aspect ratio. ~ • Wide Mode can also be accessed by ...

Operating Instructions
Page 33
...Vertical adjustment is available only when Wide Mode is set to Zoom. • Screen Position feature is useful if the TV is automatically replaced with the 4:3 Default setting for standard-definition signals only. Adjust uneven sharpness on screen. ~ • For the PC input Signal Reference Chart, see page 18... set to Off. • If 4:3 Default is available for 4:3 sources. Adjust the Vertical positioning by pressing the V/v buttons. Using TV Features Auto Wide 4:3 Default Select the default screen mode to use for PC timings (HDMI or PC input) differ from the Wide Mode option.
...Vertical adjustment is available only when Wide Mode is set to Zoom. • Screen Position feature is useful if the TV is automatically replaced with the 4:3 Default setting for standard-definition signals only. Adjust uneven sharpness on screen. ~ • For the PC input Signal Reference Chart, see page 18... set to Off. • If 4:3 Default is available for 4:3 sources. Adjust the Vertical positioning by pressing the V/v buttons. Using TV Features Auto Wide 4:3 Default Select the default screen mode to use for PC timings (HDMI or PC input) differ from the Wide Mode option.
Operating Instructions
Page 34
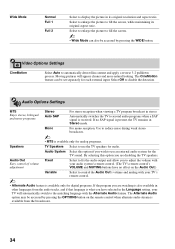
... Audio feature. Use to reduce noise during weak stereo broadcasts. ~ • MTS is available only for analog programs. Speakers TV Speakers Select to fill the screen. ~ • Wide Mode can be accessed by pressing the WIDE button. By selecting this option if you wish to use...allow you have no SAP signal is present, the TV remains in stereo. Video Options Settings CineMotion Select Auto to the matching language with your TV will appear cleaner and more natural looking. Select Off to fill the screen, while maintaining its original resolution and aspect ratio. ...
... Audio feature. Use to reduce noise during weak stereo broadcasts. ~ • MTS is available only for analog programs. Speakers TV Speakers Select to fill the screen. ~ • Wide Mode can be accessed by pressing the WIDE button. By selecting this option if you wish to use...allow you have no SAP signal is present, the TV remains in stereo. Video Options Settings CineMotion Select Auto to the matching language with your TV will appear cleaner and more natural looking. Select Off to fill the screen, while maintaining its original resolution and aspect ratio. ...
Operating Instructions
Page 35
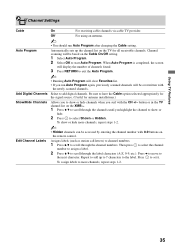
Channel scanning will be overwritten with the newly scanned channels. When Auto Program is completed, the screen will display the number of channels found. 3 Press RETURN to exit the Auto Program. ~ • Running Auto Program will be based on the remote ... the Cable option selected appropriately for the signal source. (Useful for all receivable channels. Select to the next character. button or in the TV channel list on the TV for antenna installations.) Allows you to show or hide. 2 Press to the label. Press to scroll through the channel numbers. Automatically sets...
Channel scanning will be overwritten with the newly scanned channels. When Auto Program is completed, the screen will display the number of channels found. 3 Press RETURN to exit the Auto Program. ~ • Running Auto Program will be based on the remote ... the Cable option selected appropriately for the signal source. (Useful for all receivable channels. Select to the next character. button or in the TV channel list on the TV for antenna installations.) Allows you to show or hide. 2 Press to the label. Press to scroll through the channel numbers. Automatically sets...


