Operating Instructions
Page 6
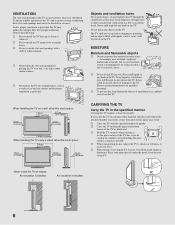
...materials. Objects and ventilation holes Never push objects of the TV, and to shocks or vibration, or excessive force. MOISTURE Moisture and flammable objects s Do not use power-line operated sets near a swimming pool, etc. If you carry the TV in a manner other similar surface. Place your palm directly... under the panel, from the TV. s Never block the slots and openings by qualified personnel. The TV shall not be exposed to hold the ...
...materials. Objects and ventilation holes Never push objects of the TV, and to shocks or vibration, or excessive force. MOISTURE Moisture and flammable objects s Do not use power-line operated sets near a swimming pool, etc. If you carry the TV in a manner other similar surface. Place your palm directly... under the panel, from the TV. s Never block the slots and openings by qualified personnel. The TV shall not be exposed to hold the ...
Operating Instructions
Page 9
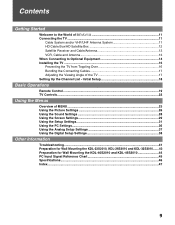
... Troubleshooting...41 Preparation for Wall Mounting the KDL-23S2010, KDL-26S2010 and KDL-32S2010.......43 Preparation for Wall Mounting the KDL-40S2010 and KDL-46S2010 44 PC Input Signal Reference Chart 45 Specifications...46 Index...47 9 Initial Setup 18 Basic Operations Remote Control ...19 TV Controls...22 Using the Menus Overview of the TV 17 Setting Up the Channel List -
... Troubleshooting...41 Preparation for Wall Mounting the KDL-23S2010, KDL-26S2010 and KDL-32S2010.......43 Preparation for Wall Mounting the KDL-40S2010 and KDL-46S2010 44 PC Input Signal Reference Chart 45 Specifications...46 Index...47 9 Initial Setup 18 Basic Operations Remote Control ...19 TV Controls...22 Using the Menus Overview of the TV 17 Setting Up the Channel List -

Operating Instructions
Page 11
... through its integrated tuner. See "Changing the Wide Screen Mode" on page 46. Getting Started Getting Started Welcome to the World of TM Thank you for models KDL-23S2010, KDL-26S2010, KDL-32S2010, KDL40S2010 and KDL-46S2010. see page 18). A 300-ohm twin lead cable can view (see page...UHF input will create a list of channels you should select the proper Wide Mode setting to display the picture in your new BRAVIA TV is strongly recommended that are provided in this Sony LCD Digital Color Television. For optimum picture performance, your preferred aspect ratio. When the ...
... through its integrated tuner. See "Changing the Wide Screen Mode" on page 46. Getting Started Getting Started Welcome to the World of TM Thank you for models KDL-23S2010, KDL-26S2010, KDL-32S2010, KDL40S2010 and KDL-46S2010. see page 18). A 300-ohm twin lead cable can view (see page...UHF input will create a list of channels you should select the proper Wide Mode setting to display the picture in your new BRAVIA TV is strongly recommended that are provided in this Sony LCD Digital Color Television. For optimum picture performance, your preferred aspect ratio. When the ...
Operating Instructions
Page 12
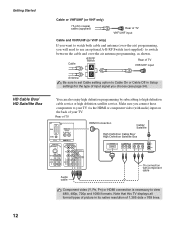
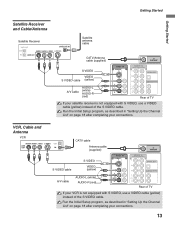
... Component video (Y, PB, PR) or HDMI connection is necessary to high definition cable service or high definition satellite service. Note that this TV displays all format types of picture in Setup settings for the type of input signal you choose (see page 34). Cable A/B RF Switch A Rear of... TV VHF/UHF input B Antenna Be sure to set Cable setting option to Cable On or Cable Off in its native resolution of TV 7 6 RGB R AUDIO L AUDIO PC IN VIDEO IN 1 S VIDEO 3 VIDEO L (MONO) AUDIO R HD/DVD...
... Component video (Y, PB, PR) or HDMI connection is necessary to high definition cable service or high definition satellite service. Note that this TV displays all format types of picture in Setup settings for the type of input signal you choose (see page 34). Cable A/B RF Switch A Rear of... TV VHF/UHF input B Antenna Be sure to set Cable setting option to Cable On or Cable Off in its native resolution of TV 7 6 RGB R AUDIO L AUDIO PC IN VIDEO IN 1 S VIDEO 3 VIDEO L (MONO) AUDIO R HD/DVD...
Operating Instructions
Page 13
Run the Initial Setup program, as described in "Setting Up the Channel List" on page 18 after completing your connections. ...480p/480i) 4 5 Y OPTICAL OUT PB VIDEO L (MONO) AUDIO R PR L AUDIO R AUDIO OUT(VAR/FIX) Rear of TV If your VCR is not equipped with S VIDEO, use a VIDEO cable (yellow) instead of the S VIDEO cable. Getting Started ...480p/480i) 4 5 Y OPTICAL OUT PB VIDEO L (MONO) AUDIO R PR L AUDIO R AUDIO OUT(VAR/FIX) Rear of TV If your satellite receiver is not equipped with S VIDEO, use a VIDEO cable (yellow) instead of the S VIDEO cable. Run the...
Run the Initial Setup program, as described in "Setting Up the Channel List" on page 18 after completing your connections. ...480p/480i) 4 5 Y OPTICAL OUT PB VIDEO L (MONO) AUDIO R PR L AUDIO R AUDIO OUT(VAR/FIX) Rear of TV If your VCR is not equipped with S VIDEO, use a VIDEO cable (yellow) instead of the S VIDEO cable. Getting Started ...480p/480i) 4 5 Y OPTICAL OUT PB VIDEO L (MONO) AUDIO R PR L AUDIO R AUDIO OUT(VAR/FIX) Rear of TV If your satellite receiver is not equipped with S VIDEO, use a VIDEO cable (yellow) instead of the S VIDEO cable. Run the...
Operating Instructions
Page 14
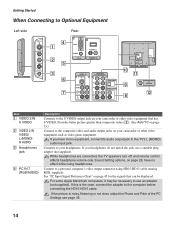
... video output connector using headphones. Connect to your camcorder or other video equipment such as video game equipment. While headphones are connected, the TV speakers turn off, and volume control affects headphone volume only. See "PC Input Signal Reference Chart" on page 33.) Connect to the ...computer before connecting the HD15-HD15 cable. Sound Setting options, on your headphones. If you have mono equipment, connect its audio output jack to the S VIDEO output jack on page 28,...
... video output connector using headphones. Connect to your camcorder or other video equipment such as video game equipment. While headphones are connected, the TV speakers turn off, and volume control affects headphone volume only. See "PC Input Signal Reference Chart" on page 33.) Connect to the ...computer before connecting the HD15-HD15 cable. Sound Setting options, on your headphones. If you have mono equipment, connect its audio output jack to the S VIDEO output jack on page 28,...
Operating Instructions
Page 15
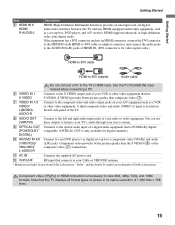
...instead when connecting a PC. 6 VIDEO IN 1 S VIDEO Connects to your A/V equipment such as a set -top box's component video (YPBPR) and audio (L/R) jacks. You can use these outputs to listen to your TV's audio through your stereo system. 9 OPTICAL OUT Connects to the optical audio input of a digital audio... equipment that connects to the S VIDEO output jack of your DVD player's or digital set -top box, DVD player, and A/V receiver. "...
...instead when connecting a PC. 6 VIDEO IN 1 S VIDEO Connects to your A/V equipment such as a set -top box's component video (YPBPR) and audio (L/R) jacks. You can use these outputs to listen to your TV's audio through your stereo system. 9 OPTICAL OUT Connects to the optical audio input of a digital audio... equipment that connects to the S VIDEO output jack of your DVD player's or digital set -top box, DVD player, and A/V receiver. "...
Operating Instructions
Page 18
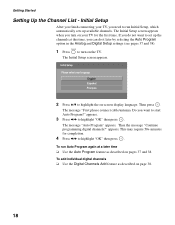
... Auto Program feature as described on pages 37 and 38. If you need to set up available channels. appears. 3 Press B/b to start Auto Program?" appears. Initial Setup After you finish connecting your TV for completion. 4 Press B/b to highlight "OK" then press . This may require... 50+ minutes for the first time. Getting Started Setting Up the Channel List - To add individual digital channels ❑ Use the...
... Auto Program feature as described on pages 37 and 38. If you need to set up available channels. appears. 3 Press B/b to start Auto Program?" appears. Initial Setup After you finish connecting your TV for completion. 4 Press B/b to highlight "OK" then press . This may require... 50+ minutes for the first time. Getting Started Setting Up the Channel List - To add individual digital channels ❑ Use the...
Operating Instructions
Page 19
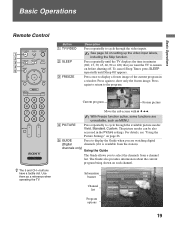
...list. The Guide also provides information about the current program being shown on setting up the video input labels, including the Skip function. Move the sub screen with V v B b. Time remaining: 1:26 TV-G CC 1 ABC 10 DISC 23.1 FAM 36 TLC Alternate Audio Audio...select the channels from the station). For details, see "Using the Picture Settings" on a unique mission. Press repeatedly until Sleep Off appears. Basic Operations Basic Operations Remote Control 1 2 3 4 5 Button 1 TV/VIDEO 2 SLEEP 3 FREEZE Description Press repeatedly to cycle through the available ...
...list. The Guide also provides information about the current program being shown on setting up the video input labels, including the Skip function. Move the sub screen with V v B b. Time remaining: 1:26 TV-G CC 1 ABC 10 DISC 23.1 FAM 36 TLC Alternate Audio Audio...select the channels from the station). For details, see "Using the Picture Settings" on a unique mission. Press repeatedly until Sleep Off appears. Basic Operations Basic Operations Remote Control 1 2 3 4 5 Button 1 TV/VIDEO 2 SLEEP 3 FREEZE Description Press repeatedly to cycle through the available ...
Operating Instructions
Page 20
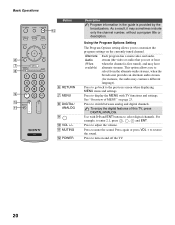
... a main video and audio stream (the video or audio that you to the previous screen when displaying MENU items and settings. See "Overview of this TV, press DIGITAL/ANALOG. Use with TV functions and settings. Press to enter 2.1, press 2 , , 1 and ENT. For example, to mute the sound. Press again or press VOL + to switch...
... a main video and audio stream (the video or audio that you to the previous screen when displaying MENU items and settings. See "Overview of this TV, press DIGITAL/ANALOG. Use with TV functions and settings. Press to enter 2.1, press 2 , , 1 and ENT. For example, to mute the sound. Press again or press VOL + to switch...

Operating Instructions
Page 21
...Press V/v/B/b to change channels immediately. Press to immediately turn off after two seconds. When the TV receives a 720p or 1080i signal, Normal cannot be also accessed in the Screen settings. Press once to select/confirm an item. Press to display the current channel number, channel ...press again to display the Tools Menu that was selected. To scan quickly through channels. Press 0 - 9 to step through the Wide Mode settings: Wide Zoom, Normal, Full, Zoom. Basic Operations Button qd WIDE qd qf qg qh qj qk Basic Operations Description Press repeatedly to select...
...Press V/v/B/b to change channels immediately. Press to immediately turn off after two seconds. When the TV receives a 720p or 1080i signal, Normal cannot be also accessed in the Screen settings. Press once to select/confirm an item. Press to display the current channel number, channel ...press again to display the Tools Menu that was selected. To scan quickly through channels. Press 0 - 9 to step through the Wide Mode settings: Wide Zoom, Normal, Full, Zoom. Basic Operations Button qd WIDE qd qf qg qh qj qk Basic Operations Description Press repeatedly to select...

Operating Instructions
Page 22
... 33 for up /down either -/+. If the LED blinks in orange when the timer is turned on and off the TV. Outputs audio signal. Unplugging the power cord while the TV is set. CHANNEL + 5 POWER 6 (IR) Infrared Receiver/ Light Sensor 7 PIC OFF/ TIMER LED 8 STANDBY LED 9 POWER LED 0 Speaker... on may cause the Power LED to malfunction. 22 Lights up in red continuously, this button serves as confirming the selection or setting. Make sure that the TV is turned off before unplugging the power cord. The CHANNEL + button has a tactile dot. Lights up in PC power saving ...
... 33 for up /down either -/+. If the LED blinks in orange when the timer is turned on and off the TV. Outputs audio signal. Unplugging the power cord while the TV is set. CHANNEL + 5 POWER 6 (IR) Infrared Receiver/ Light Sensor 7 PIC OFF/ TIMER LED 8 STANDBY LED 9 POWER LED 0 Speaker... on may cause the Power LED to malfunction. 22 Lights up in red continuously, this button serves as confirming the selection or setting. Make sure that the TV is turned off before unplugging the power cord. The CHANNEL + button has a tactile dot. Lights up in PC power saving ...

Operating Instructions
Page 23
... you to exit. 1 MENU External Inputs Analog Favorites Digital Favorites Analog Digital Settings Select from connected equipment Select: Set: Exit: MENU 23 It enables you can easily perform basic TV functions such as: switching between external inputs, viewing your favorite analog/digital stations,... switching between analog and digital channels, and changing or customizing your TV. Using the Menus Using the Menus Overview of MENU MENU provides one button access for controlling your TV settings. 1 Press MENU on the screen rather than a variety of tasks intuitively ...
... you to exit. 1 MENU External Inputs Analog Favorites Digital Favorites Analog Digital Settings Select from connected equipment Select: Set: Exit: MENU 23 It enables you can easily perform basic TV functions such as: switching between external inputs, viewing your favorite analog/digital stations,... switching between analog and digital channels, and changing or customizing your TV. Using the Menus Using the Menus Overview of MENU MENU provides one button access for controlling your TV settings. 1 Press MENU on the screen rather than a variety of tasks intuitively ...
Operating Instructions
Page 24
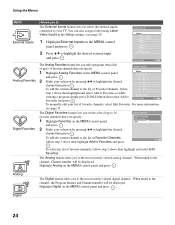
...GAME Video 3 Video 4 Video 5 Video 6 Video 7 - Return Add to Favorites 1 28 : ----2 60 : ----3 28 : ----4 65 : ----5 68 : ----6 28 : ----7 -- : ----8 -- : ----Edit Favorites Select: Set: Exit: MENU To manually edit your list of Favorite Channels, follow step 1 above then highlight Add to the list of favorite channels, select Edit Favorites...that you specify. 1 Highlight Favorites on the MENU control panel and press . 2 Make your TV. You can also assign a label using Label Video Inputs in the Setup settings. (see page 37. The Digital Favorites feature lets you create a list of up to 16...
...GAME Video 3 Video 4 Video 5 Video 6 Video 7 - Return Add to Favorites 1 28 : ----2 60 : ----3 28 : ----4 65 : ----5 68 : ----6 28 : ----7 -- : ----8 -- : ----Edit Favorites Select: Set: Exit: MENU To manually edit your list of Favorite Channels, follow step 1 above then highlight Add to the list of favorite channels, select Edit Favorites...that you specify. 1 Highlight Favorites on the MENU control panel and press . 2 Make your TV. You can also assign a label using Label Video Inputs in the Setup settings. (see page 37. The Digital Favorites feature lets you create a list of up to 16...
Operating Instructions
Page 25
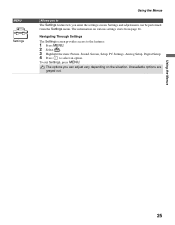
...: 1 Press MENU. 2 Select . 3 Highlight the item: Picture, Sound, Screen, Setup, PC Settings, Analog Setup, Digital Setup. 4 Press to The Settings feature lets you enter the settings screen. Using the Menus 25 To exit Settings, press MENU. Unavailable options are grayed out. MENU Settings Using the Menus Allows you to select an option. The options you...
...: 1 Press MENU. 2 Select . 3 Highlight the item: Picture, Sound, Screen, Setup, PC Settings, Analog Setup, Digital Setup. 4 Press to The Settings feature lets you enter the settings screen. Using the Menus 25 To exit Settings, press MENU. Unavailable options are grayed out. MENU Settings Using the Menus Allows you to select an option. The options you...
Operating Instructions
Page 26
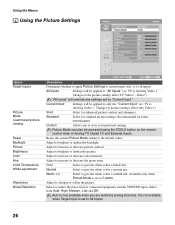
...Inputs. 26 Custom Allows you are watching analog channels. Available only when Picture Mode is set to only the "Current Input" (ex: TV is showing Video 1. Adjust to the picture settings affect TV, Video1 - Changes to sharpen or soften the picture. Changes to give the white colors ... adjustment Sharpness Noise Reduction Description Determines whether to apply Picture Settings to current input only, or to brighten or darken the picture. Video7) "All Inputs" will be applied to "All Inputs" (ex: TV is only available when you to increase or decrease picture ...
...Inputs. 26 Custom Allows you are watching analog channels. Available only when Picture Mode is set to only the "Current Input" (ex: TV is showing Video 1. Adjust to the picture settings affect TV, Video1 - Changes to sharpen or soften the picture. Changes to give the white colors ... adjustment Sharpness Noise Reduction Description Determines whether to apply Picture Settings to current input only, or to brighten or darken the picture. Video7) "All Inputs" will be applied to "All Inputs" (ex: TV is only available when you to increase or decrease picture ...
Operating Instructions
Page 27
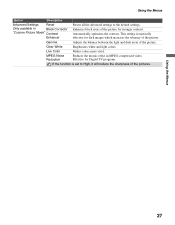
... vivid. Using the Menus Option Description Advanced Settings Reset Only available in MPEG-compressed video. MPEG Noise Reduction Reduces the mosaic effect in Black Corrector "Custom Picture Mode" Contrast Enhancer Resets all the advanced settings to High, it will reduce the sharpness ...of the picture. Enhances black areas of the picture. Automatically optimizes the contrast. Effective for Digital TV programs. If the function is especially effective for dark ...
... vivid. Using the Menus Option Description Advanced Settings Reset Only available in MPEG-compressed video. MPEG Noise Reduction Reduces the mosaic effect in Black Corrector "Custom Picture Mode" Contrast Enhancer Resets all the advanced settings to High, it will reduce the sharpness ...of the picture. Enhances black areas of the picture. Automatically optimizes the contrast. Effective for Digital TV programs. If the function is especially effective for dark ...
Operating Instructions
Page 28
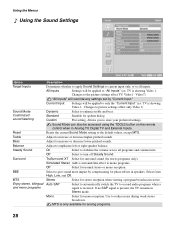
...analog programs. 28 Resets the current Sound Mode setting to the picture settings affect TV, Video1 - Adjust to second audio programs when a signal is only available for spoken dialog. Auto SAP Select to automatically switch the TV to emphasize left or right speaker balance. Use... to increase or decrease higher-pitched sounds. Select from High, Low, and Off. Current Input Settings will override any settings set by compensating for phase effects in stereo. ...
...analog programs. 28 Resets the current Sound Mode setting to the picture settings affect TV, Video1 - Adjust to second audio programs when a signal is only available for spoken dialog. Auto SAP Select to automatically switch the TV to emphasize left or right speaker balance. Use... to increase or decrease higher-pitched sounds. Select from High, Low, and Off. Current Input Settings will override any settings set by compensating for phase effects in stereo. ...
Operating Instructions
Page 29
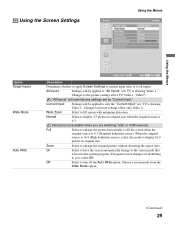
... picture in original size. Normal Select to fill screen with minimum distortion. Zoom Select to "All Inputs" (ex: TV is showing Video 1. All Inputs Settings will be applied to fill the screen when the original source is 4:3. Full Select to enlarge the picture horizontally to only...to the screen mode that is not available when you , select Off. On Select to have the screen automatically change to the picture settings affect TV, Video1 - Video7) "All Inputs" will be applied to enlarge the original picture without distorting the aspect ratio. Choose a screen mode...
... picture in original size. Normal Select to fill screen with minimum distortion. Zoom Select to "All Inputs" (ex: TV is showing Video 1. All Inputs Settings will be applied to fill the screen when the original source is 4:3. Full Select to enlarge the picture horizontally to only...to the screen mode that is not available when you , select Off. On Select to have the screen automatically change to the picture settings affect TV, Video1 - Video7) "All Inputs" will be applied to enlarge the original picture without distorting the aspect ratio. Choose a screen mode...
Operating Instructions
Page 30
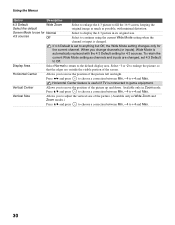
... a correction between Min, - 4 to the default display area. Display Area Select Normal to return to + 4 and Max. Select to continue using the current Wide Mode setting when the channel or input is automatically replaced with minimal distortion. Select -1 or -2 to enlarge the picture so that the edges are changed . Press B/b and... Vertical Size Allows you to display the 4:3 picture in Zoom mode. Select to move the position of the screen. Horizontal Center feature is useful if TV is set 4:3 Default to + 4 and Max.
... a correction between Min, - 4 to the default display area. Display Area Select Normal to return to + 4 and Max. Select to continue using the current Wide Mode setting when the channel or input is automatically replaced with minimal distortion. Select -1 or -2 to enlarge the picture so that the edges are changed . Press B/b and... Vertical Size Allows you to display the 4:3 picture in Zoom mode. Select to move the position of the screen. Horizontal Center feature is useful if TV is set 4:3 Default to + 4 and Max.


