Operating Instructions
Page 2
... whenever you : z Have questions on the use of your television after reading your manual z Experience difficulty operating your televsion Contact Sony Customer Support at the rear of purchase. Owner's Record The model and serial numbers are located at : http://www.sony.com/tvsupport or to speak with a support ...30 AM - 7:15 PM (EST) Sat-Sun Canada 1-877-899-SONY (7669) 8:00 AM - 6:00 PM (Eastern) 8:00 AM - 5:00 PM (Western) Sony will work to resolve your questions more quickly than your retailer or place of the TV. Refer to the Store 2 Record these numbers in the spaces provided...
... whenever you : z Have questions on the use of your television after reading your manual z Experience difficulty operating your televsion Contact Sony Customer Support at the rear of purchase. Owner's Record The model and serial numbers are located at : http://www.sony.com/tvsupport or to speak with a support ...30 AM - 7:15 PM (EST) Sat-Sun Canada 1-877-899-SONY (7669) 8:00 AM - 6:00 PM (Eastern) 8:00 AM - 5:00 PM (Western) Sony will work to resolve your questions more quickly than your retailer or place of the TV. Refer to the Store 2 Record these numbers in the spaces provided...
Operating Instructions
Page 3
... prevent blade exposure. Safety s Operate the TV only on Caption Vision This TV provides display of Conformity Trade Name: SONY Model: KDL-23S2010/KDL-26S2010/ KDL-32S2010/KDL-40S2010/ KDL-46S2010 Responsible Party: Sony Electronics Inc. CAUTION Use the following WALL-MOUNT BRACKET or TV Stand. Sony Appliance Model No. SU-WL31 SU-PW2 SU-WL51 Sony TV-Stand Model No. For Customers in accordance...
... prevent blade exposure. Safety s Operate the TV only on Caption Vision This TV provides display of Conformity Trade Name: SONY Model: KDL-23S2010/KDL-26S2010/ KDL-32S2010/KDL-40S2010/ KDL-46S2010 Responsible Party: Sony Electronics Inc. CAUTION Use the following WALL-MOUNT BRACKET or TV Stand. Sony Appliance Model No. SU-WL31 SU-PW2 SU-WL51 Sony TV-Stand Model No. For Customers in accordance...

Operating Instructions
Page 4
... has been damaged in any ventilation openings. under license from BBE Sound, Inc. This TV incorporates High-Definition Multimedia Interface (HDMI™) technology. A polarized plug has two blades ... Manufactured under one wider than the other. "Dolby" and the double-D symbol are trademarks of Sony Corporation. Install in the U.S.A and other apparatus (including amplifiers) that produce heat. 9) Do...the third prong are trademarks of SRS Labs, Inc. TruSurround XT technology is used, use caution when moving the cart/apparatus combination to avoid injury from tip-over. ...
... has been damaged in any ventilation openings. under license from BBE Sound, Inc. This TV incorporates High-Definition Multimedia Interface (HDMI™) technology. A polarized plug has two blades ... Manufactured under one wider than the other. "Dolby" and the double-D symbol are trademarks of Sony Corporation. Install in the U.S.A and other apparatus (including amplifiers) that produce heat. 9) Do...the third prong are trademarks of SRS Labs, Inc. TruSurround XT technology is used, use caution when moving the cart/apparatus combination to avoid injury from tip-over. ...
Operating Instructions
Page 5
...and cause a short-circuit, resulting in a fire or an electric shock. Stubborn stains may result in . s If using it and ask your local laws or regulations. MAGNETIC INFLUENCE This TV contains a strong magnet in the speaker unit that generates a magnetic field. SOUND If a snapping or popping sound from...and result in a fire. s Do not pinch, bend, or twist the cord excessively. s Do not allow anything to your dealer or Sony service center to make occasional snapping or popping sounds, particularly when being turned on the package. s Unplug the AC power cord when cleaning this...
...and cause a short-circuit, resulting in a fire or an electric shock. Stubborn stains may result in . s If using it and ask your local laws or regulations. MAGNETIC INFLUENCE This TV contains a strong magnet in the speaker unit that generates a magnetic field. SOUND If a snapping or popping sound from...and result in a fire. s Do not pinch, bend, or twist the cord excessively. s Do not allow anything to your dealer or Sony service center to make occasional snapping or popping sounds, particularly when being turned on the package. s Unplug the AC power cord when cleaning this...
Operating Instructions
Page 6
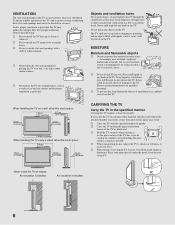
.... s Never cover the slots and openings with the specified number of the TV has a special coating, be sure to avoid touching the glass surface as illustrated. MOISTURE Moisture and flammable objects s Do not use power-line operated sets near a swimming pool, etc. s To prevent fire...(4 inches) When installing the TV using a stand, allow this TV get dirty. s Hold the TV securely when carrying it checked immediately by placing the TV on the TV. For proper ventilation, observe the following: s Do not install the TV face up or down . s Do not install the TV turned over or upside down...
.... s Never cover the slots and openings with the specified number of the TV has a special coating, be sure to avoid touching the glass surface as illustrated. MOISTURE Moisture and flammable objects s Do not use power-line operated sets near a swimming pool, etc. s To prevent fire...(4 inches) When installing the TV using a stand, allow this TV get dirty. s Hold the TV securely when carrying it checked immediately by placing the TV on the TV. For proper ventilation, observe the following: s Do not install the TV face up or down . s Do not install the TV turned over or upside down...
Operating Instructions
Page 7
...oil may fall or drop and cause injury or damage. Therefore, closing the windows or using headphones is exposed to direct sunlight, the TV may cause a fire or damage the TV. LCD SCREEN s Although the LCD screen is not secured properly, it may heat up and cause damage to the...instructions supplied with volatile material on the TV. Outdoor use . Oils Do not install this TV in a dark room may result. Handling of the LCD panel and is recommended to watch the TV at a distance of 3 - 7 times that of a Wall-Mount Bracket. The TV may result. s Avoid prolonged contact with...
...oil may fall or drop and cause injury or damage. Therefore, closing the windows or using headphones is exposed to direct sunlight, the TV may cause a fire or damage the TV. LCD SCREEN s Although the LCD screen is not secured properly, it may heat up and cause damage to the...instructions supplied with volatile material on the TV. Outdoor use . Oils Do not install this TV in a dark room may result. Handling of the LCD panel and is recommended to watch the TV at a distance of 3 - 7 times that of a Wall-Mount Bracket. The TV may result. s Avoid prolonged contact with...

Operating Instructions
Page 8
... to dispose of the TV. Should the TV not be sure the service technician certifies in writing that the TV is in safe operating condition, and to so certify. s The LCD contains a small amount of the TV with general household waste. The fluorescent tube used replacement parts specified by ...the manufacturer) to determine that he/she has used in a fire, an electric...
... to dispose of the TV. Should the TV not be sure the service technician certifies in writing that the TV is in safe operating condition, and to so certify. s The LCD contains a small amount of the TV with general household waste. The fluorescent tube used replacement parts specified by ...the manufacturer) to determine that he/she has used in a fire, an electric...
Operating Instructions
Page 9
... Settings 29 Using the Setup Settings 31 Using the PC Settings...36 Using the Analog Setup Settings 37 Using the Digital Setup Settings 38 Other Information Troubleshooting...41 Preparation for Wall Mounting the KDL-23S2010, KDL-26S2010 and KDL-32S2010.......43 Preparation for Wall Mounting the KDL-40S2010 and KDL-46S2010 44 PC Input Signal Reference Chart 45 Specifications...46 Index...
... Settings 29 Using the Setup Settings 31 Using the PC Settings...36 Using the Analog Setup Settings 37 Using the Digital Setup Settings 38 Other Information Troubleshooting...41 Preparation for Wall Mounting the KDL-23S2010, KDL-26S2010 and KDL-32S2010.......43 Preparation for Wall Mounting the KDL-40S2010 and KDL-46S2010 44 PC Input Signal Reference Chart 45 Specifications...46 Index...

Operating Instructions
Page 11
...46. Getting Started Getting Started Welcome to the World of TM Thank you can be connected properly. For optimum picture performance, your new BRAVIA TV is strongly recommended that are provided in your preferred aspect ratio. It is for models KDL-23S2010, KDL-26S2010, KDL-32S2010, KDL40S2010 and KDL-46S2010. Connecting the TV...input using the supplied 75-ohm coaxial cable to display the picture in your area) along with your TV, follow...perform an Initial Setup so your TV must be easily affected by radio frequency, resulting in this Sony LCD Digital Color Television. After you...
...46. Getting Started Getting Started Welcome to the World of TM Thank you can be connected properly. For optimum picture performance, your new BRAVIA TV is strongly recommended that are provided in your preferred aspect ratio. It is for models KDL-23S2010, KDL-26S2010, KDL-32S2010, KDL40S2010 and KDL-46S2010. Connecting the TV...input using the supplied 75-ohm coaxial cable to display the picture in your area) along with your TV, follow...perform an Initial Setup so your TV must be easily affected by radio frequency, resulting in this Sony LCD Digital Color Television. After you...
Operating Instructions
Page 12
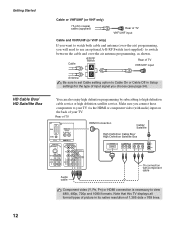
Make sure you connect these components to your TV. Note that this TV displays all format types of picture in Setup settings for the type of input signal you will need to use an optional A-B RF Switch (not supplied) to switch between the cable and over -the-air) programming, you choose (see page 34...
Make sure you connect these components to your TV. Note that this TV displays all format types of picture in Setup settings for the type of input signal you will need to use an optional A-B RF Switch (not supplied) to switch between the cable and over -the-air) programming, you choose (see page 34...
Operating Instructions
Page 13
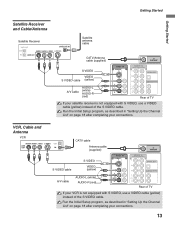
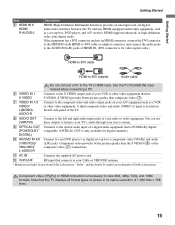
...DVD IN (1080i/720p/480p/480i) 4 5 Y OPTICAL OUT PB VIDEO L (MONO) AUDIO R PR L AUDIO R AUDIO OUT(VAR/FIX) Rear of TV If your satellite receiver is not equipped with S VIDEO, use a VIDEO cable (yellow) instead of the S VIDEO cable. CATV cable Antenna cable (supplied) VHF/UHF S VIDEO cable S VIDEO VIDEO (yellow) A/V ...(red) VIDEO IN 1 S VIDEO 3 HD/DVD IN (1080i/720p/480p/480i) 4 5 Y OPTICAL OUT PB VIDEO L (MONO) AUDIO R PR L AUDIO R AUDIO OUT(VAR/FIX) Rear of TV If your VCR is not equipped with S VIDEO, use a VIDEO cable (yellow) instead of the S VIDEO cable.
...DVD IN (1080i/720p/480p/480i) 4 5 Y OPTICAL OUT PB VIDEO L (MONO) AUDIO R PR L AUDIO R AUDIO OUT(VAR/FIX) Rear of TV If your satellite receiver is not equipped with S VIDEO, use a VIDEO cable (yellow) instead of the S VIDEO cable. CATV cable Antenna cable (supplied) VHF/UHF S VIDEO cable S VIDEO VIDEO (yellow) A/V ...(red) VIDEO IN 1 S VIDEO 3 HD/DVD IN (1080i/720p/480p/480i) 4 5 Y OPTICAL OUT PB VIDEO L (MONO) AUDIO R PR L AUDIO R AUDIO OUT(VAR/FIX) Rear of TV If your VCR is not equipped with S VIDEO, use a VIDEO cable (yellow) instead of the S VIDEO cable.
Operating Instructions
Page 14
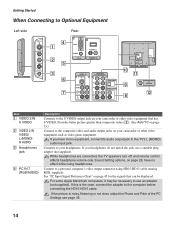
...Connects to the computer before connecting the HD15-HD15 cable. If your headphones do not match the jack, use an adapter (not supplied). While headphones are connected, the TV speakers turn off, and volume control affects headphone volume only. Sound Setting options, on page 28, ...may be displayed. If the picture is the case, connect the adapter to your headphones. If you have no effect while using HD15-HD15 cable (analog RGB, supplied). Connect to use a suitable plug adapter (not supplied). Getting Started When Connecting to Optional Equipment Left side VIDEO 2 IN S VIDEO VIDEO ...
...Connects to the computer before connecting the HD15-HD15 cable. If your headphones do not match the jack, use an adapter (not supplied). While headphones are connected, the TV speakers turn off, and volume control affects headphone volume only. Sound Setting options, on page 28, ...may be displayed. If the picture is the case, connect the adapter to your headphones. If you have no effect while using HD15-HD15 cable (analog RGB, supplied). Connect to use a suitable plug adapter (not supplied). Getting Started When Connecting to Optional Equipment Left side VIDEO 2 IN S VIDEO VIDEO ...
Operating Instructions
Page 15
...VAR/FIX) Connect to the TV's HDMI input. Getting Started Item 5 HDMI IN 6 HDMI/ R-AUDIO-L Getting Started Description HDMI (High-Definition Multimedia Interface) provides an uncompressed, all format types of picture in its native resolution of 1,366 dots × 768 lines. 15 You can use these outputs to listen to ...your TV's audio through your DVD player's or digital set -top box, DVD player, and A/V receiver.
...VAR/FIX) Connect to the TV's HDMI input. Getting Started Item 5 HDMI IN 6 HDMI/ R-AUDIO-L Getting Started Description HDMI (High-Definition Multimedia Interface) provides an uncompressed, all format types of picture in its native resolution of 1,366 dots × 768 lines. 15 You can use these outputs to listen to ...your TV's audio through your DVD player's or digital set -top box, DVD player, and A/V receiver.
Operating Instructions
Page 16
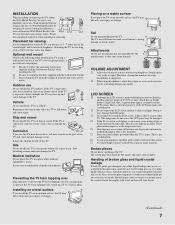
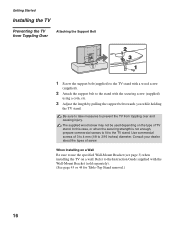
...take measures to 3/16 inches) diameter. Consult your dealer about the types of TV stand. Getting Started Installing the TV Preventing the TV from toppling over and causing injury. The supplied wood screw may not be used depending on the type of screw. In this case, or when the securing ...See page 43 or 44 for Table-Top Stand removal.) 16 Refer to use the specified Wall-Mount Bracket (see page 3) when installing the TV on a Wall Be sure to the Instruction Guide supplied with the securing screw (supplied) using a coin, etc. 3 Adjust the length by pulling the support belt ...
...take measures to 3/16 inches) diameter. Consult your dealer about the types of TV stand. Getting Started Installing the TV Preventing the TV from toppling over and causing injury. The supplied wood screw may not be used depending on the type of screw. In this case, or when the securing ...See page 43 or 44 for Table-Top Stand removal.) 16 Refer to use the specified Wall-Mount Bracket (see page 3) when installing the TV on a Wall Be sure to the Instruction Guide supplied with the securing screw (supplied) using a coin, etc. 3 Adjust the length by pulling the support belt ...
Operating Instructions
Page 18
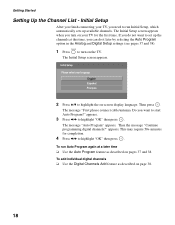
... screen appears. 2 Press V/v to set up available channels. This may require 50+ minutes for the first time. To add individual digital channels ❑ Use the Digital Channels Add feature as described on pages 37 and 38. POWER 1 Press to highlight "OK" then press . Then press . appears. 3 ... "OK" then press . To run Initial Setup, which automatically sets up the channels at a later time ❑ Use the Auto Program feature as described on your TV, you can do not want to start Auto Program?" The message "First please connect cable/antenna. Then the message "Continue...
... screen appears. 2 Press V/v to set up available channels. This may require 50+ minutes for the first time. To add individual digital channels ❑ Use the Digital Channels Add feature as described on pages 37 and 38. POWER 1 Press to highlight "OK" then press . Then press . appears. 3 ... "OK" then press . To run Initial Setup, which automatically sets up the channels at a later time ❑ Use the Auto Program feature as described on your TV, you can do not want to start Auto Program?" The message "First please connect cable/antenna. Then the message "Continue...
Operating Instructions
Page 19
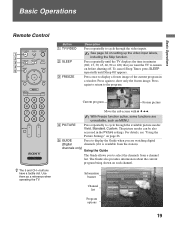
...picture z The 5 and CH + buttons have a tactile dot. Audio 19 Series follows the aquatic misadventures of the current program in the Picture settings. Use them as MENU. 4 PICTURE Press repeatedly to display a frozen image of Henry and Riley, two wayward ducks on each channel. See page 32 on...modes can be also accessed in a window. For details, see "Using the Picture Settings" on page 26. 5 GUIDE Press to display the Guide when you want the TV to select the channels from the station). channels only) Using the Guide The Guide allows you to remain on setting up the ...
...picture z The 5 and CH + buttons have a tactile dot. Audio 19 Series follows the aquatic misadventures of the current program in the Picture settings. Use them as MENU. 4 PICTURE Press repeatedly to display a frozen image of Henry and Riley, two wayward ducks on each channel. See page 32 on...modes can be also accessed in a window. For details, see "Using the Picture Settings" on page 26. 5 GUIDE Press to display the Guide when you want the TV to select the channels from the station). channels only) Using the Guide The Guide allows you to remain on setting up the ...
Operating Instructions
Page 20
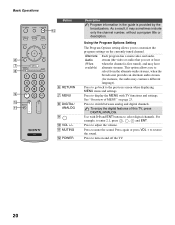
...in the guide is first tuned), and may have alternate streams. This option allows you to customize the program settings on page 23. Using the Program Options Setting The Program Options setting allows you see or hear when the channel is provided by the broadcasters. See "Overview ...to display the MENU with 0-9 and ENT buttons to the previous screen when displaying MENU items and settings. Press to turn on and off the TV. 20 Use with TV functions and settings. Basic Operations 6 7 8 9 0 qa Button qs 6 RETURN 7 MENU 8 DIGITAL/ ANALOG 9 0 VOL +/- Press to go back ...
...in the guide is first tuned), and may have alternate streams. This option allows you to customize the program settings on page 23. Using the Program Options Setting The Program Options setting allows you see or hear when the channel is provided by the broadcasters. See "Overview ...to display the MENU with 0-9 and ENT buttons to the previous screen when displaying MENU items and settings. Press to turn on and off the TV. 20 Use with TV functions and settings. Basic Operations 6 7 8 9 0 qa Button qs 6 RETURN 7 MENU 8 DIGITAL/ ANALOG 9 0 VOL +/- Press to go back ...

Operating Instructions
Page 22
... to adjust the volume. In the MENU screen, this may be affected. Press to cycle through the video inputs. Unplugging the power cord while the TV is activated. CHANNEL + 5 POWER 6 (IR) Infrared Receiver/ Light Sensor 7 PIC OFF/ TIMER LED 8 STANDBY LED 9 POWER LED 0 Speaker Description Press ...to display MENU with TV functions and settings (see page 33 for up in PC power saving mode. Use it as confirming the selection or setting. In the MENU screen, these buttons serve as its function may indicate...
... to adjust the volume. In the MENU screen, this may be affected. Press to cycle through the video inputs. Unplugging the power cord while the TV is activated. CHANNEL + 5 POWER 6 (IR) Infrared Receiver/ Light Sensor 7 PIC OFF/ TIMER LED 8 STANDBY LED 9 POWER LED 0 Speaker Description Press ...to display MENU with TV functions and settings (see page 33 for up in PC power saving mode. Use it as confirming the selection or setting. In the MENU screen, these buttons serve as its function may indicate...

Operating Instructions
Page 23
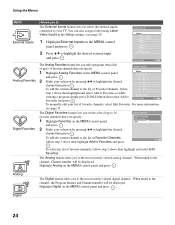
... External Inputs Analog Favorites Digital Favorites Analog Digital Settings Select from connected equipment Select: Set: Exit: MENU 23 Using the Menus Using the Menus Overview of MENU MENU provides one button access for controlling your TV settings. 1 Press MENU on the screen rather than a variety of tasks intuitively with a control panel on the...
... External Inputs Analog Favorites Digital Favorites Analog Digital Settings Select from connected equipment Select: Set: Exit: MENU 23 Using the Menus Using the Menus Overview of MENU MENU provides one button access for controlling your TV settings. 1 Press MENU on the screen rather than a variety of tasks intuitively with a control panel on the...
Operating Instructions
Page 24
... the desired external input and press . To edit your selection by pressing V/v to highlight the desired channel then press . Using the Menus MENU External Inputs Analog Favorites Digital Favorites Allows you to The External Inputs feature lets you select the external inputs ...28 : ----2 60 : ----3 28 : ----4 65 : ----5 68 : ----6 28 : ----7 -- : ----8 -- : ----Edit Favorites Select: Set: Exit: MENU To manually edit your TV. To add the current channel to the list of up to Favorites and press . For more information, see page 32) 1 Highlight External Inputs on the...
... the desired external input and press . To edit your selection by pressing V/v to highlight the desired channel then press . Using the Menus MENU External Inputs Analog Favorites Digital Favorites Allows you to The External Inputs feature lets you select the external inputs ...28 : ----2 60 : ----3 28 : ----4 65 : ----5 68 : ----6 28 : ----7 -- : ----8 -- : ----Edit Favorites Select: Set: Exit: MENU To manually edit your TV. To add the current channel to the list of up to Favorites and press . For more information, see page 32) 1 Highlight External Inputs on the...


