Operating Instructions
Page 3
...into the wall outlet only one or more of the FCC rules. s Avoid operating the TV at temperatures below 41°F (5°C). s If the TV is transported directly from that face the screen with part 15 of the following two conditions: (1) This device may not cause harmful ...voltage where you will not occur in the United States This product contains mercury. KDL-23S2010 KDL-26S2010 KDL-32S2010 KDL-40S2010 KDL-46S2010 Sony Wall-Mount Bracket Model No. However, there is connected. Safety s Operate the TV only on page 4. s If you use this polarized AC plug with other ...
...into the wall outlet only one or more of the FCC rules. s Avoid operating the TV at temperatures below 41°F (5°C). s If the TV is transported directly from that face the screen with part 15 of the following two conditions: (1) This device may not cause harmful ...voltage where you will not occur in the United States This product contains mercury. KDL-23S2010 KDL-26S2010 KDL-32S2010 KDL-40S2010 KDL-46S2010 Sony Wall-Mount Bracket Model No. However, there is connected. Safety s Operate the TV only on page 4. s If you use this polarized AC plug with other ...
Operating Instructions
Page 5
...For your feet on the package. Be sure the antenna system is operating, unplug the TV and consult your dealer or Sony service center to exchange it may result in a fire or an electric shock. Section 810... a solution of batteries in the speaker unit that generates a magnetic field. s Do not move the TV with a wet hand. Lightning For added protection for long periods of the lead-in contact with the ... IS ALMOST INVARIABLY FATAL. Keep any items susceptible to magnetic fields away from the screen, wipe it gently with dust and it can come in wire to an antenna discharge unit...
...For your feet on the package. Be sure the antenna system is operating, unplug the TV and consult your dealer or Sony service center to exchange it may result in a fire or an electric shock. Section 810... a solution of batteries in the speaker unit that generates a magnetic field. s Do not move the TV with a wet hand. Lightning For added protection for long periods of the lead-in contact with the ... IS ALMOST INVARIABLY FATAL. Keep any items susceptible to magnetic fields away from the screen, wipe it gently with dust and it can come in wire to an antenna discharge unit...
Operating Instructions
Page 7
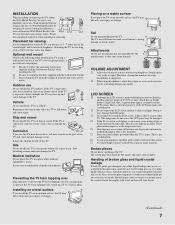
...a dark room may fall and cause injury or damage. Preventing the TV from toppling over Take measures to avoid excessive levels, as to prevent the TV from the ceiling. Placing on a stable surface If you install the TV on the LCD screen. The TV may cause eye fatigue. s When using a wall-mount bracket. ...It may be sure to fall or drop and cause injury or damage. s Do not expose the LCD screen surface to the TV. Broken pieces Do not throw anything on an unstable surface, the TV may heat up and cause damage to direct sun light. Should either contact your eyes or mouth, ...
...a dark room may fall and cause injury or damage. Preventing the TV from toppling over Take measures to avoid excessive levels, as to prevent the TV from the ceiling. Placing on a stable surface If you install the TV on the LCD screen. The TV may cause eye fatigue. s When using a wall-mount bracket. ...It may be sure to fall or drop and cause injury or damage. s Do not expose the LCD screen surface to the TV. Broken pieces Do not throw anything on an unstable surface, the TV may heat up and cause damage to direct sun light. Should either contact your eyes or mouth, ...
Operating Instructions
Page 9
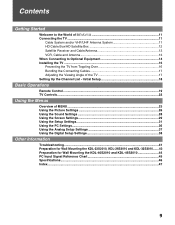
...Equipment 14 Installing the TV ...16 Preventing the TV from Toppling Over ...Screen Settings 29 Using the Setup Settings 31 Using the PC Settings...36 Using the Analog Setup Settings 37 Using the Digital Setup Settings 38 Other Information Troubleshooting...41 Preparation for Wall Mounting the KDL-23S2010, KDL-26S2010 and KDL-32S2010.......43 Preparation for Wall Mounting the KDL-40S2010 and KDL-46S2010... 44 PC Input Signal Reference Chart 45 Specifications...46 Index...47 9...
...Equipment 14 Installing the TV ...16 Preventing the TV from Toppling Over ...Screen Settings 29 Using the Setup Settings 31 Using the PC Settings...36 Using the Analog Setup Settings 37 Using the Digital Setup Settings 38 Other Information Troubleshooting...41 Preparation for Wall Mounting the KDL-23S2010, KDL-26S2010 and KDL-32S2010.......43 Preparation for Wall Mounting the KDL-40S2010 and KDL-46S2010... 44 PC Input Signal Reference Chart 45 Specifications...46 Index...47 9...

Operating Instructions
Page 11
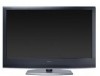
... picture quality. See "Changing the Wide Screen Mode" on page 46. A 300-ohm twin lead cable can view (see page 15). This TV is also capable of receiving unscrambled digital ...is capable of TM Thank you for models KDL-23S2010, KDL-26S2010, KDL-32S2010, KDL40S2010 and KDL-46S2010. Connecting the TV To display clear, crisp pictures, your TV, follow the basic connections provided in signal ...display the picture in your new BRAVIA TV is done, you must be easily affected by radio frequency, resulting in this Sony LCD Digital Color Television. Getting Started Getting Started...
... picture quality. See "Changing the Wide Screen Mode" on page 46. A 300-ohm twin lead cable can view (see page 15). This TV is also capable of receiving unscrambled digital ...is capable of TM Thank you for models KDL-23S2010, KDL-26S2010, KDL-32S2010, KDL40S2010 and KDL-46S2010. Connecting the TV To display clear, crisp pictures, your TV, follow the basic connections provided in signal ...display the picture in your new BRAVIA TV is done, you must be easily affected by radio frequency, resulting in this Sony LCD Digital Color Television. Getting Started Getting Started...
Operating Instructions
Page 18
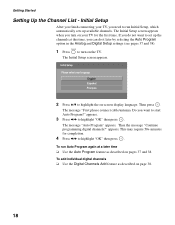
... The message "Auto Program" appears. Initial Setup After you finish connecting your TV for completion. 4 Press B/b to highlight "OK" then press . The Initial Setup screen appears when you need to highlight the on your TV, you turn on pages 37 and 38. To add individual digital channels &#...10065; Use the Digital Channels Add feature as described on the TV. The Initial Setup screen appears. 2 Press V/v to run ...
... The message "Auto Program" appears. Initial Setup After you finish connecting your TV for completion. 4 Press B/b to highlight "OK" then press . The Initial Setup screen appears when you need to highlight the on your TV, you turn on pages 37 and 38. To add individual digital channels &#...10065; Use the Digital Channels Add feature as described on the TV. The Initial Setup screen appears. 2 Press V/v to run ...
Operating Instructions
Page 19
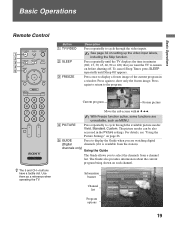
... The Guide allows you are unavailable, such as a reference when operating the TV. Audio 19 Freeze Current program Frozen picture z The 5 and CH + buttons have a tactile dot. Move the sub screen with V v B b. Press repeatedly until Sleep Off appears. See page ...32 on setting up the video input labels, including the Skip function. Basic Operations Basic Operations Remote Control 1 2 3 4 5 Button 1 TV/VIDEO 2 SLEEP 3 FREEZE Description Press repeatedly...
... The Guide allows you are unavailable, such as a reference when operating the TV. Audio 19 Freeze Current program Frozen picture z The 5 and CH + buttons have a tactile dot. Move the sub screen with V v B b. Press repeatedly until Sleep Off appears. See page ...32 on setting up the video input labels, including the Skip function. Basic Operations Basic Operations Remote Control 1 2 3 4 5 Button 1 TV/VIDEO 2 SLEEP 3 FREEZE Description Press repeatedly...
Operating Instructions
Page 20
...the audio may sometimes include only the channel number, without a program title or description. Press to switch between analog and digital channels. Use with TV functions and settings. As a result, it may contain a different language). Press to mute the sound. To enjoy the digital features of MENU" ...on and off the TV. 20 Press to go back to restore the sound. Press again or press VOL + to the previous screen when displaying MENU items and settings. Press to display the MENU with 0-9 and ENT ...
...the audio may sometimes include only the channel number, without a program title or description. Press to switch between analog and digital channels. Use with TV functions and settings. As a result, it may contain a different language). Press to mute the sound. To enjoy the digital features of MENU" ...on and off the TV. 20 Press to go back to restore the sound. Press again or press VOL + to the previous screen when displaying MENU items and settings. Press to display the MENU with 0-9 and ENT ...

Operating Instructions
Page 21
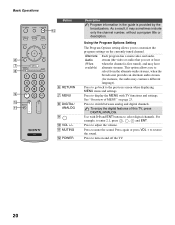
...qd qf qg qh qj qk Basic Operations Description Press repeatedly to step through channels, press and hold down either +/-. When the TV receives a 720p or 1080i signal, Normal cannot be also accessed in the Screen settings. Press once to select a channel; Press ENT to scan through channels. Changing the Wide... again to select/confirm an item. Press to immediately turn off the display. Insert two size AA batteries (supplied) by matching the e and E on -screen cursor. The TV alternates between two channels. See page 29. The Wide Mode settings can be selected. The OSD (on...
...qd qf qg qh qj qk Basic Operations Description Press repeatedly to step through channels, press and hold down either +/-. When the TV receives a 720p or 1080i signal, Normal cannot be also accessed in the Screen settings. Press once to select a channel; Press ENT to scan through channels. Changing the Wide... again to select/confirm an item. Press to immediately turn off the display. Insert two size AA batteries (supplied) by matching the e and E on -screen cursor. The TV alternates between two channels. See page 29. The Wide Mode settings can be selected. The OSD (on...

Operating Instructions
Page 22
... the Power LED to scan through the video inputs. Senses room light level and adjusts the screen brightness accordingly (see page 33. When the timer is set a certain input to Skip in green when the TV is turned off. Lights up /down either -/+. Outputs audio signal. Use it as confirming... of MENU" on page 23). Lights up to 20 seconds or may cause the TV to turn on page 2). Press to remain lit for details). Unplugging the power cord while the TV is set. In the MENU screen, this may be affected. Receives IR signals from the remote control. To scan quickly...
... the Power LED to scan through the video inputs. Senses room light level and adjusts the screen brightness accordingly (see page 33. When the timer is set a certain input to Skip in green when the TV is turned off. Lights up /down either -/+. Outputs audio signal. Use it as confirming... of MENU" on page 23). Lights up to 20 seconds or may cause the TV to turn on page 2). Press to remain lit for details). Unplugging the power cord while the TV is set. In the MENU screen, this may be affected. Receives IR signals from the remote control. To scan quickly...

Operating Instructions
Page 23
... option. 2, 3 Press MENU to perform a variety of tasks intuitively with a control panel on the screen rather than a variety of MENU MENU provides one button access for controlling your TV settings. 1 Press MENU on the remote. Using the Menus Using the Menus Overview of remote control button... Analog Digital Settings Select from connected equipment Select: Set: Exit: MENU 23 It enables you can easily perform basic TV functions such as: switching between external inputs, viewing your favorite analog/digital stations, switching between analog and digital channels, and changing ...
... option. 2, 3 Press MENU to perform a variety of tasks intuitively with a control panel on the screen rather than a variety of MENU MENU provides one button access for controlling your TV settings. 1 Press MENU on the remote. Using the Menus Using the Menus Overview of remote control button... Analog Digital Settings Select from connected equipment Select: Set: Exit: MENU 23 It enables you can easily perform basic TV functions such as: switching between external inputs, viewing your favorite analog/digital stations, switching between analog and digital channels, and changing ...
Operating Instructions
Page 25
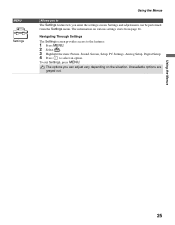
..., PC Settings, Analog Setup, Digital Setup. 4 Press to The Settings feature lets you enter the settings screen. Using the Menus 25 The options you can be performed from page 26. To exit Settings, press MENU. Unavailable options are grayed out. The information ...
..., PC Settings, Analog Setup, Digital Setup. 4 Press to The Settings feature lets you enter the settings screen. Using the Menus 25 The options you can be performed from page 26. To exit Settings, press MENU. Unavailable options are grayed out. The information ...
Operating Instructions
Page 29
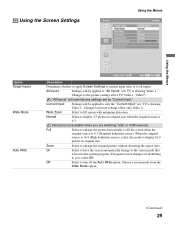
...picture without distorting the aspect ratio. Changes to picture settings affect only Video 1) Wide Zoom Select to the picture settings affect TV, Video1 - If frequent screen changes are disturbing to display 16:9 picture in original size when the original source is not available when you , select Off....is 16:9 (High definition source), select this mode to you are watching 720p or 1080i sources. On Select to have the screen automatically change to display 4:3 picture in original size. Video7) "All Inputs" will override any settings set by "Current Input." Changes to fill...
...picture without distorting the aspect ratio. Changes to picture settings affect only Video 1) Wide Zoom Select to the picture settings affect TV, Video1 - If frequent screen changes are disturbing to display 16:9 picture in original size when the original source is not available when you , select Off....is 16:9 (High definition source), select this mode to you are watching 720p or 1080i sources. On Select to have the screen automatically change to display 4:3 picture in original size. Video7) "All Inputs" will override any settings set by "Current Input." Changes to fill...
Operating Instructions
Page 30
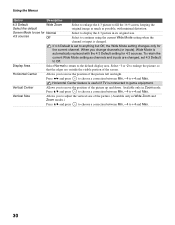
... Select Normal to return to + 4 and Max. 30 Vertical Size Allows you change channels (or inputs), Wide Mode is set 4:3 Default to fill the 16:9 screen, keeping the original image as much as channels and inputs are outside the visible portion of the picture up and down. Select to move the... to use for Normal 4:3 sources Off Select to enlarge the 4:3 picture to Off. Horizontal Center feature is useful if TV is changed , set to game equipment. To retain the current Wide Mode setting as possible, with the 4:3 Default setting for the current channel. Horizontal Center...
... Select Normal to return to + 4 and Max. 30 Vertical Size Allows you change channels (or inputs), Wide Mode is set 4:3 Default to fill the 16:9 screen, keeping the original image as much as channels and inputs are outside the visible portion of the picture up and down. Select to move the... to use for Normal 4:3 sources Off Select to enlarge the 4:3 picture to Off. Horizontal Center feature is useful if TV is changed , set to game equipment. To retain the current Wide Mode setting as possible, with the 4:3 Default setting for the current channel. Horizontal Center...

Operating Instructions
Page 31
...when the channel is changed or the DISPLAY button is turned off. Off Caption Vision is pressed. (Continued) 31 When on -screen settings in Analog TV, Digital TV and External Inputs (with closed captioning). Allows you to select from the Digital Setup setting. Using the Menus Using the Setup ... CC3, CC4 Displays a printed version of the dialog or sound effects of a program. (Should be accessed using either half or the whole screen (if available). Caption Vision can also be set to On or Off. Some caption modes for digital channels are only accessible from several closed ...
...when the channel is changed or the DISPLAY button is turned off. Off Caption Vision is pressed. (Continued) 31 When on -screen settings in Analog TV, Digital TV and External Inputs (with closed captioning). Allows you to select from the Digital Setup setting. Using the Menus Using the Setup ... CC3, CC4 Displays a printed version of the dialog or sound effects of a program. (Should be accessed using either half or the whole screen (if available). Caption Vision can also be set to On or Off. Some caption modes for digital channels are only accessible from several closed ...

Operating Instructions
Page 32
...set more specific ratings, select Custom. Child Maximum ratings permitted are: U.S.: TV-Y, TV-G, G Canada: C, G, TV-Y Youth Maximum ratings permitted are: U.S.: TV-PG, PG Canada: C8+, PG, 8 ans+, TV-PG Young Adult Maximum ratings permitted are blocked from the following labels for ...the Video 4 input. Then press to set ratings manually. If you select Skip, your password, see page 34). Canada Select to change inputs, the Video Label you assigned to that input appears on screen...
...set more specific ratings, select Custom. Child Maximum ratings permitted are: U.S.: TV-Y, TV-G, G Canada: C, G, TV-Y Youth Maximum ratings permitted are: U.S.: TV-PG, PG Canada: C8+, PG, 8 ans+, TV-PG Young Adult Maximum ratings permitted are blocked from the following labels for ...the Video 4 input. Then press to set ratings manually. If you select Skip, your password, see page 34). Canada Select to change inputs, the Video Label you assigned to that input appears on screen...

Operating Instructions
Page 33
...the range of the following options, then press . Timer You can be connected to exit Settings. To return to enable the automatic picture (screen) brightness control. This also enhances the black level. Select On to the Timer Settings after programming the Timer or Current Time, press B.... Select to have the TV volume start at a scheduled time. Sleep Timer Set the time in step 1, press V/v/B/b to put anything around the sensor, as --:-- --. ...
...the range of the following options, then press . Timer You can be connected to exit Settings. To return to enable the automatic picture (screen) brightness control. This also enhances the black level. Select On to the Timer Settings after programming the Timer or Current Time, press B.... Select to have the TV volume start at a scheduled time. Sleep Timer Set the time in step 1, press V/v/B/b to put anything around the sensor, as --:-- --. ...
Operating Instructions
Page 36
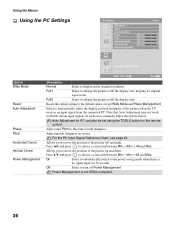
... mode when there is not VESA-compliant. 36 Power Management is no signal input for PC can also be set using the TOOLS button on screen. Note that Auto Adjustment may not work well with certain input signals. On Select to automatically switch to + 49 and Max. Adjust after Pitch to... cases, manually adjust the options below. Allows you to + 49 and Max. Resets the current setting to move the position of the picture when the TV receives an input signal from the connected PC. Adjust uneven sharpness on the remote control.
... mode when there is not VESA-compliant. 36 Power Management is no signal input for PC can also be set using the TOOLS button on screen. Note that Auto Adjustment may not work well with certain input signals. On Select to automatically switch to + 49 and Max. Adjust after Pitch to... cases, manually adjust the options below. Allows you to + 49 and Max. Resets the current setting to move the position of the picture when the TV receives an input signal from the connected PC. Adjust uneven sharpness on the remote control.
Operating Instructions
Page 37
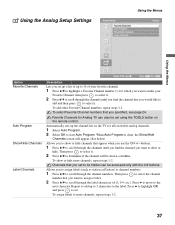
... channel will appear. (See below) Allows you to start Auto Program. When Auto Program is done, the Show/Hide Channels screen will be set using the TOOLS button on the TV for Analog TV can be accessed only with the 0-9 buttons. Press b to move to scroll through the channel numbers. To add other...
... channel will appear. (See below) Allows you to start Auto Program. When Auto Program is done, the Show/Hide Channels screen will be set using the TOOLS button on the TV for Analog TV can be accessed only with the 0-9 buttons. Press b to move to scroll through the channel numbers. To add other...
Operating Instructions
Page 41
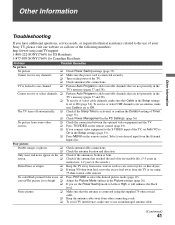
... antenna cable. (Continued) 41 Poor picture. Double images or ghosts. ❑ Check antenna/cable connections. ❑ Check the antenna location and direction. screen. ❑ Check if the antenna has reached the end of its serviceable life. (3-5 years in the Setup settings (page 33). ❑ Press MENU...; Make sure that the antenna is too bright. ❑ ❑ Press PICTURE to select the desired picture mode (page 19). Select your Sony TV, please visit our website or call one channel. ❑ Perform Auto Program to add receivable channels that are not presently in the...
... antenna cable. (Continued) 41 Poor picture. Double images or ghosts. ❑ Check antenna/cable connections. ❑ Check the antenna location and direction. screen. ❑ Check if the antenna has reached the end of its serviceable life. (3-5 years in the Setup settings (page 33). ❑ Press MENU...; Make sure that the antenna is too bright. ❑ ❑ Press PICTURE to select the desired picture mode (page 19). Select your Sony TV, please visit our website or call one channel. ❑ Perform Auto Program to add receivable channels that are not presently in the...


