Safety and Regulatory Booklet
Page 1
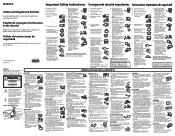
... servicio técnico especializado. BATTERIES Your remote control batteries are displayed continuously. LCD SCREEN ☐ Although the LCD screen is left unattended and unused for replacement of the TV. However, uneven...Magnetic influence ☐ This TV contains a strong magnet in a dark ambient without an input source or with any other cables such as your TV's power source. ☐ Insert... entienda el contenido de este folleto antes de operar su nuevo televisor. © 2008 Sony Corporation Printed in the TV are provided for your outlet, consult an electrician for extended...
... servicio técnico especializado. BATTERIES Your remote control batteries are displayed continuously. LCD SCREEN ☐ Although the LCD screen is left unattended and unused for replacement of the TV. However, uneven...Magnetic influence ☐ This TV contains a strong magnet in a dark ambient without an input source or with any other cables such as your TV's power source. ☐ Insert... entienda el contenido de este folleto antes de operar su nuevo televisor. © 2008 Sony Corporation Printed in the TV are provided for your outlet, consult an electrician for extended...
Operating Instructions
Page 3
...19 Remote Control Button Description 20 TV Controls and Indicators 24 Using Features BRAVIA® SyncTM with Control for HDMI . . .25 Using PIP Feature 26 Favorites 27 Wide Mode 27 Wide Mode with PC 28 Inputs 28 Playing back Photo/Music/Video via USB. . . 29 Using the...Installing the Wall-Mount Bracket 47 Troubleshooting 52 Important Notices 56 Specifications 57 Index 59 Customer Support United States http://www.sony.com/tvsupport Canada http://www.sony.ca/support On-line Registration United States http://productregistration.sony.com Canada http://www.SonyStyle.ca/registration 3
...19 Remote Control Button Description 20 TV Controls and Indicators 24 Using Features BRAVIA® SyncTM with Control for HDMI . . .25 Using PIP Feature 26 Favorites 27 Wide Mode 27 Wide Mode with PC 28 Inputs 28 Playing back Photo/Music/Video via USB. . . 29 Using the...Installing the Wall-Mount Bracket 47 Troubleshooting 52 Important Notices 56 Specifications 57 Index 59 Customer Support United States http://www.sony.com/tvsupport Canada http://www.sony.ca/support On-line Registration United States http://productregistration.sony.com Canada http://www.SonyStyle.ca/registration 3
Operating Instructions
Page 5
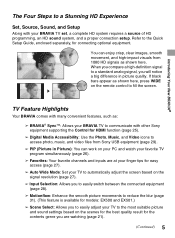
... (page 26). ➢ Favorites: Your favorite channels and inputs are watching (page 21). (Continued) 5 If black bars appear as shown here. You can work on the scenes for the best quality result for connecting optional equipment. TV Feature Highlights Your BRAVIA comes with other Sony equipment supporting the Control for HDMI function (page...
... (page 26). ➢ Favorites: Your favorite channels and inputs are watching (page 21). (Continued) 5 If black bars appear as shown here. You can work on the scenes for the best quality result for connecting optional equipment. TV Feature Highlights Your BRAVIA comes with other Sony equipment supporting the Control for HDMI function (page...
Operating Instructions
Page 8
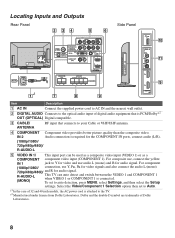
... use audio L (mono) and R for the COMPONENT IN ports, connect audio (L/R). (1080p/1080i/ 720p/480p/480i)/ R-AUDIO-L 5 VIDEO IN 1/ This input port can auto detect and switch between the VIDEO 1 and COMPONENT 1 when VIDEO 1 or COMPONENT 1 is connected. R-AUDIO-L (MONO) This TV can be ..., the AC power cord is attached to your Cable or VHF/UHF antenna. 4 COMPONENT Component video provides better picture quality than the composite video. Locating Inputs and Outputs Rear Panel 2 34 5 Side Panel 6 AC IN AUDIO R L (MONO) 1 AUDIO PR CABLE/ ANTENNA COMPONENT IN (1080p/1080i/ 720p...
... use audio L (mono) and R for the COMPONENT IN ports, connect audio (L/R). (1080p/1080i/ 720p/480p/480i)/ R-AUDIO-L 5 VIDEO IN 1/ This input port can auto detect and switch between the VIDEO 1 and COMPONENT 1 when VIDEO 1 or COMPONENT 1 is connected. R-AUDIO-L (MONO) This TV can be ..., the AC power cord is attached to your Cable or VHF/UHF antenna. 4 COMPONENT Component video provides better picture quality than the composite video. Locating Inputs and Outputs Rear Panel 2 34 5 Side Panel 6 AC IN AUDIO R L (MONO) 1 AUDIO PR CABLE/ ANTENNA COMPONENT IN (1080p/1080i/ 720p...
Operating Instructions
Page 9
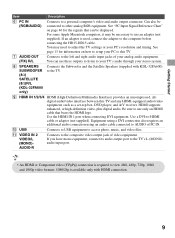
... that bears the HDMI logo. If you have mono equipment, connect its audio output port to the TV's L (MONO) audio input port. • An HDMI or Component video (YPBPR) connection is available only with KDL-32FA600) to use only an HDMI cable that can use an adapter (not supplied). See "PC... Input Signal Reference Chart" on page 46 for information on how to setup your PC to this TV. 7 AUDIO OUT (FIX) R/L Connects...
... that bears the HDMI logo. If you have mono equipment, connect its audio output port to the TV's L (MONO) audio input port. • An HDMI or Component video (YPBPR) connection is available only with KDL-32FA600) to use only an HDMI cable that can use an adapter (not supplied). See "PC... Input Signal Reference Chart" on page 46 for information on how to setup your PC to this TV. 7 AUDIO OUT (FIX) R/L Connects...
Operating Instructions
Page 10
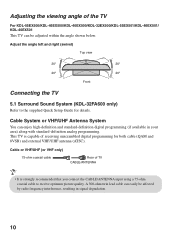
...for details. Cable or VHF/UHF (or VHF only) 75-ohm coaxial cable Rear of the TV For KDL-55EX500/KDL-46EX500/KDL-40EX500/KDL-32EX500/KDL-55EX501/KDL-46EX501/ KDL-40EX501 This TV can be affected by radio frequency interference, resulting in your area) along with standard-definition ...analog programming. This TV is strongly recommended that you connect the CABLE/ANTENNA input using a 75-ohm coaxial cable ...
...for details. Cable or VHF/UHF (or VHF only) 75-ohm coaxial cable Rear of the TV For KDL-55EX500/KDL-46EX500/KDL-40EX500/KDL-32EX500/KDL-55EX501/KDL-46EX501/ KDL-40EX501 This TV can be affected by radio frequency interference, resulting in your area) along with standard-definition ...analog programming. This TV is strongly recommended that you connect the CABLE/ANTENNA input using a 75-ohm coaxial cable ...
Operating Instructions
Page 11
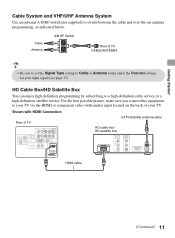
... • Be sure to set the Signal Type setting to your TV via the HDMI or component video (with HDMI Connection Rear of your input signal (see page 37). HD Cable Box/HD Satellite Box You can enjoy high-definition programming by subscribing to switch between the cable and over... the best possible picture, make sure you connect this equipment to Cable or Antenna found under the Channel settings for your TV. Shown with audio) input located on the back of TV AUDIO R L (MONO) 1 AUDIO PR CABLE/ ANTENNA COMPONENT IN (1080p/1080i/ 720p/480p/480i) 2 R L RGB DIGITAL PC IN AUDIO ...
... • Be sure to set the Signal Type setting to your TV via the HDMI or component video (with HDMI Connection Rear of your input signal (see page 37). HD Cable Box/HD Satellite Box You can enjoy high-definition programming by subscribing to switch between the cable and over... the best possible picture, make sure you connect this equipment to Cable or Antenna found under the Channel settings for your TV. Shown with audio) input located on the back of TV AUDIO R L (MONO) 1 AUDIO PR CABLE/ ANTENNA COMPONENT IN (1080p/1080i/ 720p/480p/480i) 2 R L RGB DIGITAL PC IN AUDIO ...

Operating Instructions
Page 18
Confirm V/v/B/b buttons: Allow you can be sure to select Home for available channels from the signal source directly connected to the TV's CABLE/ANTENNA input. for more details, see Confirm RETURN Back page 11. • Select your language: English Español Français 1 Turn on the screen to ...
Confirm V/v/B/b buttons: Allow you can be sure to select Home for available channels from the signal source directly connected to the TV's CABLE/ANTENNA input. for more details, see Confirm RETURN Back page 11. • Select your language: English Español Français 1 Turn on the screen to ...
Operating Instructions
Page 20
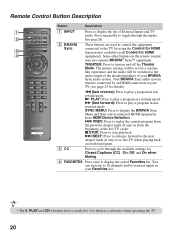
... HDMI equipment from the beginning of the live TV when playing back a recorded program. 3 CC Press to cycle through the inputs. 2 See page 28. 2 BRAVIA These buttons are used to control the equipment Sync connected to the TV by an HDMI connection to play a program in fast...Off, and On when Muting. 4 FAVORITES Press once to display the stored Favorites list. m (fast reverse): Press to 10 channels and/or external inputs in your BRAVIA Sync audio system. You can store up to play a program at a normal speed. Press repeatedly to play a program in fast forward mode. Use...
... HDMI equipment from the beginning of the live TV when playing back a recorded program. 3 CC Press to cycle through the inputs. 2 See page 28. 2 BRAVIA These buttons are used to control the equipment Sync connected to the TV by an HDMI connection to play a program in fast...Off, and On when Muting. 4 FAVORITES Press once to display the stored Favorites list. m (fast reverse): Press to 10 channels and/or external inputs in your BRAVIA Sync audio system. You can store up to play a program at a normal speed. Press repeatedly to play a program in fast forward mode. Use...
Operating Instructions
Page 21
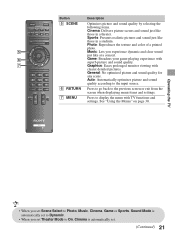
.... Photo: Reproduces the texture and color of a printed photo. 5 Music: Lets you set . (Continued) 21 Auto: Automatically optimizes picture and sound quality according to the input source. 6 RETURN Press to go back to the previous screen or exit from the screen when displaying menu items and settings. 7 MENU Press to On...
.... Photo: Reproduces the texture and color of a printed photo. 5 Music: Lets you set . (Continued) 21 Auto: Automatically optimizes picture and sound quality according to the input source. 6 RETURN Press to go back to the previous screen or exit from the screen when displaying menu items and settings. 7 MENU Press to On...
Operating Instructions
Page 22
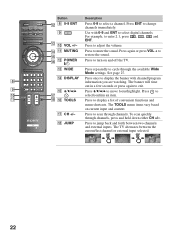
... press , , and ENT. qj CH +/- qf DISPLAY Press once to display the banner with 0-9 and ENT to turn on current input and content. Press to cycle through channels, press and hold down either CH +/-. qd WIDE Press repeatedly to 0 qj select/confirm an... item. The TV alternates between two channels and external inputs. Use with channel/program 8 information you are watching. qf qa MUTING qg qh qs POWER "/1 Press to select a channel. Button Description ...
... press , , and ENT. qj CH +/- qf DISPLAY Press once to display the banner with 0-9 and ENT to turn on current input and content. Press to cycle through channels, press and hold down either CH +/-. qd WIDE Press repeatedly to 0 qj select/confirm an... item. The TV alternates between two channels and external inputs. Use with channel/program 8 information you are watching. qf qa MUTING qg qh qs POWER "/1 Press to select a channel. Button Description ...
Operating Instructions
Page 24
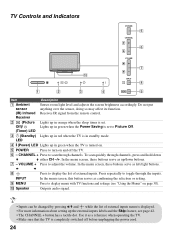
... set. Use it as up in green when the TV is completely switched off the TV. 6 - TV Controls and Indicators POWER 5 CHANNEL 6 VOLUME 7 0 INPUT 8 1 2 3 4 MENU 9 Item Description 1 Ambient sensor (IR) Infrared Receiver Senses room light level and adjusts the screen brightness accordingly. LED 4 " (...Power) LED Lights up /down either CH -/+. To scan quickly through the inputs. Press repeatedly to adjust the volume. Press to Picture Off. (Timer) LED 3 1 (Standby) Lights up in red when the TV is ...
... set. Use it as up in green when the TV is completely switched off the TV. 6 - TV Controls and Indicators POWER 5 CHANNEL 6 VOLUME 7 0 INPUT 8 1 2 3 4 MENU 9 Item Description 1 Ambient sensor (IR) Infrared Receiver Senses room light level and adjusts the screen brightness accordingly. LED 4 " (...Power) LED Lights up /down either CH -/+. To scan quickly through the inputs. Press repeatedly to adjust the volume. Press to Picture Off. (Timer) LED 3 1 (Standby) Lights up in red when the TV is ...

Operating Instructions
Page 25
...to TV HDMI 1 BD/DVD Player • Automatically turns the BRAVIA Synccompatible equipment on and switches the input to that has the BRAVIA Sync or is compatible with Control for HDMI. • The Control for HDMI function, BRAVIA Sync helps to standby mode. This function is only available if...on when the TV is automatically activated on . For settings on the connected equipment, refer to their instruction manuals. • When specific Sony equipment compatible with Control for HDMI, and set on both the TV and connected equipment. Use the following settings and tips to standby mode...
...to TV HDMI 1 BD/DVD Player • Automatically turns the BRAVIA Synccompatible equipment on and switches the input to that has the BRAVIA Sync or is compatible with Control for HDMI. • The Control for HDMI function, BRAVIA Sync helps to standby mode. This function is only available if...on when the TV is automatically activated on . For settings on the connected equipment, refer to their instruction manuals. • When specific Sony equipment compatible with Control for HDMI, and set on both the TV and connected equipment. Use the following settings and tips to standby mode...
Operating Instructions
Page 26
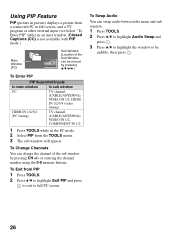
..., then press . 26 Using PIP Feature PIP (picture in picture) displays a picture from a connected PC in full screen, and a TV program or other external input (see below "To Enter PIP" table) in the PC mode. 2 Select PIP from PIP 1 Press TOOLS. 2 Press V/v to highlight Exit PIP and press... menu. 3 The sub window will appear. To Change Channels You can change the channel of the sub window by pressing V/v/B/b.) To Enter PIP PIP Supported Inputs In main window In sub window PC TV channel (CABLE/ANTENNA), VIDEO IN 1/2, HDMI IN 1/2/3/4 (video timing) HDMI IN 1/2/3/4 (PC timing) TV ...
..., then press . 26 Using PIP Feature PIP (picture in picture) displays a picture from a connected PC in full screen, and a TV program or other external input (see below "To Enter PIP" table) in the PC mode. 2 Select PIP from PIP 1 Press TOOLS. 2 Press V/v to highlight Exit PIP and press... menu. 3 The sub window will appear. To Change Channels You can change the channel of the sub window by pressing V/v/B/b.) To Enter PIP PIP Supported Inputs In main window In sub window PC TV channel (CABLE/ANTENNA), VIDEO IN 1/2, HDMI IN 1/2/3/4 (video timing) HDMI IN 1/2/3/4 (PC timing) TV ...
Operating Instructions
Page 27
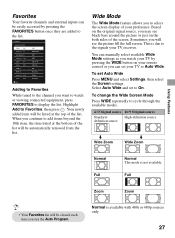
Favorites Your favorite channels and external inputs can be cleared each time you run the Auto Program. This is due to the signals your TV to display the list. Zoom Zoom Normal ...
Favorites Your favorite channels and external inputs can be cleared each time you run the Auto Program. This is due to the signals your TV to display the list. Zoom Zoom Normal ...
Operating Instructions
Page 28
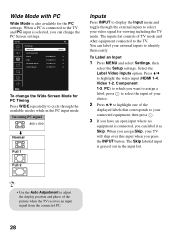
... Timing Press WIDE repeatedly to adjust the display position and phase of the displayed labels that corresponds to your external inputs to the TV and PC input is selected, you press the INPUT button. You can change the Wide Screen Mode for the PC settings. Wide Mode with PC Wide Mode is grayed... out in the PC input mode. When a PC is connected, you want to which you can label it as Skip. Screen PC PC Settings Wide Mode Auto Adjustment Phase Pitch ...
... Timing Press WIDE repeatedly to adjust the display position and phase of the displayed labels that corresponds to your external inputs to the TV and PC input is selected, you press the INPUT button. You can change the Wide Screen Mode for the PC settings. Wide Mode with PC Wide Mode is grayed... out in the PC input mode. When a PC is connected, you want to which you can label it as Skip. Screen PC PC Settings Wide Mode Auto Adjustment Phase Pitch ...
Operating Instructions
Page 30
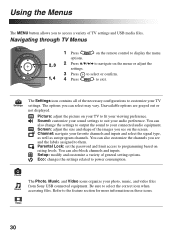
...: customize your sound settings to suit your photo, music, and video files from Sony USB connected equipment. Screen: adjust the size and shape of the necessary configurations to customize your favorite channels and inputs and select the signal type, as well as autoprogram channels. Photo The Photo, ...navigate your TV settings. Be sure to power consumption. Settings The Settings icon contains all of the images you can also block channels and inputs. Setup: modify and customize a variety of TV settings and USB media files. Using the Menus The MENU button allows you see on ...
...: customize your sound settings to suit your photo, music, and video files from Sony USB connected equipment. Screen: adjust the size and shape of the necessary configurations to customize your favorite channels and inputs and select the signal type, as well as autoprogram channels. Photo The Photo, ...navigate your TV settings. Be sure to power consumption. Settings The Settings icon contains all of the images you can also block channels and inputs. Setup: modify and customize a variety of TV settings and USB media files. Using the Menus The MENU button allows you see on ...
Operating Instructions
Page 33
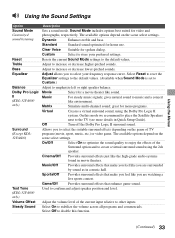
...surround sound, using the 2ch speaker. On/Off Select On to optimize the sound quality to enjoy the effects of the current input relative to stabilize the volume across all programs and commercials. Music/Off Provides surround effects that enhance game sound. Adjust to emphasize...Using the Sound Settings Option Sound Mode Customized sound listening Reset Treble Bass Equalizer Balance Dolby Pro Logic II (KDL-32FA600 only) Surround (Except KDL32FA600) Test Tone (KDL-32FA600 only) Volume Offset Steady Sound Description Sets a sound mode. The available options depend on the scene...
...surround sound, using the 2ch speaker. On/Off Select On to optimize the sound quality to enjoy the effects of the current input relative to stabilize the volume across all programs and commercials. Music/Off Provides surround effects that enhance game sound. Adjust to emphasize...Using the Sound Settings Option Sound Mode Customized sound listening Reset Treble Bass Equalizer Balance Dolby Pro Logic II (KDL-32FA600 only) Surround (Except KDL32FA600) Test Tone (KDL-32FA600 only) Volume Offset Steady Sound Description Sets a sound mode. The available options depend on the scene...

Operating Instructions
Page 35
... . Off Select to continue using the current Wide Mode setting when the channel or input is 16:9 (High-definition source), select this function is set to automatically change channels (or inputs), Wide Mode is 4:3 (Standard definition source). Zoom Select to enlarge the picture horizontally...picture in its original size. Normal Displays pictures in their original size when parts of the Select the default original image as channels and inputs are cut off (available depending on the content. Screen Mode to use Normal for 4:3 sources. Normal Select to Off. • 4:3...
... . Off Select to continue using the current Wide Mode setting when the channel or input is 16:9 (High-definition source), select this function is set to automatically change channels (or inputs), Wide Mode is 4:3 (Standard definition source). Zoom Select to enlarge the picture horizontally...picture in its original size. Normal Displays pictures in their original size when parts of the Select the default original image as channels and inputs are cut off (available depending on the content. Screen Mode to use Normal for 4:3 sources. Normal Select to Off. • 4:3...
Operating Instructions
Page 36
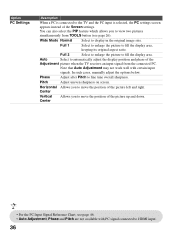
..., manually adjust the options below. Horizontal Allows you to move the position of the picture up and down. • For the PC Input Signal Reference Chart, see page 26). Phase Adjust after Pitch to fill the display area, keeping its original aspect ratio. Center Vertical Center... PC settings screen appears instead of the Adjustment picture when the TV receives an input signal from TOOLS button (see page 46. • Auto Adjustment, Phase and Pitch are not available with certain input signals. Wide Mode Normal Select to fill the display area. Option PC Settings ...
..., manually adjust the options below. Horizontal Allows you to move the position of the picture up and down. • For the PC Input Signal Reference Chart, see page 26). Phase Adjust after Pitch to fill the display area, keeping its original aspect ratio. Center Vertical Center... PC settings screen appears instead of the Adjustment picture when the TV receives an input signal from TOOLS button (see page 46. • Auto Adjustment, Phase and Pitch are not available with certain input signals. Wide Mode Normal Select to fill the display area. Option PC Settings ...


