
Child Safety: It Makes A Difference How and Where You Use Your Flat Panel Display
Page 1
... a program, especially on a "larger than life" flat panel display. As you enjoy your flat panel display. • Carefully read and understand all cords and cables connected to place or install the display where it cannot be pushed, pulled over and cause injury. Care should be taken to the flat panel display...
... a program, especially on a "larger than life" flat panel display. As you enjoy your flat panel display. • Carefully read and understand all cords and cables connected to place or install the display where it cannot be pushed, pulled over and cause injury. Care should be taken to the flat panel display...
End User License Agreement
Page 1
... LOSS OF USE, DATA OR PROFITS, WHETHER IN AN ACTION OF CONTRACT, NEGLIGENCE OR OTHER TORTIOUS ACTION, ARISING OUT OF OR IN CONNECTION WITH THE USE OR PERFORMANCE OF THIS SOFTWARE. ADDITIONAL INFORMATION MAY BE OBTAINED FROM MPEG LA, L.L.C. ADDITIONAL INFORMATION MAY BE OBTAINED FROM ...Some other program whose permissions for a charge no charge to all copies of security features. READ THIS AGREEMENT BEFORE USING YOUR SONY TELEVISION. The Sony Software includes software in exchange for example, but changing it with the information you received the program in object code or executable...
... LOSS OF USE, DATA OR PROFITS, WHETHER IN AN ACTION OF CONTRACT, NEGLIGENCE OR OTHER TORTIOUS ACTION, ARISING OUT OF OR IN CONNECTION WITH THE USE OR PERFORMANCE OF THIS SOFTWARE. ADDITIONAL INFORMATION MAY BE OBTAINED FROM MPEG LA, L.L.C. ADDITIONAL INFORMATION MAY BE OBTAINED FROM ...Some other program whose permissions for a charge no charge to all copies of security features. READ THIS AGREEMENT BEFORE USING YOUR SONY TELEVISION. The Sony Software includes software in exchange for example, but changing it with the information you received the program in object code or executable...
Operating Instructions
Page 3
...Getting Started Setting Up Your TV 7 Attaching the Table-Top Stand 8 Locating Inputs and Outputs 10 Connecting the TV 12 Connecting Other Equipment 16 When Installing the TV Against a Wall or Enclosed Area 17 Securing the TV 18... 28 Favorites 29 Wide Mode 29 Wide Mode with PC 30 Inputs 31 Playing back Photo/Music (KDL-46/40BX450 only)/ Video via USB 31 Using the Menus Navigating through TV Menus 33 Using the Picture... Index 65 Customer Support United States http://www.sony.com/tvsupport Canada http://www.sony.ca/support On-line Registration United States http://productregistration...
...Getting Started Setting Up Your TV 7 Attaching the Table-Top Stand 8 Locating Inputs and Outputs 10 Connecting the TV 12 Connecting Other Equipment 16 When Installing the TV Against a Wall or Enclosed Area 17 Securing the TV 18... 28 Favorites 29 Wide Mode 29 Wide Mode with PC 30 Inputs 31 Playing back Photo/Music (KDL-46/40BX450 only)/ Video via USB 31 Using the Menus Navigating through TV Menus 33 Using the Picture... Index 65 Customer Support United States http://www.sony.com/tvsupport Canada http://www.sony.ca/support On-line Registration United States http://productregistration...
Operating Instructions
Page 4
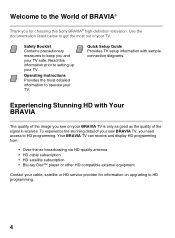
Read this Sony BRAVIA® high-definition television. Your BRAVIA TV can receive and display HD programming from: • Over-the-air broadcasting via HD-quality antenna • ... most detailed information to operate your TV. Operating Instructions Provides the most out of your TV. Quick Setup Guide Provides TV setup information with sample connection diagrams. Experiencing Stunning HD with Your BRAVIA The quality of the image you see on upgrading to HD programming. 4 ® Introducing Your New BRAVIA Welcome...
Read this Sony BRAVIA® high-definition television. Your BRAVIA TV can receive and display HD programming from: • Over-the-air broadcasting via HD-quality antenna • ... most detailed information to operate your TV. Operating Instructions Provides the most out of your TV. Quick Setup Guide Provides TV setup information with sample connection diagrams. Experiencing Stunning HD with Your BRAVIA The quality of the image you see on upgrading to HD programming. 4 ® Introducing Your New BRAVIA Welcome...
Operating Instructions
Page 5
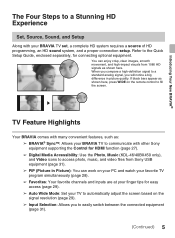
... Your New BRAVIA® The Four Steps to a Stunning HD Experience Set, Source, Sound, and Setup Along with other Sony equipment supporting the Control for connecting optional equipment. When you compare a high-definition signal to the Quick Setup Guide, enclosed separately, for HDMI function (page ...27). ➢ Digital Media Accessibility: Use the Photo, Music (KDL-46/40BX450 only), and Video icons to access photo, ...
... Your New BRAVIA® The Four Steps to a Stunning HD Experience Set, Source, Sound, and Setup Along with other Sony equipment supporting the Control for connecting optional equipment. When you compare a high-definition signal to the Quick Setup Guide, enclosed separately, for HDMI function (page ...27). ➢ Digital Media Accessibility: Use the Photo, Music (KDL-46/40BX450 only), and Video icons to access photo, ...
Operating Instructions
Page 10
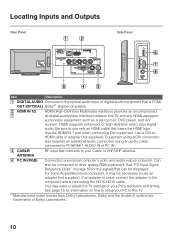
...are trademarks of digital audio equipment that bears the HDMI logo. Use the HDMI IN 1 port when connecting DVI equipment. You may be displayed. For some Apple Macintosh computers, it may need to this ... adjust the TV settings or your Cable or VHF/UHF antenna. 4 PC IN (RGB) Connects to other analog RGB equipment. Use a DVI-toHDMI cable or adapter (not supplied). Be sure to... use only an HDMI cable that is used, connect the adapter to the optical audio input of Dolby Laboratories. 10 If an adapter is PCM/ OUT (OPTICAL...
...are trademarks of digital audio equipment that bears the HDMI logo. Use the HDMI IN 1 port when connecting DVI equipment. You may be displayed. For some Apple Macintosh computers, it may need to this ... adjust the TV settings or your Cable or VHF/UHF antenna. 4 PC IN (RGB) Connects to other analog RGB equipment. Use a DVI-toHDMI cable or adapter (not supplied). Be sure to... use only an HDMI cable that is used, connect the adapter to the optical audio input of Dolby Laboratories. 10 If an adapter is PCM/ OUT (OPTICAL...
Operating Instructions
Page 11
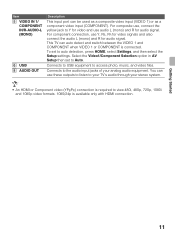
... the audio input jacks of your stereo system. • An HDMI or Component video (YPBPR) connection is required to Y for video and use Y, PB, PR for video signals and also connect the audio L (mono) and R for audio signal. You can use these outputs to listen to Auto.... This TV can be used as a composite video input (VIDEO 1) or as a component video input (COMPONENT). For component connection, use audio L (mono) and R for audio signal. Connects to USB equipment to auto detection, press HOME, select Settings, and then select the Setup settings. Item 5 VIDEO IN 1/ COMPONENT...
... the audio input jacks of your stereo system. • An HDMI or Component video (YPBPR) connection is required to Y for video and use Y, PB, PR for video signals and also connect the audio L (mono) and R for audio signal. You can use these outputs to listen to Auto.... This TV can be used as a composite video input (VIDEO 1) or as a component video input (COMPONENT). For component connection, use audio L (mono) and R for audio signal. Connects to USB equipment to auto detection, press HOME, select Settings, and then select the Setup settings. Item 5 VIDEO IN 1/ COMPONENT...
Operating Instructions
Page 12
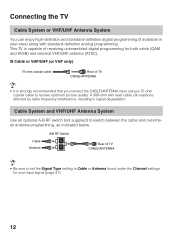
...not supplied) to Cable or Antenna found under the Channel settings for both cable (QAM and 8VSB) and external VHF/UHF antenna (ATSC). Connecting the TV Cable System or VHF/UHF Antenna System You can easily be affected by radio frequency interference, resulting in your input signal (page ...41). 12 This TV is strongly recommended that you connect the CABLE/ANTENNA input using a 75-ohm coaxial cable to receive optimum picture quality. Cable Antenna A/B RF Switch A B Rear of receiving ...
...not supplied) to Cable or Antenna found under the Channel settings for both cable (QAM and 8VSB) and external VHF/UHF antenna (ATSC). Connecting the TV Cable System or VHF/UHF Antenna System You can easily be affected by radio frequency interference, resulting in your input signal (page ...41). 12 This TV is strongly recommended that you connect the CABLE/ANTENNA input using a 75-ohm coaxial cable to receive optimum picture quality. Cable Antenna A/B RF Switch A B Rear of receiving ...

Operating Instructions
Page 13
Getting Started HD Cable Box/HD Satellite Box You can enjoy high-definition programming by subscribing to your TV. x Shown with HDMI Connection CATV/Satellite antenna cable Rear of TV HD cable box/ HD satellite box HDMI cable x Shown with audio) input located on the back of your ...TV via the HDMI or component video (with DVI Connection Rear of TV DVI-to-HDMI cable HD cable box/ HD satellite box CATV/Satellite antenna cable Audio cable (stereo mini plugs) (Continued) 13 For...
Getting Started HD Cable Box/HD Satellite Box You can enjoy high-definition programming by subscribing to your TV. x Shown with HDMI Connection CATV/Satellite antenna cable Rear of TV HD cable box/ HD satellite box HDMI cable x Shown with audio) input located on the back of your ...TV via the HDMI or component video (with DVI Connection Rear of TV DVI-to-HDMI cable HD cable box/ HD satellite box CATV/Satellite antenna cable Audio cable (stereo mini plugs) (Continued) 13 For...
Operating Instructions
Page 14
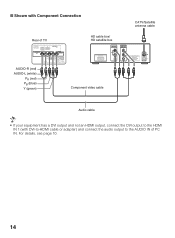
For details, see page 10. 14 x Shown with Component Connection Rear of TV HD cable box/ HD satellite box CATV/Satellite antenna cable AUDIO-R (red) AUDIO-L (white) PR (red) PB (blue) Y (green) Component video cable Audio cable • If your equipment has a DVI output and not an HDMI output, connect the DVI output to the HDMI IN 1 (with DVI-to-HDMI cable or adapter) and connect the audio output to the AUDIO IN of PC IN.
For details, see page 10. 14 x Shown with Component Connection Rear of TV HD cable box/ HD satellite box CATV/Satellite antenna cable AUDIO-R (red) AUDIO-L (white) PR (red) PB (blue) Y (green) Component video cable Audio cable • If your equipment has a DVI output and not an HDMI output, connect the DVI output to the HDMI IN 1 (with DVI-to-HDMI cable or adapter) and connect the audio output to the AUDIO IN of PC IN.
Operating Instructions
Page 15
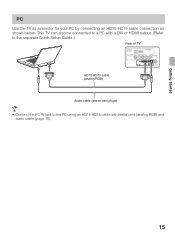
Getting Started PC Use the TV as a monitor for your PC by connecting an HD15-HD15 cable connection as shown below. This TV can also be connected to a PC with a DVI or HDMI output. (Refer to the separate Quick Setup Guide.) Rear of TV HD15-HD15 cable (analog RGB) Audio cable (stereo mini plugs) • Connect the PC IN jack to the PC using an HD15-HD15 cable with ferrite core (analog RGB) and audio cable (page 10). 15
Getting Started PC Use the TV as a monitor for your PC by connecting an HD15-HD15 cable connection as shown below. This TV can also be connected to a PC with a DVI or HDMI output. (Refer to the separate Quick Setup Guide.) Rear of TV HD15-HD15 cable (analog RGB) Audio cable (stereo mini plugs) • Connect the PC IN jack to the PC using an HD15-HD15 cable with ferrite core (analog RGB) and audio cable (page 10). 15
Operating Instructions
Page 16
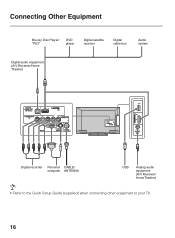
Connecting Other Equipment Blu-ray Disc Player/ "PS3" DVD player Digital satellite receiver Digital cable box Audio system Digital audio equipment (A/V Receiver/Home Theater) Digital recorder Personal CABLE/ computer ANTENNA USB Analog audio equipment (A/V Receiver/ HomeTheater) • Refer to the Quick Setup Guide (supplied) when connecting other equipment to your TV. 16
Connecting Other Equipment Blu-ray Disc Player/ "PS3" DVD player Digital satellite receiver Digital cable box Audio system Digital audio equipment (A/V Receiver/Home Theater) Digital recorder Personal CABLE/ computer ANTENNA USB Analog audio equipment (A/V Receiver/ HomeTheater) • Refer to the Quick Setup Guide (supplied) when connecting other equipment to your TV. 16

Operating Instructions
Page 18
Preventing the TV from toppling over . ❑ Route all AC power cords and connecting cables so that they are not accessible to curious children. Recommended Measures to Secure the TV Consider the following measures when securing your TV to ... bodily injury or even death. Use two angle braces (not supplied) to a TV stand (not supplied). 1 Secure the stand for the TV. Securing the TV Sony strongly recommends taking measures to prevent the TV from Toppling ❑ Secure the TV to a wall and/or stand. ❑ Do not allow children to...
Preventing the TV from toppling over . ❑ Route all AC power cords and connecting cables so that they are not accessible to curious children. Recommended Measures to Secure the TV Consider the following measures when securing your TV to ... bodily injury or even death. Use two angle braces (not supplied) to a TV stand (not supplied). 1 Secure the stand for the TV. Securing the TV Sony strongly recommends taking measures to prevent the TV from Toppling ❑ Secure the TV to a wall and/or stand. ❑ Do not allow children to...

Operating Instructions
Page 20
... your cable or antenna to the next screen. 3 Auto Program will appear. for digital and analog channels Complete your cable connections before beginning the Initial Setup. Refer to navigate and highlight options where applicable. Confirm 2 Use the remote control buttons described below to the TV's ...CABLE/ANTENNA input. Follow the help text provided on the TV. To rescan for available channels from the signal source directly connected to navigate through the Initial Setup. button: Allows you to select the highlighted option and advance to the TV (you can...
... your cable or antenna to the next screen. 3 Auto Program will appear. for digital and analog channels Complete your cable connections before beginning the Initial Setup. Refer to navigate and highlight options where applicable. Confirm 2 Use the remote control buttons described below to the TV's ...CABLE/ANTENNA input. Follow the help text provided on the TV. To rescan for available channels from the signal source directly connected to navigate through the Initial Setup. button: Allows you to select the highlighted option and advance to the TV (you can...

Operating Instructions
Page 22
... a normal speed. See page 31. 2 SYNC Press to display the BRAVIA Sync Menu and then 3 MENU select connected HDMI equipment from HDMI Device Selection. 3 Equipment These buttons are used to control the equipment Control connected to replay the current program from the previous chapter mark. m (fast reverse): Press to play a program in...
... a normal speed. See page 31. 2 SYNC Press to display the BRAVIA Sync Menu and then 3 MENU select connected HDMI equipment from HDMI Device Selection. 3 Equipment These buttons are used to control the equipment Control connected to replay the current program from the previous chapter mark. m (fast reverse): Press to play a program in...
Operating Instructions
Page 27
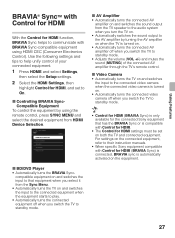
...instruction manuals. • When specific Sony equipment compatible with Control for HDMI function, BRAVIA Sync helps to standby mode. 27 Using Features Using Features BRAVIA® SyncTM with Control for HDMI With the Control for HDMI (BRAVIA Sync) is connected, BRAVIA sync is automatically activated on... switches the input to the connected equipment when the equipment starts to play. • Automatically turns the connected equipment off when you switch the TV to standby mode. • Control for HDMI (BRAVIA Sync) is only available for the connected Sony equipment that has the BRAVIA...
...instruction manuals. • When specific Sony equipment compatible with Control for HDMI function, BRAVIA Sync helps to standby mode. 27 Using Features Using Features BRAVIA® SyncTM with Control for HDMI With the Control for HDMI (BRAVIA Sync) is connected, BRAVIA sync is automatically activated on... switches the input to the connected equipment when the equipment starts to play. • Automatically turns the connected equipment off when you switch the TV to standby mode. • Control for HDMI (BRAVIA Sync) is only available for the connected Sony equipment that has the BRAVIA...
Operating Instructions
Page 28
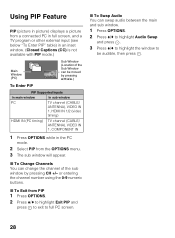
Using PIP Feature PIP (picture in picture) displays a picture from a connected PC in full screen, and a TV program or other external input (see below "To Enter PIP" table) in the PC mode. 2 Select PIP from PIP 1 ...
Using PIP Feature PIP (picture in picture) displays a picture from a connected PC in full screen, and a TV program or other external input (see below "To Enter PIP" table) in the PC mode. 2 Select PIP from PIP 1 ...

Operating Instructions
Page 29
...:9 Original source Standard- x To set your TV to display the list. Full (Continued) 29 Sometimes you will be cleared each time you watch or viewing connected equipment, press HOME and select Favorites to Auto Wide. Favorites Add to Favorites Cable 4.61 ABC Antenna 12 BBCNEWS Component DVD Antenna 24.6 BBO Cable...
...:9 Original source Standard- x To set your TV to display the list. Full (Continued) 29 Sometimes you will be cleared each time you watch or viewing connected equipment, press HOME and select Favorites to Auto Wide. Favorites Add to Favorites Cable 4.61 ABC Antenna 12 BBCNEWS Component DVD Antenna 24.6 BBO Cable...
Operating Instructions
Page 30
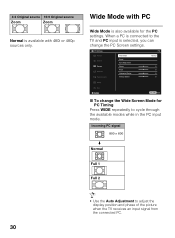
... mode. 4:3 Original source 16:9 Original source Zoom Zoom Normal is selected, you can change the Wide Screen Mode for the PC settings. When a PC is connected to the TV and PC input is available with PC Wide Mode is also available for PC Timing Press WIDE repeatedly to adjust the display...
... mode. 4:3 Original source 16:9 Original source Zoom Zoom Normal is selected, you can change the Wide Screen Mode for the PC settings. When a PC is connected to the TV and PC input is available with PC Wide Mode is also available for PC Timing Press WIDE repeatedly to adjust the display...
Operating Instructions
Page 31
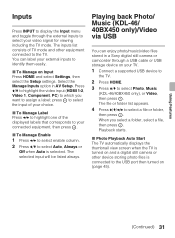
Select the Manage Inputs option in a Sony digital still camera or camcorder through the external inputs to select your connected equipment, then press . x To Manage Label Press B/b to highlight one of the displayed labels that corresponds to your video signal for viewing including... Press INPUT to display the Input menu and toggle through a USB cable or USB storage device on your TV. 1 Connect a supported USB device to the TV. 2 Press HOME. 3 Press V/v to select Photo, Music (KDL-46/40BX450 only), or Video, then press . When you want to assign a label; x To Manage Enable 1 ...
Select the Manage Inputs option in a Sony digital still camera or camcorder through the external inputs to select your connected equipment, then press . x To Manage Label Press B/b to highlight one of the displayed labels that corresponds to your video signal for viewing including... Press INPUT to display the Input menu and toggle through a USB cable or USB storage device on your TV. 1 Connect a supported USB device to the TV. 2 Press HOME. 3 Press V/v to select Photo, Music (KDL-46/40BX450 only), or Video, then press . When you want to assign a label; x To Manage Enable 1 ...

