
Operating Instructions
Page 5
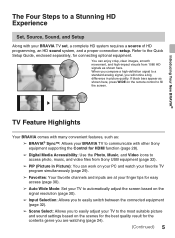
... you are at your finger tips for easy access (page 30). ➢ Auto Wide Mode: Set your TV to automatically adjust the screen based on your PC and watch your favorite TV program simultaneously (page 29). ➢ Favorites: Your favorite channels and inputs are watching (page 24...Quick Setup Guide, enclosed separately, for connecting optional equipment. Refer to a Stunning HD Experience Set, Source, Sound, and Setup Along with other Sony equipment supporting the Control for HDMI function (page 28). ➢ Digital Media Accessibility: Use the Photo, Music, and Video icons to access photo...
... you are at your finger tips for easy access (page 30). ➢ Auto Wide Mode: Set your TV to automatically adjust the screen based on your PC and watch your favorite TV program simultaneously (page 29). ➢ Favorites: Your favorite channels and inputs are watching (page 24...Quick Setup Guide, enclosed separately, for connecting optional equipment. Refer to a Stunning HD Experience Set, Source, Sound, and Setup Along with other Sony equipment supporting the Control for HDMI function (page 28). ➢ Digital Media Accessibility: Use the Photo, Music, and Video icons to access photo...
Operating Instructions
Page 25
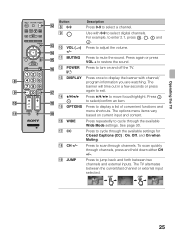
... shortcuts. qh qs POWER Press to move focus/highlight. qf V/v/B/b Press V/v/B/b to turn on current input and content. The options menu items vary qa ql based on and off the TV. Press to cycle through channels. Operating the TV Button qs 8 0-9 Description Press 0-9 to select a channel. 9 Use with channel/ 8 program information...
... shortcuts. qh qs POWER Press to move focus/highlight. qf V/v/B/b Press V/v/B/b to turn on current input and content. The options menu items vary qa ql based on and off the TV. Press to cycle through channels. Operating the TV Button qs 8 0-9 Description Press 0-9 to select a channel. 9 Use with channel/ 8 program information...
Operating Instructions
Page 30
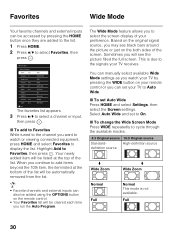
... input, then press . Highlight Add to Auto Wide. Select Auto Wide and set Auto Wide Press HOME and select Settings, then select the Screen settings. Based on the original signal source, you may see black bars around the picture or just on the both sides of the list will see the...
... input, then press . Highlight Add to Auto Wide. Select Auto Wide and set Auto Wide Press HOME and select Settings, then select the Screen settings. Based on the original signal source, you may see black bars around the picture or just on the both sides of the list will see the...

Operating Instructions
Page 37
Picture: adjust the picture on your TV to power consumption. Channel: navigate your sound settings to programming based on the screen. You can also change the settings to output the sound to your viewing preference. Eco: changes the settings related to fit your ...
Picture: adjust the picture on your TV to power consumption. Channel: navigate your sound settings to programming based on the screen. You can also change the settings to output the sound to your viewing preference. Eco: changes the settings related to fit your ...
Operating Instructions
Page 38
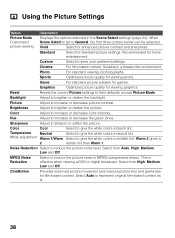
...Mode. This is set to give the white colors a bluish tint. Recommended for standard picture settings. Sports Optimizes picture quality for film-based content. Reset Resets the current Picture settings to give the white colors a reddish tint. Hue Adjust to sharpen or soften the picture.... Sharpness Adjust to increase or decrease the green tones. Select from Auto, High, Medium, Low and Off. Cinema For film-based content. Backlight Adjust to reduce the picture noise in MPEG-compressed videos. MPEG Noise Reduction Select to brighten or darken the backlight....
...Mode. This is set to give the white colors a bluish tint. Recommended for standard picture settings. Sports Optimizes picture quality for film-based content. Reset Resets the current Picture settings to give the white colors a reddish tint. Hue Adjust to sharpen or soften the picture.... Sharpness Adjust to increase or decrease the green tones. Select from Auto, High, Medium, Low and Off. Cinema For film-based content. Backlight Adjust to reduce the picture noise in MPEG-compressed videos. MPEG Noise Reduction Select to brighten or darken the backlight....
Operating Instructions
Page 41
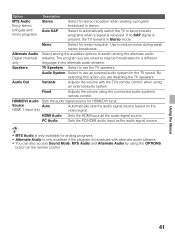
... Audio is only available if the program is present, the TV remains in stereo. Source Auto HDMI 1 input only Automatically sets the audio signal source based on the remote control. Fixed Adjusts the volume using an external audio system. HDMI/DVI Audio Sets the audio signal source for mono reception. By...
... Audio is only available if the program is present, the TV remains in stereo. Source Auto HDMI 1 input only Automatically sets the audio signal source based on the remote control. Fixed Adjusts the volume using an external audio system. HDMI/DVI Audio Sets the audio signal source for mono reception. By...
Operating Instructions
Page 42
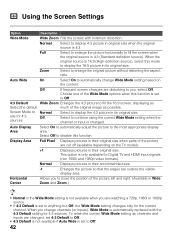
.... 4:3 Default Wide Zoom Enlarges the 4:3 picture to display the 16:9 picture in the Wide Mode setting is not available when you change Wide Mode setting based on the TV model). +1 Displays pictures in original size when the original source is 16:9 (High-definition source), select this function. To retain the current...
.... 4:3 Default Wide Zoom Enlarges the 4:3 picture to display the 16:9 picture in the Wide Mode setting is not available when you change Wide Mode setting based on the TV model). +1 Displays pictures in original size when the original source is 16:9 (High-definition source), select this function. To retain the current...
Operating Instructions
Page 45
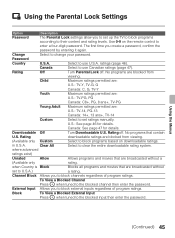
... and movies that are blocked from viewing. (Available only Custom Select to block channels regardless of program ratings. External Input Allows you to block programs based on the remote control to use Canadian ratings (page 47). Password Country U.S.A. Select to enter a four-digit password. No programs are broadcasted without a (Available only...
... and movies that are blocked from viewing. (Available only Custom Select to block channels regardless of program ratings. External Input Allows you to block programs based on the remote control to use Canadian ratings (page 47). Password Country U.S.A. Select to enter a four-digit password. No programs are broadcasted without a (Available only...

Operating Instructions
Page 46
... U.S.A. D Suggestive dialog. TV-14 Parents strongly cautioned. V Violence. • To ensure maximum blocking capability, set the Age-Based Ratings. 46 Age-Based Ratings TV-Y All children. S Sexual situations. US Models: Selecting Custom Parental Lock Rating Options To select custom rating options for... Option Movie Rating TV Rating Block programs by their rating, content or both Description G All children and general audience. Content-Based Ratings FV Fantasy violence. If you block unrated TV programs, be aware that the following types of programs may be blocked...
... U.S.A. D Suggestive dialog. TV-14 Parents strongly cautioned. V Violence. • To ensure maximum blocking capability, set the Age-Based Ratings. 46 Age-Based Ratings TV-Y All children. S Sexual situations. US Models: Selecting Custom Parental Lock Rating Options To select custom rating options for... Option Movie Rating TV Rating Block programs by their rating, content or both Description G All children and general audience. Content-Based Ratings FV Fantasy violence. If you block unrated TV programs, be aware that the following types of programs may be blocked...
Operating Instructions
Page 57
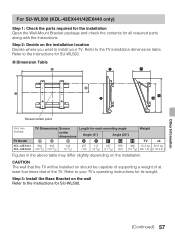
... for SU-WL500. (Continued) 57 Step 3: Install the Base Bracket on the wall Refer to the Instructions for each mounting angle Weight center dimensions Angle (0°) Angle (20°) AB C D EFGH TV ×4 KDL-42EX441 983 603 KDL-42EX440 (38 3/4) (23 3/4) 143 (5 3/4) 457 111 287...) (18 3/8) (29.1 lb.) (116.3 lb.) Figures in the above table may differ slightly depending on the installation. For SU-WL500 (KDL-42EX441/42EX440 only) Step 1: Check the parts required for the installation Open the Wall-Mount Bracket package and check the contents for SU-WL500. Refer to your...
... for SU-WL500. (Continued) 57 Step 3: Install the Base Bracket on the wall Refer to the Instructions for each mounting angle Weight center dimensions Angle (0°) Angle (20°) AB C D EFGH TV ×4 KDL-42EX441 983 603 KDL-42EX440 (38 3/4) (23 3/4) 143 (5 3/4) 457 111 287...) (18 3/8) (29.1 lb.) (116.3 lb.) Figures in the above table may differ slightly depending on the installation. For SU-WL500 (KDL-42EX441/42EX440 only) Step 1: Check the parts required for the installation Open the Wall-Mount Bracket package and check the contents for SU-WL500. Refer to your...
Operating Instructions
Page 60
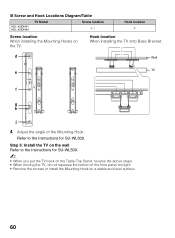
x Screw and Hook Locations Diagram/Table KDL-42EX441 KDL-42EX440 TV Model Screw location e, j Hook location b Screw location When installing the Mounting Hooks on a stable and level surface. 60 Step 5: Install the TV on the ... of the front panel too tight. • Remove the screws or install the Mounting Hook on the TV. Hook location When installing the TV onto Base Bracket.
x Screw and Hook Locations Diagram/Table KDL-42EX441 KDL-42EX440 TV Model Screw location e, j Hook location b Screw location When installing the Mounting Hooks on a stable and level surface. 60 Step 5: Install the TV on the ... of the front panel too tight. • Remove the screws or install the Mounting Hook on the TV. Hook location When installing the TV onto Base Bracket.
Operating Instructions
Page 61
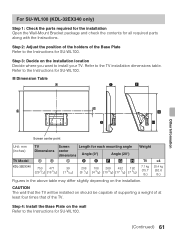
.... Step 2: Adjust the position of the holders of at least four times that the TV will be capable of supporting a weight of the Base Plate Refer to the Instructions for SU-WL100. (Continued) 61 Step 3: Decide on should be installed on the installation location Decide where you ...for SU-WL100. x Dimension Table Other Information Screen center point Unit: mm (inches) TV Model KDL-32EX340 TV Screen Length for all required parts along with the Instructions. For SU-WL100 (KDL-32EX340 only) Step 1: Check the parts required for the installation Open the Wall-Mount Bracket package ...
.... Step 2: Adjust the position of the holders of at least four times that the TV will be capable of supporting a weight of the Base Plate Refer to the Instructions for SU-WL100. (Continued) 61 Step 3: Decide on should be installed on the installation location Decide where you ...for SU-WL100. x Dimension Table Other Information Screen center point Unit: mm (inches) TV Model KDL-32EX340 TV Screen Length for all required parts along with the Instructions. For SU-WL100 (KDL-32EX340 only) Step 1: Check the parts required for the installation Open the Wall-Mount Bracket package ...
Operating Instructions
Page 63
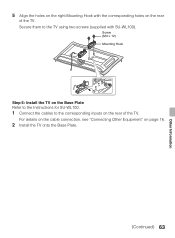
Other Information 5 Align the holes on the right Mounting Hook with SU-WL100). Secure them to the corresponding inputs on page 16. 2 Install the TV onto the Base Plate. (Continued) 63 For details on the cable connection, see "Connecting Other Equipment" on the rear of the TV. Screw (M4 × 12) Mounting Hook Step 6: Install the TV on the Base Plate Refer to the Instructions for SU-WL100. 1 Connect the cables to the TV using two screws (supplied with the corresponding holes on the rear of the TV.
Other Information 5 Align the holes on the right Mounting Hook with SU-WL100). Secure them to the corresponding inputs on page 16. 2 Install the TV onto the Base Plate. (Continued) 63 For details on the cable connection, see "Connecting Other Equipment" on the rear of the TV. Screw (M4 × 12) Mounting Hook Step 6: Install the TV on the Base Plate Refer to the Instructions for SU-WL100. 1 Connect the cables to the TV using two screws (supplied with the corresponding holes on the rear of the TV.
Operating Instructions
Page 64
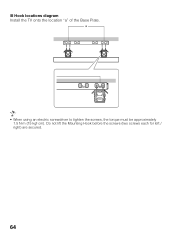
Do not lift the Mounting Hook before the screws (two screws each for left / right) are secured. 64 x Hook locations diagram Install the TV onto the location "a" of the Base Plate. • When using an electric screwdriver to tighten the screws, the torque must be approximately 1.5 N·m {15 kgf·cm}.
Do not lift the Mounting Hook before the screws (two screws each for left / right) are secured. 64 x Hook locations diagram Install the TV onto the location "a" of the Base Plate. • When using an electric screwdriver to tighten the screws, the torque must be approximately 1.5 N·m {15 kgf·cm}.
Operating Instructions
Page 69
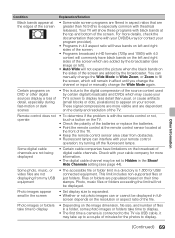
... the screen are added by certain digital broadcasts and DVDs which are added by the broadcaster (see page 44). For more visible and are populated based on their time stamps. Photo, music files or folders exceeding the limit will commonly have black bands on the left and right sides of the...
... the screen are added by certain digital broadcasts and DVDs which are added by the broadcaster (see page 44). For more visible and are populated based on their time stamps. Photo, music files or folders exceeding the limit will commonly have black bands on the left and right sides of the...


