
Child Safety: It Makes A Difference Where Your TV Stands
Page 1
... cause unnecessary injury. The home theater entertainment experience is committed to climb on or play with furniture and television sets. 5 Avoid placing any items on top of TVs such as VCRs and remotes that may pique the children's curiosity. 6 Remember that children can become excited ...
... cause unnecessary injury. The home theater entertainment experience is committed to climb on or play with furniture and television sets. 5 Avoid placing any items on top of TVs such as VCRs and remotes that may pique the children's curiosity. 6 Remember that children can become excited ...

Limited Warranty
Page 1
... warranty lasts, so the above limitations or exclusions may have other than a facility authorized by Sony to state. This warranty does not cover customer instruction, installation, set up adjustments or signal reception problems. This warranty does not cover cosmetic damage or damage due...the purchaser will repair or replace the Product with the Sony Partnership within the Warranty period. 4-096-275-02 ® LCD COLOR TV LIMITED WARRANTY Sony Electronics Inc. ("Sony") warrants this Product is determined to you . SONY SHALL NOT BE LIABLE FOR ANY INCIDENTAL OR CONSEQUENTIAL DAMAGES...
... warranty lasts, so the above limitations or exclusions may have other than a facility authorized by Sony to state. This warranty does not cover customer instruction, installation, set up adjustments or signal reception problems. This warranty does not cover cosmetic damage or damage due...the purchaser will repair or replace the Product with the Sony Partnership within the Warranty period. 4-096-275-02 ® LCD COLOR TV LIMITED WARRANTY Sony Electronics Inc. ("Sony") warrants this Product is determined to you . SONY SHALL NOT BE LIABLE FOR ANY INCIDENTAL OR CONSEQUENTIAL DAMAGES...
Operating Instuctions
Page 6
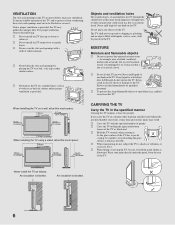
... spill liquid of persons, it checked immediately by placing the TV on the TV. MOISTURE Moisture and flammable objects s Do not use power-line operated sets near a swimming pool, etc. It may touch dangerous voltage points or short out parts that specified and without the specified number of any liquid or...
... spill liquid of persons, it checked immediately by placing the TV on the TV. MOISTURE Moisture and flammable objects s Do not use power-line operated sets near a swimming pool, etc. It may touch dangerous voltage points or short out parts that specified and without the specified number of any liquid or...
Operating Instuctions
Page 9
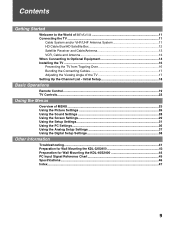
... Using the Picture Settings 26 Using the Sound Settings 28 Using the Screen Settings 29 Using the Setup Settings 31 Using the PC Settings...36 Using the Analog Setup Settings 37 Using the Digital Setup Settings 38 Other Information Troubleshooting...41 Preparation for Wall Mounting the KDL-32S2400 43 Preparation for Wall Mounting the KDL-40S2400 44 PC Input Signal...
... Using the Picture Settings 26 Using the Sound Settings 28 Using the Screen Settings 29 Using the Setup Settings 31 Using the PC Settings...36 Using the Analog Setup Settings 37 Using the Digital Setup Settings 38 Other Information Troubleshooting...41 Preparation for Wall Mounting the KDL-32S2400 43 Preparation for Wall Mounting the KDL-40S2400 44 PC Input Signal...
Operating Instuctions
Page 11
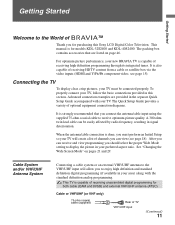
...you must be easily affected by radio frequency, resulting in this Sony LCD Digital Color Television. When the antenna/cable connection is strongly recommended ... Mode" on page 46. This manual is also capable of receiving HDTV content from a cable or satellite box via the video inputs (HDMI...display clear, crisp pictures, your new BRAVIA TV is capable of receiving unscrambled digital programming for models KDL-32S2400 and KDL-40S2400. A 300-ohm twin lead cable can...World of TM Thank you should select the proper Wide Mode setting to display the picture in your preferred aspect ratio. The...
...you must be easily affected by radio frequency, resulting in this Sony LCD Digital Color Television. When the antenna/cable connection is strongly recommended ... Mode" on page 46. This manual is also capable of receiving HDTV content from a cable or satellite box via the video inputs (HDMI...display clear, crisp pictures, your new BRAVIA TV is capable of receiving unscrambled digital programming for models KDL-32S2400 and KDL-40S2400. A 300-ohm twin lead cable can...World of TM Thank you should select the proper Wide Mode setting to display the picture in your preferred aspect ratio. The...

Operating Instuctions
Page 12
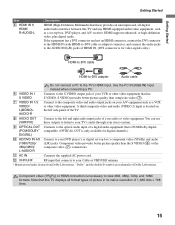
... service. Rear of input signal you choose (see page 34). Cable A/B RF Switch A Rear of TV VHF/UHF input B Antenna Be sure to set Cable setting option to Cable On or Cable Off in its native resolution of your TV via the HDMI or component video (with component cable Audio cable... sure you connect these components to view 480i, 480p, 720p and 1080i formats. Note that this TV displays all format types of picture in Setup settings for the type of TV 7 6 RGB R AUDIO L AUDIO PC IN VIDEO IN 1 S VIDEO 3 VIDEO L (MONO) AUDIO R HD/DVD IN (1080i/720p/480p/480i) 4 5 Y OPTICAL...
... service. Rear of input signal you choose (see page 34). Cable A/B RF Switch A Rear of TV VHF/UHF input B Antenna Be sure to set Cable setting option to Cable On or Cable Off in its native resolution of your TV via the HDMI or component video (with component cable Audio cable... sure you connect these components to view 480i, 480p, 720p and 1080i formats. Note that this TV displays all format types of picture in Setup settings for the type of TV 7 6 RGB R AUDIO L AUDIO PC IN VIDEO IN 1 S VIDEO 3 VIDEO L (MONO) AUDIO R HD/DVD IN (1080i/720p/480p/480i) 4 5 Y OPTICAL...

Operating Instuctions
Page 13
... your satellite receiver is not equipped with S VIDEO, use a VIDEO cable (yellow) instead of the S VIDEO cable. Run the Initial Setup program, as described in "Setting Up the Channel List" on page 18 after completing your connections. Getting Started Satellite Receiver and Cable/Antenna Satellite Receiver Satellite antenna cable Getting Started...If your VCR is not equipped with S VIDEO, use a VIDEO cable (yellow) instead of the S VIDEO cable. Run the Initial Setup program, as described in "Setting Up the Channel List" on page 18 after completing your connections. 13
... your satellite receiver is not equipped with S VIDEO, use a VIDEO cable (yellow) instead of the S VIDEO cable. Run the Initial Setup program, as described in "Setting Up the Channel List" on page 18 after completing your connections. Getting Started Satellite Receiver and Cable/Antenna Satellite Receiver Satellite antenna cable Getting Started...If your VCR is not equipped with S VIDEO, use a VIDEO cable (yellow) instead of the S VIDEO cable. Run the Initial Setup program, as described in "Setting Up the Channel List" on page 18 after completing your connections. 13

Operating Instuctions
Page 14
... to the TV's L (MONO) audio input jack. If this is noisy, flickering or not clear, adjust the Phase and Pitch of the PC Settings see page 36. 14 Sound Setting options, on page 45 for the signals that has S VIDEO. Connect to a personal computer's video output connector using headphones. If the picture...
... to the TV's L (MONO) audio input jack. If this is noisy, flickering or not clear, adjust the Phase and Pitch of the PC Settings see page 36. 14 Sound Setting options, on page 45 for the signals that has S VIDEO. Connect to a personal computer's video output connector using headphones. If the picture...
Operating Instuctions
Page 15
...to view 480i, 480p, 720p, and 1080i formats. You can use these outputs to listen to your TV's audio through your A/V equipment such as a set -top box's component video (YPBPR) and audio (L/R) jacks. If the equipment has a DVI connector and not an HDMI connector, connect the DVI connector ... RF input that is PCM/Dolby digital (PCM/DOLBY* compatible. (OPTICAL OUT is necessary to the S VIDEO output jack of your DVD player's or digital set -top box, DVD player, and A/V receiver. A third composite video and audio (VIDEO 2) input is for digital channels.) DIGITAL) 0 HD/DVD IN 4/5 (1080i/...
...to view 480i, 480p, 720p, and 1080i formats. You can use these outputs to listen to your TV's audio through your A/V equipment such as a set -top box's component video (YPBPR) and audio (L/R) jacks. If the equipment has a DVI connector and not an HDMI connector, connect the DVI connector ... RF input that is PCM/Dolby digital (PCM/DOLBY* compatible. (OPTICAL OUT is necessary to the S VIDEO output jack of your DVD player's or digital set -top box, DVD player, and A/V receiver. A third composite video and audio (VIDEO 2) input is for digital channels.) DIGITAL) 0 HD/DVD IN 4/5 (1080i/...
Operating Instuctions
Page 18
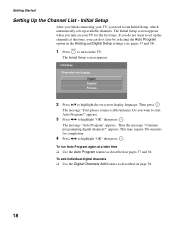
... not want to run Auto Program again at this time, you need to start Auto Program?" appears. To run Initial Setup, which automatically sets up the channels at a later time ❑ Use the Auto Program feature as described on pages 37 and 38. To add individual digital...page 38. 18 This may require 50+ minutes for the first time. Initial Setup After you finish connecting your TV for completion. 4 Press B/b to set up available channels. The message "Auto Program" appears. The message "First please connect cable/antenna. appears. 3 Press B/b to highlight the on-screen ...
... not want to run Auto Program again at this time, you need to start Auto Program?" appears. To run Initial Setup, which automatically sets up the channels at a later time ❑ Use the Auto Program feature as described on pages 37 and 38. To add individual digital...page 38. 18 This may require 50+ minutes for the first time. Initial Setup After you finish connecting your TV for completion. 4 Press B/b to set up available channels. The message "Auto Program" appears. The message "First please connect cable/antenna. appears. 3 Press B/b to highlight the on-screen ...
Operating Instuctions
Page 19
... Audio 2 English 65 HIST 68 SHOW C23.1 FAM Alt. Move the sub screen with V v B b. For details, see "Using the Picture Settings" on each channel. Press again to the program. Audio 19 To cancel Sleep Timer, press SLEEP repeatedly until the TV displays the time in the... Picture settings. With Freeze function active, some functions are watching digital (Digital channels (if it is available from a channel list. The picture modes ...
... Audio 2 English 65 HIST 68 SHOW C23.1 FAM Alt. Move the sub screen with V v B b. For details, see "Using the Picture Settings" on each channel. Press again to the program. Audio 19 To cancel Sleep Timer, press SLEEP repeatedly until the TV displays the time in the... Picture settings. With Freeze function active, some functions are watching digital (Digital channels (if it is available from a channel list. The picture modes ...
Operating Instuctions
Page 20
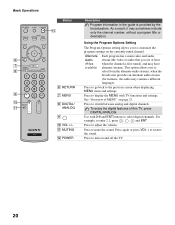
...features of MENU" on page 23. Press to select digital channels. As a result, it may contain a different language). Use with TV functions and settings. For example, to restore the sound. Press again or press VOL + to enter 2.1, press 2 , , 1 and ENT. Press to adjust the... volume. Using the Program Options Setting The Program Options setting allows you to select from the alternate audio streams, when the broadcaster provides an alternate audio stream (for instance, the audio may sometimes...
...features of MENU" on page 23. Press to select digital channels. As a result, it may contain a different language). Use with TV functions and settings. For example, to restore the sound. Press again or press VOL + to enter 2.1, press 2 , , 1 and ENT. Press to adjust the... volume. Using the Program Options Setting The Program Options setting allows you to select from the alternate audio streams, when the broadcaster provides an alternate audio stream (for instance, the audio may sometimes...
Operating Instuctions
Page 21
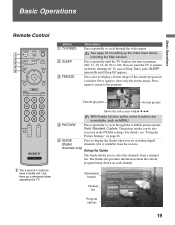
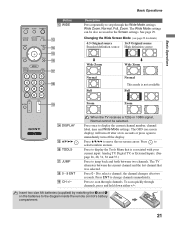
...Normal, Full, Zoom. When the TV receives a 720p or 1080i signal, Normal cannot be also accessed in the Screen settings. Press to display the Tools Menu that was selected. The Wide Mode settings can be selected. Press to select a channel; Press 0 - 9 to select/confirm an item. Press to the ...or External Inputs. (See page 26, 28, 31, 36 and 37.) Press to display the current channel number, channel label, time and Wide Mode settings. Insert two size AA batteries (supplied) by matching the e and E on the batteries to scan through channels. Basic Operations Button qd WIDE qd qf...
...Normal, Full, Zoom. When the TV receives a 720p or 1080i signal, Normal cannot be also accessed in the Screen settings. Press to display the Tools Menu that was selected. The Wide Mode settings can be selected. Press to select a channel; Press 0 - 9 to select/confirm an item. Press to the ...or External Inputs. (See page 26, 28, 31, 36 and 37.) Press to display the current channel number, channel label, time and Wide Mode settings. Insert two size AA batteries (supplied) by matching the e and E on the batteries to scan through channels. Basic Operations Button qd WIDE qd qf...
Operating Instuctions
Page 22
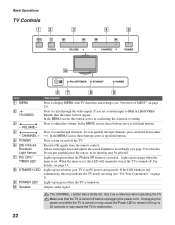
.... Senses room light level and adjusts the screen brightness accordingly (see "For Your Convenience" on . Lights up in orange when the timer is set. Press to Skip in red continuously, this button serves as a reference when operating the TV. Do not put anything near the sensor, as ..., see "Overview of MENU" on may cause the Power LED to 20 seconds or may be affected. Press to display MENU with TV functions and settings (see page 33. CHANNEL + 5 POWER 6 (IR) Infrared Receiver/ Light Sensor 7 PIC OFF/ TIMER LED 8 STANDBY LED 9 POWER LED 0 Speaker Description Press ...
.... Senses room light level and adjusts the screen brightness accordingly (see "For Your Convenience" on . Lights up in orange when the timer is set. Press to Skip in red continuously, this button serves as a reference when operating the TV. Do not put anything near the sensor, as ..., see "Overview of MENU" on may cause the Power LED to 20 seconds or may be affected. Press to display MENU with TV functions and settings (see page 33. CHANNEL + 5 POWER 6 (IR) Infrared Receiver/ Light Sensor 7 PIC OFF/ TIMER LED 8 STANDBY LED 9 POWER LED 0 Speaker Description Press ...
Operating Instuctions
Page 23
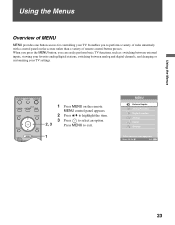
Using the Menus Using the Menus Overview of MENU MENU provides one button access for controlling your TV settings. 1 Press MENU on the screen rather than a variety of tasks intuitively with a control panel on the remote. MENU control panel appears. 2 Press ... button presses. When you press the MENU button, you to exit. 1 MENU External Inputs Analog Favorites Digital Favorites Analog Digital Settings Select from connected equipment Select: Set: Exit: MENU 23 It enables you can easily perform basic TV functions such as: switching between external inputs, viewing your favorite...
Using the Menus Using the Menus Overview of MENU MENU provides one button access for controlling your TV settings. 1 Press MENU on the screen rather than a variety of tasks intuitively with a control panel on the remote. MENU control panel appears. 2 Press ... button presses. When you press the MENU button, you to exit. 1 MENU External Inputs Analog Favorites Digital Favorites Analog Digital Settings Select from connected equipment Select: Set: Exit: MENU 23 It enables you can easily perform basic TV functions such as: switching between external inputs, viewing your favorite...
Operating Instuctions
Page 24
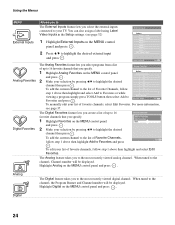
... Favorites and press . Return Add to Favorites 1 28 : ----2 60 : ----3 28 : ----4 65 : ----5 68 : ----6 28 : ----7 -- : ----8 -- : ----Edit Favorites Select: Set: Exit: MENU To manually edit your TV. The Analog feature takes you specify. 1 Highlight Favorites on the MENU control panel and press . 2 Press V/v to your...Favorites. When tuned to 16 favorite channels that you to highlight the desired channel then press . Edit Video Labels Select: Set: Exit: MENU The Analog Favorites feature lets you specify. The Digital Favorites feature lets you to Favorites and press ....
... Favorites and press . Return Add to Favorites 1 28 : ----2 60 : ----3 28 : ----4 65 : ----5 68 : ----6 28 : ----7 -- : ----8 -- : ----Edit Favorites Select: Set: Exit: MENU To manually edit your TV. The Analog feature takes you specify. 1 Highlight Favorites on the MENU control panel and press . 2 Press V/v to your...Favorites. When tuned to 16 favorite channels that you to highlight the desired channel then press . Edit Video Labels Select: Set: Exit: MENU The Analog Favorites feature lets you specify. The Digital Favorites feature lets you to Favorites and press ....

Operating Instuctions
Page 25
... item: Picture, Sound, Screen, Setup, PC Settings, Analog Setup, Digital Setup. 4 Press to The Settings feature lets you can be performed from page 26. To exit Settings, press MENU. The options you enter the settings screen. Settings and adjustments can adjust vary depending on various settings starts from the Settings menu. Unavailable options are grayed out. Using...
... item: Picture, Sound, Screen, Setup, PC Settings, Analog Setup, Digital Setup. 4 Press to The Settings feature lets you can be performed from page 26. To exit Settings, press MENU. The options you enter the settings screen. Settings and adjustments can adjust vary depending on various settings starts from the Settings menu. Unavailable options are grayed out. Using...

Operating Instuctions
Page 26
..., Low and Off. Changes to brighten or darken the backlight. Adjust to all inputs. Using the Menus Using the Picture Settings Option Target Inputs Picture Mode Customized picture viewing Reset Backlight Picture Brightness Color Hue Color Temperature White adjustment Sharpness Noise Reduction Description ... TV, Digital TV and External Inputs. It is not available when Target Input is set to "All Inputs" (ex: TV is set by "Current Input." All Inputs Settings will override any settings set to give the white colors a neutral tint. Select to reduce the noise level of...
..., Low and Off. Changes to brighten or darken the backlight. Adjust to all inputs. Using the Menus Using the Picture Settings Option Target Inputs Picture Mode Customized picture viewing Reset Backlight Picture Brightness Color Hue Color Temperature White adjustment Sharpness Noise Reduction Description ... TV, Digital TV and External Inputs. It is not available when Target Input is set to "All Inputs" (ex: TV is set by "Current Input." All Inputs Settings will override any settings set to give the white colors a neutral tint. Select to reduce the noise level of...
Operating Instuctions
Page 27
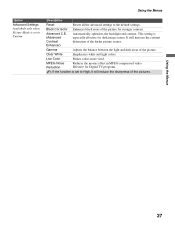
..., it will increase the contrast distinction of the pictures. Black Corrector Enhances black areas of the picture. This setting is especially effective for Digital TV programs. If the function is set to the default settings. Clear White Emphasizes white and light colors. Advanced C.E. (Advanced Contrast Enhancer) Automatically optimizes the backlight and contrast. Gamma...
..., it will increase the contrast distinction of the pictures. Black Corrector Enhances black areas of the picture. This setting is especially effective for Digital TV programs. If the function is set to the default settings. Clear White Emphasizes white and light colors. Advanced C.E. (Advanced Contrast Enhancer) Automatically optimizes the backlight and contrast. Gamma...
Operating Instuctions
Page 28
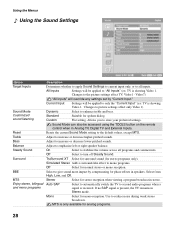
...by "Current Input." Select to stabilize the volume across all inputs. Mono Select for spoken dialog. Use to store your preferred settings. Allows you to reduce noise during weak stereo broadcasts. Off Select to second audio programs when a signal is received. Auto ... and commercials. If no SAP signal is showing Video 1. Standard Suitable for mono reception. Using the Menus Using the Sound Settings Option Target Inputs Sound Mode Customized sound listening Reset Treble Bass Balance Steady Sound Surround BBE MTS Enjoy stereo, bilingual and mono...
...by "Current Input." Select to stabilize the volume across all inputs. Mono Select for spoken dialog. Use to store your preferred settings. Allows you to reduce noise during weak stereo broadcasts. Off Select to second audio programs when a signal is received. Auto ... and commercials. If no SAP signal is showing Video 1. Standard Suitable for mono reception. Using the Menus Using the Sound Settings Option Target Inputs Sound Mode Customized sound listening Reset Treble Bass Balance Steady Sound Surround BBE MTS Enjoy stereo, bilingual and mono...


