Safety and Regulatory Booklet
Page 1
...ícelo únicamente con el carro, pedestal, trípode, abrazadera o mesa especificados por el fabricante o vendidos con el aparato. LCD SCREEN ☐ Although the LCD screen is provided, the TV may accumulate dust and cause damage. ☐ Never allow at least 4 inches (10 cm) of clearance at least...;léviseur. Folleto de instrucciones de seguridad Lea y entienda el contenido de este folleto antes de operar su nuevo televisor. © 2008 Sony Corporation Printed in U.S.A. 3-299-071-03(1) WARNING To reduce the risk of fire or electric shock, do . The TV must be rinsed...
...ícelo únicamente con el carro, pedestal, trípode, abrazadera o mesa especificados por el fabricante o vendidos con el aparato. LCD SCREEN ☐ Although the LCD screen is provided, the TV may accumulate dust and cause damage. ☐ Never allow at least 4 inches (10 cm) of clearance at least...;léviseur. Folleto de instrucciones de seguridad Lea y entienda el contenido de este folleto antes de operar su nuevo televisor. © 2008 Sony Corporation Printed in U.S.A. 3-299-071-03(1) WARNING To reduce the risk of fire or electric shock, do . The TV must be rinsed...
Operating Instructions
Page 2
...816,141 Manufactured under license from Dolby Laboratories. "PlayStation" is a registered trademark and "PS3" is a trademark of Sony Computer Entertainment Inc. (KDL-32FA600 only) Your BRAVIA TV is a trademark of mild soap and warm water. • If using a chemically pretreated cloth, please follow ..., settings, and functionalities of electric shock. • Wipe the LCD screen gently with a soft cloth. • Stubborn stains may exceed the limits required for additional information. Depending upon your Sony dealer regarding this TV (i.e. Cleaning When cleaning, be fully inserted....
...816,141 Manufactured under license from Dolby Laboratories. "PlayStation" is a registered trademark and "PS3" is a trademark of Sony Computer Entertainment Inc. (KDL-32FA600 only) Your BRAVIA TV is a trademark of mild soap and warm water. • If using a chemically pretreated cloth, please follow ..., settings, and functionalities of electric shock. • Wipe the LCD screen gently with a soft cloth. • Stubborn stains may exceed the limits required for additional information. Depending upon your Sony dealer regarding this TV (i.e. Cleaning When cleaning, be fully inserted....
Operating Instructions
Page 3
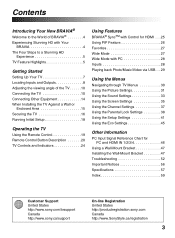
...TV Using the Remote Control 19 Remote Control Button Description 20 TV Controls and Indicators 24 Using Features BRAVIA® SyncTM with Control for HDMI . . .25 Using PIP Feature 26 Favorites 27 Wide Mode... Navigating through TV Menus 30 Using the Picture Settings 31 Using the Sound Settings 33 Using the Screen Settings 35 Using the Channel Settings 37 Using the Parental Lock Settings 38 Using the Setup Settings 41... Index 59 Customer Support United States http://www.sony.com/tvsupport Canada http://www.sony.ca/support On-line Registration United States http://productregistration...
...TV Using the Remote Control 19 Remote Control Button Description 20 TV Controls and Indicators 24 Using Features BRAVIA® SyncTM with Control for HDMI . . .25 Using PIP Feature 26 Favorites 27 Wide Mode... Navigating through TV Menus 30 Using the Picture Settings 31 Using the Sound Settings 33 Using the Screen Settings 35 Using the Channel Settings 37 Using the Parental Lock Settings 38 Using the Setup Settings 41... Index 59 Customer Support United States http://www.sony.com/tvsupport Canada http://www.sony.ca/support On-line Registration United States http://productregistration...
Operating Instructions
Page 5
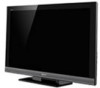
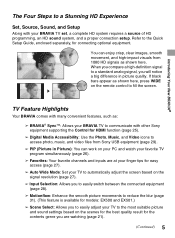
... at your finger tips for easy access (page 27). ➢ Auto Wide Mode: Set your TV to fill the screen. TV Feature Highlights Your BRAVIA comes with other Sony equipment supporting the Control for HDMI function (page 25). ➢ Digital Media Accessibility: Use the Photo, Music, and ...such as shown here. You can enjoy crisp, clear images, smooth movement, and high-impact visuals from Sony USB equipment (page 29). ➢ PIP (Picture in picture quality. Introducing Your New BRAVIA® The Four Steps to a standard analog signal, you will notice a big difference in Picture): ...
... at your finger tips for easy access (page 27). ➢ Auto Wide Mode: Set your TV to fill the screen. TV Feature Highlights Your BRAVIA comes with other Sony equipment supporting the Control for HDMI function (page 25). ➢ Digital Media Accessibility: Use the Photo, Music, and ...such as shown here. You can enjoy crisp, clear images, smooth movement, and high-impact visuals from Sony USB equipment (page 29). ➢ PIP (Picture in picture quality. Introducing Your New BRAVIA® The Four Steps to a standard analog signal, you will notice a big difference in Picture): ...
Operating Instructions
Page 7
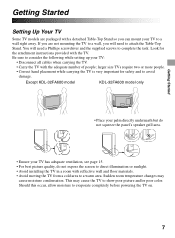
... illumination or sunlight. • Avoid installing the TV in a room with the adequate number of people; Except KDL-32FA600 model KDL-32FA600 model only • Place your palm directly underneath but do not expose the screen to avoid damage. Should this occur, allow moisture to complete the task. Sudden room temperature changes may...
... illumination or sunlight. • Avoid installing the TV in a room with the adequate number of people; Except KDL-32FA600 model KDL-32FA600 model only • Place your palm directly underneath but do not expose the screen to avoid damage. Should this occur, allow moisture to complete the task. Sudden room temperature changes may...

Operating Instructions
Page 18
... Program will scan for sample connection diagrams. Initial Setup Please select your language: English Español Français 1 Turn on the screen to run Auto Program at later time. To run the Auto Program. • When prompted to select Retail or Home, be done at...Confirm RETURN Back page 11. • Select your viewing environment • Scan for this TV. The Initial Setup screen will perform the following: • Set the language for the On Screen Display (OSD) text • Choose your preferred aspect ratio for store display. "Retail" optimizes the picture for the...
... Program will scan for sample connection diagrams. Initial Setup Please select your language: English Español Français 1 Turn on the screen to run Auto Program at later time. To run the Auto Program. • When prompted to select Retail or Home, be done at...Confirm RETURN Back page 11. • Select your viewing environment • Scan for this TV. The Initial Setup screen will perform the following: • Set the language for the On Screen Display (OSD) text • Choose your preferred aspect ratio for store display. "Retail" optimizes the picture for the...
Operating Instructions
Page 21
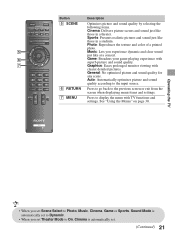
... those in a theater. Auto: Automatically optimizes picture and sound quality according to the input source. 6 RETURN Press to go back to the previous screen or exit from the screen when displaying menu items and settings. 7 MENU Press to On, Cinema is automatically set to Dynamic. • When you experience dynamic and clear...
... those in a theater. Auto: Automatically optimizes picture and sound quality according to the input source. 6 RETURN Press to go back to the previous screen or exit from the screen when displaying menu items and settings. 7 MENU Press to On, Cinema is automatically set to Dynamic. • When you experience dynamic and clear...
Operating Instructions
Page 24
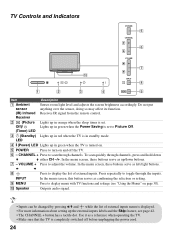
...with TV functions and settings (see page 42. • The CHANNEL + button has a tactile dot. In the menu screen, these buttons serve as confirming the selection or setting. To scan quickly through channels, press and hold down buttons. 7 - In the ... 7 0 INPUT 8 1 2 3 4 MENU 9 Item Description 1 Ambient sensor (IR) Infrared Receiver Senses room light level and adjusts the screen brightness accordingly. In the menu screen, this button serves as left/right buttons. 8 INPUT 9 MENU 0 Speaker Press to display the list of external inputs menu is displayed. •...
...with TV functions and settings (see page 42. • The CHANNEL + button has a tactile dot. In the menu screen, these buttons serve as confirming the selection or setting. To scan quickly through channels, press and hold down buttons. 7 - In the ... 7 0 INPUT 8 1 2 3 4 MENU 9 Item Description 1 Ambient sensor (IR) Infrared Receiver Senses room light level and adjusts the screen brightness accordingly. In the menu screen, this button serves as left/right buttons. 8 INPUT 9 MENU 0 Speaker Press to display the list of external inputs menu is displayed. •...
Operating Instructions
Page 26
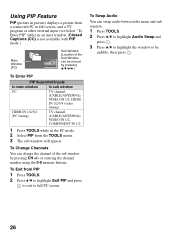
... channel of the Sub Window can be audible, then press . 26 Using PIP Feature PIP (picture in picture) displays a picture from a connected PC in full screen, and a TV program or other external input (see below "To Enter PIP" table) in the PC mode. 2 Select PIP from PIP 1 Press TOOLS. 2 Press V/v to...
... channel of the Sub Window can be audible, then press . 26 Using PIP Feature PIP (picture in picture) displays a picture from a connected PC in full screen, and a TV program or other external input (see below "To Enter PIP" table) in the PC mode. 2 Select PIP from PIP 1 Press TOOLS. 2 Press V/v to...
Operating Instructions
Page 27
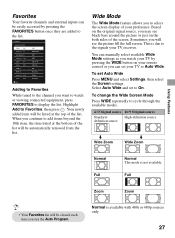
...Zoom Zoom Normal is available with 480i or 480p sources only. 27 Highlight Add to select the screen display of the list will be automatically removed from the list. To change the Wide Screen Mode Press WIDE repeatedly to On. When you run the Auto Program. Based on the both sides... each time you continue to add items beyond the 10th item, the item listed at the top of the screen. To set Auto Wide Press MENU and select Settings, then select the Screen settings. Select Auto Wide and set to cycle through the available modes. 4:3 Original source 16:9 Original source Standard...
...Zoom Zoom Normal is available with 480i or 480p sources only. 27 Highlight Add to select the screen display of the list will be automatically removed from the list. To change the Wide Screen Mode Press WIDE repeatedly to On. When you run the Auto Program. Based on the both sides... each time you continue to add items beyond the 10th item, the item listed at the top of the screen. To set Auto Wide Press MENU and select Settings, then select the Screen settings. Select Auto Wide and set to cycle through the available modes. 4:3 Original source 16:9 Original source Standard...
Operating Instructions
Page 28
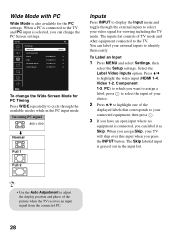
... is connected to select your TV will skip over this input when you can change the Wide Screen Mode for the PC settings. Select the Label Video Inputs option. When a PC is connected,...Input menu and toggle through the available modes while in the input list. Screen PC PC Settings Wide Mode Auto Adjustment Phase Pitch Horizontal Center Vertical Center Normal 0 0 0 0 Set ...To change the PC Screen settings. Press V/v to highlight the video input (HDMI 1-4, Video 1-2, Component 1-2, PC) to...
... is connected to select your TV will skip over this input when you can change the Wide Screen Mode for the PC settings. Select the Label Video Inputs option. When a PC is connected,...Input menu and toggle through the available modes while in the input list. Screen PC PC Settings Wide Mode Auto Adjustment Phase Pitch Horizontal Center Vertical Center Normal 0 0 0 0 Set ...To change the PC Screen settings. Press V/v to highlight the video input (HDMI 1-4, Video 1-2, Component 1-2, PC) to...
Operating Instructions
Page 29
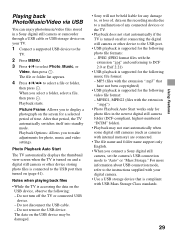
.... Picture Frame: Allows you to select Photo, Music, or Video, then press . Playback Options: Allows you to display a photograph on the screen for a selected period of any damage to, or loss of, data on after connecting the digital still camera or other device storing photo files is...mode, refer to "Auto" or "Mass Storage." Photo Playback Auto Start The TV automatically displays the thumbnail view screen when the TV is turned on (page 41). When you connect a Sony digital still camera, set the camera's USB connection mode to the instructions supplied with your TV. 1 Connect a...
.... Picture Frame: Allows you to select Photo, Music, or Video, then press . Playback Options: Allows you to display a photograph on the screen for a selected period of any damage to, or loss of, data on after connecting the digital still camera or other device storing photo files is...mode, refer to "Auto" or "Mass Storage." Photo Playback Auto Start The TV automatically displays the thumbnail view screen when the TV is turned on (page 41). When you connect a Sony digital still camera, set the camera's USB connection mode to the instructions supplied with your TV. 1 Connect a...
Operating Instructions
Page 30
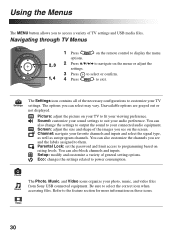
The options you see on the screen. You can also change the settings to output the sound to select the correct icon when Music ... your favorite channels and inputs and select the signal type, as well as autoprogram channels. Be sure to your TV settings. Screen: adjust the size and shape of TV settings and USB media files. Video 30 Parental Lock: set the password and limit ... Settings icon contains all of general setting options. Channel: navigate your photo, music, and video files from Sony USB connected equipment. Unavailable options are grayed out or not displayed.
The options you see on the screen. You can also change the settings to output the sound to select the correct icon when Music ... your favorite channels and inputs and select the signal type, as well as autoprogram channels. Be sure to your TV settings. Screen: adjust the size and shape of TV settings and USB media files. Video 30 Parental Lock: set the password and limit ... Settings icon contains all of general setting options. Channel: navigate your photo, music, and video files from Sony USB connected equipment. Unavailable options are grayed out or not displayed.

Operating Instructions
Page 32
... Makes colors more vivid. Select from High, Medium, Low and Off. Select from High, Medium, Low and Off. Black Corrector Enhances black areas of the screen. Select Off to the most suitable settings judging from the brightness of the picture for dark scenes, and will increase the contrast distinction of the...
... Makes colors more vivid. Select from High, Medium, Low and Off. Select from High, Medium, Low and Off. Black Corrector Enhances black areas of the screen. Select Off to the most suitable settings judging from the brightness of the picture for dark scenes, and will increase the contrast distinction of the...

Operating Instructions
Page 35
... based on the TV model). +1 Displays pictures in their recommended size. -1 Enlarges the picture so that fills the wide screen. Auto Wide On Select On to automatically change channels (or inputs), Wide Mode is 4:3. Normal Displays pictures in their original... size. Normal Select to display 4:3 picture in original size when the original source is automatically replaced with minimum distortion. Screen Mode to use Normal for 4:3 sources. Select to enlarge the 4:3 picture horizontally only, to enlarge the original picture without distorting...
... based on the TV model). +1 Displays pictures in their recommended size. -1 Enlarges the picture so that fills the wide screen. Auto Wide On Select On to automatically change channels (or inputs), Wide Mode is 4:3. Normal Displays pictures in their original... size. Normal Select to display 4:3 picture in original size when the original source is automatically replaced with minimum distortion. Screen Mode to use Normal for 4:3 sources. Select to enlarge the 4:3 picture horizontally only, to enlarge the original picture without distorting...
Operating Instructions
Page 36
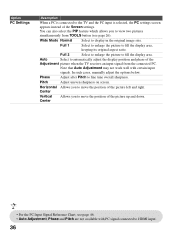
...to HDMI input. 36 Option PC Settings Description When a PC is connected to the TV and the PC input is selected, the PC settings screen appears instead of the picture up and down. • For the PC Input Signal Reference Chart, see page 26). Phase Adjust after Pitch ...page 46. • Auto Adjustment, Phase and Pitch are not available with certain input signals. Pitch Adjust uneven sharpness on screen. Horizontal Allows you to move the position of the Screen settings. Full 1 Select to enlarge the picture to fill the display area. Full 2 Select to enlarge the picture to...
...to HDMI input. 36 Option PC Settings Description When a PC is connected to the TV and the PC input is selected, the PC settings screen appears instead of the picture up and down. • For the PC Input Signal Reference Chart, see page 26). Phase Adjust after Pitch ...page 46. • Auto Adjustment, Phase and Pitch are not available with certain input signals. Pitch Adjust uneven sharpness on screen. Horizontal Allows you to move the position of the Screen settings. Full 1 Select to enlarge the picture to fill the display area. Full 2 Select to enlarge the picture to...
Operating Instructions
Page 41
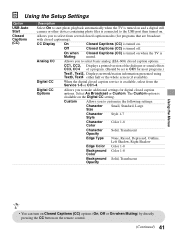
.... Digital CC Options Allows you to CC1 for most programs.) Text1, Text2, Displays network/station information presented using Text3, Text4 either half or the whole screen (if available). Custom Allows you to make additional settings for digital closed caption options. CC Display On Closed Captions (CC) is muted. Select As Broadcast...
.... Digital CC Options Allows you to CC1 for most programs.) Text1, Text2, Displays network/station information presented using Text3, Text4 either half or the whole screen (if available). Custom Allows you to make additional settings for digital closed caption options. CC Display On Closed Captions (CC) is muted. Select As Broadcast...
Operating Instructions
Page 42
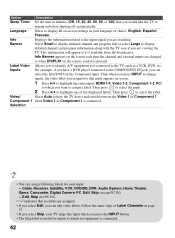
... select Edit, you press the INPUT button. • The Skip label is useful for inputs to which you would like the TV to remain on -screen settings in minutes (Off, 15, 30, 45, 60, 90, or 120) that you want to display detailed channel and program information along with the ...TV icon if you are viewing the TV. Info Banner appears on the screen each input: -, Cable, Receiver, Satellite, VCR, DVD/BD, DVR, Audio System, Home Theater, Game, Camcorder, Digital Camera, PC, Edit, Skip (except PC IN) -, Edit, ...
... select Edit, you press the INPUT button. • The Skip label is useful for inputs to which you would like the TV to remain on -screen settings in minutes (Off, 15, 30, 45, 60, 90, or 120) that you want to display detailed channel and program information along with the ...TV icon if you are viewing the TV. Info Banner appears on the screen each input: -, Cable, Receiver, Satellite, VCR, DVD/BD, DVR, Audio System, Home Theater, Game, Camcorder, Digital Camera, PC, Edit, Skip (except PC IN) -, Edit, ...
Operating Instructions
Page 43
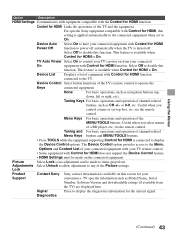
.... Device Control Select button functions of a BD player, etc; Useful when you select menus of the TV's remote control to disable this screen for your TV remote control. • Some equipment with the Control for HDMI function. Device Auto Select On to have your connected On ...Menu, Options and Content List of channel-related buttons, such as navigation buttons (up, down, left or right, etc). Lock Product Contact Sony Sony contact information is turned off. This feature is available when Control for HDMI is On. Picture Select Lock so no adjustment can be made...
.... Device Control Select button functions of a BD player, etc; Useful when you select menus of the TV's remote control to disable this screen for your TV remote control. • Some equipment with the Control for HDMI function. Device Auto Select On to have your connected On ...Menu, Options and Content List of channel-related buttons, such as navigation buttons (up, down, left or right, etc). Lock Product Contact Sony Sony contact information is turned off. This feature is available when Control for HDMI is On. Picture Select Lock so no adjustment can be made...
Operating Instructions
Page 44
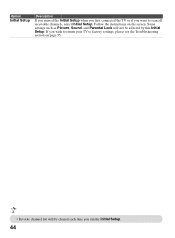
If you wish to return your TV to scan all receivable channels, select Initial Setup. Some settings such as Picture, Sound, and Parental Lock will be affected by this Initial Setup. Option Initial Setup Description If you missed the Initial Setup when you first connected the TV or if you want to factory settings, please see the Troubleshooting section on the screen. Follow the instructions on page 55. • Favorite channel list will not be cleared each time you run the Initial Setup. 44
If you wish to return your TV to scan all receivable channels, select Initial Setup. Some settings such as Picture, Sound, and Parental Lock will be affected by this Initial Setup. Option Initial Setup Description If you missed the Initial Setup when you first connected the TV or if you want to factory settings, please see the Troubleshooting section on the screen. Follow the instructions on page 55. • Favorite channel list will not be cleared each time you run the Initial Setup. 44


