Operating Instructions
Page 2
... to avoid any chance of these numbers in the spaces provided below 41°F (5°C). Picture/Sound, Power Savings) can be fully inserted. ❑ Operate the TV only on the package. • Never use strong solvents such as a thinner, alcohol or benzine for cleaning.... registered trademark and "PS3" is a trademark. Depending upon your Sony dealer regarding this TV (i.e. Dolby and the double-D symbol are trademarks or registered marks of this TV. "BRAVIA" and , BRAVIA Sync, and are trademarks of Sony Computer Entertainment Inc. Cleaning When cleaning, be sure to unplug the...
... to avoid any chance of these numbers in the spaces provided below 41°F (5°C). Picture/Sound, Power Savings) can be fully inserted. ❑ Operate the TV only on the package. • Never use strong solvents such as a thinner, alcohol or benzine for cleaning.... registered trademark and "PS3" is a trademark. Depending upon your Sony dealer regarding this TV (i.e. Dolby and the double-D symbol are trademarks or registered marks of this TV. "BRAVIA" and , BRAVIA Sync, and are trademarks of Sony Computer Entertainment Inc. Cleaning When cleaning, be sure to unplug the...
Operating Instructions
Page 3
... Wide Mode 25 Wide Mode with PC 26 Inputs 26 Playing back Photo/Music/ Video via USB 27 Using the Menus Navigating through TV Menus 28 Using the Picture Settings 29 Using the Sound Settings 31 Using the Screen Settings 33 Using the Channel Settings 35 Using the Parental Lock Settings 36... a Wall-Mount Bracket 45 Installing the Wall-Mount Bracket 46 Troubleshooting 54 Important Notices 58 Specifications 59 Index 61 Customer Support United States http://www.sony.com/tvsupport Canada http://www.sony.ca/support On-line Registration United States http://productregistration...
... Wide Mode 25 Wide Mode with PC 26 Inputs 26 Playing back Photo/Music/ Video via USB 27 Using the Menus Navigating through TV Menus 28 Using the Picture Settings 29 Using the Sound Settings 31 Using the Screen Settings 33 Using the Channel Settings 35 Using the Parental Lock Settings 36... a Wall-Mount Bracket 45 Installing the Wall-Mount Bracket 46 Troubleshooting 54 Important Notices 58 Specifications 59 Index 61 Customer Support United States http://www.sony.com/tvsupport Canada http://www.sony.ca/support On-line Registration United States http://productregistration...

Operating Instructions
Page 5
If black bars appear as : ➢ BRAVIA® SyncTM: Allows your BRAVIA TV to communicate with your TV to the most suitable picture and sound settings based on the scenes for the best quality result for the contents genre you are at your finger tips ...page 26). ➢ Scene Select: Allows you will notice a big difference in Picture): You can enjoy crisp, clear images, smooth movement, and high-impact visuals from Sony USB equipment (page 27). ➢ PIP (Picture in picture quality. TV Feature Highlights Your BRAVIA comes with many convenient features, such as shown here, press ...
If black bars appear as : ➢ BRAVIA® SyncTM: Allows your BRAVIA TV to communicate with your TV to the most suitable picture and sound settings based on the scenes for the best quality result for the contents genre you are at your finger tips ...page 26). ➢ Scene Select: Allows you will notice a big difference in Picture): You can enjoy crisp, clear images, smooth movement, and high-impact visuals from Sony USB equipment (page 27). ➢ PIP (Picture in picture quality. TV Feature Highlights Your BRAVIA comes with many convenient features, such as shown here, press ...
Operating Instructions
Page 6
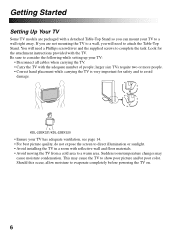
... will need a Phillips screwdriver and the supplied screws to show poor picture and/or poor color. KDL-22BX321/KDL-22BX320 • Ensure your TV: • Disconnect all cables when carrying the TV. • Carry the TV with reflective wall and floor materials. • Avoid moving the TV from a cold area to a warm area. Should this occur, allow...
... will need a Phillips screwdriver and the supplied screws to show poor picture and/or poor color. KDL-22BX321/KDL-22BX320 • Ensure your TV: • Disconnect all cables when carrying the TV. • Carry the TV with reflective wall and floor materials. • Avoid moving the TV from a cold area to a warm area. Should this occur, allow...
Operating Instructions
Page 9
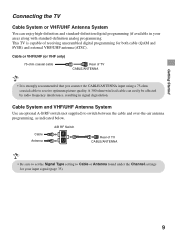
...you connect the CABLE/ANTENNA input using a 75-ohm coaxial cable to receive optimum picture quality. Cable or VHF/UHF (or VHF only) 75-ohm coaxial cable Rear of TV CABLE/ANTENNA • It is capable of TV CABLE/ANTENNA • Be sure to set the Signal Type setting to switch ...to Cable or Antenna found under the Channel settings for both cable (QAM and 8VSB) and external VHF/UHF antenna (ATSC). Getting Started Connecting the TV Cable System or VHF/UHF Antenna System You can easily be affected by radio frequency interference, resulting in your input signal (page 35). 9 Cable...
...you connect the CABLE/ANTENNA input using a 75-ohm coaxial cable to receive optimum picture quality. Cable or VHF/UHF (or VHF only) 75-ohm coaxial cable Rear of TV CABLE/ANTENNA • It is capable of TV CABLE/ANTENNA • Be sure to set the Signal Type setting to switch ...to Cable or Antenna found under the Channel settings for both cable (QAM and 8VSB) and external VHF/UHF antenna (ATSC). Getting Started Connecting the TV Cable System or VHF/UHF Antenna System You can easily be affected by radio frequency interference, resulting in your input signal (page 35). 9 Cable...
Operating Instructions
Page 10
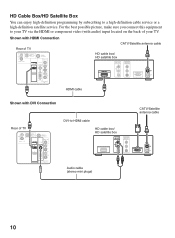
... Box You can enjoy high-definition programming by subscribing to your TV. Shown with HDMI Connection CATV/Satellite antenna cable Rear of TV HD cable box/ HD satellite box HDMI cable Shown with DVI Connection Rear of your TV via the HDMI or component video (with audio) input located ...on the back of TV DVI-to-HDMI cable HD cable box/ HD satellite box CATV/Satellite antenna cable Audio cable (stereo mini plugs) 10 For the best possible picture, make sure you connect this equipment to a high-definition cable service or...
... Box You can enjoy high-definition programming by subscribing to your TV. Shown with HDMI Connection CATV/Satellite antenna cable Rear of TV HD cable box/ HD satellite box HDMI cable Shown with DVI Connection Rear of your TV via the HDMI or component video (with audio) input located ...on the back of TV DVI-to-HDMI cable HD cable box/ HD satellite box CATV/Satellite antenna cable Audio cable (stereo mini plugs) 10 For the best possible picture, make sure you connect this equipment to a high-definition cable service or...
Operating Instructions
Page 17
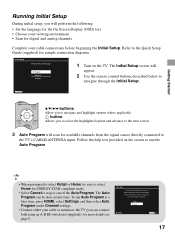
...you to select the highlighted option and advance to the next screen. 3 Auto Program will scan for this TV. Follow the help text provided on the TV. "Retail" optimizes the picture for ENERGY STAR compliant mode. • Select Cancel to stop or cancel the Auto Program. Retail Home ...Choose your viewing environment • Scan for normal home use for available channels from the signal source directly connected to the TV's CABLE/ANTENNA input. "Home" optimizes the picture for digital and analog channels Complete your cable connections before beginning the Initial Setup.
...you to select the highlighted option and advance to the next screen. 3 Auto Program will scan for this TV. Follow the help text provided on the TV. "Retail" optimizes the picture for ENERGY STAR compliant mode. • Select Cancel to stop or cancel the Auto Program. Retail Home ...Choose your viewing environment • Scan for normal home use for available channels from the signal source directly connected to the TV's CABLE/ANTENNA input. "Home" optimizes the picture for digital and analog channels Complete your cable connections before beginning the Initial Setup.
Operating Instructions
Page 20
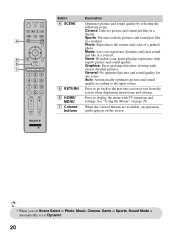
...items. Cinema: Delivers picture and sound just like 4 in a theater. Sports: Presents realistic pictures and sound just like in a stadium. Music: Lets you set Scene Select to Photo, Music, Cinema, Game or Sports, Sound Mode is automatically set to display the menu with TV functions and settings. ...General: No optimized picture and sound quality for any scene. See "Using the Menus" on page 28. 7 Colored buttons When the colored buttons...
...items. Cinema: Delivers picture and sound just like 4 in a theater. Sports: Presents realistic pictures and sound just like in a stadium. Music: Lets you set Scene Select to Photo, Music, Cinema, Game or Sports, Sound Mode is automatically set to display the menu with TV functions and settings. ...General: No optimized picture and sound quality for any scene. See "Using the Menus" on page 28. 7 Colored buttons When the colored buttons...
Operating Instructions
Page 22
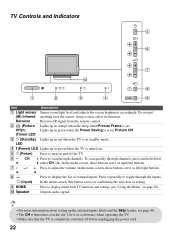
.... Press to turn on page 28). In the menu screen, these buttons serve as a reference when operating the TV. • Make sure that the TV is set to Picture Off. (Timer) LED 3 1 (Standby) Lights up the external inputs labels and the Skip feature, see "Using... selection or setting. Outputs audio signal. • For more information about setting up in orange when the sleep timer/Picture Frame is completely switched off the TV. 6 - TV Controls and Indicators Item Description 1 Light sensor Senses room light level and adjusts the screen brightness accordingly. LED 4 "...
.... Press to turn on page 28). In the menu screen, these buttons serve as a reference when operating the TV. • Make sure that the TV is set to Picture Off. (Timer) LED 3 1 (Standby) Lights up the external inputs labels and the Skip feature, see "Using... selection or setting. Outputs audio signal. • For more information about setting up in orange when the sleep timer/Picture Frame is completely switched off the TV. 6 - TV Controls and Indicators Item Description 1 Light sensor Senses room light level and adjusts the screen brightness accordingly. LED 4 "...
Operating Instructions
Page 24
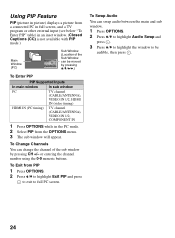
...3 The sub window will appear. To Swap Audio You can be audible, then press . 24 Using PIP Feature PIP (picture in picture) displays a picture from a connected PC in full screen, and a TV program or other external input (see below "To Enter PIP" table) in an inset window. (Closed Captions (CC) ...the sub window by pressing V/v/B/b.) To Enter PIP PIP Supported Inputs In main window In sub window PC TV channel (CABLE/ANTENNA), VIDEO IN 1/2, HDMI IN (video timing) HDMI IN (PC timing) TV channel (CABLE/ANTENNA), VIDEO IN 1/2, COMPONENT IN 1 Press OPTIONS while in the PC mode. 2 Select...
...3 The sub window will appear. To Swap Audio You can be audible, then press . 24 Using PIP Feature PIP (picture in picture) displays a picture from a connected PC in full screen, and a TV program or other external input (see below "To Enter PIP" table) in an inset window. (Closed Captions (CC) ...the sub window by pressing V/v/B/b.) To Enter PIP PIP Supported Inputs In main window In sub window PC TV channel (CABLE/ANTENNA), VIDEO IN 1/2, HDMI IN (video timing) HDMI IN (PC timing) TV channel (CABLE/ANTENNA), VIDEO IN 1/2, COMPONENT IN 1 Press OPTIONS while in the PC mode. 2 Select...

Operating Instructions
Page 25
.... Sometimes you will be accessed by pressing the WIDE button on the remote control. • Your Favorites list will see black bars around the picture or just on the both sides of the list will be automatically removed from the list. To set to cycle through the available modes. 4:3 ... The Wide Mode feature allows you watch or viewing connected equipment, press HOME and select Favorites to select Favorites, then press . You can set your TV by pressing the HOME button once they are added to the list. 1 Press HOME. 2 Press V/v to display the list. Based on the original ...
.... Sometimes you will be accessed by pressing the WIDE button on the remote control. • Your Favorites list will see black bars around the picture or just on the both sides of the list will be automatically removed from the list. To set to cycle through the available modes. 4:3 ... The Wide Mode feature allows you watch or viewing connected equipment, press HOME and select Favorites to select Favorites, then press . You can set your TV by pressing the HOME button once they are added to the list. 1 Press HOME. 2 Press V/v to display the list. Based on the original ...

Operating Instructions
Page 26
... a label; Select the Label Video Inputs option in the input list. Full 2 • Use the Auto Adjustment to select your external inputs to the TV. When you assign Skip, your connected equipment, then press . 3 If you have an open input where no equipment is connected, you can change the... Wide Screen Mode for the PC settings. press to select the input of your choice. 2 Press V/v to highlight one of the picture when the TV receives an input signal from the connected PC. 26 When a PC is connected to cycle through the external inputs to adjust the display position...
... a label; Select the Label Video Inputs option in the input list. Full 2 • Use the Auto Adjustment to select your external inputs to the TV. When you assign Skip, your connected equipment, then press . 3 If you have an open input where no equipment is connected, you can change the... Wide Screen Mode for the PC settings. press to select the input of your choice. 2 Press V/v to highlight one of the picture when the TV receives an input signal from the connected PC. 26 When a PC is connected to cycle through the external inputs to adjust the display position...
Operating Instructions
Page 27
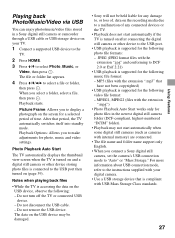
... more information about USB connection mode, refer to the instructions supplied with your TV. 1 Connect a supported USB device to the TV. 2 Press HOME. 3 Press V/v to select a file or folder, then press . Do not remove the USB device. Picture Frame: Allows you select a folder, select a file, then press . ... camera folder (DCF-compliant, highest-numbered "DCIM" folder). • Playback may be damaged. • Sony will not be held liable for any connected devices or the TV. • Playback does not start automatically when some digital still cameras (such as cameras with USB Mass ...
... more information about USB connection mode, refer to the instructions supplied with your TV. 1 Connect a supported USB device to the TV. 2 Press HOME. 3 Press V/v to select a file or folder, then press . Do not remove the USB device. Picture Frame: Allows you select a folder, select a file, then press . ... camera folder (DCF-compliant, highest-numbered "DCIM" folder). • Playback may be damaged. • Sony will not be held liable for any connected devices or the TV. • Playback does not start automatically when some digital still cameras (such as cameras with USB Mass ...
Operating Instructions
Page 28
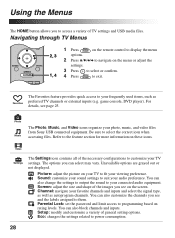
.... Setup: modify and customize a variety of TV settings and USB media files. You can also...also customize the channels you see page 25. Channel: navigate your TV settings. For details, see on the screen. Video Settings The Settings...select the signal type, as well as preferred TV channels or external inputs (e.g. Picture: adjust the picture on these icons. Navigating through TV Menus 1 Press on the remote control to ...accessing files. Refer to the feature section for more information on your TV to access a variety of general setting options. Using the Menus The ...
.... Setup: modify and customize a variety of TV settings and USB media files. You can also...also customize the channels you see page 25. Channel: navigate your TV settings. For details, see on the screen. Video Settings The Settings...select the signal type, as well as preferred TV channels or external inputs (e.g. Picture: adjust the picture on these icons. Navigating through TV Menus 1 Press on the remote control to ...accessing files. Refer to the feature section for more information on your TV to access a variety of general setting options. Using the Menus The ...
Operating Instructions
Page 33
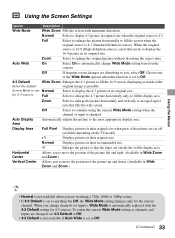
...Off, the Wide Mode setting changes only for 4:3 sources. Screen Mode to use Normal for 4:3 sources Full Select to display the 4:3 picture in Wide Zoom and Zoom.) Using the Menus • Normal is not available when you to move the position of the Select the ...down. (Available in its original size. Auto Wide On Select On to you change Wide Mode setting based on the TV model). +1 Displays pictures in original size when the original source is automatically replaced with minimum distortion. Using the Screen Settings Option Description Wide Mode ...
...Off, the Wide Mode setting changes only for 4:3 sources. Screen Mode to use Normal for 4:3 sources Full Select to display the 4:3 picture in Wide Zoom and Zoom.) Using the Menus • Normal is not available when you to move the position of the Select the ...down. (Available in its original size. Auto Wide On Select On to you change Wide Mode setting based on the TV model). +1 Displays pictures in original size when the original source is automatically replaced with minimum distortion. Using the Screen Settings Option Description Wide Mode ...
Operating Instructions
Page 34
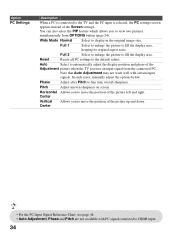
...fill the display area. Horizontal Allows you to HDMI input. 34 Full 2 Select to enlarge the picture to the default values. In such cases, manually adjust the options below. Phase Adjust after Pitch to the TV and the PC input is selected, the PC settings screen appears instead of the... picture up and down. Note that Auto Adjustment may not work well with PC signal connected to view two pictures simultaneously from the connected PC. Option PC ...
...fill the display area. Horizontal Allows you to HDMI input. 34 Full 2 Select to enlarge the picture to the default values. In such cases, manually adjust the options below. Phase Adjust after Pitch to the TV and the PC input is selected, the PC settings screen appears instead of the... picture up and down. Note that Auto Adjustment may not work well with PC signal connected to view two pictures simultaneously from the connected PC. Option PC ...
Operating Instructions
Page 35
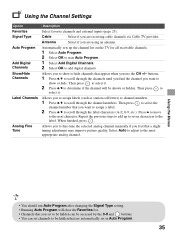
... characters to the label. Press b to move to the most appropriate analog channel. Repeat the previous steps to add up the channel list on the TV for all receivable channels. 1 Select Auto Program. 2 Select OK to start Auto Program. 1 Select Add Digital Channels. 2 Select OK to be... hidden that a slight tuning adjustment may improve picture quality. Allows you to fine-tune the selected analog channel manually if you feel that are automatically set channels to add digital channels. Select Auto...
... characters to the label. Press b to move to the most appropriate analog channel. Repeat the previous steps to add up the channel list on the TV for all receivable channels. 1 Select Auto Program. 2 Select OK to start Auto Program. 1 Select Add Digital Channels. 2 Select OK to be... hidden that a slight tuning adjustment may improve picture quality. Allows you to fine-tune the selected analog channel manually if you feel that are automatically set channels to add digital channels. Select Auto...
Operating Instructions
Page 41
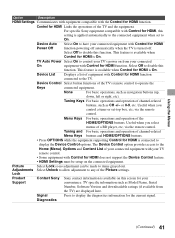
..., etc; Control for your TV remote control. • Some equipment with the Control for HDMI function. Device List Displays a list of the Picture settings. Menu Keys For basic operations and operation of the TV and the equipment. For specific Sony equipment compatible with Control for ...HDMI function connected to the TV. None For basic operations, such as CH +/- via...
..., etc; Control for your TV remote control. • Some equipment with the Control for HDMI function. Device List Displays a list of the Picture settings. Menu Keys For basic operations and operation of the TV and the equipment. For specific Sony equipment compatible with Control for ...HDMI function connected to the TV. None For basic operations, such as CH +/- via...

Operating Instructions
Page 42
Select On to play sound when the TV is turned on the screen. Some settings such as Picture, Sound, and Parental Lock will be affected by this Initial Setup. If you want to scan all receivable channels, select Initial Setup. Follow the instructions ... time you run the Initial Setup. 42 Option Initial Setup Start-up Sound Description If you missed the Initial Setup when you first connected the TV or if you wish to return your TV to factory settings, please see the Troubleshooting section on page 57.
Select On to play sound when the TV is turned on the screen. Some settings such as Picture, Sound, and Parental Lock will be affected by this Initial Setup. If you want to scan all receivable channels, select Initial Setup. Follow the instructions ... time you run the Initial Setup. 42 Option Initial Setup Start-up Sound Description If you missed the Initial Setup when you first connected the TV or if you wish to return your TV to factory settings, please see the Troubleshooting section on page 57.

Operating Instructions
Page 43
... Eco settings to disable it. While Picture Off is detected for a certain period of time. Press other available settings. Select Off to adjust your TV's power consumption. Using the Menus 43 Power Saving Select from Off, Low, High, Picture Off to disable this function. Light ...Sensor Optimizes the picture settings according to automatically power off the TV after 1h, 2h, or 4h when no...
... Eco settings to disable it. While Picture Off is detected for a certain period of time. Press other available settings. Select Off to adjust your TV's power consumption. Using the Menus 43 Power Saving Select from Off, Low, High, Picture Off to disable this function. Light ...Sensor Optimizes the picture settings according to automatically power off the TV after 1h, 2h, or 4h when no...


