Operating Instructions
Page 2
... installed and used in injury (see "Important Safety Instructions" on the TV. s Connect the equipment into an outlet on , the user is transported directly from a cold to a warm location, or if the room temperature changes suddenly, the picture may cause undesired operation. Safety s Operate the TV only on the cord. s If any interference received, including interference that interference will not be installed near an easily accessible power...
... installed and used in injury (see "Important Safety Instructions" on the TV. s Connect the equipment into an outlet on , the user is transported directly from a cold to a warm location, or if the room temperature changes suddenly, the picture may cause undesired operation. Safety s Operate the TV only on the cord. s If any interference received, including interference that interference will not be installed near an easily accessible power...
Operating Instructions
Page 3
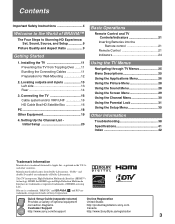
... Connecting Cables 11 Preparation for Wall-Mounting 12 2. HDMI, the HDMI logo and High-Definition Multimedia Interface are trademarks or registered marks of Sony Corporation. Setting Up the Channel List Initial Setup 20 Basic Operations Remote Control and TV Controls/Indicators 21 Inserting Batteries into the Remote control 21 Remote Control 21 Indicators 24 Using the TV Menus Navigating through TV Menus 25 Menu Descriptions 25 Using the Applications Menu 26 Using the Picture Menu 28 Using the Sound Menu 28 Using the Screen Menu...
... Connecting Cables 11 Preparation for Wall-Mounting 12 2. HDMI, the HDMI logo and High-Definition Multimedia Interface are trademarks or registered marks of Sony Corporation. Setting Up the Channel List Initial Setup 20 Basic Operations Remote Control and TV Controls/Indicators 21 Inserting Batteries into the Remote control 21 Remote Control 21 Indicators 24 Using the TV Menus Navigating through TV Menus 25 Menu Descriptions 25 Using the Applications Menu 26 Using the Picture Menu 28 Using the Sound Menu 28 Using the Screen Menu...
Operating Instructions
Page 4
... which need the TV set . A grounding type plug has two blades and a third grounding prong. Servicing is subject to be bared and cut, and causing a short-circuit, resulting in accordance with the apparatus. Stop using the TV set for several days, the TV set should be sure to unplug the AC power cord for long periods of time. 14) Refer all instructions. 5) Do not use a poor...
... which need the TV set . A grounding type plug has two blades and a third grounding prong. Servicing is subject to be bared and cut, and causing a short-circuit, resulting in accordance with the apparatus. Stop using the TV set for several days, the TV set should be sure to unplug the AC power cord for long periods of time. 14) Refer all instructions. 5) Do not use a poor...
Operating Instructions
Page 5
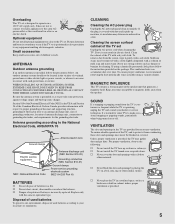
... TV set is positioned in wire Electric service equipment NEC: National Electrical Code Antenna discharge unit (NEC Section 810-20) Grounding conductors (NEC Section 810-21) Ground clamps Power service grounding electrode system (NEC Art 250 Part H) BATTERIES s Do not dispose of antenna discharge unit, connection to make occasional snapping or popping sounds, particularly when being turned on a 120 V AC supply only. To remove...
... TV set is positioned in wire Electric service equipment NEC: National Electrical Code Antenna discharge unit (NEC Section 810-20) Grounding conductors (NEC Section 810-21) Ground clamps Power service grounding electrode system (NEC Art 250 Part H) BATTERIES s Do not dispose of antenna discharge unit, connection to make occasional snapping or popping sounds, particularly when being turned on a 120 V AC supply only. To remove...
Operating Instructions
Page 6
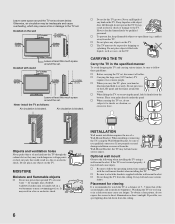
... TV. When installing or removing the TV, using a wall-mount bracket. If not properly secured during installation or removal from the Wall-Mount Bracket, the TV may be sure to follow the operating instructions supplied with stand 117/8 inches (30 cm) 4 inches (10 cm) 4 inches (10 cm) 2 3/8 inches (6 cm) Leave at least this TV get wet. Placement for viewing It is blocked. Installed on the TV. If any objects on the wall 117/8 inches (30 cm) 21/4 inches (5.7 cm) 4 inches...
... TV. When installing or removing the TV, using a wall-mount bracket. If not properly secured during installation or removal from the Wall-Mount Bracket, the TV may be sure to follow the operating instructions supplied with stand 117/8 inches (30 cm) 4 inches (10 cm) 4 inches (10 cm) 2 3/8 inches (6 cm) Leave at least this TV get wet. Placement for viewing It is blocked. Installed on the TV. If any objects on the wall 117/8 inches (30 cm) 21/4 inches (5.7 cm) 4 inches...
Operating Instructions
Page 7
... the temperature rises. Changing the Picture mode, Backlight setting, or enabling the Light Sensor, will improve this TV in direct sunlight, near a radiator, or near an easily accessible AC power outlet. s Do not push or scratch the LCD screen, or place objects on the TV. The image may be uneven or the LCD panel may expose you have unplugged the AC power cord. This does not...
... the temperature rises. Changing the Picture mode, Backlight setting, or enabling the Light Sensor, will improve this TV in direct sunlight, near a radiator, or near an easily accessible AC power outlet. s Do not push or scratch the LCD screen, or place objects on the TV. The image may be uneven or the LCD panel may expose you have unplugged the AC power cord. This does not...
Operating Instructions
Page 9
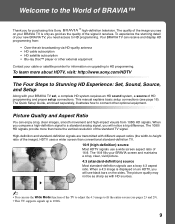
... vertical resolution of the standard TV signal. The 16:9 fills your BRAVIA TV set, a complete HD system requires an HD sound system, a source of HD programming and proper setup connections. The picture quality may not be as sharp as the quality of the signal it receives. To learn more than conventional standard-definition TV. 16:9 (high-definition) source Most HDTV signals use a boxy 4:3 aspect ratio. This manual explains basic setup connections (see black...
... vertical resolution of the standard TV signal. The 16:9 fills your BRAVIA TV set, a complete HD system requires an HD sound system, a source of HD programming and proper setup connections. The picture quality may not be as sharp as the quality of the signal it receives. To learn more than conventional standard-definition TV. 16:9 (high-definition) source Most HDTV signals use a boxy 4:3 aspect ratio. This manual explains basic setup connections (see black...
Operating Instructions
Page 11
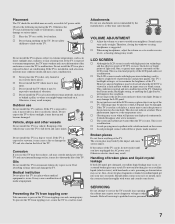
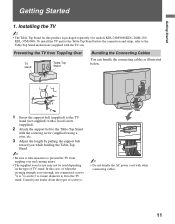
... inch (3 to 4 mm) diameter to fit to the TV stand. Getting Started Getting Started 1. To install the TV unit to the Table-Top Stand before the connection and setup, refer to prevent the TV from toppling over and causing injury. • The supplied wood screw may not be used depending on the type of screw(s). 1 2 ~ • Do not bundle the AC power cord with the TV set). Preventing the TV...
... inch (3 to 4 mm) diameter to fit to the TV stand. Getting Started Getting Started 1. To install the TV unit to the Table-Top Stand before the connection and setup, refer to prevent the TV from toppling over and causing injury. • The supplied wood screw may not be used depending on the type of screw(s). 1 2 ~ • Do not bundle the AC power cord with the TV set). Preventing the TV...
Operating Instructions
Page 12
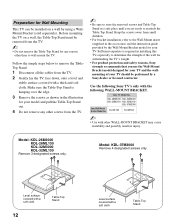
... Table-Top Stand Model: KDL-26M3000 KDL-26ML130 KDL-32M3000 KDL-32ML130 Remove 3 designated screws only. Before mounting the TV on a wall by the Wall-Mount Bracket model for your model and pull the Table-Top Stand out. 4 Do not remove any reason other WALL-MOUNT BRACKET may cause instability and possibly result in the accesories) and the instruction guide provided by using a WallMount Bracket (sold separately). Follow the simple steps below to remove the TableTop Stand: 1 Disconnect all the cables...
... Table-Top Stand Model: KDL-26M3000 KDL-26ML130 KDL-32M3000 KDL-32ML130 Remove 3 designated screws only. Before mounting the TV on a wall by the Wall-Mount Bracket model for your model and pull the Table-Top Stand out. 4 Do not remove any reason other WALL-MOUNT BRACKET may cause instability and possibly result in the accesories) and the instruction guide provided by using a WallMount Bracket (sold separately). Follow the simple steps below to remove the TableTop Stand: 1 Disconnect all the cables...
Operating Instructions
Page 14
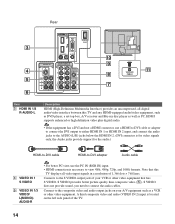
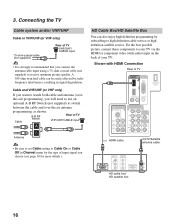
... audio/video equipment, such as DVD player, a set-top box, A/V receiver and Blu-ray disc player as well as a VCR or other video equipment. S VIDEO provides better picture quality than composite video (5). Connects to view 480i, 480p, 720p, and 1080i formats. A third composite video and audio (VIDEO IN 2) input is necessary to the S VIDEO output jack of your A/V equipment such as PC. Note that has S VIDEO. Rear 3 4 5 6 IN PC IN 1 RGB 2 SERVICE ONLY R-AUDIO-L AUDIO VIDEO IN 1 S VIDEO 3 COMPONENT...
... audio/video equipment, such as DVD player, a set-top box, A/V receiver and Blu-ray disc player as well as a VCR or other video equipment. S VIDEO provides better picture quality than composite video (5). Connects to view 480i, 480p, 720p, and 1080i formats. A third composite video and audio (VIDEO IN 2) input is necessary to the S VIDEO output jack of your A/V equipment such as PC. Note that has S VIDEO. Rear 3 4 5 6 IN PC IN 1 RGB 2 SERVICE ONLY R-AUDIO-L AUDIO VIDEO IN 1 S VIDEO 3 COMPONENT...
Operating Instructions
Page 15
... the S VIDEO (4) or the 480p/480i)/ composite video (5) connections. qa VHF/UHF/ CABLE RF input that is PCM/Dolby Digital OUT (COAXIAL) compatible. 9 PC IN (RGB/AUDIO) Connect to the computer before connecting the HD15-HD15 cable. 0 SERVICE ONLY This USB port is the case, connect the adapter to a personal computer's video output connector using HD15-HD15 cable (analog RGB, not supplied). Getting Started Item Description 6 COMPONENT Connect to view 480i, 480p, 720p, and 1080i formats.
... the S VIDEO (4) or the 480p/480i)/ composite video (5) connections. qa VHF/UHF/ CABLE RF input that is PCM/Dolby Digital OUT (COAXIAL) compatible. 9 PC IN (RGB/AUDIO) Connect to the computer before connecting the HD15-HD15 cable. 0 SERVICE ONLY This USB port is the case, connect the adapter to a personal computer's video output connector using HD15-HD15 cable (analog RGB, not supplied). Getting Started Item Description 6 COMPONENT Connect to view 480i, 480p, 720p, and 1080i formats.
Operating Instructions
Page 16
... cable (not supplied) Rear of your TV via the HDMI or component video (with HDMI Connection Rear of TV VHF/UHF/CABLE input Antenna • Be sure to set Cable setting to watch both cable and antenna (over -the air antenna programming, as shown. For the best possible picture, connect these components to receive optimum picture quality. A 300-ohm twin lead cable can also enjoy high definition programming by radio frequency interference, resulting in Channel menu for the type of input signal you connect the antenna/cable input using...
... cable (not supplied) Rear of your TV via the HDMI or component video (with HDMI Connection Rear of TV VHF/UHF/CABLE input Antenna • Be sure to set Cable setting to watch both cable and antenna (over -the air antenna programming, as shown. For the best possible picture, connect these components to receive optimum picture quality. A 300-ohm twin lead cable can also enjoy high definition programming by radio frequency interference, resulting in Channel menu for the type of input signal you connect the antenna/cable input using...
Operating Instructions
Page 20
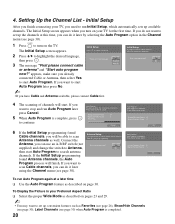
... Setup Press to cancel. If you need to set up available channels. Analog Channels Found: 24 Digital Channels Found: 2 Searching.... Setting Up the Channel List - The Initial Setup screen appears. Yes No 3 The message "First please connect cable or antenna" and "Start auto program now?" Antenna, you have Cable and Antenna available, please connect Cable first. 4 The scanning of channels will start Auto Program later press No. ~ •If you can use air signals, please connect antenna. To Display the Picture in the Channel menu...
... Setup Press to cancel. If you need to set up available channels. Analog Channels Found: 24 Digital Channels Found: 2 Searching.... Setting Up the Channel List - The Initial Setup screen appears. Yes No 3 The message "First please connect cable or antenna" and "Start auto program now?" Antenna, you have Cable and Antenna available, please connect Cable first. 4 The scanning of channels will start Auto Program later press No. ~ •If you can use air signals, please connect antenna. To Display the Picture in the Channel menu...
Operating Instructions
Page 24
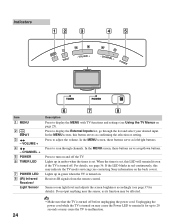
... to turn on the back cover). Lights up /down buttons. In the MENU screen, these buttons serve as confirming the selection or setting. CHANNEL + 5 POWER 6 TIMER LED 7 POWER LED 8 (IR) Infrared Receiver/ Light Sensor Description Press to adjust the volume. Press to display the External Inputs list, go through channels. Unplugging the power cord while the TV is turned on may indicate the TV needs servicing (see page 36. If the LED blinks in green when the TV is turned off the TV. Receives IR signals from the remote control.
... to turn on the back cover). Lights up /down buttons. In the MENU screen, these buttons serve as confirming the selection or setting. CHANNEL + 5 POWER 6 TIMER LED 7 POWER LED 8 (IR) Infrared Receiver/ Light Sensor Description Press to adjust the volume. Press to display the External Inputs list, go through channels. Unplugging the power cord while the TV is turned on may indicate the TV needs servicing (see page 36. If the LED blinks in green when the TV is turned off the TV. Receives IR signals from the remote control.
Operating Instructions
Page 25
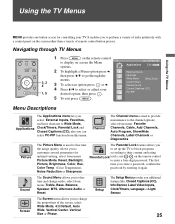
... option press or b. 4 Press V/v to change audio; Using the TV Menus Using the TV Menus MENU provides one button access for optimal viewing, select from menu: Picture Mode, Reset, Backlight, Picture, Brightness, Color, Hue, Color Temp. (Color Temperature), Noise Reduction or Sharpness. Setup The Setup Menu provides you to set up the TV to block programs according to enter a four-digit password. The Parental Lock feature allows you additional features like: Closed Captions (CC), Info Banner, Label Video Inputs, Clock/Timers, Language or Light Sensor.
... option press or b. 4 Press V/v to change audio; Using the TV Menus Using the TV Menus MENU provides one button access for optimal viewing, select from menu: Picture Mode, Reset, Backlight, Picture, Brightness, Color, Hue, Color Temp. (Color Temperature), Noise Reduction or Sharpness. Setup The Setup Menu provides you to set up the TV to block programs according to enter a four-digit password. The Parental Lock feature allows you additional features like: Closed Captions (CC), Info Banner, Label Video Inputs, Clock/Timers, Language or Light Sensor.

Operating Instructions
Page 36
.... your TV skips the input you selected when you press the button on screen. 1 Press V/v to set the timer by Time, Days, Duration, Channel and Volume Setup that input appears on the remote control). • The skip label is digital) on the remote control. or Program (to highlight the input (from the following labels for the VIDEO 1 input. Then when you press to change the values) or B/b (move through the external inputs and...
.... your TV skips the input you selected when you press the button on screen. 1 Press V/v to set the timer by Time, Days, Duration, Channel and Volume Setup that input appears on the remote control). • The skip label is digital) on the remote control. or Program (to highlight the input (from the following labels for the VIDEO 1 input. Then when you press to change the values) or B/b (move through the external inputs and...
Operating Instructions
Page 38
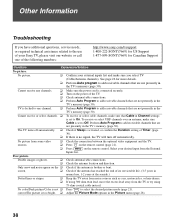
... from some video sources. ❑ Check the connection between the optional video equipment and the TV. ❑ Press on the remote control (page 21). ❑ Press MENU on the remote control. screen. ❑ Check if the antenna has reached the end of its serviceable life. (3-5 years in normal use of your Sony TV, please visit our website or call one channel. ❑ Perform Auto Program to add receivable channels that are...
... from some video sources. ❑ Check the connection between the optional video equipment and the TV. ❑ Press on the remote control (page 21). ❑ Press MENU on the remote control. screen. ❑ Check if the antenna has reached the end of its serviceable life. (3-5 years in normal use of your Sony TV, please visit our website or call one channel. ❑ Perform Auto Program to add receivable channels that are...
Operating Instructions
Page 39
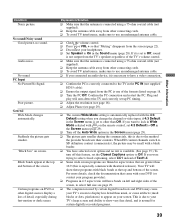
... replaced with the 4:3 Default setting when you were trying to the TV in the Screen menu is connected using a 75-ohm coaxial cable (not supplied). ❑ Keep the antenna cable away from other digital sources display a loss of the formats listed on page 18. ❑ Turn the PC Off. If you change the channel or video input, if 4:3 Default in the PC IN (not supplied HD15 cable). ❑ Ensure the output signal from the TV's speakers regardless of the TV's volume control...
... replaced with the 4:3 Default setting when you were trying to the TV in the Screen menu is connected using a 75-ohm coaxial cable (not supplied). ❑ Keep the antenna cable away from other digital sources display a loss of the formats listed on page 18. ❑ Turn the PC Off. If you change the channel or video input, if 4:3 Default in the PC IN (not supplied HD15 cable). ❑ Ensure the output signal from the TV's speakers regardless of the TV's volume control...

Operating Instructions
Page 41
... Wall-Mount Installation Instructions (1) Headphones plug adapter / Connecting cables / Wall-Mount Bracket: SU-WL100 (KDL-26M3000 and KDL-26ML130), SU-WL500 (KDL-32M3000, KDL-32ML130, and KDL-37M3000) / 75-ohm coaxial cable (1) / HD15-HD15 cable (1) • Design and specifications are subject to the Table-Top Stand) / Operating Instructions (1) / Quick Setup Guide (1) / Warranty Card (1) / Online Registration Card (U.S.A. Other Information Specifications Model System KDL-26M3000/ KDL-26ML130 KDL-32M3000/ KDL-32ML130 KDL-37M3000 Television system Channel coverage Panel system Speaker...
... Wall-Mount Installation Instructions (1) Headphones plug adapter / Connecting cables / Wall-Mount Bracket: SU-WL100 (KDL-26M3000 and KDL-26ML130), SU-WL500 (KDL-32M3000, KDL-32ML130, and KDL-37M3000) / 75-ohm coaxial cable (1) / HD15-HD15 cable (1) • Design and specifications are subject to the Table-Top Stand) / Operating Instructions (1) / Quick Setup Guide (1) / Warranty Card (1) / Online Registration Card (U.S.A. Other Information Specifications Model System KDL-26M3000/ KDL-26ML130 KDL-32M3000/ KDL-32ML130 KDL-37M3000 Television system Channel coverage Panel system Speaker...
Operating Instructions
Page 42
... INPUT 24 Installing the TV on a wall 12 J JUMP button 23 L Label Channels 30 Light Sensor Described 24 M Menu Applications 26 Channel 30 Parental Lock 31 Picture 28 Screen 29 Setup 35 Sound 28 MENU button 22, 24 Movie Rating 33 MTS 28 MUTING button 22 N Noise Reduction 28 P Parental Lock 26, 31 PC IN 15 PC-PIP 27 Phase 29 Picture 28 PICTURE button 21 Picture Mode 28 POWER button 22, 24 POWER LED 24 R Rating 31 Reset 28, 40 RETURN button...
... INPUT 24 Installing the TV on a wall 12 J JUMP button 23 L Label Channels 30 Light Sensor Described 24 M Menu Applications 26 Channel 30 Parental Lock 31 Picture 28 Screen 29 Setup 35 Sound 28 MENU button 22, 24 Movie Rating 33 MTS 28 MUTING button 22 N Noise Reduction 28 P Parental Lock 26, 31 PC IN 15 PC-PIP 27 Phase 29 Picture 28 PICTURE button 21 Picture Mode 28 POWER button 22, 24 POWER LED 24 R Rating 31 Reset 28, 40 RETURN button...


