Safety and Regulatory Booklet
Page 1
...fabricante o vendidos con el aparato. Consulte el reverso para obtener más información. LCD SCREEN ☐ Although the LCD screen is in a fire or an electric shock. This condition is damaged, liquid has ...inside the TV, unplug the TV immediately and have been used in a dark ambient without an input source or with wet hands as it checked by the cord. ☐ Keep the power ... similar characteristics as a chest of drawers. ☐ Care should be pulled or grabbed by Sony and to certify that adequate replacement parts with this booklet before operating it further. ☐ ...
...fabricante o vendidos con el aparato. Consulte el reverso para obtener más información. LCD SCREEN ☐ Although the LCD screen is in a fire or an electric shock. This condition is damaged, liquid has ...inside the TV, unplug the TV immediately and have been used in a dark ambient without an input source or with wet hands as it checked by the cord. ☐ Keep the power ... similar characteristics as a chest of drawers. ☐ Care should be pulled or grabbed by Sony and to certify that adequate replacement parts with this booklet before operating it further. ☐ ...
Operating Instructions
Page 3
...19 Remote Control Button Description 20 TV Controls and Indicators 24 Using Features BRAVIA® SyncTM with Control for HDMI . . .25 Using PIP Feature 26 Favorites 27 Wide Mode 27 Wide Mode with PC 28 Inputs 28 Playing back Photo/Music/Video via USB. . . 29 Using the...Installing the Wall-Mount Bracket 47 Troubleshooting 52 Important Notices 56 Specifications 57 Index 59 Customer Support United States http://www.sony.com/tvsupport Canada http://www.sony.ca/support On-line Registration United States http://productregistration.sony.com Canada http://www.SonyStyle.ca/registration 3
...19 Remote Control Button Description 20 TV Controls and Indicators 24 Using Features BRAVIA® SyncTM with Control for HDMI . . .25 Using PIP Feature 26 Favorites 27 Wide Mode 27 Wide Mode with PC 28 Inputs 28 Playing back Photo/Music/Video via USB. . . 29 Using the...Installing the Wall-Mount Bracket 47 Troubleshooting 52 Important Notices 56 Specifications 57 Index 59 Customer Support United States http://www.sony.com/tvsupport Canada http://www.sony.ca/support On-line Registration United States http://productregistration.sony.com Canada http://www.SonyStyle.ca/registration 3
Operating Instructions
Page 5
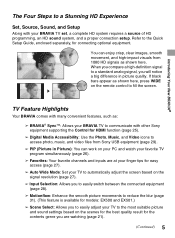
... favorite TV program simultaneously (page 26). ➢ Favorites: Your favorite channels and inputs are watching (page 21). (Continued) 5 If black bars appear as : ➢ BRAVIA® SyncTM: Allows your BRAVIA TV to communicate with your TV to the most suitable picture and sound settings based... in Picture): You can enjoy crisp, clear images, smooth movement, and high-impact visuals from Sony USB equipment (page 29). ➢ PIP (Picture in picture quality. Introducing Your New BRAVIA® The Four Steps to a Stunning HD Experience Set, Source, Sound, and Setup Along with...
... favorite TV program simultaneously (page 26). ➢ Favorites: Your favorite channels and inputs are watching (page 21). (Continued) 5 If black bars appear as : ➢ BRAVIA® SyncTM: Allows your BRAVIA TV to communicate with your TV to the most suitable picture and sound settings based... in Picture): You can enjoy crisp, clear images, smooth movement, and high-impact visuals from Sony USB equipment (page 29). ➢ PIP (Picture in picture quality. Introducing Your New BRAVIA® The Four Steps to a Stunning HD Experience Set, Source, Sound, and Setup Along with...
Operating Instructions
Page 8
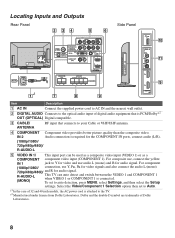
...720p/480p/480i)/ and R for the COMPONENT IN ports, connect audio (L/R). (1080p/1080i/ 720p/480p/480i)/ R-AUDIO-L 5 VIDEO IN 1/ This input port can auto detect and switch between the VIDEO 1 and COMPONENT 1 when VIDEO 1 or COMPONENT 1 is PCM/Dolby*2 OUT (OPTICAL) Digital compatible.... 3 CABLE/ ANTENNA RF input that is connected. Locating Inputs and Outputs Rear Panel 2 34 5 Side Panel 6 AC IN AUDIO R L (MONO) 1 AUDIO PR CABLE/ ANTENNA COMPONENT IN (1080p/1080i...
...720p/480p/480i)/ and R for the COMPONENT IN ports, connect audio (L/R). (1080p/1080i/ 720p/480p/480i)/ R-AUDIO-L 5 VIDEO IN 1/ This input port can auto detect and switch between the VIDEO 1 and COMPONENT 1 when VIDEO 1 or COMPONENT 1 is PCM/Dolby*2 OUT (OPTICAL) Digital compatible.... 3 CABLE/ ANTENNA RF input that is connected. Locating Inputs and Outputs Rear Panel 2 34 5 Side Panel 6 AC IN AUDIO R L (MONO) 1 AUDIO PR CABLE/ ANTENNA COMPONENT IN (1080p/1080i...
Operating Instructions
Page 9
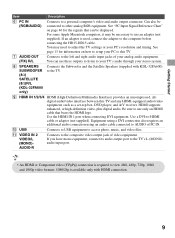
...) provides an uncompressed, alldigital audio/video interface between this TV. 7 AUDIO OUT (FIX) R/L Connects to the left and right audio input jacks of your stereo system. 8 SPEAKERS SUBWOOFER (8Ω) SATELLITE (8Ω)R/L (KDL-32FA600 only) Connects the Subwoofer and the Satellite Speakers (supplied with HDMI connection. 9 See page 13 for the signals that...
...) provides an uncompressed, alldigital audio/video interface between this TV. 7 AUDIO OUT (FIX) R/L Connects to the left and right audio input jacks of your stereo system. 8 SPEAKERS SUBWOOFER (8Ω) SATELLITE (8Ω)R/L (KDL-32FA600 only) Connects the Subwoofer and the Satellite Speakers (supplied with HDMI connection. 9 See page 13 for the signals that...
Operating Instructions
Page 10
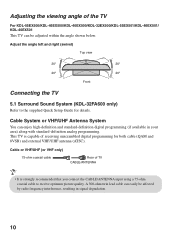
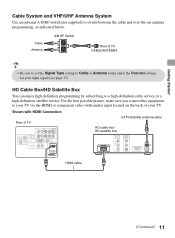
...or VHF only) 75-ohm coaxial cable Rear of TV CABLE/ANTENNA • It is capable of the TV For KDL-55EX500/KDL-46EX500/KDL-40EX500/KDL-32EX500/KDL-55EX501/KDL-46EX501/ KDL-40EX501 This TV can easily be adjusted within the angle shown below. Cable System or VHF/UHF Antenna System You can... frequency interference, resulting in your area) along with standard-definition analog programming. This TV is strongly recommended that you connect the CABLE/ANTENNA input using a 75-ohm coaxial cable to the supplied Quick Setup Guide for both cable (QAM and 8VSB) and external VHF/UHF antenna (ATSC...
...or VHF only) 75-ohm coaxial cable Rear of TV CABLE/ANTENNA • It is capable of the TV For KDL-55EX500/KDL-46EX500/KDL-40EX500/KDL-32EX500/KDL-55EX501/KDL-46EX501/ KDL-40EX501 This TV can easily be adjusted within the angle shown below. Cable System or VHF/UHF Antenna System You can... frequency interference, resulting in your area) along with standard-definition analog programming. This TV is strongly recommended that you connect the CABLE/ANTENNA input using a 75-ohm coaxial cable to the supplied Quick Setup Guide for both cable (QAM and 8VSB) and external VHF/UHF antenna (ATSC...
Operating Instructions
Page 11
... and VHF/UHF Antenna System Use an optional A-B RF switch (not supplied) to a high-definition cable service or a high-definition satellite service. Shown with audio) input located on the back of TV AUDIO R L (MONO) 1 AUDIO PR CABLE/ ANTENNA COMPONENT IN (1080p/1080i/ 720p/480p/480i) 2 R L RGB DIGITAL PC...your TV. Cable Antenna A/B RF Switch A B Rear of TV CABLE/ANTENNA • Be sure to set the Signal Type setting to your input signal (see page 37). HD Cable Box/HD Satellite Box You can enjoy high-definition programming by subscribing to switch between the cable and over...
... and VHF/UHF Antenna System Use an optional A-B RF switch (not supplied) to a high-definition cable service or a high-definition satellite service. Shown with audio) input located on the back of TV AUDIO R L (MONO) 1 AUDIO PR CABLE/ ANTENNA COMPONENT IN (1080p/1080i/ 720p/480p/480i) 2 R L RGB DIGITAL PC...your TV. Cable Antenna A/B RF Switch A B Rear of TV CABLE/ANTENNA • Be sure to set the Signal Type setting to your input signal (see page 37). HD Cable Box/HD Satellite Box You can enjoy high-definition programming by subscribing to switch between the cable and over...

Operating Instructions
Page 18
Refer to stop or cancel the Auto Program. Follow the help text provided on the TV. Confirm V/v/B/b buttons: Allow you to the TV's CABLE/ANTENNA input. To run the Auto Program. • When prompted to select Retail or Home, be done at a Initial Setup Please select the type of use for ...
Refer to stop or cancel the Auto Program. Follow the help text provided on the TV. Confirm V/v/B/b buttons: Allow you to the TV's CABLE/ANTENNA input. To run the Auto Program. • When prompted to select Retail or Home, be done at a Initial Setup Please select the type of use for ...
Operating Instructions
Page 20
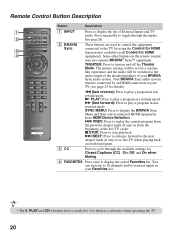
...program in your TV (see page 25 for details). N PLAY: Press to turn on the remote control may also operate BRAVIA® SyncTM equipment. Remote Control Button Description Button Description 1 1 INPUT Press to the TV by an HDMI connection to play a program at a normal speed. Press repeatedly to toggle through ... the audio output of the attached speakers of the live TV when playing back a recorded program. 3 CC Press to cycle through the inputs. 2 See page 28. 2 BRAVIA These buttons are used to control the equipment Sync connected to display the list of External...
...program in your TV (see page 25 for details). N PLAY: Press to turn on the remote control may also operate BRAVIA® SyncTM equipment. Remote Control Button Description Button Description 1 1 INPUT Press to the TV by an HDMI connection to play a program at a normal speed. Press repeatedly to toggle through ... the audio output of the attached speakers of the live TV when playing back a recorded program. 3 CC Press to cycle through the inputs. 2 See page 28. 2 BRAVIA These buttons are used to control the equipment Sync connected to display the list of External...
Operating Instructions
Page 21
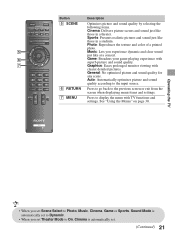
General: No optimized picture and sound quality for any scene. Auto: Automatically optimizes picture and sound quality according to the input source. 6 RETURN Press to go back to the previous screen or exit from the screen when displaying menu items and settings. 7 MENU Press to display ...
General: No optimized picture and sound quality for any scene. Auto: Automatically optimizes picture and sound quality according to the input source. 6 RETURN Press to go back to the previous screen or exit from the screen when displaying menu items and settings. 7 MENU Press to display ...
Operating Instructions
Page 22
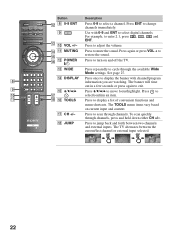
...channels, press and hold down either CH +/-. Press to 0 qj select/confirm an item. The TV alternates between two channels and external inputs. qf DISPLAY Press once to display a list of convenient functions and menu shortcuts. qa qk qh TOOLS Press to display the banner with... 0-9 and ENT to change channels immediately. 9 qd 0 VOL +/- qj CH +/- Press to turn on current input and content. To scan quickly through channels. qk JUMP Press to select a channel. Button Description qs 8 0-9 ENT Press 0-9 to jump back and ...
...channels, press and hold down either CH +/-. Press to 0 qj select/confirm an item. The TV alternates between two channels and external inputs. qf DISPLAY Press once to display a list of convenient functions and menu shortcuts. qa qk qh TOOLS Press to display the banner with... 0-9 and ENT to change channels immediately. 9 qd 0 VOL +/- qj CH +/- Press to turn on current input and content. To scan quickly through channels. qk JUMP Press to select a channel. Button Description qs 8 0-9 ENT Press 0-9 to jump back and ...
Operating Instructions
Page 24
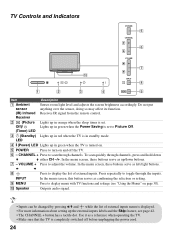
... • For more information about setting up /down either CH -/+. In the menu screen, this button serves as left/right buttons. 8 INPUT 9 MENU 0 Speaker Press to turn on page 30). Receives IR signal from the remote control. 2 (Picture Lights up in standby mode.... In the menu screen, these buttons serve as confirming the selection or setting. TV Controls and Indicators POWER 5 CHANNEL 6 VOLUME 7 0 INPUT 8 1 2 3 4 MENU 9 Item Description 1 Ambient sensor (IR) Infrared Receiver Senses room light level and adjusts the screen brightness accordingly. Press ...
... • For more information about setting up /down either CH -/+. In the menu screen, this button serves as left/right buttons. 8 INPUT 9 MENU 0 Speaker Press to turn on page 30). Receives IR signal from the remote control. 2 (Picture Lights up in standby mode.... In the menu screen, these buttons serve as confirming the selection or setting. TV Controls and Indicators POWER 5 CHANNEL 6 VOLUME 7 0 INPUT 8 1 2 3 4 MENU 9 Item Description 1 Ambient sensor (IR) Infrared Receiver Senses room light level and adjusts the screen brightness accordingly. Press ...

Operating Instructions
Page 25
... play. • Automatically turns the connected equipment off when you switch the TV to standby mode. • Control for HDMI (BRAVIA Sync) is only available for the connected Sony equipment that equipment when you select it from the TV speaker to the audio system when you switch the TV to standby... off when you switch the TV to the AV amplifier by using HDMI CEC (Consumer Electronics Control). For settings on and switches the input to that has the BRAVIA Sync or is compatible with Control for HDMI. • The Control for HDMI, and set on both the TV and connected equipment. ...
... play. • Automatically turns the connected equipment off when you switch the TV to standby mode. • Control for HDMI (BRAVIA Sync) is only available for the connected Sony equipment that equipment when you select it from the TV speaker to the audio system when you switch the TV to standby... off when you switch the TV to the AV amplifier by using HDMI CEC (Consumer Electronics Control). For settings on and switches the input to that has the BRAVIA Sync or is compatible with Control for HDMI. • The Control for HDMI, and set on both the TV and connected equipment. ...
Operating Instructions
Page 26
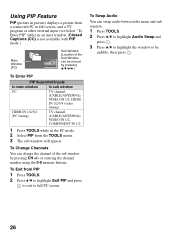
...then press . 26 Using PIP Feature PIP (picture in picture) displays a picture from a connected PC in full screen, and a TV program or other external input (see below "To Enter PIP" table) in the PC mode. 2 Select PIP from PIP 1 Press TOOLS. 2 Press V/v to highlight Exit PIP and ...press to exit to be moved by pressing V/v/B/b.) To Enter PIP PIP Supported Inputs In main window In sub window PC TV channel (CABLE/ANTENNA), VIDEO IN 1/2, HDMI IN 1/2/3/4 (video timing) HDMI IN 1/2/3/4 (PC timing) TV channel ...
...then press . 26 Using PIP Feature PIP (picture in picture) displays a picture from a connected PC in full screen, and a TV program or other external input (see below "To Enter PIP" table) in the PC mode. 2 Select PIP from PIP 1 Press TOOLS. 2 Press V/v to highlight Exit PIP and ...press to exit to be moved by pressing V/v/B/b.) To Enter PIP PIP Supported Inputs In main window In sub window PC TV channel (CABLE/ANTENNA), VIDEO IN 1/2, HDMI IN 1/2/3/4 (video timing) HDMI IN 1/2/3/4 (PC timing) TV channel ...
Operating Instructions
Page 27
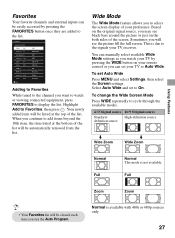
... available with 480i or 480p sources only. 27 Zoom Zoom Normal is due to the signals your TV receives. Favorites Your favorite channels and external inputs can set your TV to Auto Wide. Wide Mode The Wide Mode feature allows you continue to add items beyond the 10th item, the item...
... available with 480i or 480p sources only. 27 Zoom Zoom Normal is due to the signals your TV receives. Favorites Your favorite channels and external inputs can set your TV to Auto Wide. Wide Mode The Wide Mode feature allows you continue to add items beyond the 10th item, the item...
Operating Instructions
Page 28
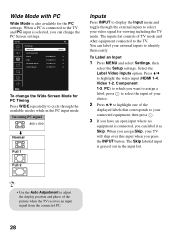
...Pitch Horizontal Center Vertical Center Normal 0 0 0 0 Set To change the PC Screen settings. Full 2 • Use the Auto Adjustment to the TV and PC input is connected, you want to the TV. When a PC is also available for PC Timing Press WIDE repeatedly to your TV will skip over this..., then select the Setup settings. When you assign Skip, your connected equipment, then press . 3 If you have an open input where no equipment is selected, you press the INPUT button. Wide Mode with PC Wide Mode is connected to adjust the display position and phase of the picture when the...
...Pitch Horizontal Center Vertical Center Normal 0 0 0 0 Set To change the PC Screen settings. Full 2 • Use the Auto Adjustment to the TV and PC input is connected, you want to the TV. When a PC is also available for PC Timing Press WIDE repeatedly to your TV will skip over this..., then select the Setup settings. When you assign Skip, your connected equipment, then press . 3 If you have an open input where no equipment is selected, you press the INPUT button. Wide Mode with PC Wide Mode is connected to adjust the display position and phase of the picture when the...
Operating Instructions
Page 30
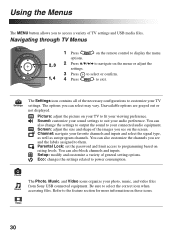
... MENU button allows you see and the labels assigned to them. You can also customize the channels you can also block channels and inputs. Video 30 Picture: adjust the picture on your TV to suit your TV settings. Sound: customize your sound settings to fit your... preference. Settings The Settings icon contains all of general setting options. Photo The Photo, Music, and Video icons organize your favorite channels and inputs and select the signal type, as well as autoprogram channels. Setup: modify and customize a variety of the necessary configurations to exit. Channel:...
... MENU button allows you see and the labels assigned to them. You can also customize the channels you can also block channels and inputs. Video 30 Picture: adjust the picture on your TV to suit your TV settings. Sound: customize your sound settings to fit your... preference. Settings The Settings icon contains all of general setting options. Photo The Photo, Music, and Video icons organize your favorite channels and inputs and select the signal type, as well as autoprogram channels. Setup: modify and customize a variety of the necessary configurations to exit. Channel:...
Operating Instructions
Page 33
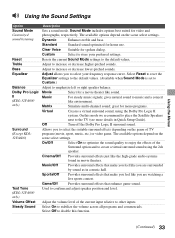
...Menus Using the Sound Settings Option Sound Mode Customized sound listening Reset Treble Bass Equalizer Balance Dolby Pro Logic II (KDL-32FA600 only) Surround (Except KDL32FA600) Test Tone (KDL-32FA600 only) Volume Offset Steady Sound Description Sets a sound mode. Sound Mode includes options best suited for spoken..., sport, music, etc.) or video game. On/Off Select On to optimize the sound quality to enjoy the effects of the current input relative to create a virtual surround sound using the Dolby Pro Logic II system. Game/Off Provides surround effects that make you feel like...
...Menus Using the Sound Settings Option Sound Mode Customized sound listening Reset Treble Bass Equalizer Balance Dolby Pro Logic II (KDL-32FA600 only) Surround (Except KDL32FA600) Test Tone (KDL-32FA600 only) Volume Offset Steady Sound Description Sets a sound mode. Sound Mode includes options best suited for spoken..., sport, music, etc.) or video game. On/Off Select On to optimize the sound quality to enjoy the effects of the current input relative to create a virtual surround sound using the Dolby Pro Logic II system. Game/Off Provides surround effects that make you feel like...

Operating Instructions
Page 35
...Normal is not available when you are watching a 720p, 1080i or 1080p source. • If 4:3 Default is set to automatically change channels (or inputs), Wide Mode is 4:3. Horizontal Allows you to move the position of the Select the default original image as channels and... this function is set to move the position of the picture are disturbing to continue using the current Wide Mode setting when the channel or input is 4:3 (Standard definition source). Screen Mode to use Normal for 4:3 sources Full Select to display 4:3 picture in their original size when parts...
...Normal is not available when you are watching a 720p, 1080i or 1080p source. • If 4:3 Default is set to automatically change channels (or inputs), Wide Mode is 4:3. Horizontal Allows you to move the position of the Select the default original image as channels and... this function is set to move the position of the picture are disturbing to continue using the current Wide Mode setting when the channel or input is 4:3 (Standard definition source). Screen Mode to use Normal for 4:3 sources Full Select to display 4:3 picture in their original size when parts...
Operating Instructions
Page 36
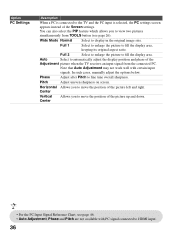
... 26). Note that Auto Adjustment may not work well with PC signal connected to HDMI input. 36 Horizontal Allows you to move the position of the Adjustment picture when the TV receives an input signal from TOOLS button (see page 46. • Auto Adjustment, Phase and Pitch ...are not available with certain input signals. In such cases, manually adjust the options below. Option PC Settings Description ...
... 26). Note that Auto Adjustment may not work well with PC signal connected to HDMI input. 36 Horizontal Allows you to move the position of the Adjustment picture when the TV receives an input signal from TOOLS button (see page 46. • Auto Adjustment, Phase and Pitch ...are not available with certain input signals. In such cases, manually adjust the options below. Option PC Settings Description ...


