Operating Instructions
Page 5
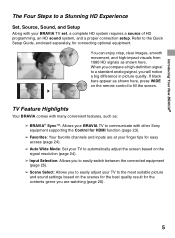
...from 1080 HD signals as : ➢ BRAVIA® SyncTM: Allows your BRAVIA TV to communicate with your TV to the most suitable picture and sound settings based on the remote control to fill the screen. TV Feature Highlights Your BRAVIA comes with many convenient features, such as shown... of HD programming, an HD sound system, and a proper connection setup. Introducing Your New BRAVIA® The Four Steps to a Stunning HD Experience Set, Source, Sound, and Setup Along with other Sony equipment supporting the Control for HDMI function (page 23). ➢ Favorites: Your favorite channels...
...from 1080 HD signals as : ➢ BRAVIA® SyncTM: Allows your BRAVIA TV to communicate with your TV to the most suitable picture and sound settings based on the remote control to fill the screen. TV Feature Highlights Your BRAVIA comes with many convenient features, such as shown... of HD programming, an HD sound system, and a proper connection setup. Introducing Your New BRAVIA® The Four Steps to a Stunning HD Experience Set, Source, Sound, and Setup Along with other Sony equipment supporting the Control for HDMI function (page 23). ➢ Favorites: Your favorite channels...
Operating Instructions
Page 21
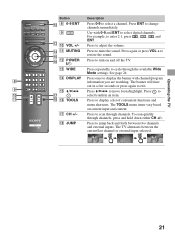
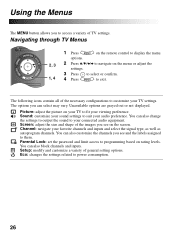
... to adjust the volume. Press ENT to turn on current input and content. Press to change channels immediately. 9 qd 0 VOL +/- The TOOLS menu items vary based on and off the TV. To scan quickly through channels, press and hold down either CH +/-. Use with channel/program 8 information you are watching. qf...
... to adjust the volume. Press ENT to turn on current input and content. Press to change channels immediately. 9 qd 0 VOL +/- The TOOLS menu items vary based on and off the TV. To scan quickly through channels, press and hold down either CH +/-. Use with channel/program 8 information you are watching. qf...
Operating Instructions
Page 24
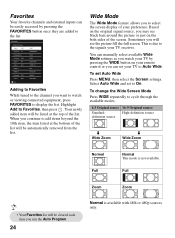
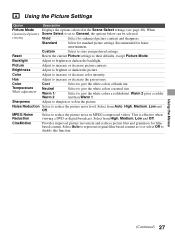
Highlight Add to display the list. Based on the original signal source, you may see the picture fill the full screen. High-definition source definition source m Wide Zoom m Wide Zoom Normal Full ...
Highlight Add to display the list. Based on the original signal source, you may see the picture fill the full screen. High-definition source definition source m Wide Zoom m Wide Zoom Normal Full ...
Operating Instructions
Page 26
Picture: adjust the picture on your TV to programming based on rating levels. Parental Lock: set the password and limit access to fit your connected audio equipment. Setup: modify and customize a variety of TV settings. ...
Picture: adjust the picture on your TV to programming based on rating levels. Parental Lock: set the password and limit access to fit your connected audio equipment. Setup: modify and customize a variety of TV settings. ...
Operating Instructions
Page 27
... a bluish tint. Select to increase or decrease the green tones. This is set to brighten or darken the picture. Select Auto to represent original film-based content as is or select Off to give the white colors a reddish tint. Color Temperature White adjustment Cool Neutral Warm 1/ Warm 2 Select to disable this...
... a bluish tint. Select to increase or decrease the green tones. This is set to brighten or darken the picture. Select Auto to represent original film-based content as is or select Off to give the white colors a reddish tint. Color Temperature White adjustment Cool Neutral Warm 1/ Warm 2 Select to disable this...
Operating Instructions
Page 31
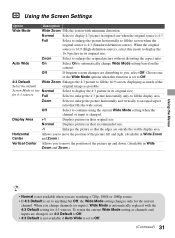
... you to move the position of the picture left and right. (Available in Wide Zoom and Zoom.) Vertical Center Allows you change Wide Mode setting based on the content. When the original source is 16:9 (High-definition source), select this function is automatically replaced with minimum distortion. Full Select to enlarge...
... you to move the position of the picture left and right. (Available in Wide Zoom and Zoom.) Vertical Center Allows you change Wide Mode setting based on the content. When the original source is 16:9 (High-definition source), select this function is automatically replaced with minimum distortion. Full Select to enlarge...
Operating Instructions
Page 34
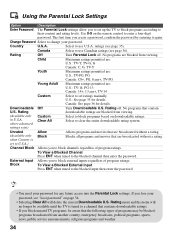
... a Blocked External Input Press ENT when tuned to their content and rating levels. If you lose your password, see page 35). Select to block programs based on downloadable ratings. ratings (see "Lost password" on the remote control to clear the entire downloadable rating system. Canada: See page 36 for details. Clear...
... a Blocked External Input Press ENT when tuned to their content and rating levels. If you lose your password, see page 35). Select to block programs based on downloadable ratings. ratings (see "Lost password" on the remote control to clear the entire downloadable rating system. Canada: See page 36 for details. Clear...
Operating Instructions
Page 35
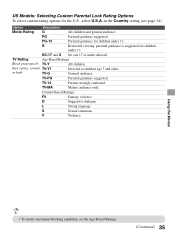
...-17 and X No one 17 or under 17. L Strong language. TV-PG Parental guidance suggested . TV Rating Age-Based Ratings Block programs by TV-Y All children. D Suggestive dialogue. Using the Menus • To ensure maximum blocking capability, set the Age...-Based Ratings. (Continued) 35 General audience. S Sexual situations. Option Description Movie Rating G All children and general audience. R Restricted viewing...
...-17 and X No one 17 or under 17. L Strong language. TV-PG Parental guidance suggested . TV Rating Age-Based Ratings Block programs by TV-Y All children. D Suggestive dialogue. Using the Menus • To ensure maximum blocking capability, set the Age...-Based Ratings. (Continued) 35 General audience. S Sexual situations. Option Description Movie Rating G All children and general audience. R Restricted viewing...
Operating Instructions
Page 45
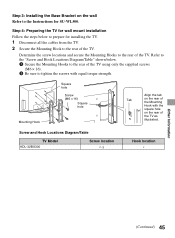
... Mounting Hook Square hole Screw (M6 × 16) Square hole Align the tab Tab on the rear of the TV. Step 3: Installing the Base Bracket on the wall Refer to the Instructions for installing the TV. 1 Disconnect all the cables from the TV. 2 Secure the Mounting Hook to...for wall mount installation Follow the steps below . 1 Secure the Mounting Hooks to prepare for SU-WL500. Screw and Hook Locations Diagram/Table TV Model KDL-32BX300 Screw location e, g Hook location c Other Information (Continued) 45 Refer to the "Screw and Hook Locations Diagram/Table" shown below to the rear...
... Mounting Hook Square hole Screw (M6 × 16) Square hole Align the tab Tab on the rear of the TV. Step 3: Installing the Base Bracket on the wall Refer to the Instructions for installing the TV. 1 Disconnect all the cables from the TV. 2 Secure the Mounting Hook to...for wall mount installation Follow the steps below . 1 Secure the Mounting Hooks to prepare for SU-WL500. Screw and Hook Locations Diagram/Table TV Model KDL-32BX300 Screw location e, g Hook location c Other Information (Continued) 45 Refer to the "Screw and Hook Locations Diagram/Table" shown below to the rear...

Operating Instructions
Page 46
Refer to the Instructions for SU-WL500. 4 Remove the screws guided by the arrow marks Do not remove any other screws from the TV. When installing the TV onto Base Bracket. of the Mounting Hook. Screw location Hook location When installing the Mounting Hooks on the TV. Wall TV 3 Adjust the angle of the TV. 46
Refer to the Instructions for SU-WL500. 4 Remove the screws guided by the arrow marks Do not remove any other screws from the TV. When installing the TV onto Base Bracket. of the Mounting Hook. Screw location Hook location When installing the Mounting Hooks on the TV. Wall TV 3 Adjust the angle of the TV. 46

Operating Instructions
Page 48
... will be installed on should be capable of supporting a weight of at least four times that of the Base Plate Refer to the Instructions for SU-WL100. Step 4: Installing the Base Plate on the wall Refer to the Instructions for SU-WL100. Refer to install your TV. Dimension Table ...Screen center point Unit: mm (inches) TV Model KDL-22BX300 TV Screen Length for all required parts along with the Instructions. ...
... will be installed on should be capable of supporting a weight of at least four times that of the Base Plate Refer to the Instructions for SU-WL100. Step 4: Installing the Base Plate on the wall Refer to the Instructions for SU-WL100. Refer to install your TV. Dimension Table ...Screen center point Unit: mm (inches) TV Model KDL-22BX300 TV Screen Length for all required parts along with the Instructions. ...
Operating Instructions
Page 49
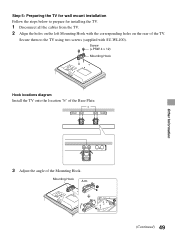
Step 5: Preparing the TV for installing the TV. 1 Disconnect all the cables from the TV. 2 Align the holes on the rear of the Base Plate. Mounting Hook Arm (Continued) 49 Screw (+PSW 4 × 12) Mounting Hook Hook locations diagram Install the TV onto the location "b" of the TV. Secure them to prepare for wall mount installation Follow the steps below to the TV using two screws (supplied with the corresponding holes on the left Mounting Hook with SU-WL100). b Other Information 3 Adjust the angle of the Mounting Hook.
Step 5: Preparing the TV for installing the TV. 1 Disconnect all the cables from the TV. 2 Align the holes on the rear of the Base Plate. Mounting Hook Arm (Continued) 49 Screw (+PSW 4 × 12) Mounting Hook Hook locations diagram Install the TV onto the location "b" of the TV. Secure them to prepare for wall mount installation Follow the steps below to the TV using two screws (supplied with the corresponding holes on the left Mounting Hook with SU-WL100). b Other Information 3 Adjust the angle of the Mounting Hook.

Operating Instructions
Page 50
...be approximately 1.5 N·m (15 kgf·cm). For details on the cable connection, see "Connecting Other Equipment" on page 13. 2 Install the TV onto the Base Plate. • When using an electric screwdriver to the TV using two screws (supplied with the corresponding holes on the rear of the TV. Do...WL100. 1 Connect the cables to the Instructions for left /right) are secured. 50 Screw (+PSW 4 × 12) Mounting Hook Step 6: Installing the TV on the Base Plate Refer to the corresponding inputs on the rear of the TV. 4 Align the holes on the right Mounting Hook with SU-WL100).
...be approximately 1.5 N·m (15 kgf·cm). For details on the cable connection, see "Connecting Other Equipment" on page 13. 2 Install the TV onto the Base Plate. • When using an electric screwdriver to the TV using two screws (supplied with the corresponding holes on the rear of the TV. Do...WL100. 1 Connect the cables to the Instructions for left /right) are secured. 50 Screw (+PSW 4 × 12) Mounting Hook Step 6: Installing the TV on the Base Plate Refer to the corresponding inputs on the rear of the TV. 4 Align the holes on the right Mounting Hook with SU-WL100).


